

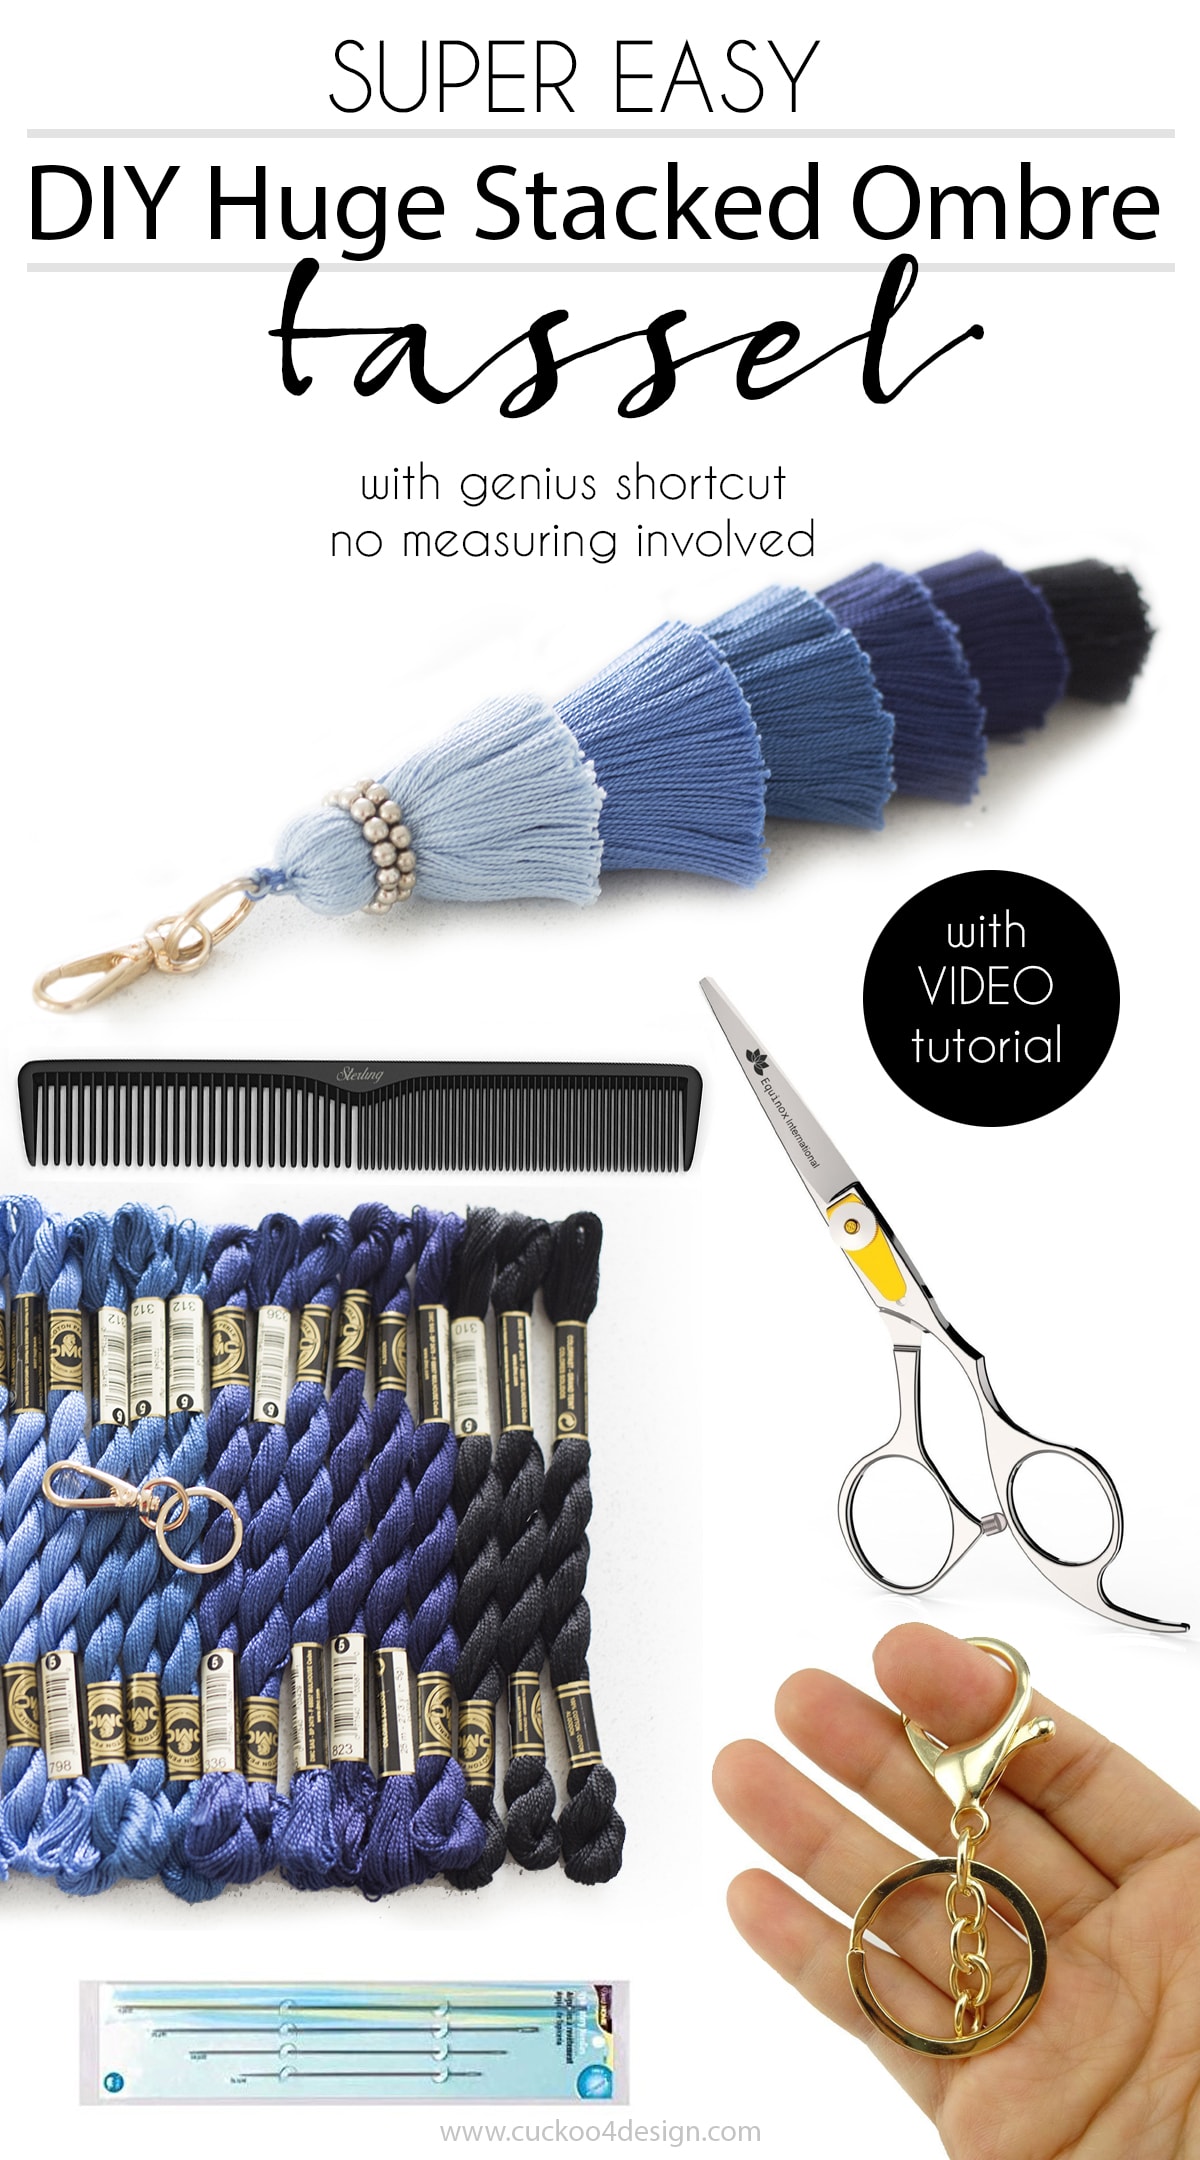
How to make a fancy tassel called layered or stacked tassel
My tassel obsession is endless and I’m feeding my obsession with today’s DIY large stacked tassel tutorial. You won’t believe how easy this little project actually is. I love making purse charms like my macrame feather, macrame leaf, or macrame stone wrap tutorial, and this stacked tassel can also be used as a purse charm as well.
How to make a fancy tassel called a layered or stacked tassel?
This post may contain affiliate links from which I will earn a commission at no extra cost to you. View my full disclosure policy.
Since I am on a blue kick lately I couldn’t resist the blue tones of the pretty embroidery thread. So let me show you what I bought and how I made it. I also have a quick video to fill in any blanks that weren’t covered in the few photos I have taken. Sometimes it’s just easier to see the hands move, am I right?
Supplies needed for this fancy tassel
- embroidery thread or HERE with different colors under the dropdown menu (you can use any type of cotton or synthetic yarn if)
- sharp scissors, I like using hair-cutting scissors for my craft projects
- a big upholstery needle
- a pretty key ring holder
- hair comb
- Optional: a stretchable decorative hair tie or bracelet
The above tip for how to straighten tassels can be used on the thread before even making the tassel as I’m demonstrating in my instructional video.
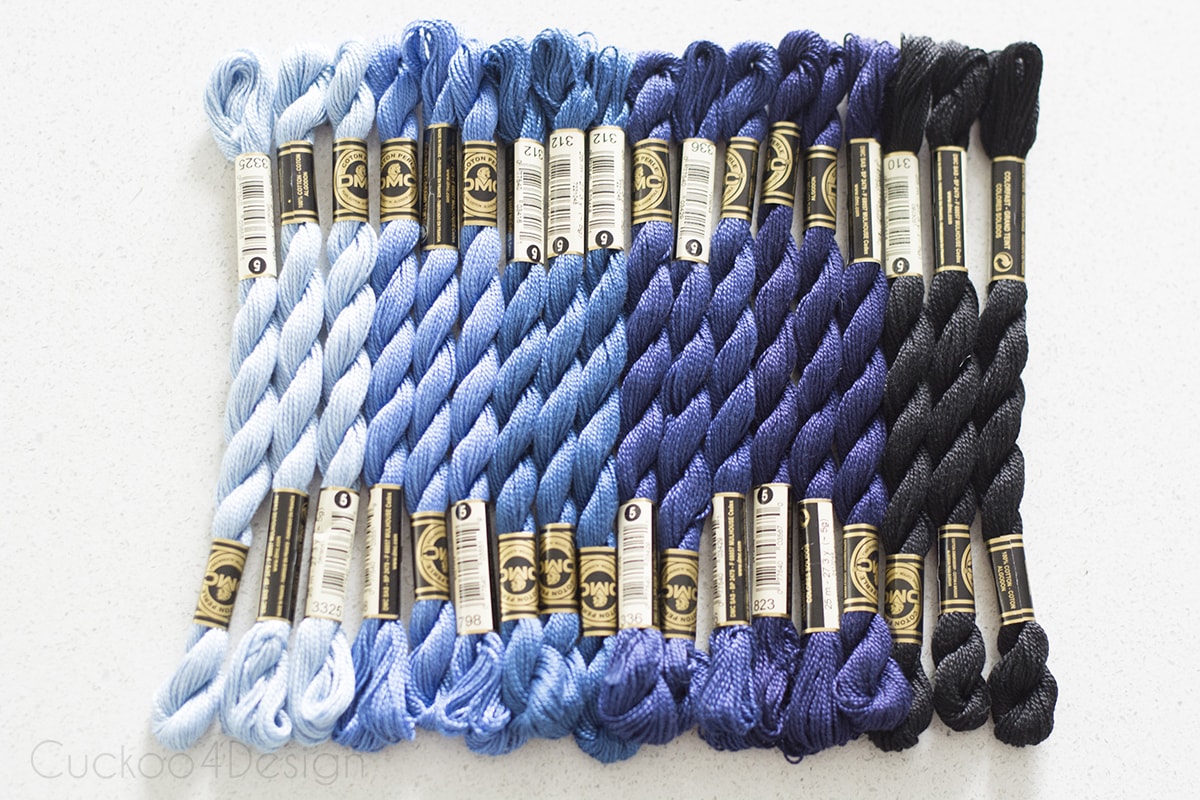
Here are the colors I chose:
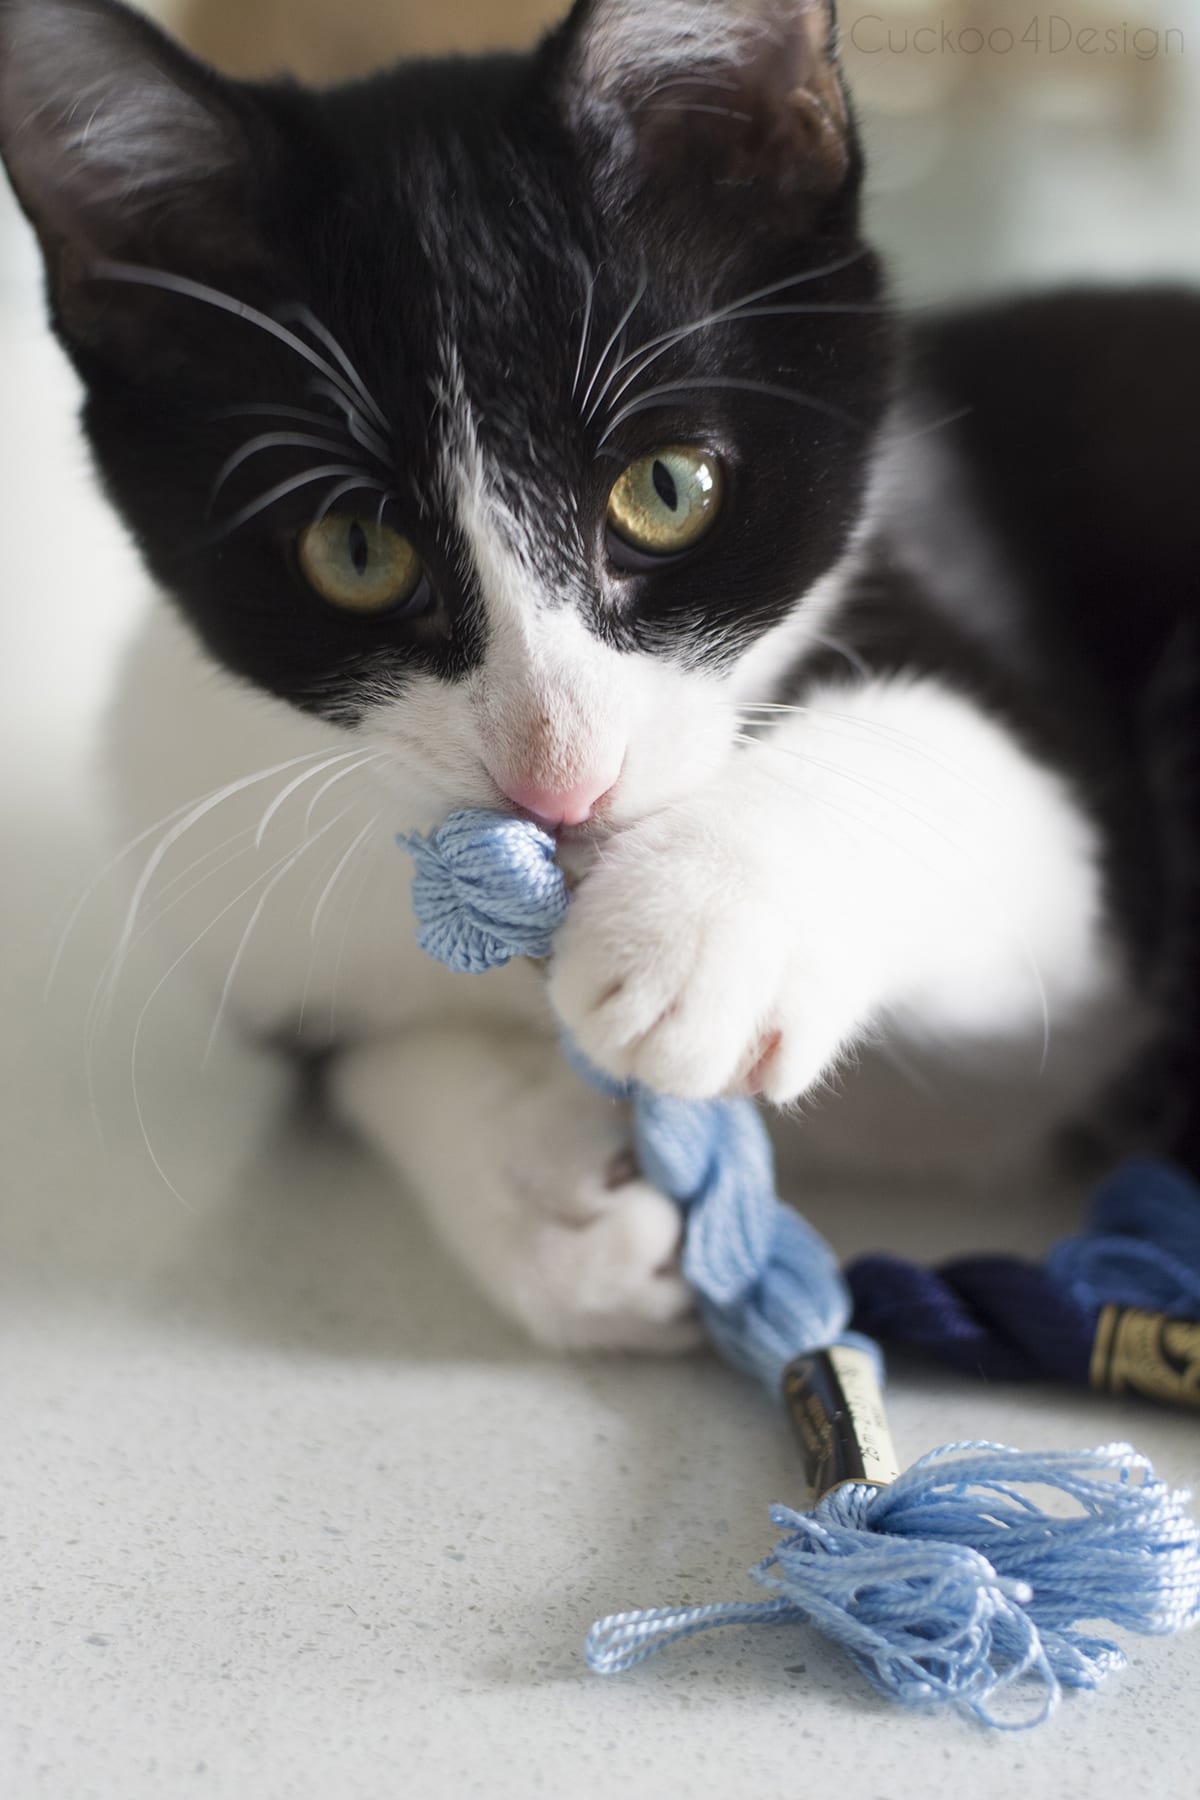
Make sure no cats are around when making this tassel 😉 They want to be more helpful than needed.
Video Tutorial
You can watch my below video to see exactly what I did. If it doesn’t load, you can also watch the tutorial on my YouTube Channel.
Step-by-step instructions for this fancy ombre stacked tassel
Step 1: Untwist the embroidery floss
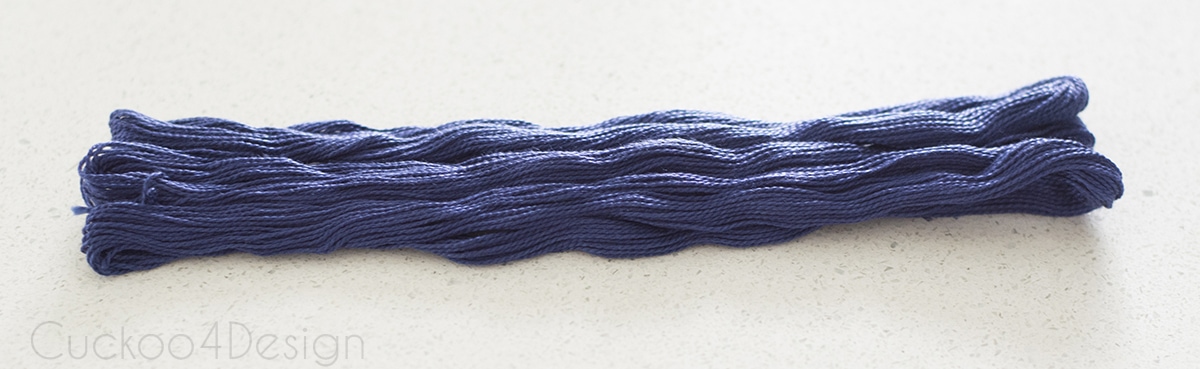
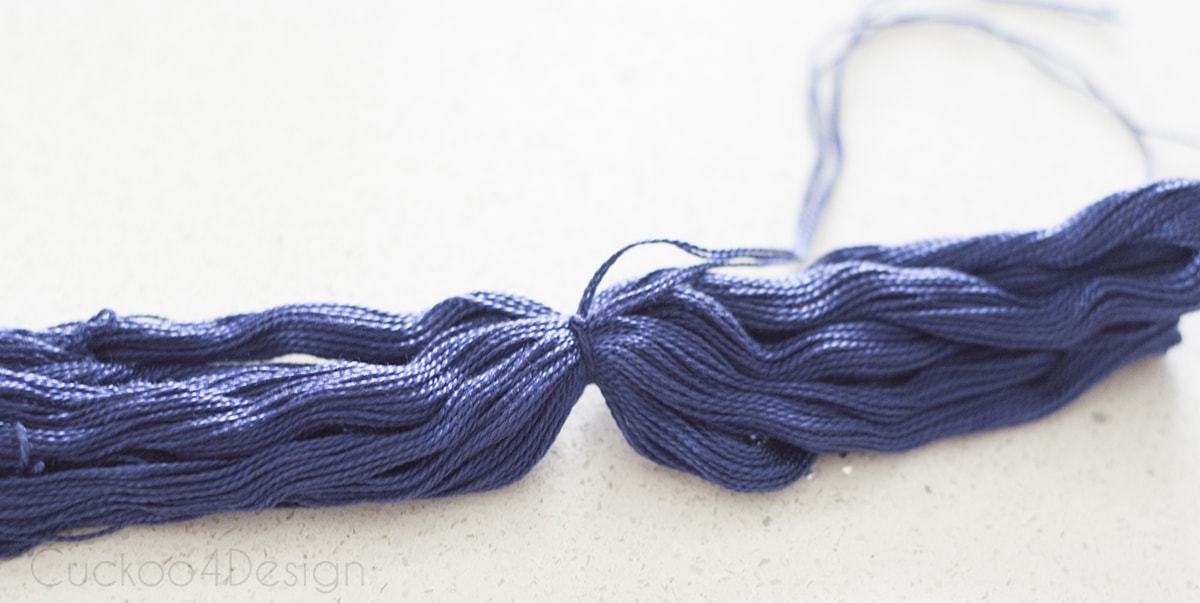
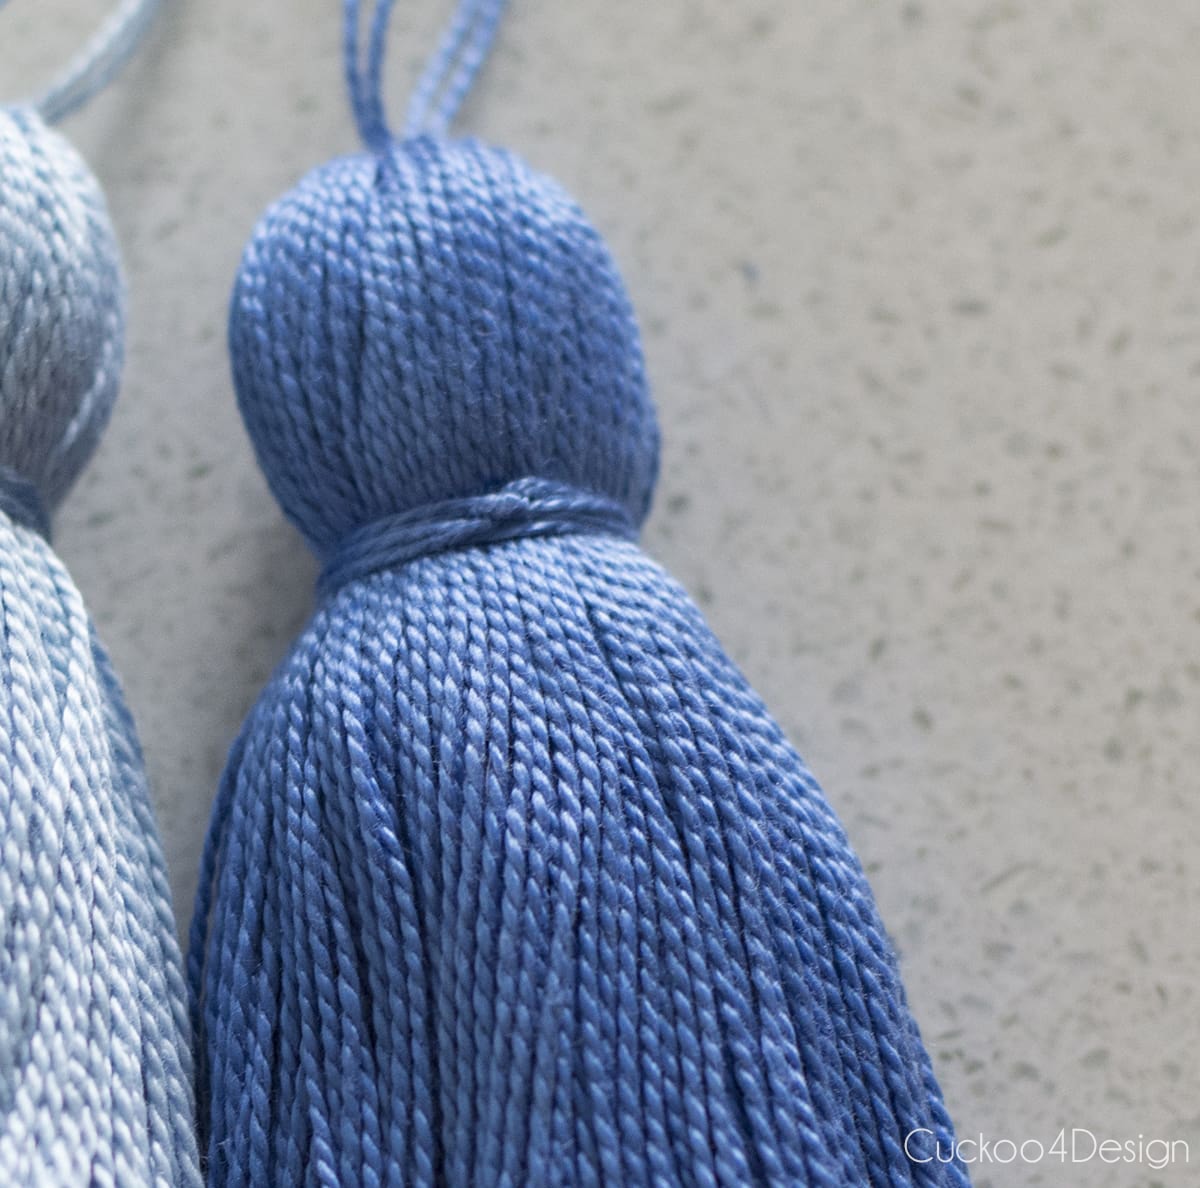
The first step is where my favorite little shortcut comes into place. No measuring and wrapping thread to make sure the tassels will all be the same size. Just use three purchased thread bunches. Embroidery floss is sold in a twisted loop. Untwist the embroidery floss and the tassels will all end up being the same size. All the measuring and looping needed to make standard tassels is done for you already.
Untwist the three individual strands of embroidery thread and line them up as pictured. Make sure to cut two pieces of thread the length of the untwisted yarn and put them aside so you can use them later to tie off the tassel.
Step 2: Tie yarn in the center
Fold the lined-up untwisted yarn in half so you can find the center and tie them in the middle with one of the pieces that you put aside earlier as shown below with a tight knot.
Step 3: Tie off the tassel head
Fold the embroidery bunch in half again with the tied-off string at the top. Use the other piece of yarn you put aside earlier to tie off the tassel head.
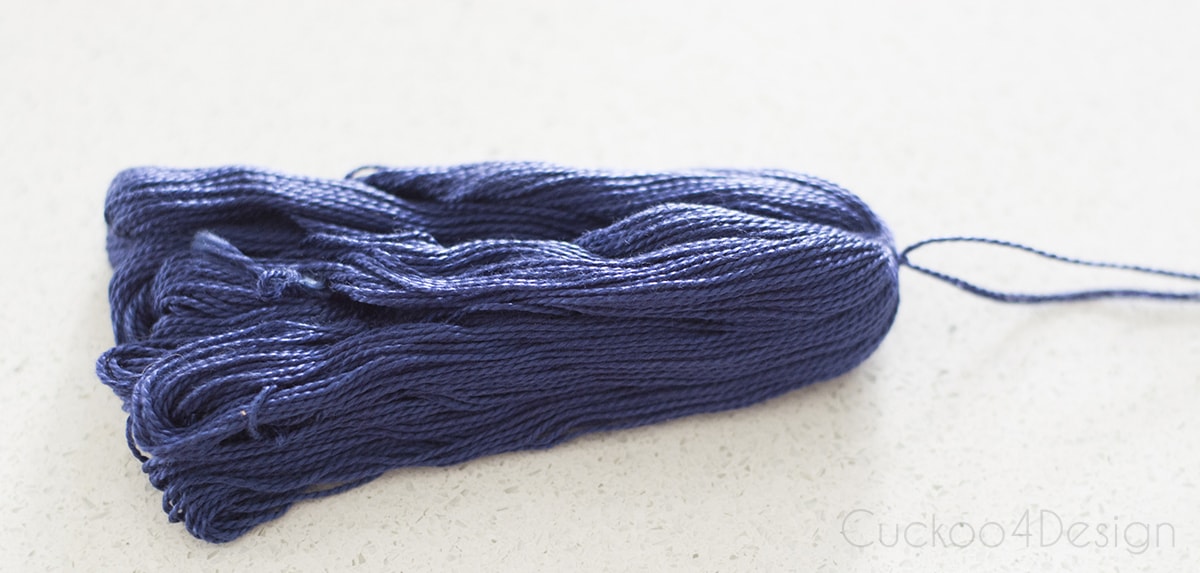

Step 4: Cut open looped ends
Use the sharp scissors to cut open the looped ends at the bottom of the tassel.
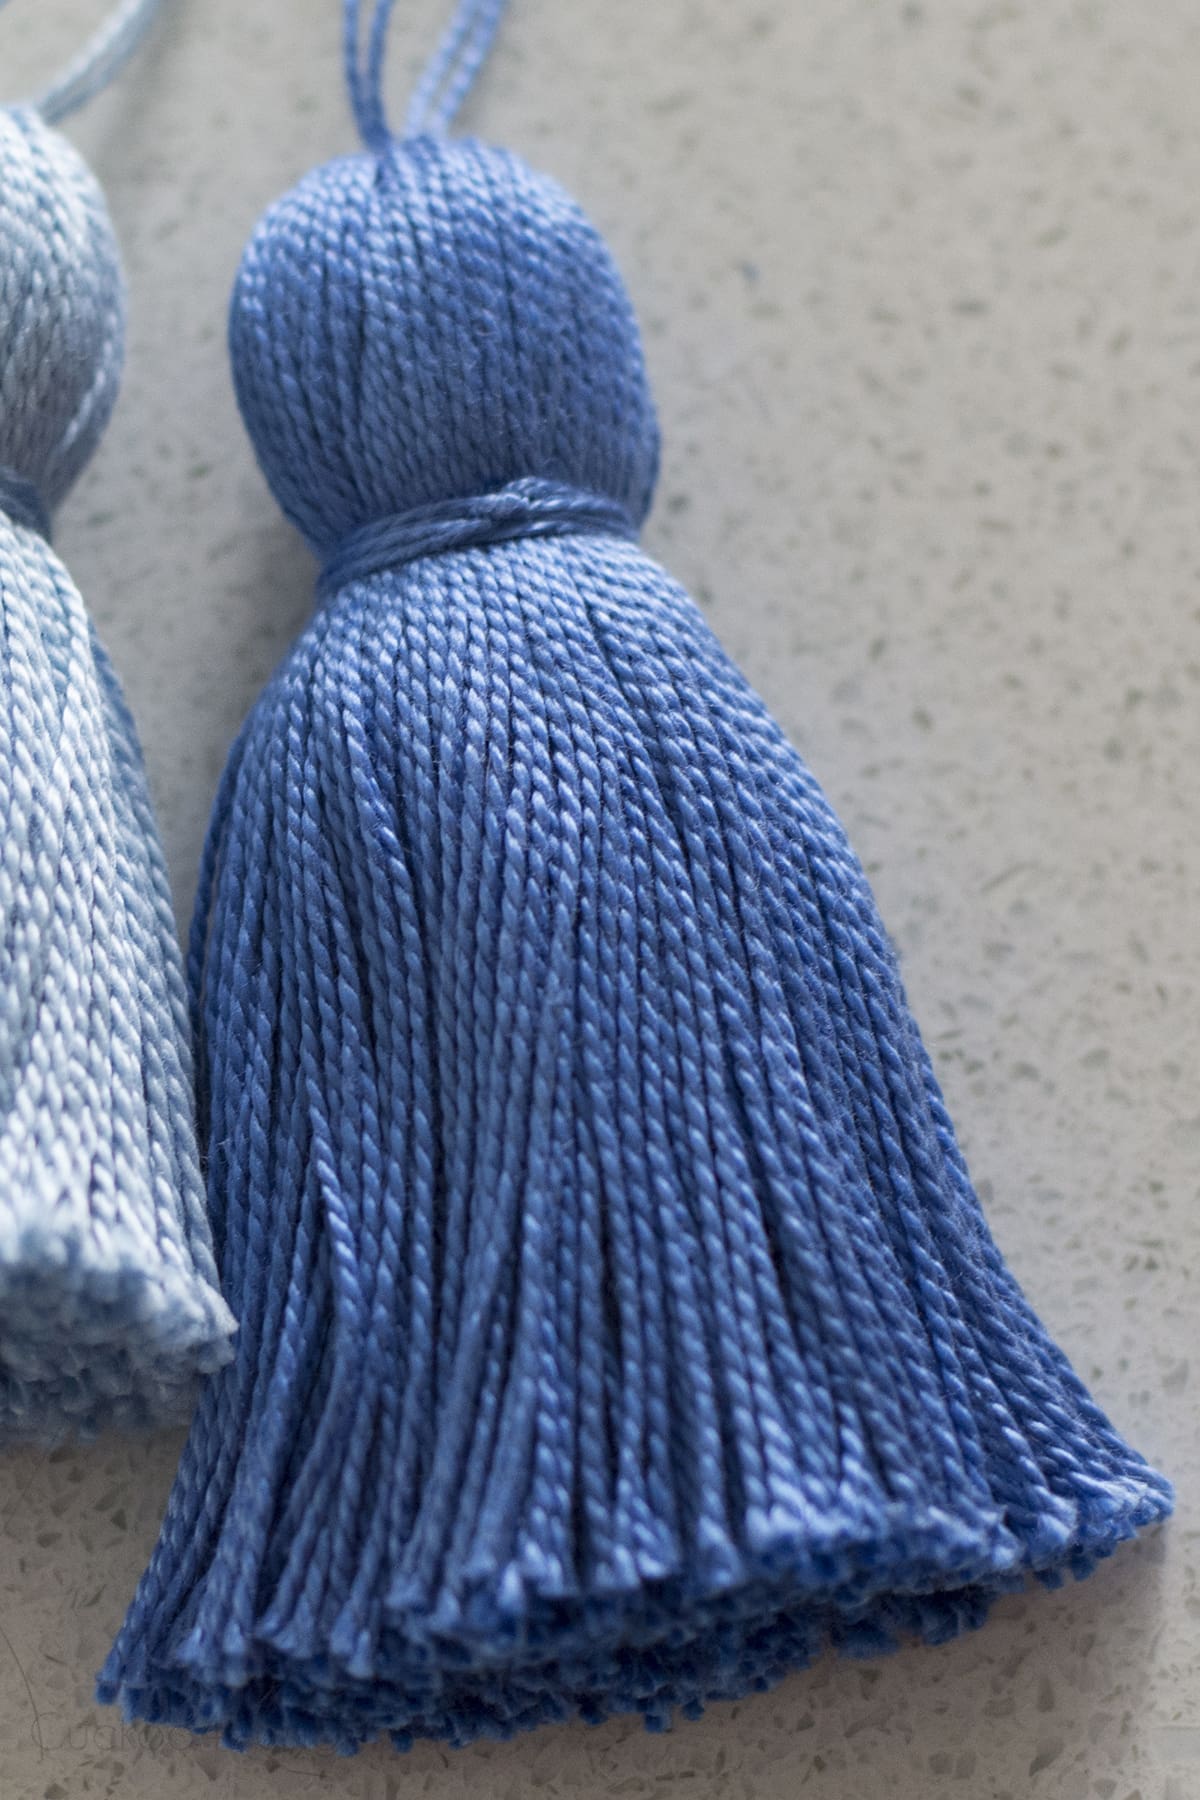
Step 5: Cut the tassel shape
After the ends are cut open, it helps to straighten the yarn so you can cut an even-shaped tassel bottom. You can straighten the yarn with a steamer by running along the tassel yarn which will flatten and straighten out its shape. Or just use a regular iron that is on a steam setting.
Comb the thread, and then cut it straight at the bottom to get one even tassel.

Step 5: Make more of the same tassels
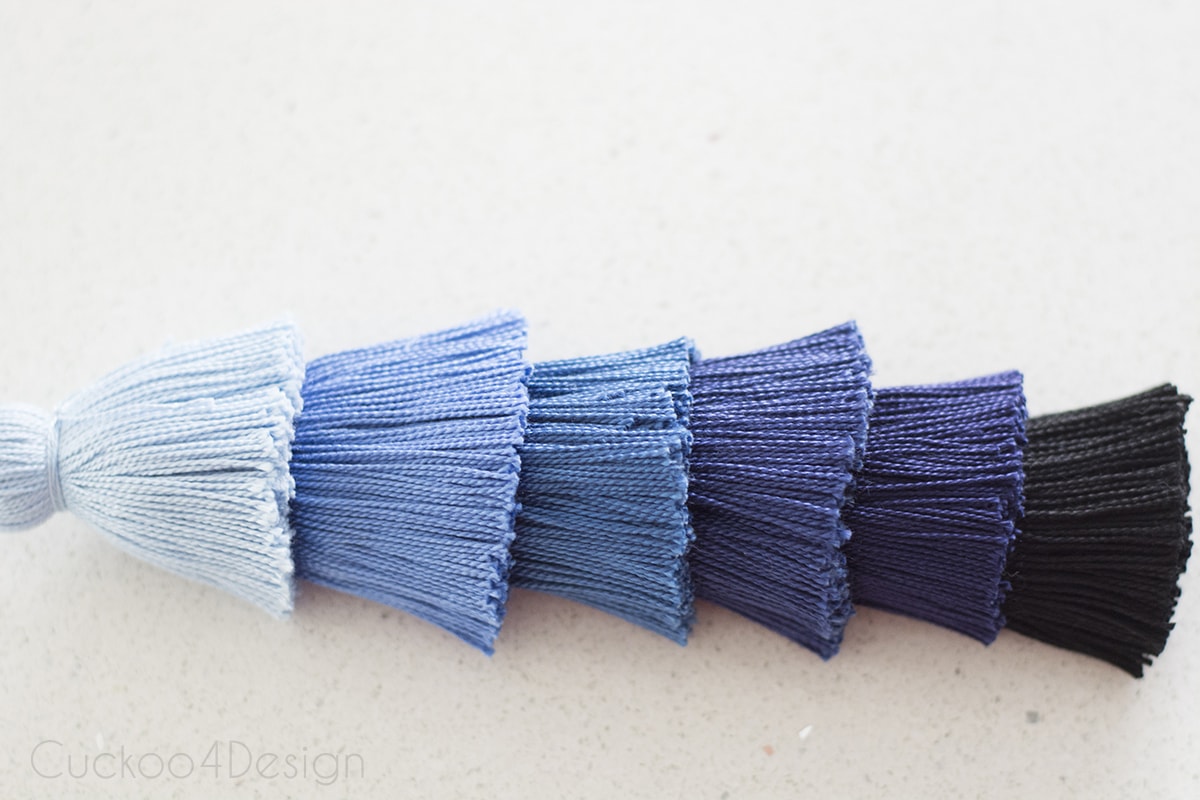
Repeat these same tassel instructions to make several tassels in whatever colors you would like to stack. As I mentioned, I was going for an ombre look and made 6 different colored tassels.
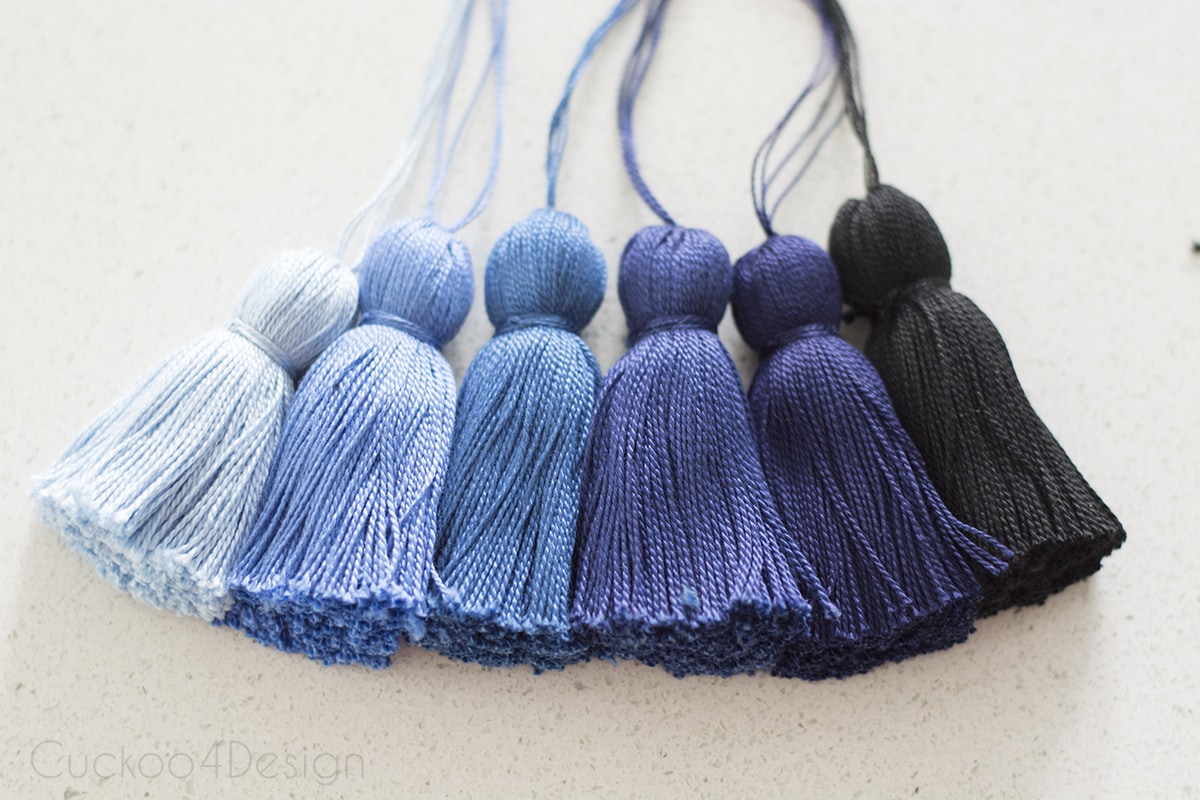
Step 6: Stack the tassels
Before you begin, line up all your tassels by shades of color.
Use the head of the strings to thread through the next tassel with the upholstery needle.
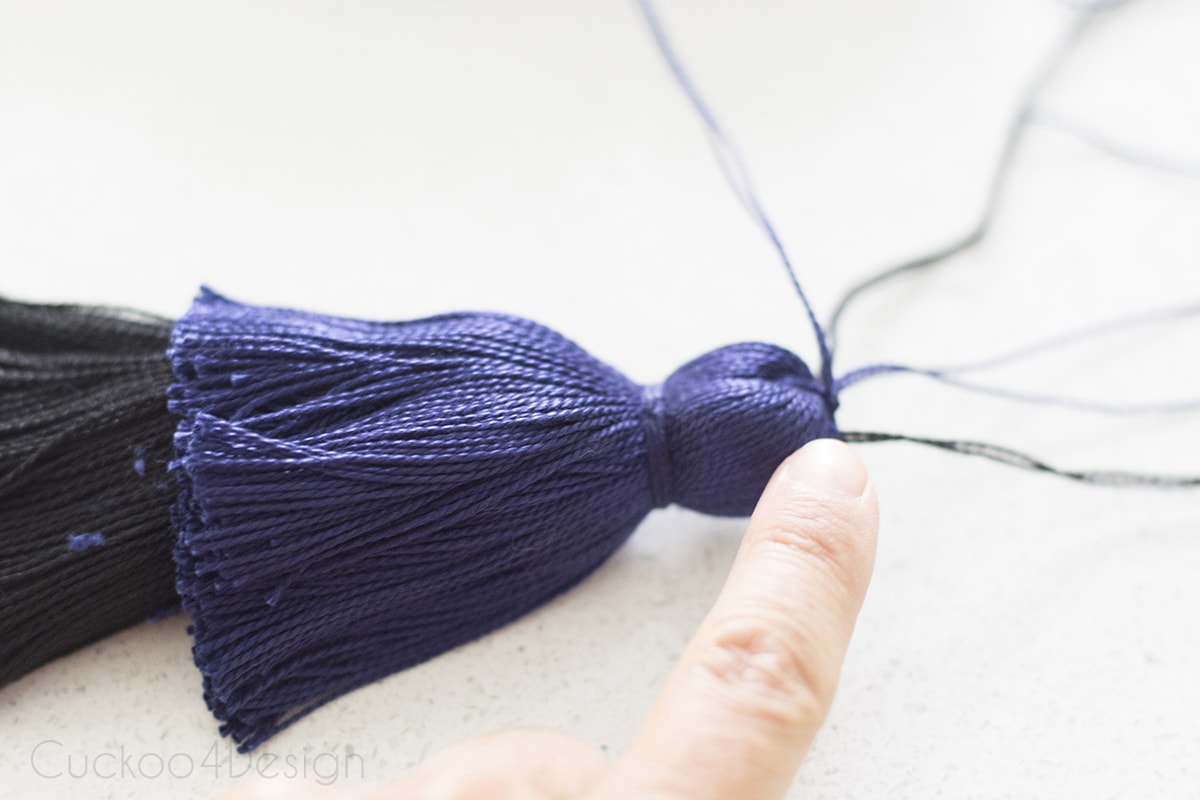
The top strings go through the center of the next tassel and tie them at the top. Keep going until all tassels are stacked.
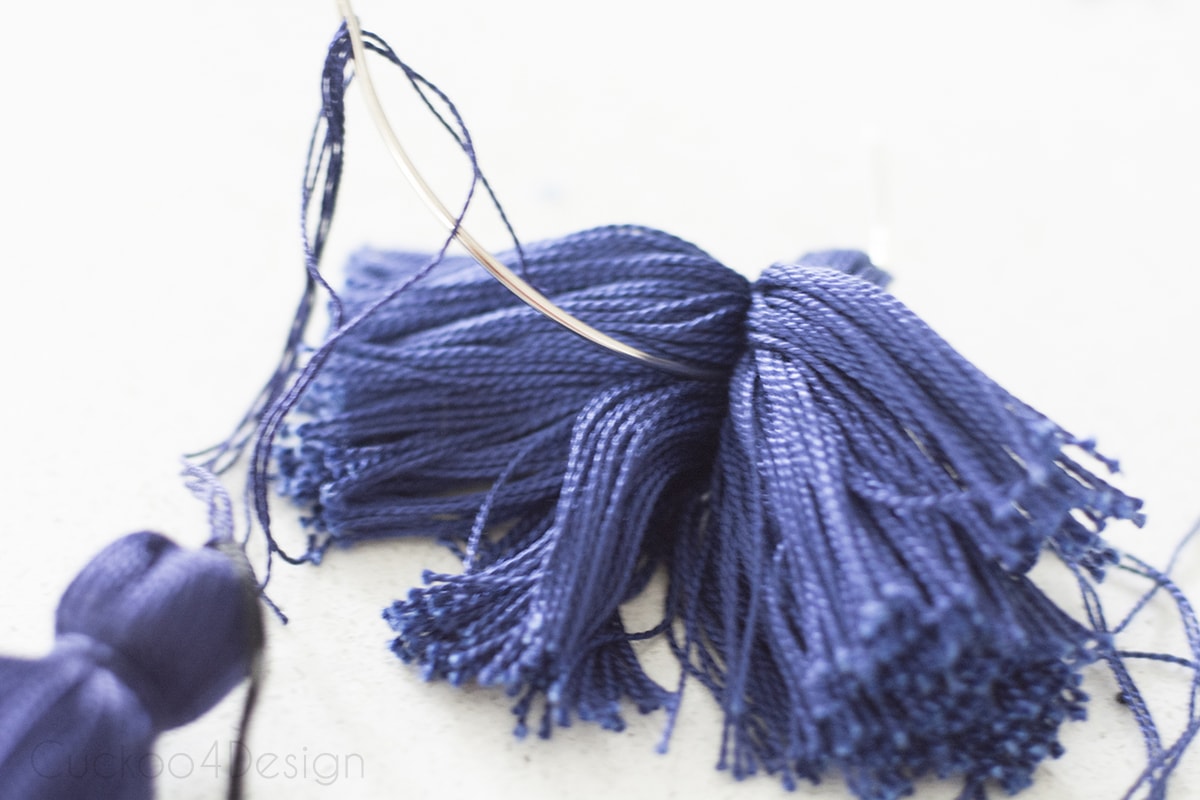
And you should end up with a long stacked ombre tassel like this when all of them are sewn together.
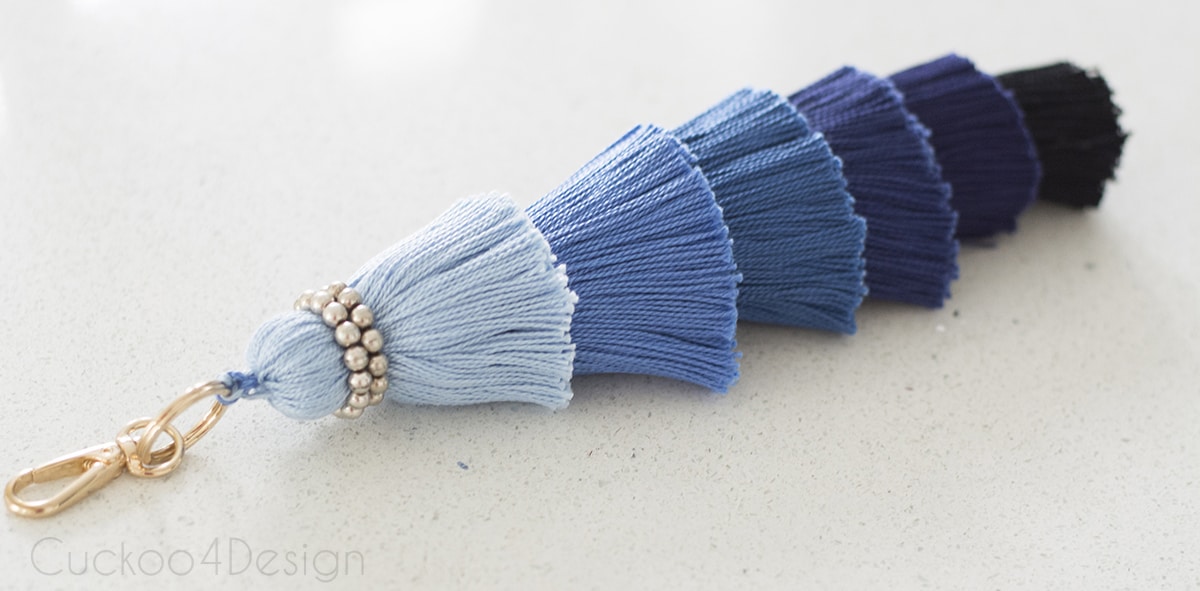
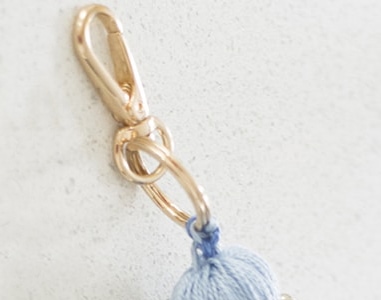
Step 7: Add a keyring
At the end tie off the top of the tassel to the keyring and then thread the string back through the top of the tassel so you don’t end up with a loose piece of yarn.
Step 8: Add an embellishment (optional)
I finished the head of the tassel with a cheap elastic silver bracelet with beads I had in my closet.
Photos of finished fancy stacked tassel
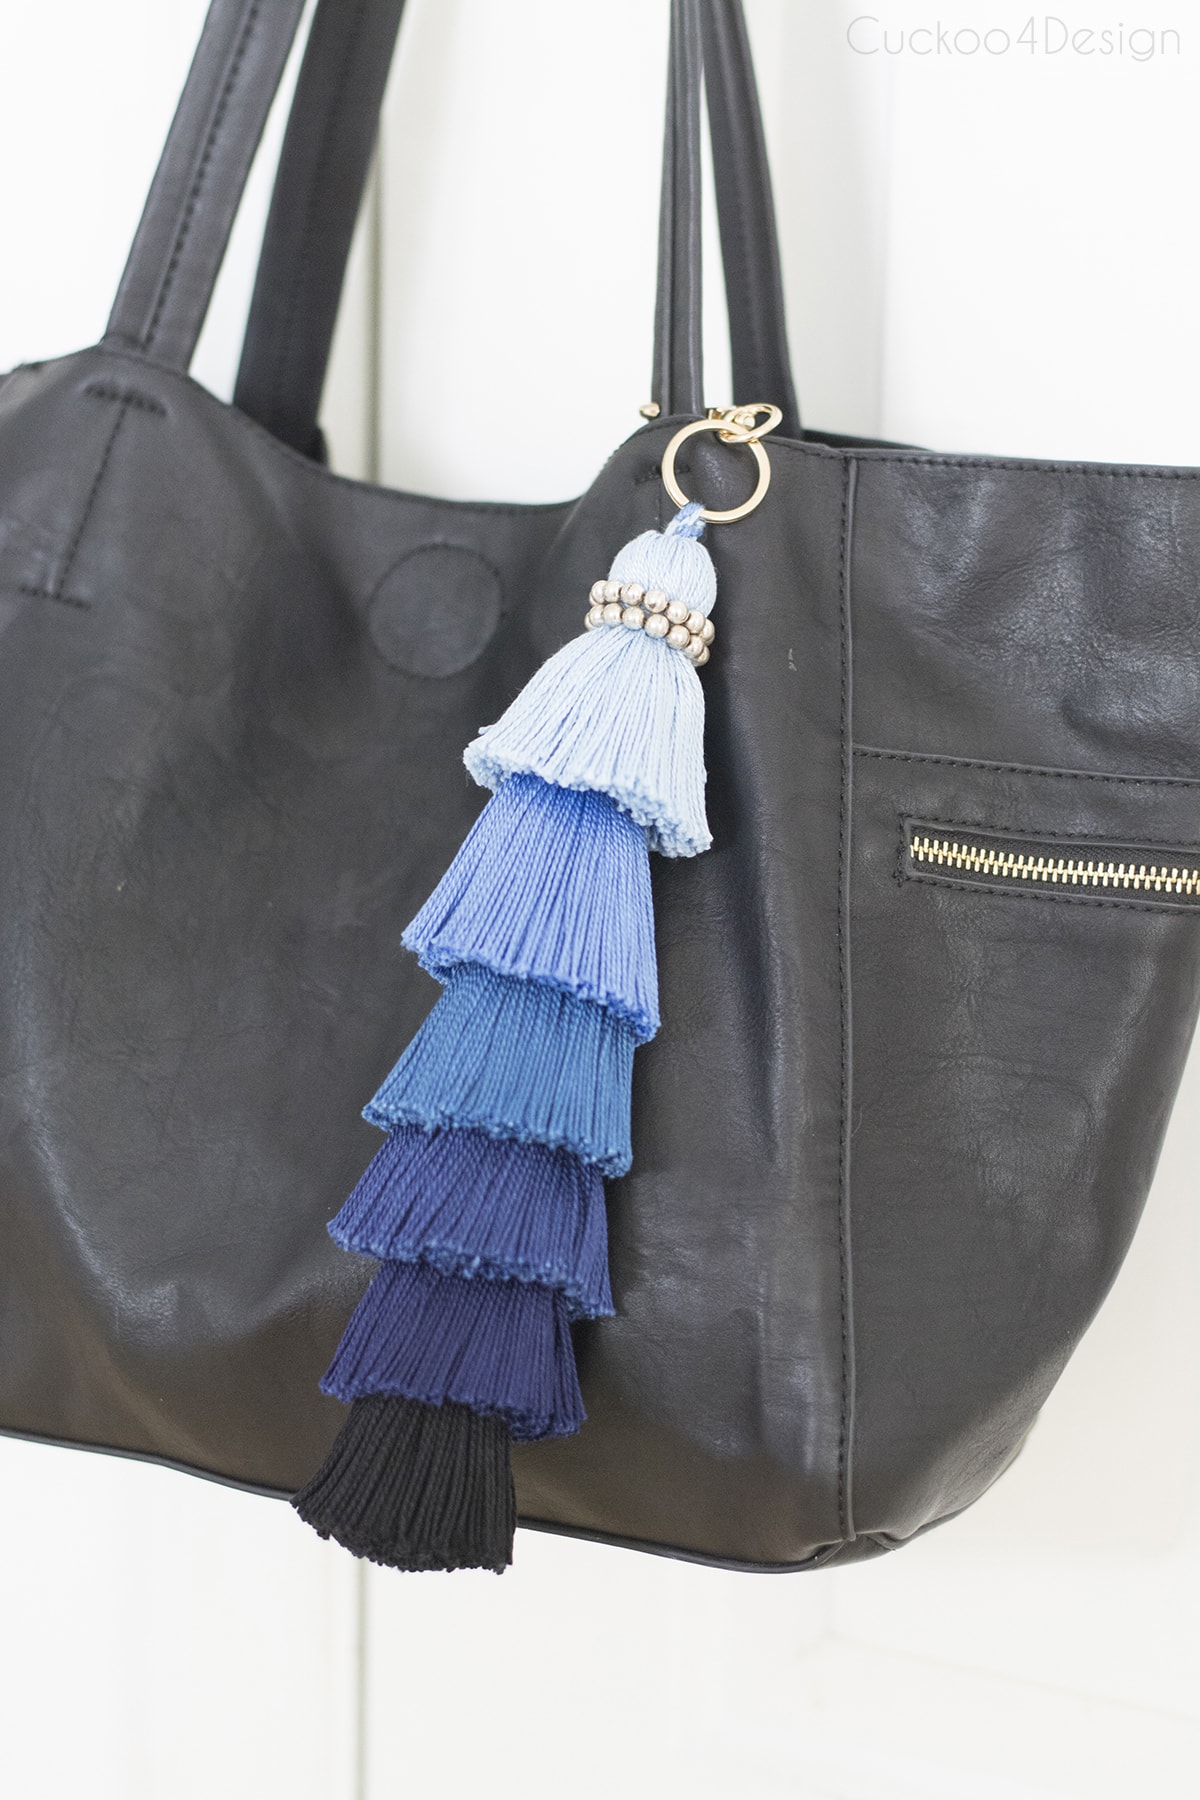
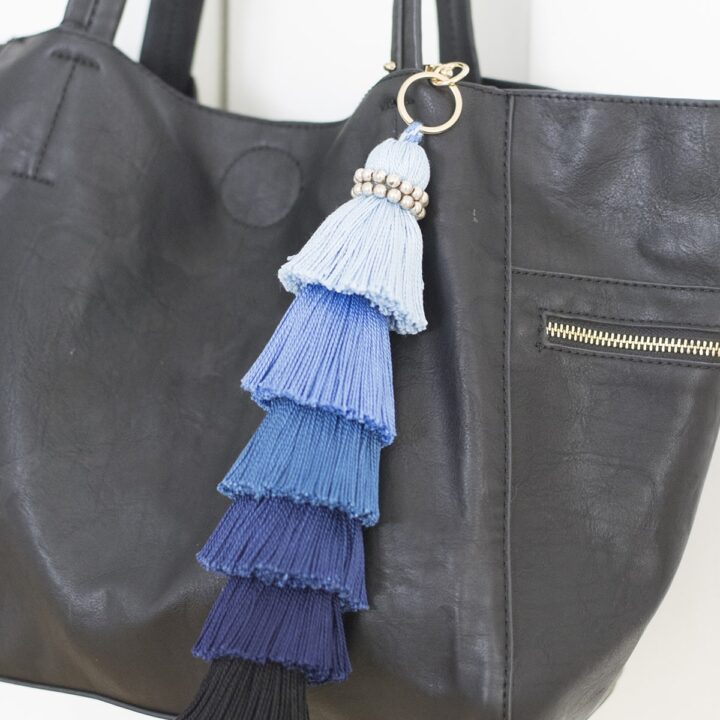
And voila… I love how the huge ombre-stacked tassel looks on my purse.
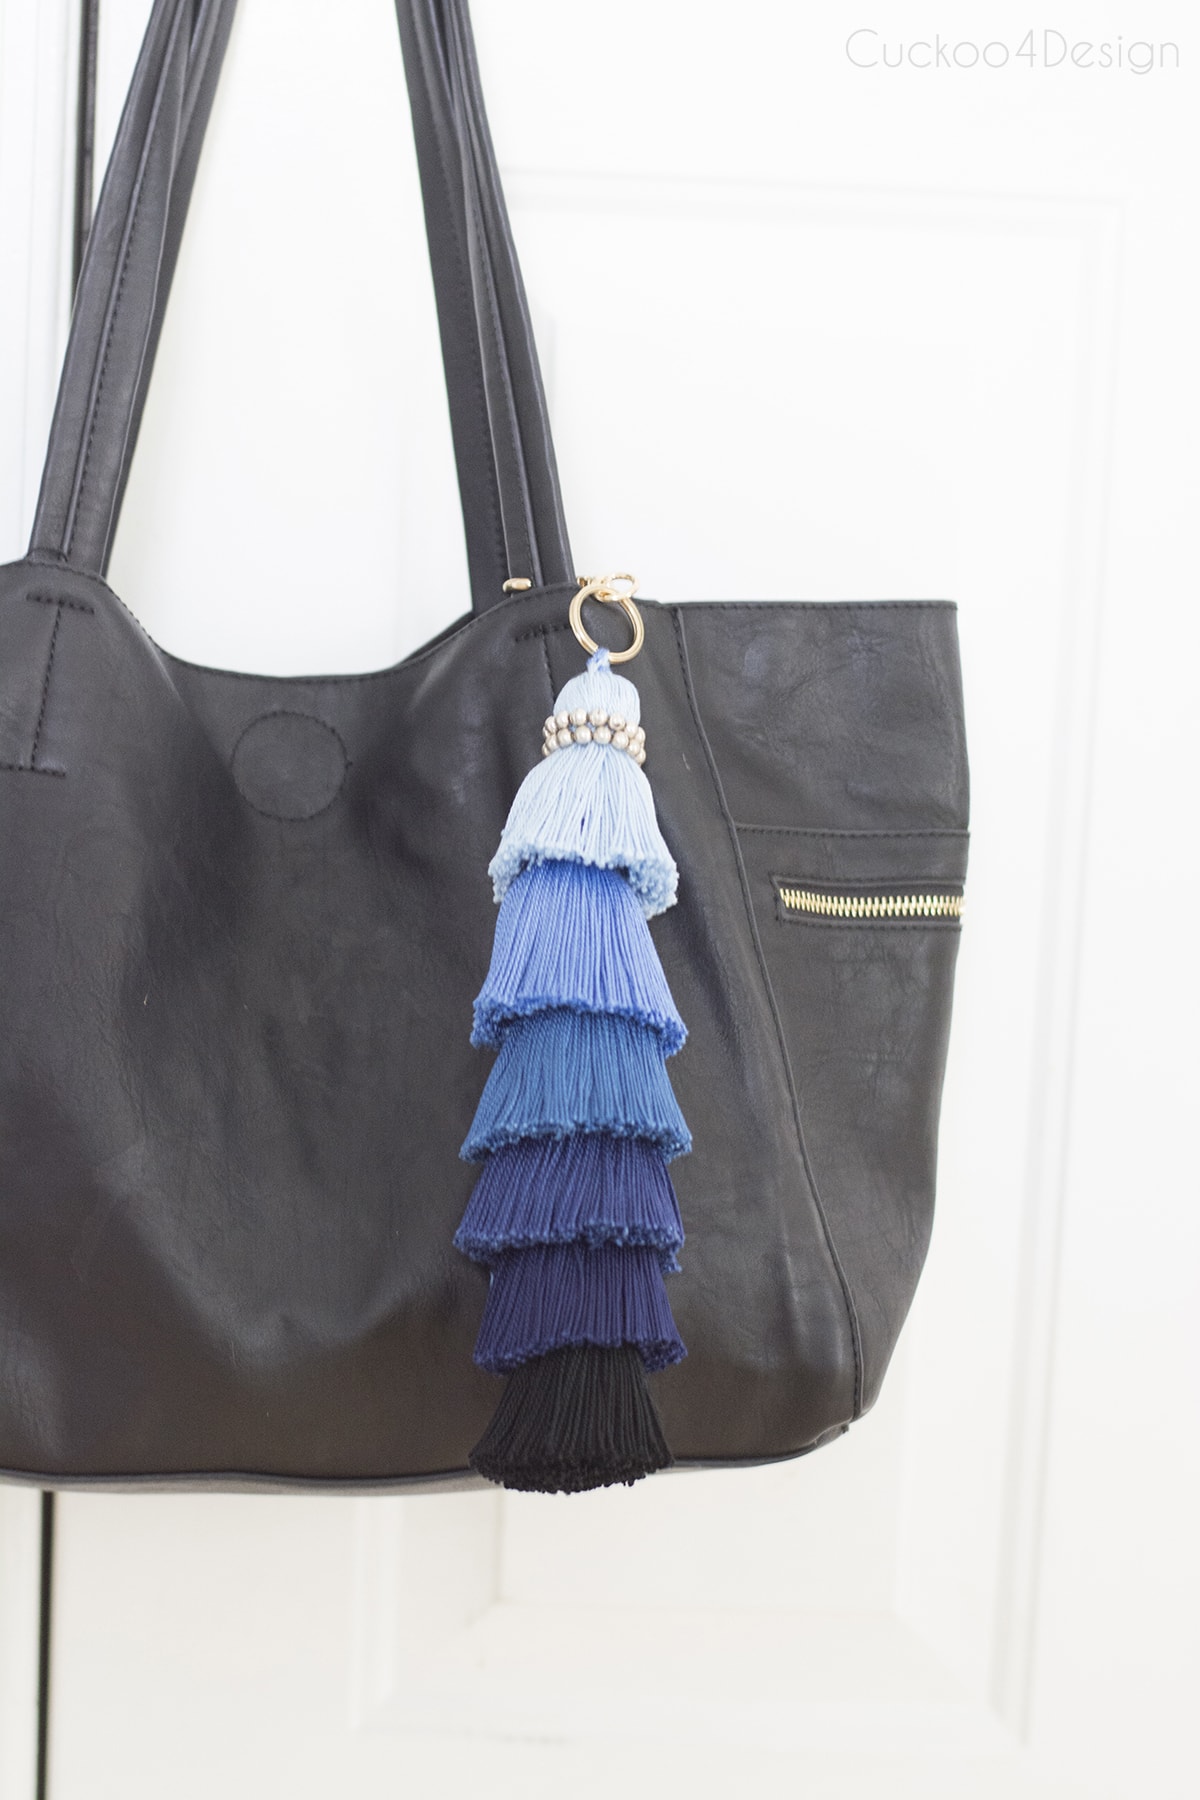
By the way, this is an old purse I bought at TJ Maxx years ago.
It sure is a statement piece.
But I also love it on my lamp when I’m not using that specific purse.
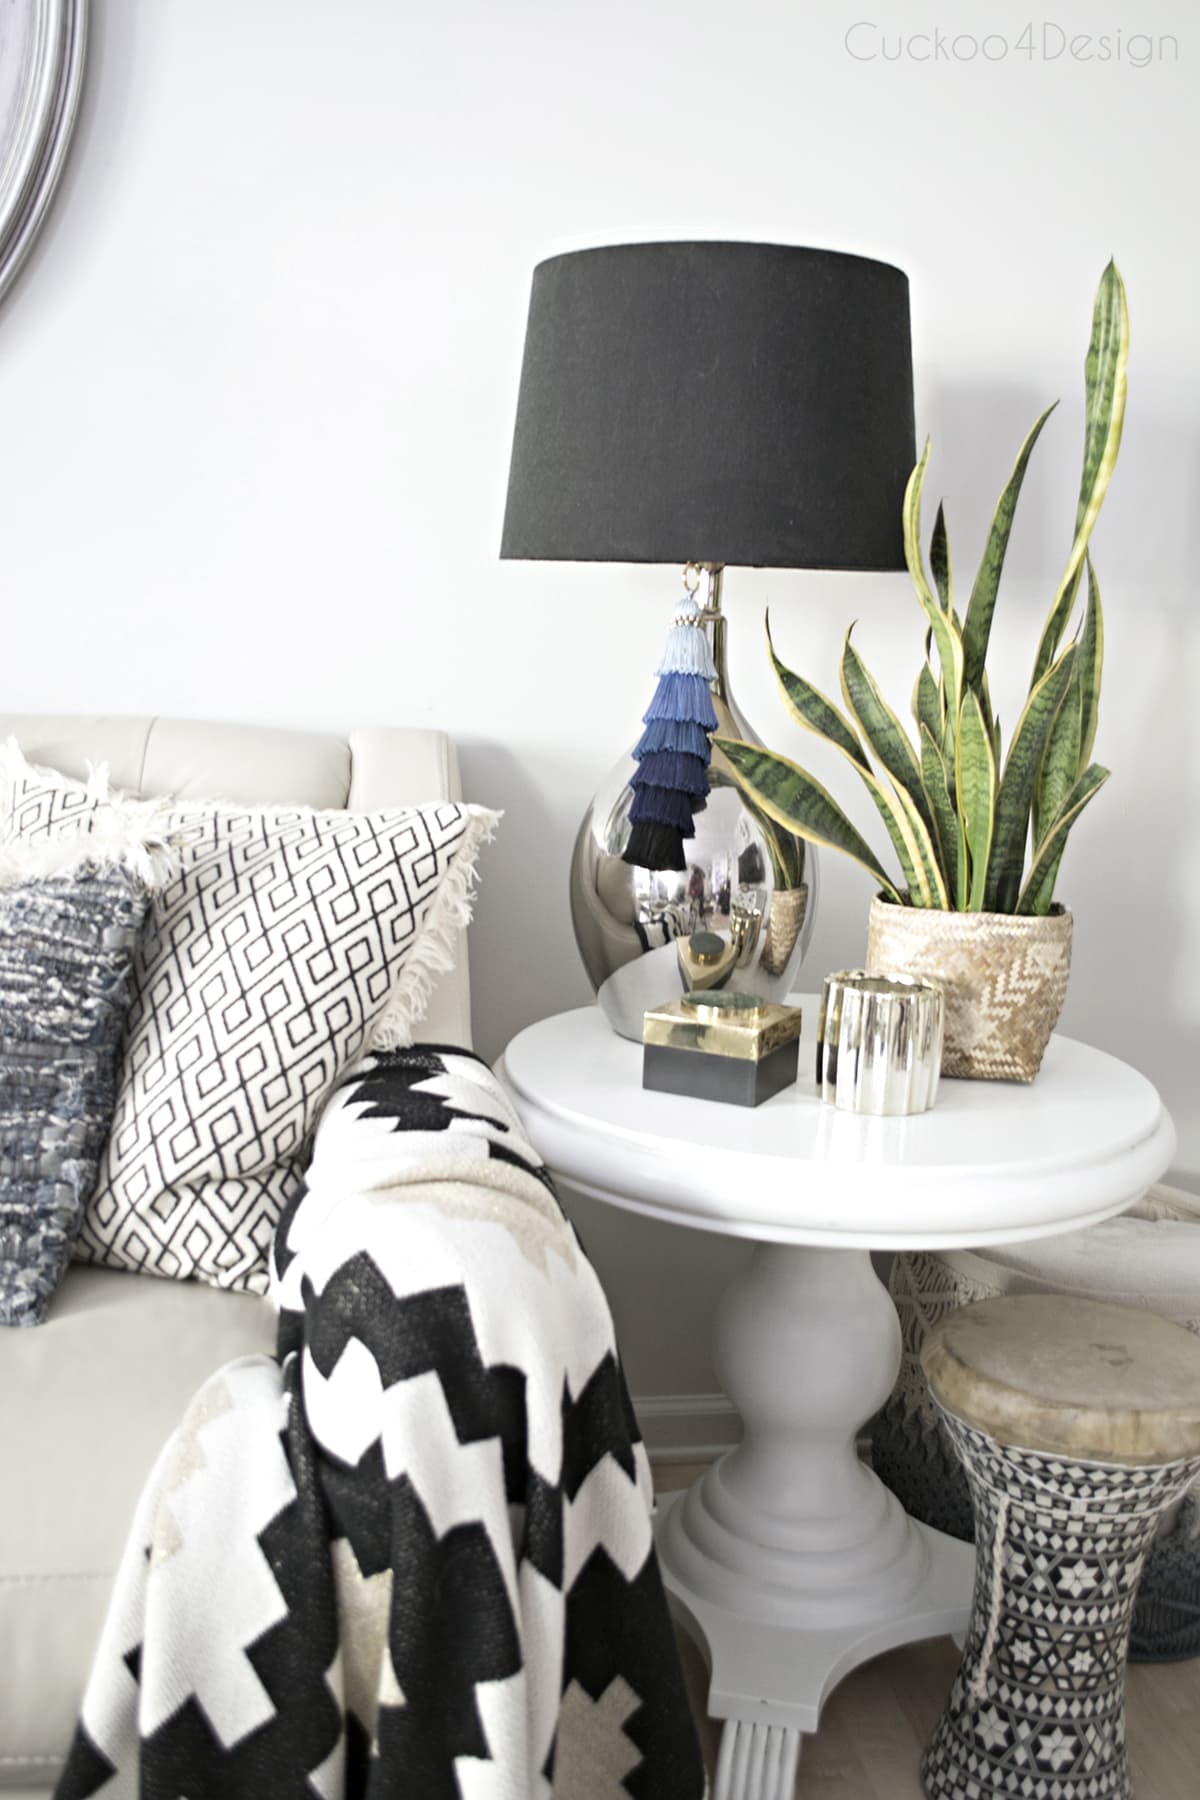
Look how pretty.


You can apply this same tutorial and make smaller-scaled fancy tassels to use on jewelry such as earrings and necklaces. But if you make them you have to buy smaller and thinner threads and also measure again to make sure they are the same size. I’m talking about my fringe earring tutorial. Love them.

Similar handmade fancy tassels for sale
Not everyone likes to craft and make things themselves, so I included Etsy shops that sell similarly stacked tassels. I love supporting small businesses.

More of my tassel tutorials
- how to make large tassels
- how to make a leather tassel
- how to make yarn tassels
- rope macrame tassel
- DIY tassel keychain (keyring)
- DIY tassel umbrella
- DIY tassel ottoman
- How to make seashell tassel

- DIY tassel embellishments for a tassel sconce, lampshade, or basket


Is this something you might try to make? I hope you like it as much as I do.
Tschüß,

How to make a fancy tassel?
Find out how to make a fancy tassel called a stacked tassel or layered tassel. It is so easy to make and looks so cute as an accessory! You can use it as a purse charm, as a home decor accessory, or even as jewelry.
Materials
- embroidery floss
- a pretty key ring holder
- Optional: a stretchable decorative hair tie or bracelet
Tools
- hair comb
- sharp scissors
- upholstery needle
Instructions
- Untwist the embroidery floss
Take three embroidery floss bunches and untwist them. Then line them up as pictured. Make sure to cut two pieces of thread the length of the untwisted yarn and put them aside so you can use them later to tie off the tassel.
- Tie yarn in the center
Fold the lined-up untwisted yarn in half so you can find the center and tie them in the middle with one of the pieces that you put aside earlier as shown below with a tight knot.
- Tie off the tassel head
Fold the embroidery bunch in half again with the tied-off string at the top. Use the other piece of yarn you put aside earlier to tie off the tassel head.

- Cut open looped ends
Use the sharp scissors to cut open the looped ends at the bottom of the tassel. - Cut the tassel shape
After the ends are cut open, it helps to straighten the yarn so you can cut an even-shaped tassel bottom. You can straighten the yarn with a steamer by running along the tassel yarn which will flatten and straighten out its shape. Or just use a regular iron that is on a steam setting. Comb the thread, and then cut it straight at the bottom to get one even tassel.

- Make more of the same tassels
Repeat these same tassel instructions to make several tassels in whatever colors you would like to stack. (I was going for an ombre look and made 6 different colored tassels.)
- Stack the tassels
Before you begin, line up all your tassels by shades of color. Use the head of the strings to thread through the next tassel with the upholstery needle.
The top strings go through the center of the next tassel and tie them at the top. Keep going until all tassels are stacked.
And you should end up with a long stacked ombre tassel like this when all of them are sewn together. - Add a keyring
At the end tie off the top of the tassel to the keyring and then thread the string back through the top of the tassel so you don't end up with a loose piece of yarn.
- Add an embellishment (optional)
I finished the head of the tassel with a cheap elastic silver bracelet I had in my closet. Or you can use whatever else you want or skip this step
Notes
Use a fabric steamer by running along the tassel yarn which will flatten and straighten out its shape. It works for regular tassels and stacked tassels.
this is so cool, julia! love the ombre effect with these and never would have thought of it.
Thanks Cassie, I had so much fun making it. I think they are addicting.
How creative. Love it, I must try. Thank you.
Thanks Diane. Good luck!
Hi Julia – Love this!!!! I was going to do something similar with pom-poms. I think I like the tassels better. 🙂 Your blues look great on your bag! .
Thanks so much Diane. Hope you are well.
This is genius and so cute! Time to pull out my DIY tools ????
Glad you like it Chee and good luck with the project!
Thanks for sharing! This would be so great for Christmas!
Ok, this is genius. I love it.
Thanks so much Marty!
I love using embroidery floss for tassels… you don’t even have to wind it. the stacked tassel is so cute on the lamp, might need to make a few of these!
Thanks Maggie, I want to make more now too.
Have a great Wednesday!
What a brilliant idea! Love how it came out, the colors are awesome, and even better that it can be used for fashion or home 🙂
YOu make it look so easy! Love it!
That was my first thought! My cat playing all day long with it! Nice DIY!
These are so cool! You are seriously the queen of tassels!
It’s simple work but looks amazing. I’m so excited to make it. Thanks