

Super easy fluted molding hack for dresser makeover
Today’s post is going to be a long one. Since redoing my Queen Ann secretary desk and my bleached French Provincial dresser, I have been wanting to also redo our midcentury modern bedroom dresser. Now that the weather is cooler again, the time was finally right to tackle it. I ended up turning it into a beauty with fluted molding even though that wasn’t my initial plan.
I purchased the dresser on Craigslist in 2013. It was such a beautiful piece but the veneer was damaged in several areas, especially the corners which you couldn’t see in the listing photo. So I ended up painting it white while leaving some wood details and giving the handles a pop of neon for my more colorful days when I started blogging. Over those 7 years of having the dresser, the paint started to scratch and chip on the top and sides from my family’s abuse.

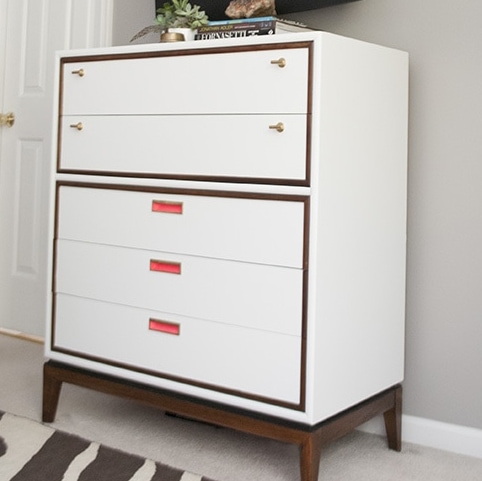
I had planned on stripping the dresser’s veneer to reveal the wood under it since it appeared to have a nice wood that was showing on the damaged corners.

I also checked the drawer insides to see what wood was showing and was pleased with what I saw.

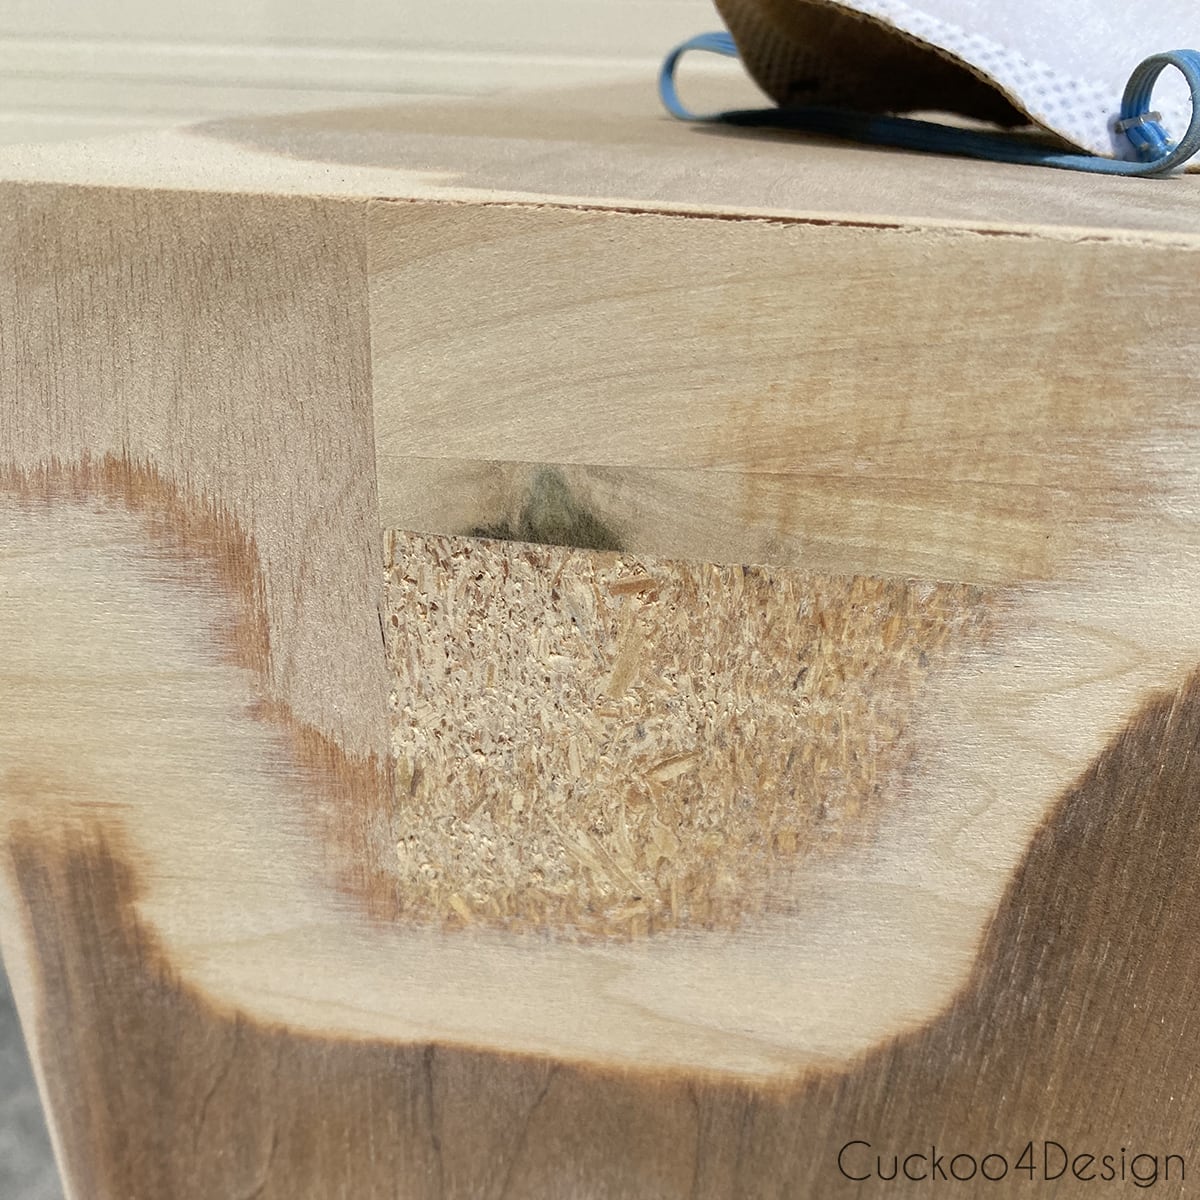
So I started sanding my heart out. I was shocked to see that the center of the dresser side had particle board under the veneer. I mean who on earth does that? This is a vintage Stanley dresser and I hope I can avoid creating heartache for someone else who is considering redoing a vintage Stanley dresser.
I was so frustrated that I actually considered tacking a sledgehammer and smashing the thing into a million pieces so I could burn it and start with a new dresser. I even searched Facebook Marketplace for a new cheap dresser that I could use instead for that area of our bedroom. The fact is though that I love this dresser’s shape and the size is just right for where I need it. After letting it marinate in my head for a bit and visiting my favorite furniture websites, I got some inspiration and hoped that I could turn it around again even if I had originally not planned to paint it again.
My light bulb moment
When Mandi of Vintage Revivals posted about her amazing fluted wall treatment, it got me thinking that this could be the way to go for my dresser drawer fronts. As you can see the wood was also all mismatched on the drawer fronts and had green and black tones to the grain. That means the drawers are poplar wood. You can get the green tone out of the poplar wood by bleaching it with oxalic acid but you can’t get the black tone and grain out. After I had bleached the cherry secretary desk and the French Provincial dresser, I didn’t want to do it again and just wanted a different look.

Mandy used half-round molding for her fluted wall treatment which ended up being pretty expensive. I went to my local home improvement stores and the half-round molding they had left wouldn’t even have covered half the drawers and cost me about $90, so no thanks to that price and having to search at other stores for more molding.
Friends on Instagram messaged me Jenna Sue Design Co.’s fluted dresser makeover but she used white fluted trim made from solid urethane. I didn’t want to paint the entire dresser again though and have some wooden detail instead like originally planned. That fluted molding is also a tad bit pricey.
Super easy fluted molding hack
So I went for a walk through the aisles of Lowes again and when I spotted pole wrap at one end of the aisle, I knew what I was going to try to use that as fluted trim. It was exactly what I wanted and the wood veneer on it matched the oak legs on the dresser which I also wanted to keep bare wood. You might ask, what on earth is pole wrap? Well, it wraps poles, haha, those ugly metal poles in basement constructions that keep the first floor of a home supported.


So in today’s post, I want to show you how I turned my disaster dresser into a fluted beauty that I’m super happy with. My inspiration was actually the below pictured fluted West Elm dresser which costs a whopping $1200. Fluted pieces of furniture are all very expensive.
A roll of pole wrap is around $45 and super easy to work with. Below I want to show you the color difference of the half-round molding compared to the oak pole wrap. Since I didn’t want to paint the molding, the woodtone of the polewrap is definitely more what I was looking for.

Materials needed for this easy and affordable fluted dresser makeover
- pole wrap
- 80-Tooth miter saw blade
- liquid nails or Loctite
- sand paper in different grit count (I finished with 220 grit)
- tack cloth (my favorite thing when redoing furniture)
- brush
- foam roller
- clear matte polycrylic varnish
- edge pull drawer handles
- optional spray gun (I love that thing)
- painters tape
- white paint
- compound miter saw or table saw
- wood clamps
- box cutter
- spackling knife
- toothpicks
- painters tape
How to apply the fluted molding material to drawers
This post may contain affiliate links from which I will earn a commission at no extra cost to you. View my full disclosure policy.
The pole wrap consists of cardboard backing that is covered in some type of MDF and then coated with a very thin oak veneer that has flutes cut into the surface to make it flexible so it can be wrapped around round poles.

You are able to cut strips of the pole wrap simply with a box cutter since you only have to actually cut the cardboard backing. Super easy!

Cutting the veneer strips was a little bit more tricky. The problem I ran into was that the wood veneer shredded when cutting it on my compound miter saw. But my friend Katja of A Home for Design suggested that I’d give a new saw blade with a higher tooth count a try. Of course, they only had the more expensive saw blades left at the store! I feel like everything is still sold out everywhere. I ended up buying the Spyder 12-in 80-Tooth Tungsten Carbide-Tipped Steel Miter Saw Blade which did the trick and cut the pole wrap like butter without any shredding. I didn’t even have to tape the area where the cuts were made. This cheaper one HERE should do the trick as well.
Cutting the pole wrap
I don’t have a table saw so I used my compound miter saw. You can either wrap the material into a roll and cut it or fold it in half. I tried both. On a table saw you can of course lay it flat to cut.

I used the drawers as guides to mark the needed height. You can clamp a piece of wood, so you get the right measurement for each drawer.
TIP: Measure every drawer!!! Mine were all different!

Here you can see how I cut the material folded in half as well.

Another tip: Lay your drawers and fluted molding material out before attaching because of how the grain can differentiate. Of course, if you are painting everything this step isn’t needed. I ended up having to buy two pole wraps because I messed up cutting with the old saw blade and the difference was very visible between the two different batches.

Gluing the fluted molding
Before I started gluing my cut pieces to the drawers I made sure to wipe them with my trusty tack cloth. Dust and dirt don’t have a chance with these sticky wipes. I never refinish a piece of furniture without tack cloth.

Then I spackled on the glue with a spackling knife. This ensures that the glue is thin and doesn’t squirt out on the sides or seams too much.

At the seams where the fluted molding butts against each other I even scraped access glue away with a butter knife.

If the glue still spilled out by the seams, I used a toothpick to remove the access glue.

Make sure that the fluted sections align correctly from each drawer to the next.

You can insert the drawers into the dresser before clamping to make sure everything aligns correct. My sections didn’t fall off and were flexible enough to still move around.

I used scrap wood pieces and bricks to make sure the fluted molding was securely glued in place.

You could say I went a little bit overboard with the clamping 😉

At the edges, I had to add a single piece of molding and there were little gaps left on each end. It didn’t end up mattering and wasn’t visible on the finished dresser.

See the little edge gap below?

I let the glue dry overnight before removing the clamps. On some drawers, the fluted molding slid a tad bit and was slightly sticking over the edge of the drawers. It wasn’t a big deal and I used my orbital sander and 220 grit sandpaper to lightly sand the molding flush with the drawers again.
Instructions for the rest of the dresser makeover
The disaster side where I had to remove all the veneer to make it an even surface again, had to be patched and sanded. I went from 80 grit to 220 grit.

I also made sure to tape the drawer fronts before painting. This way less dust is flying around and the inside doesn’t get all messy. Make sure to cover the area where you are painting with some type of drop cloth

I use spray cans of Kilz primer. which is my favorite primer but since it is oil-based, I don’t like rolling it or using it in my sprayer which is why I use spray cans. Make sure you shake the can long and hard before using.

The primer didn’t get into the grain well which is why I decided to actually use a roller to roll on the actual paint.

Normally I use my spray gun though. The roller ensured that I got into the grain. I use a small foam roller and apply very light pressure. Two coats did the trick.
Oh and for the paint I used the same eggshell Ultra White by Valspar that I use on my walls. I know a lot of folks like using something more durable but I’ve had good results with this method since I apply a clear coat at the end.

I always spray the clear coat with my sprayer. It works great but you have to make sure that you only spray very thin layers. The clear coat is very runny and can leave drips easily. It happened to me and I had to sand again.
I spray about 3-4 coats and always lightly sand in between with 220 grit sandpaper and wipe with a tack cloth in between coats.

Finding the right hardware
I really wanted to find thin edge pulls like my inspiration dresser. I was afraid that I wouldn’t find any but I did. The edge pulls I used come in a ten-pack and I only needed 5 but the price wasn’t bad so I didn’t care that I have 5 left.
My problem was finding thin pulls that were deep enough the thick drawers. Mine ended up being pretty thick since I glued extra material onto them.
Attaching the pulls is super easy since you can find the center so easily with the fluted molding and being able to just count the flutes.

I ended up leaving the wood veneer plain and without a clear coat. I can always add that later. The reason I didn’t is that the matte clear coat changes the color of the wood tremendously and I liked the color fo the plain oak so much better. See below what I mean.

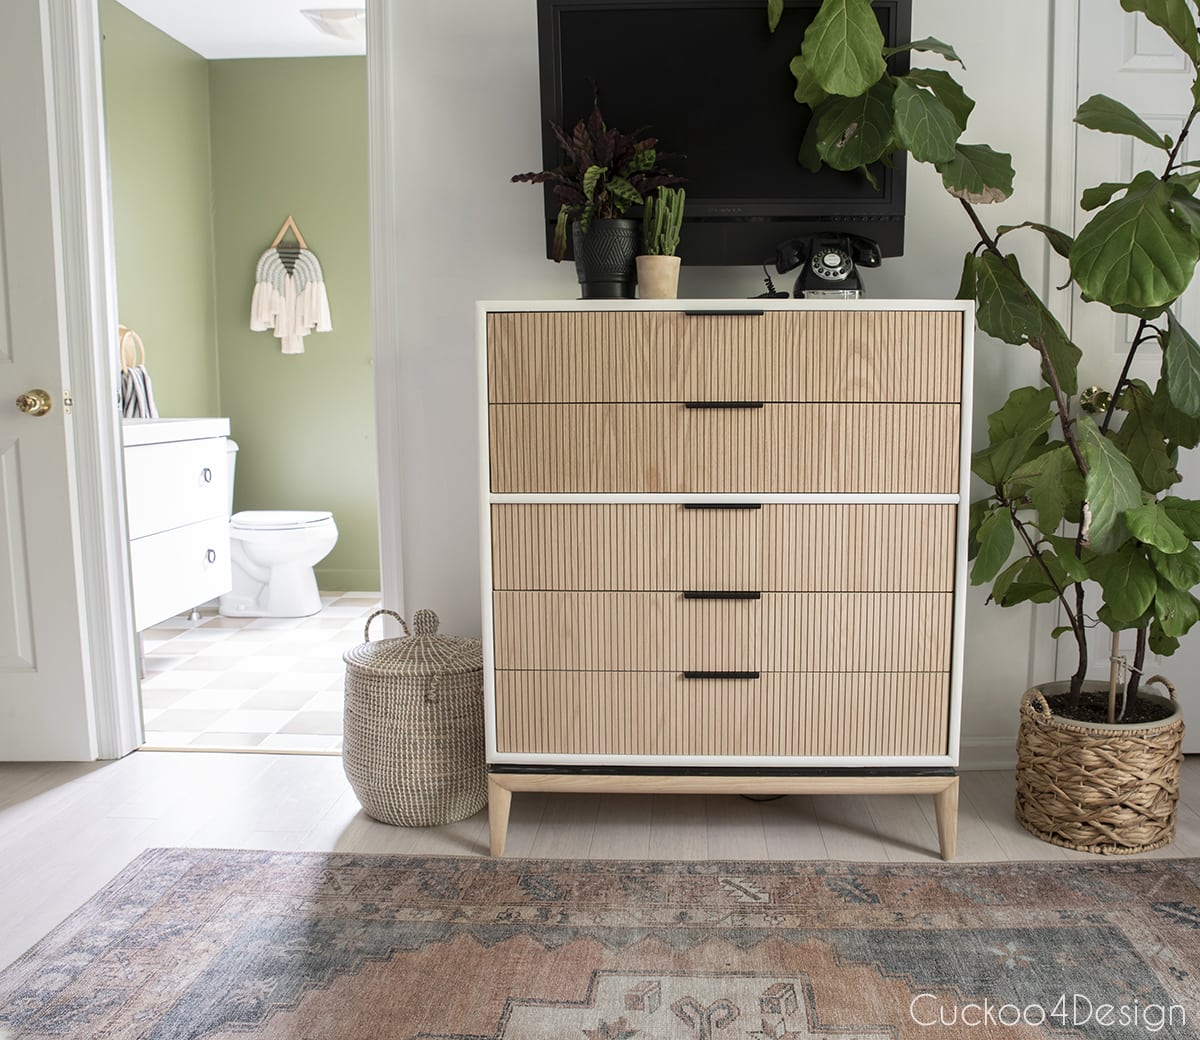
Finished dresser with fluted molding
Let me show you what the dresser looks like in our bedroom under the TV. We have a dinosaur flat-screen TV, haha.

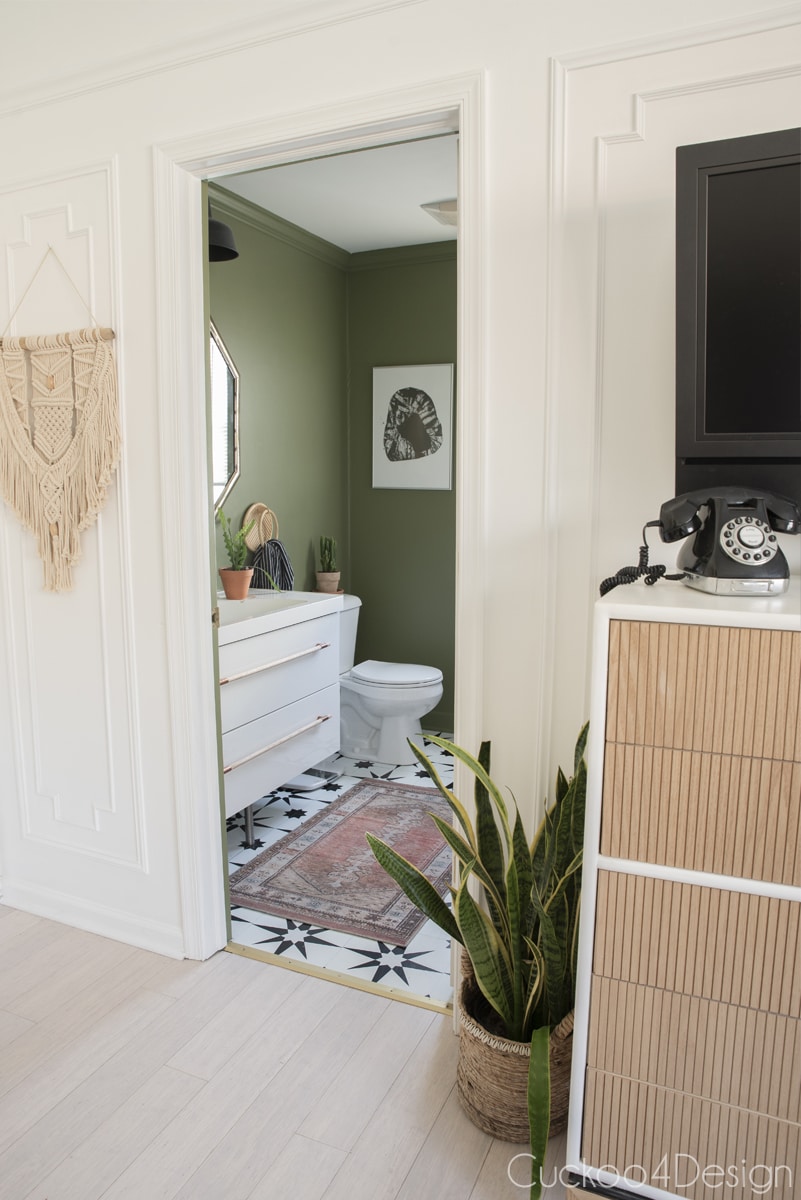
Oh, and I’ve been working on a bathroom refresh as well. You can see the sneak peek of the color change.
Use the image thumbnails to shop:

Update: I gave the bathroom floor pictured in the background an update with cheap peel-and-stick floor tiles. It’s the perfect affordable makeover.

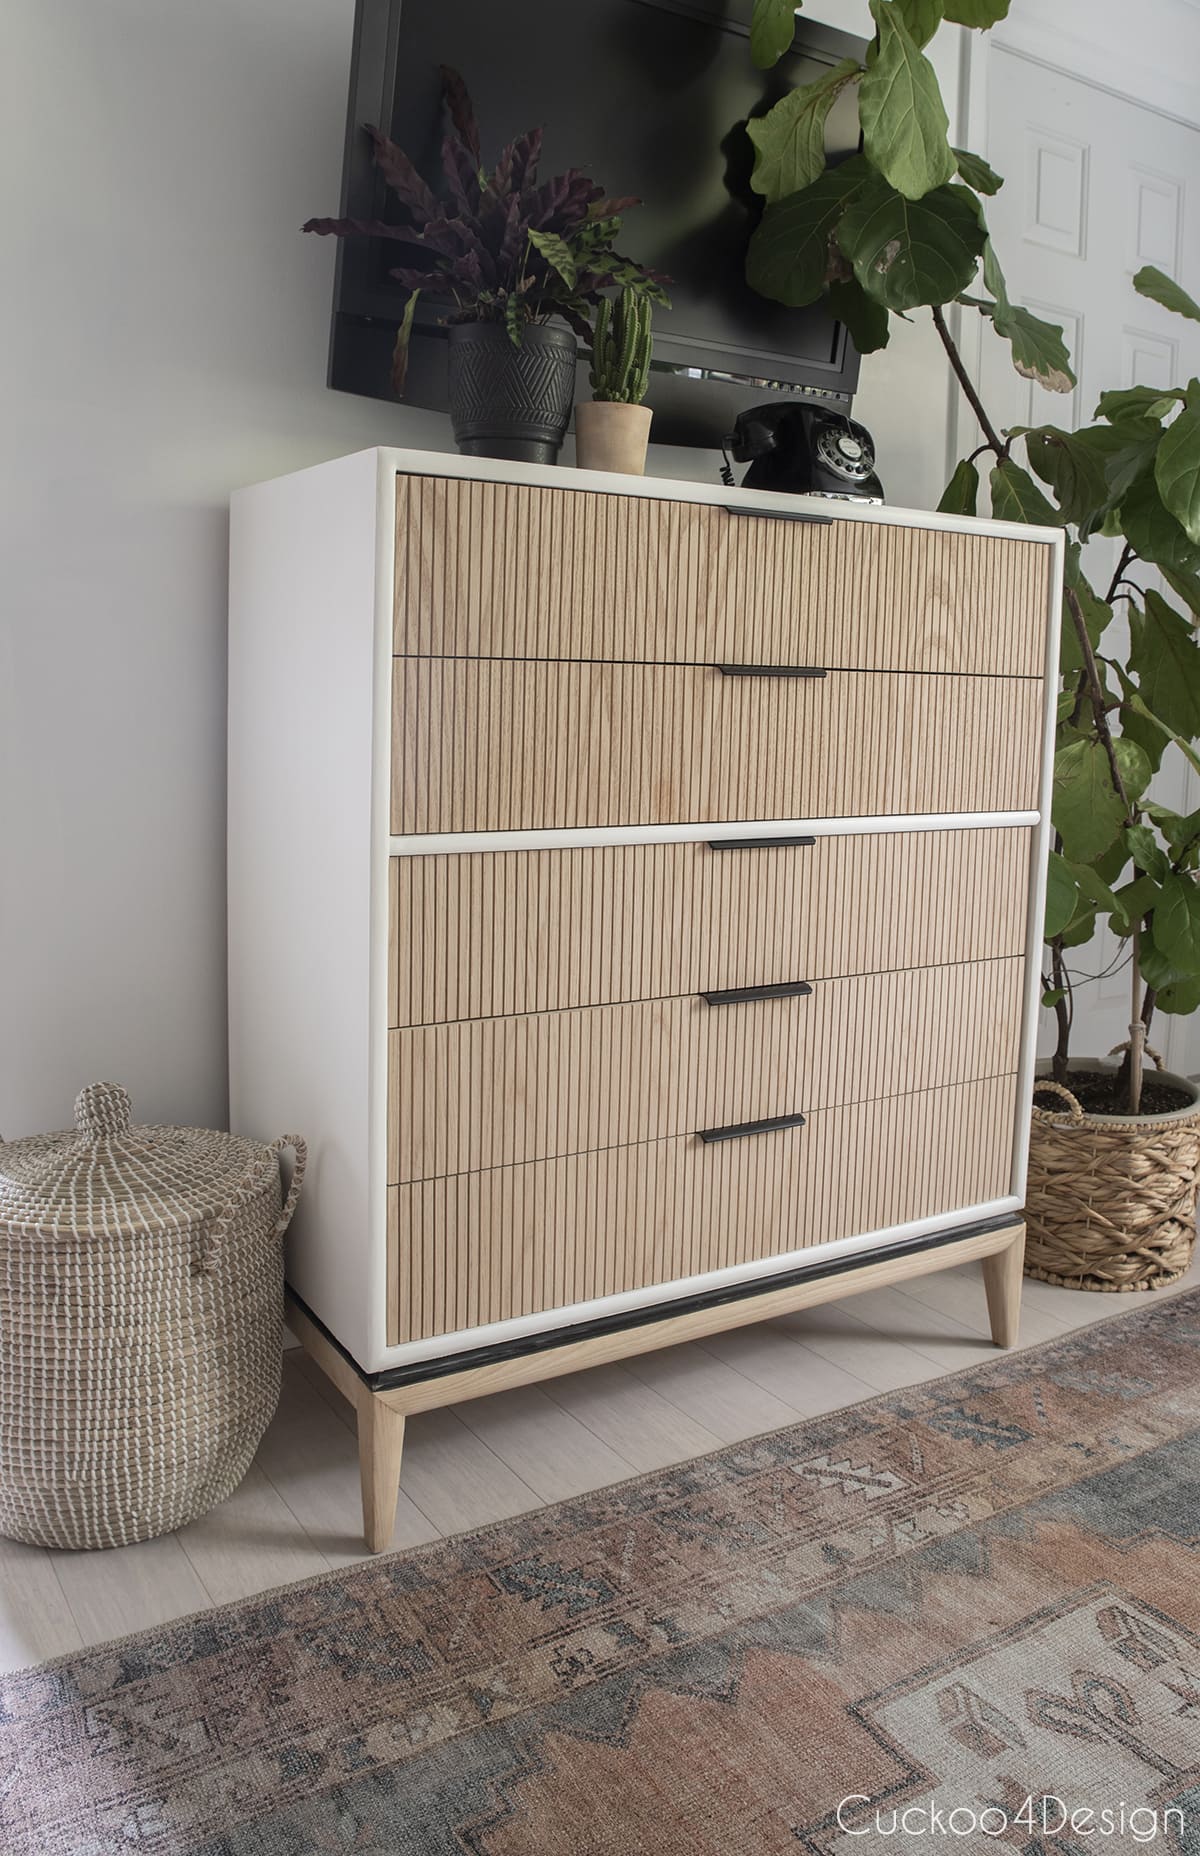
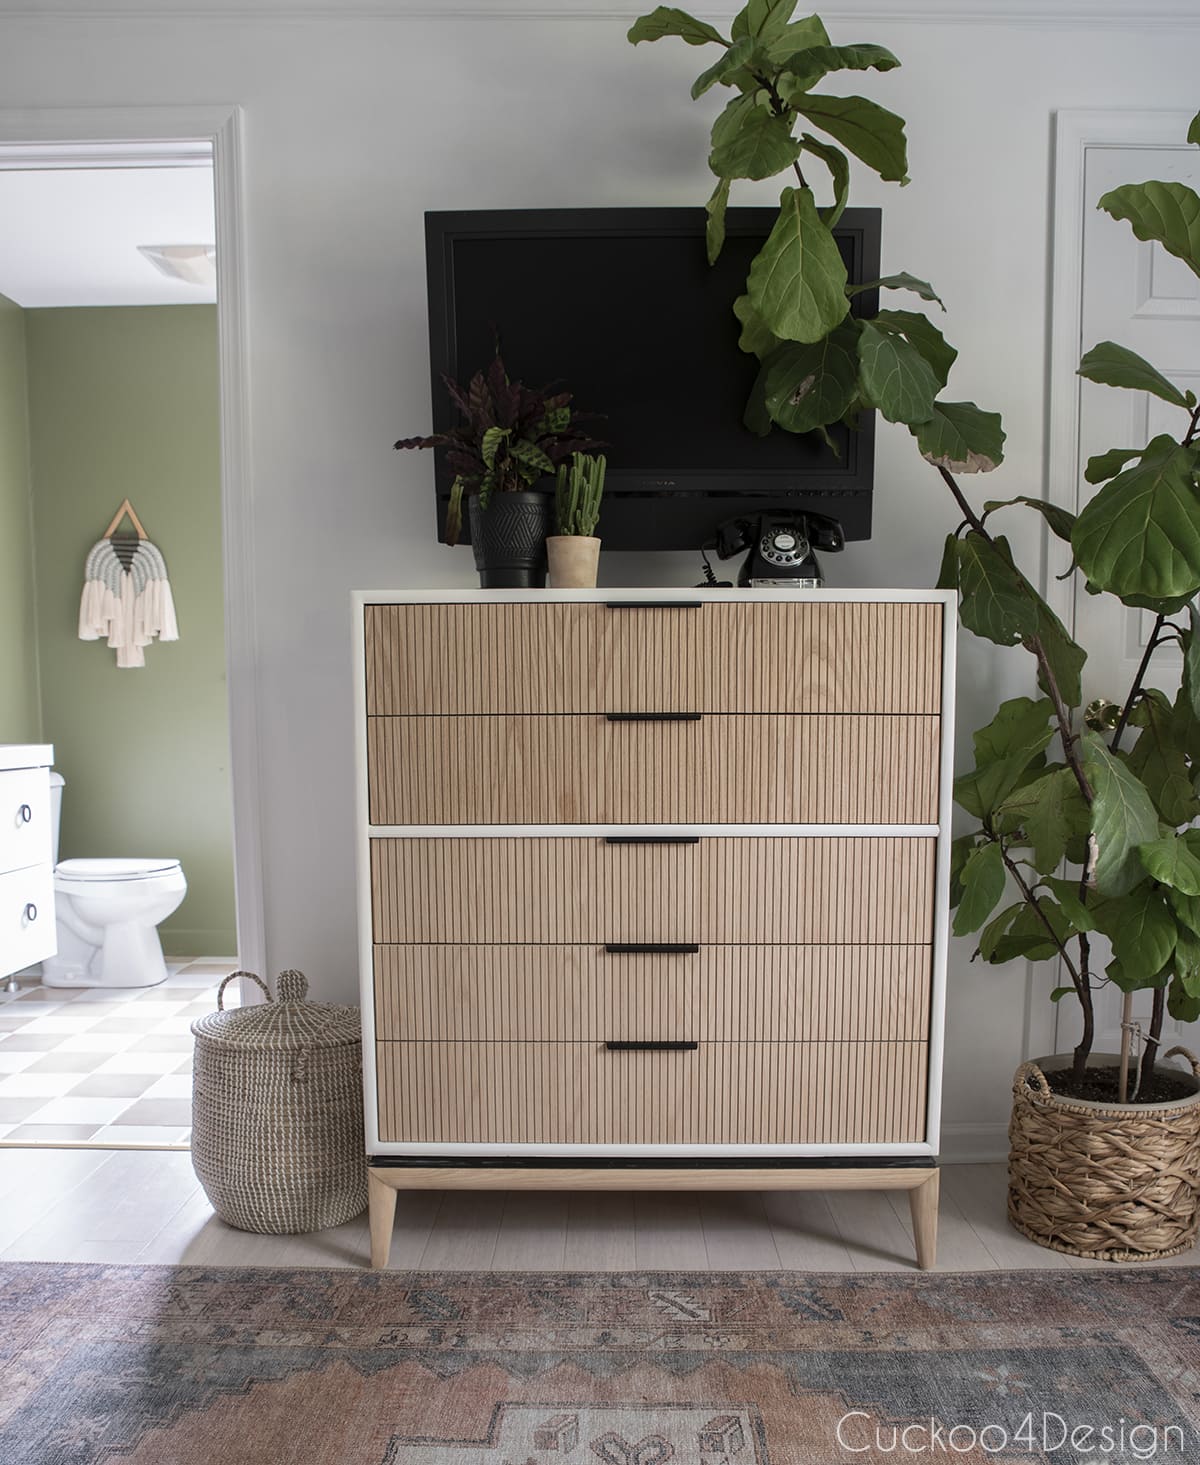
The black detail at the bottom of the feet is still the original molding and color from the old Craigslist dresser.


more of my furniture makeovers
I’m glad I didn’t give up after all even though I almost lost my mind along the way LOL. Don’t you agree that the shape of this dresser is just very special? But even with a different shape, you can turn a dresser into a fluted beauty if it has a different shape. And with the help of the pole wrap, it is also a lot more affordable.
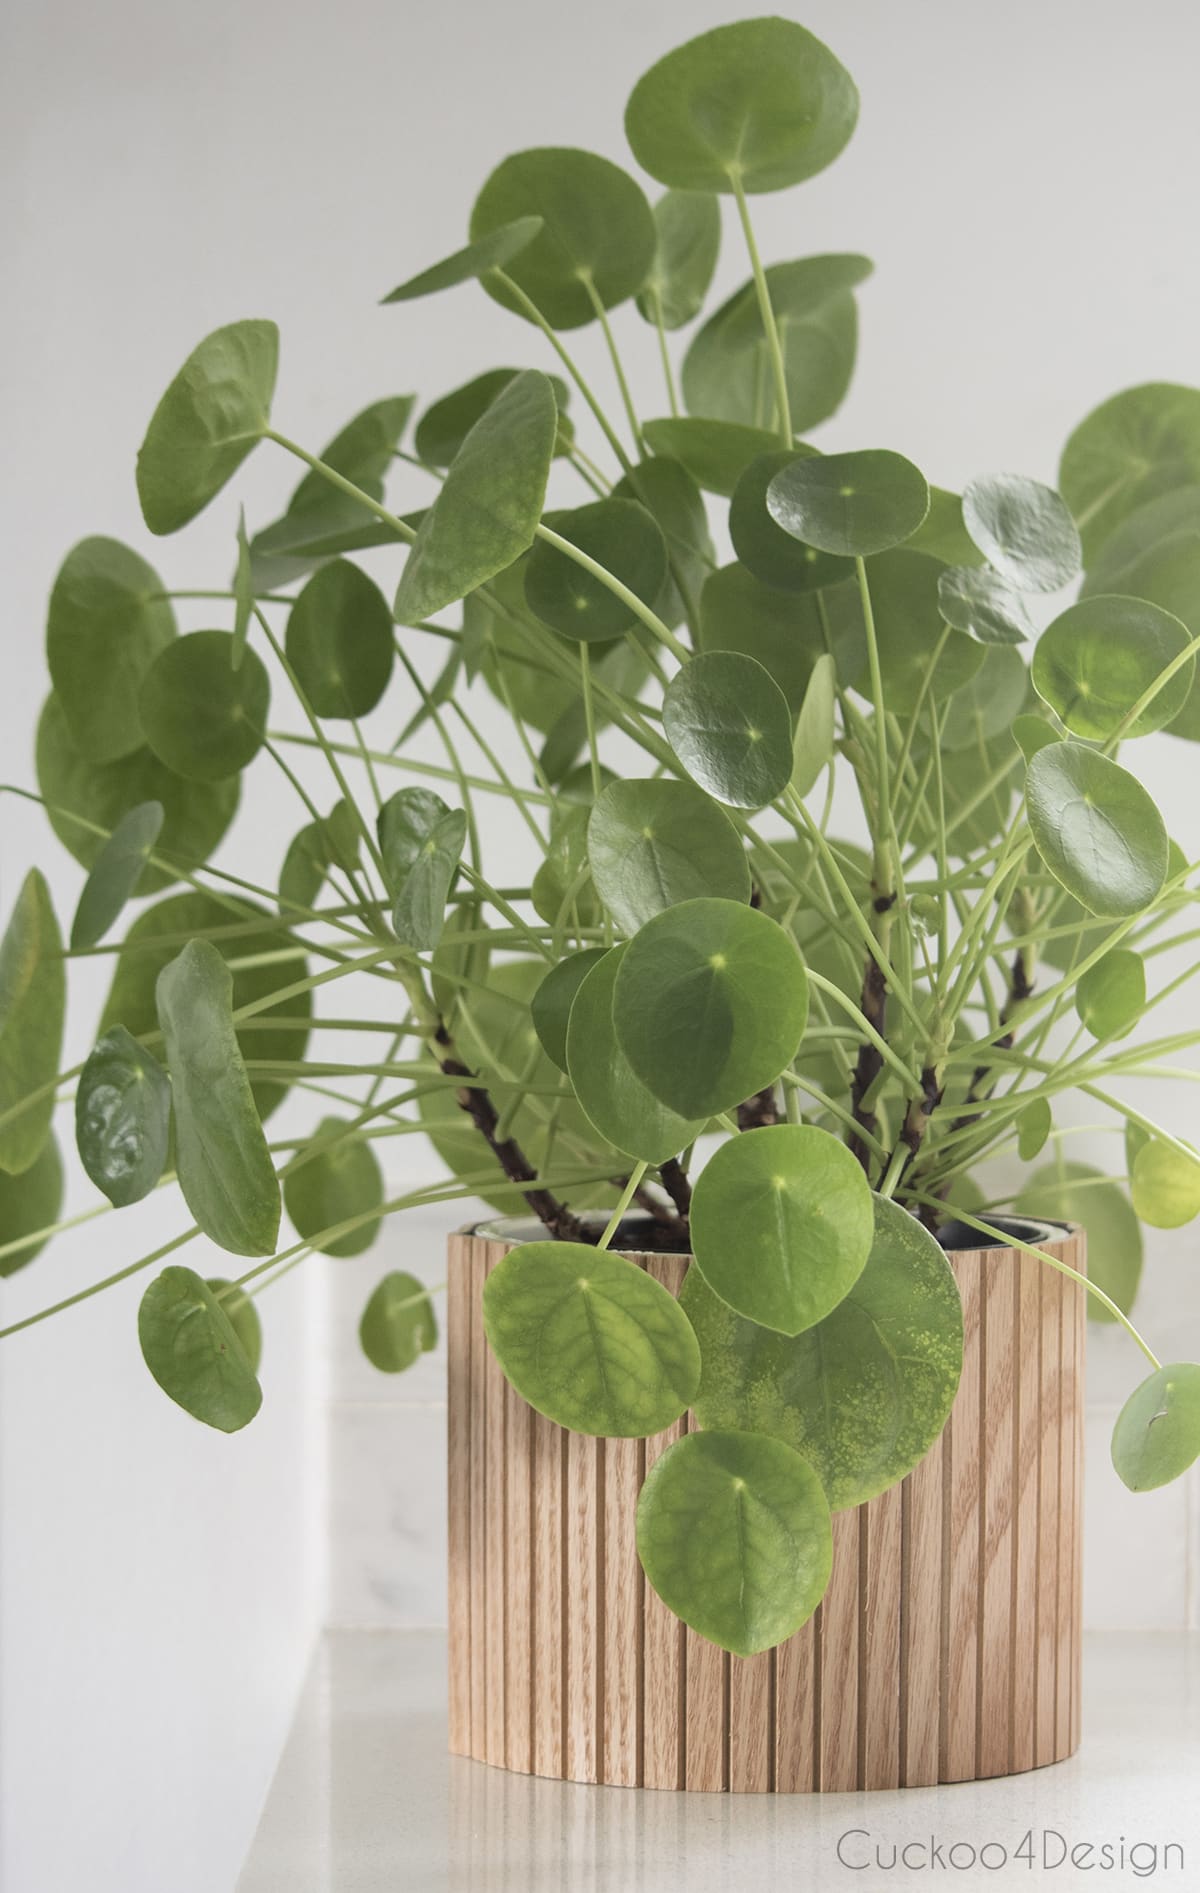
Also, check out the fluted planter I made with the pole wrap scarps. Or you might like my tutorial about how to make a fluted lampshade.

I’m off to finish adding more molding to the bathroom, giving the floor the much-needed makeover, and also painting and adding more molding to the bedroom. Can’t wait to share all of that with you.
Tschüß,

The dresser turned out fabulous!
I refinish/paint furniture, and almost every MCM piece is constructed with veneer on the sides, and many times on the top. There were a few high end brands that didn’t do this, but for the most part, this is the standard.
Thank you! I agree, yes they are but I have never seen the particle board in the middle like this. It usually has cheap wood under it.
I live in Canada, so maybe the Canadian manufacturers were more into particle board/plywood under the veneer, but I see particle board/plywood a lot on pieces here. 🙂 I can’t say that I’ve ever foud a dresser by the big name US or Scandinavian MCM companies here, though. Mostly Canadian manufacturers (when the pieces are marked).
Hmmm that’s so interesting Rebecca.
Looks Amazing …Better than the West Elm one!!!!
Thanks so much!
Wow, stunning! You are a creative person, beautiful transformation of the dressor
Thank you Tammara
This is brilliant!! I have 2 dressers that could use this!!
Oh good luck and tank you.
Another fantastic job!
Thank you so much Nancy.
How cool is this!!! You did a great job!
Thanks so much Jen! I’m glad it is over 😉
That is stunning. Wow.
Thanks so much Adrienne.
Absolutely fantastic! I cannot believe how incredible this looks. Congrats.
Thank you Arli for the sweet compliment.
You are so talented!!
Thanks so much Carol
Wow, simpy amazing transformation. I probably would have just taken a sledgehammer to it but your perserverance really paid off!
I was very close to letting my frustration out on the dresser 😉 Thanks Susan.
That is awesome! Turned out beautifully. Glad you stuck with it cause this is going to give a lot of diy inspiration. Good job!
I figured it also would be ridiculous for me to give up since I have a blog and I should be helping others figure things out if they run into a similar issue 😉 Thanks Barb
this is ridiculously amazing, Julia!!! I am in love!!! GENIUS.
Thanks Cassie, I have a feeling I’ll be using the pole wrap again.
Another awesome transformation….you are incredibly talented! I SO enjoy your projects, this one is beautiful!!!
Thanks so much Kathie!
I love it! It’s better than your inspiration piece. Very well done.
Well that’s an awesome compliment Barabara. Thanks so much
I’m still so in awe of this!!
Thank you, Ashley!
Such an informative article! I agreed that at first, we should use a tack cloth to get better finishing for flawless results. By using tack cloth you can easily remove small dust and dirt particles from the surface. Your blog is very well written and all the information provided by you is really very helpful. Thank you for sharing! Keep Posting!
Stunning and very creative! Another beautiful restoration.
Thanks so much, Heather.
Incroyable, bravo ! Sais-tu où trouver à nouveau ce rouleau cannelé ? Merci à toi.
I’m glad you like it. I bought the fluted wrap at a local store and linked to it in my blog post.
I love this. I am picking up a credenza tomorrow that I want to do this on, but the pole wrap is now almost $70! So, I am looking at various bamboo placements to use. My drawers are not as wide as yours, so I think I will be able to find something that fits. They have a lot of very interesting designs. Thanks for the inspiration!
Oh wow, the price really went up on the pole wrap then. Good luck!
I really love the dresser you refurbished! Yes, it is better than your inspiration piece. I just had the same experience with the dresser sides. I have to redo some glides, too. YIKES.
Thank you Paula.
Oh friend this looks incredible!!!!! Fantastic job!!!!
Oh hey, Shavonda! Thanks so much! I’m so glad I finally changed up that dresser.
Wow that is gorgeous, and even better than the West Elm piece. I’m always impressed by your creativity -and your ability to find great pieces to transform!
Thank you so much JJ