

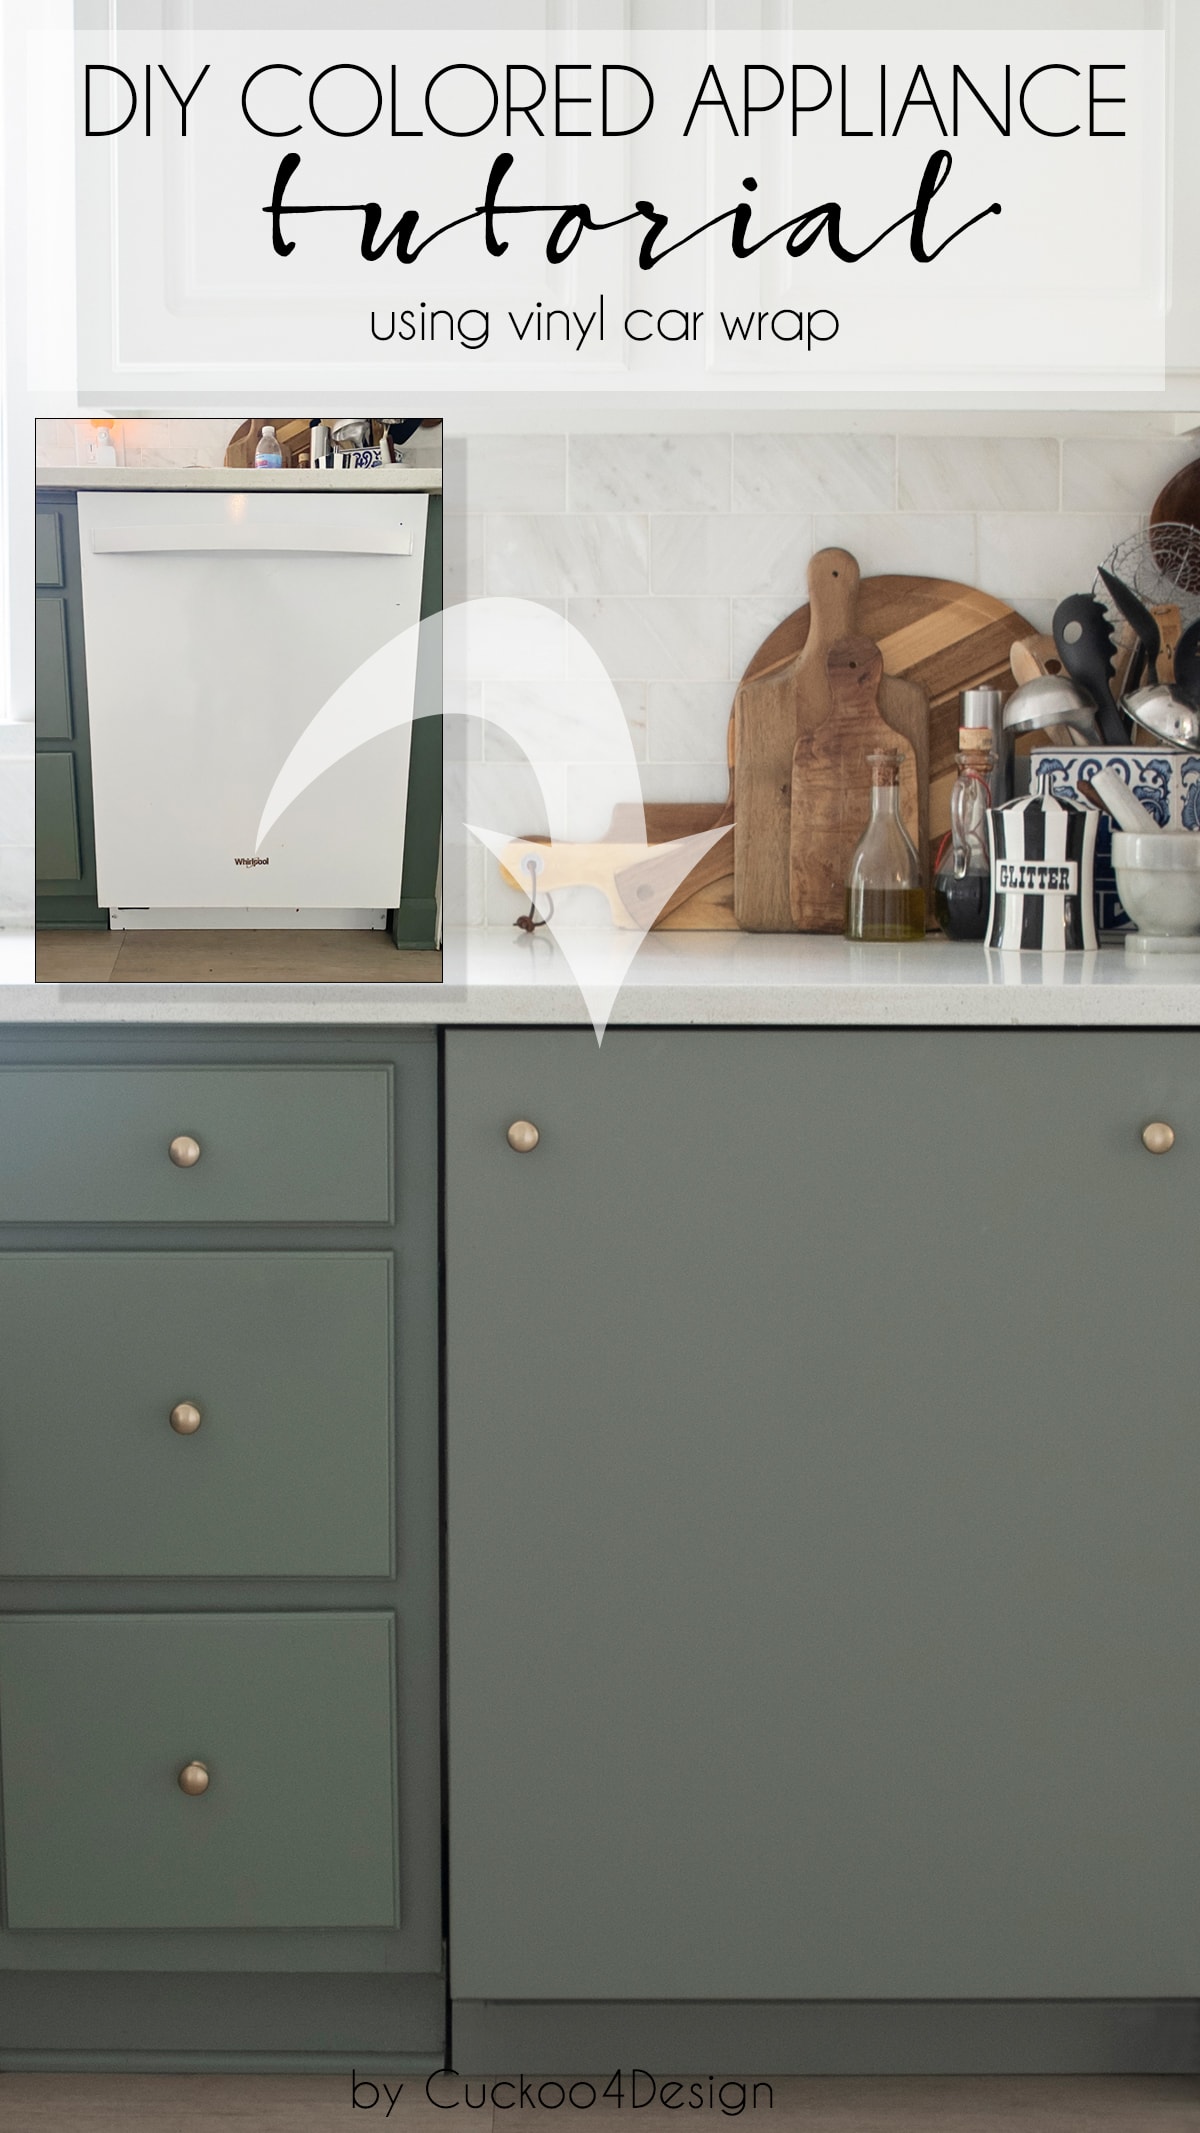
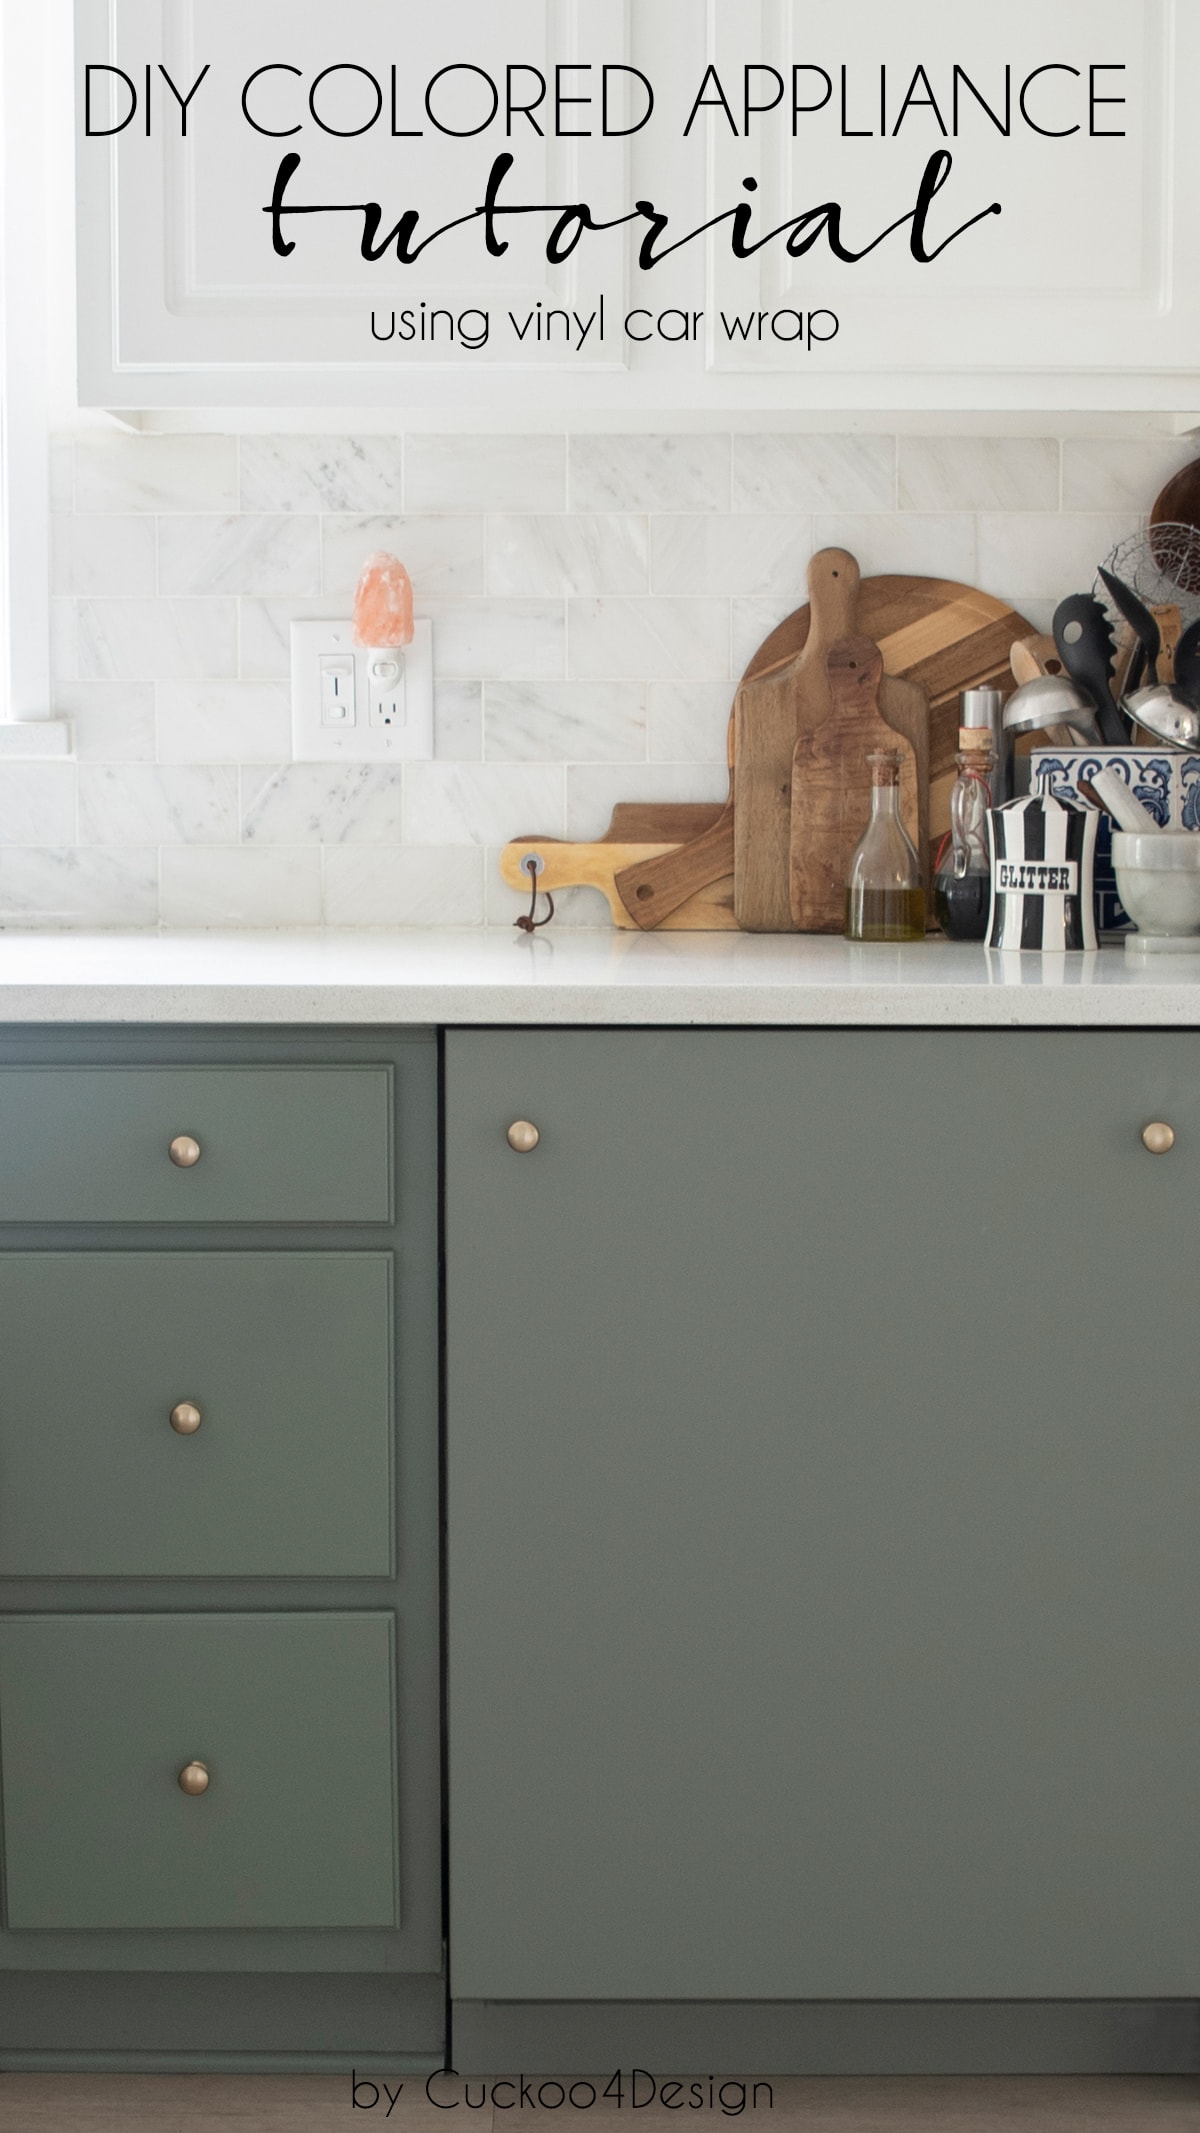
How to change your dishwasher color to match cabinets (vinyl wrap tutorial)
Today’s project has been marinating in my head for a very long time. Our dishwasher is pretty new, but it has taken a beating lately, and I kept thinking about how to change an appliance color to match it to your kitchen cabinets. Unlike a stove, which can be a beautiful statement piece in a bold color, a dishwasher really needs to blend in with the cabinetry, in my opinion. The whole appeal of expensive cabinet-front dishwashers is to blend in with the cabinetry. And I wanted that seamless, built-in look without the price tag. That’s when I discovered appliance wrap.
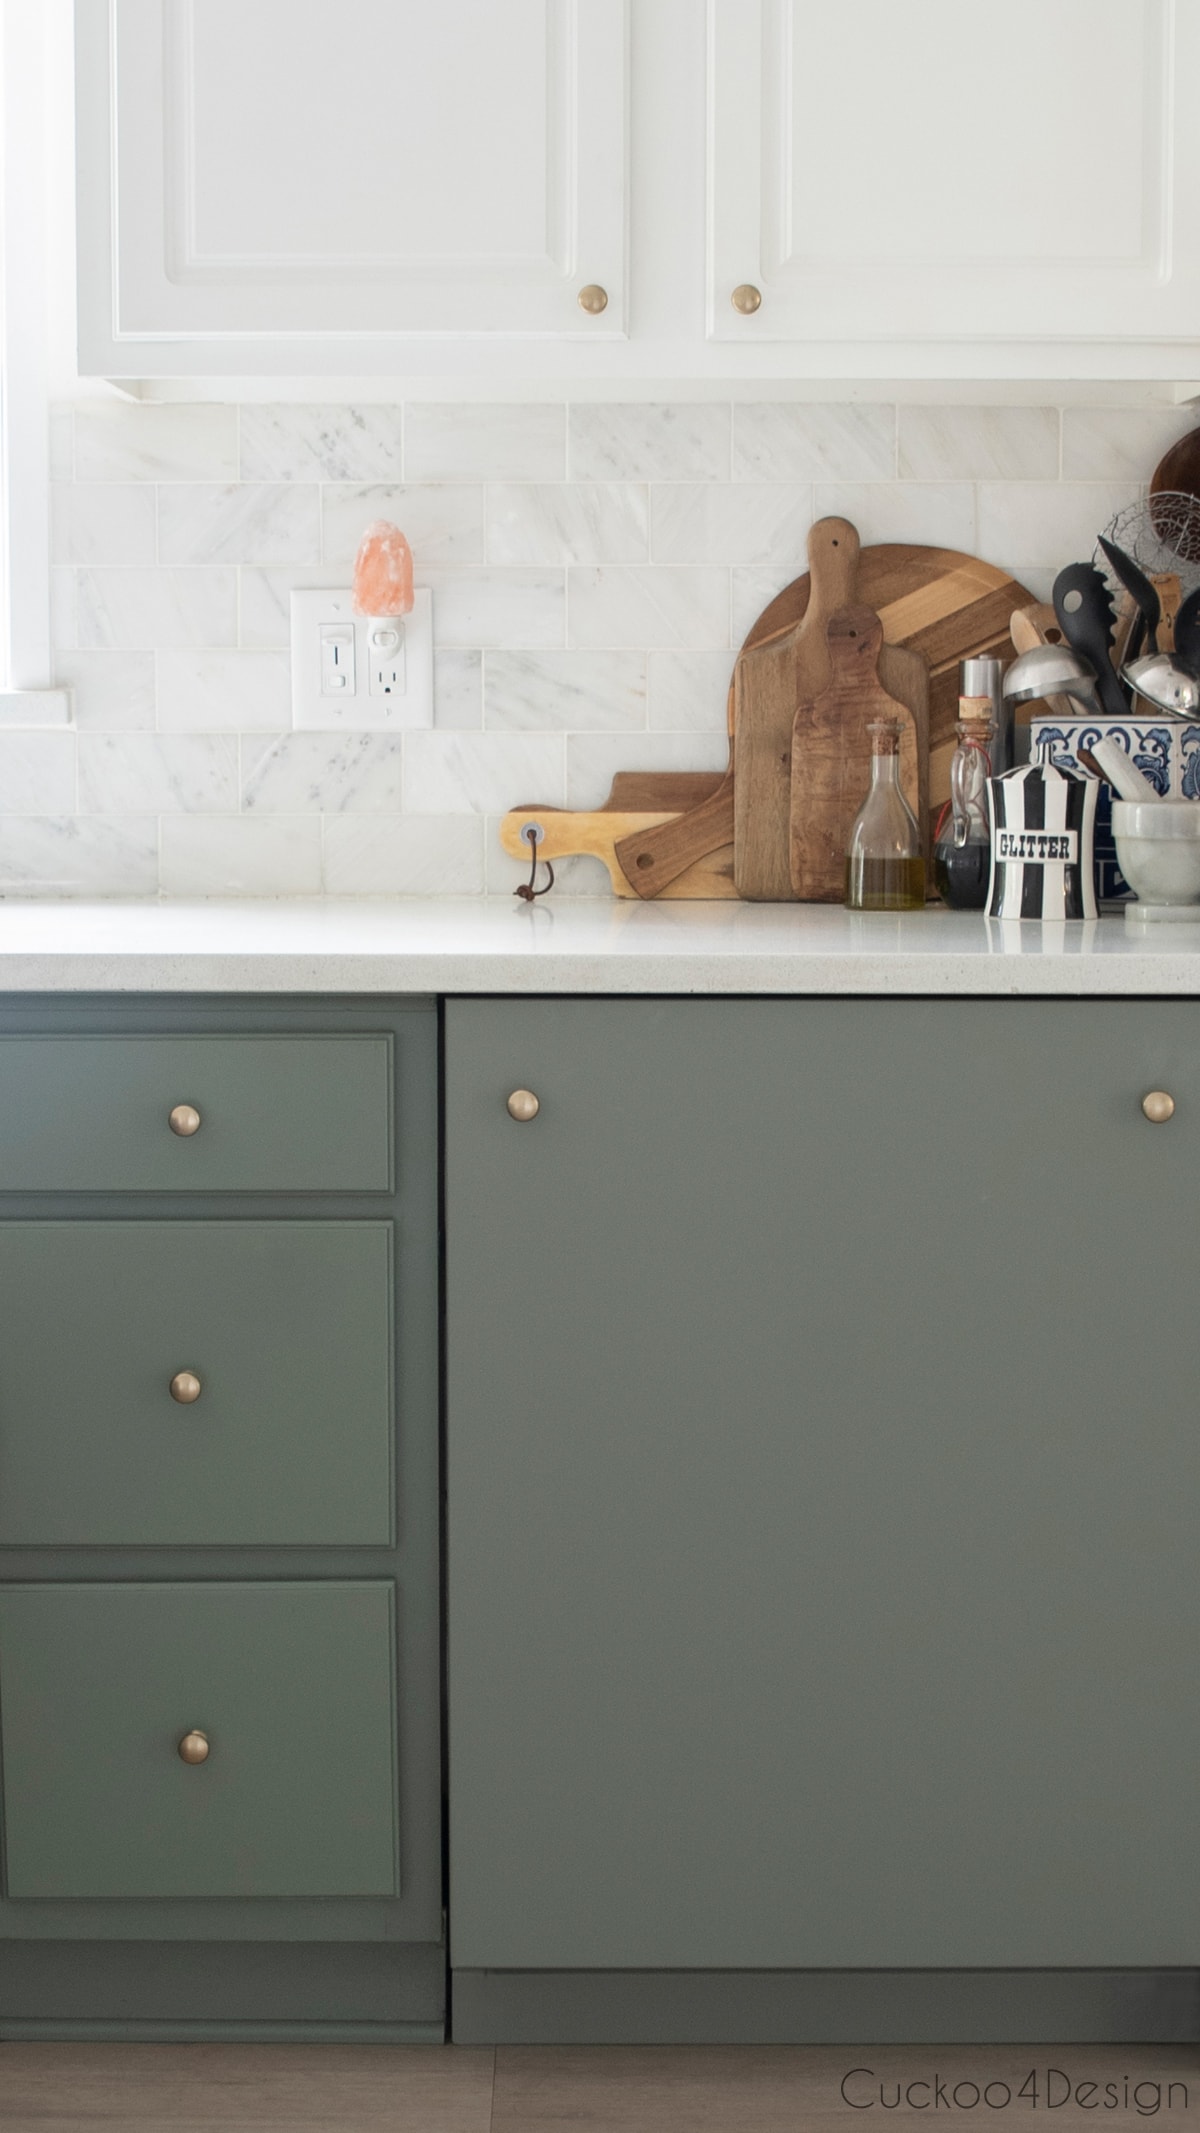
The challenge? Since our old dishwasher couldn’t be customized with a cabinet front, I needed to match our exact sage green kitchen cabinet color so I could turn the dishwasher from white to green. I started googling “Can you change the color of your appliances?” and discovered appliance wrap, which is heat-resistant car wrap vinyl applied directly to the surface. Here’s what makes this tutorial different: most people just buy whatever vinyl color is readily available online. I needed my dishwasher to disappear into the design, which meant I had to figure out how to custom color-match vinyl wrap to my exact paint color. That color-matching process using free online tools is what my tutorial focuses on and it’s the key to making your dishwasher look like it was always meant to be there.
This appliance wrap method works on any appliance. I’m using my dishwasher as the example, but the same process applies to stoves, microwaves, and more.
Why did I use vinyl car wrap instead of paint?
When researching how to change an appliance color, I quickly learned that traditional paint wouldn’t work for what I needed.
- Appliance paints aren’t being offered in tintable colors. At least I haven’t found any.
- The paint has to be heat resistant. Those paints aren’t tintable either
- A vinyl car wrap is shapable like shrink wrap, it is color customizable and it is heat resistant
- Car wrap is also fully removable, unlike paint which could be necessary in case of a warranty issue. A lot of companies won’t honor the warranty if you altered the appliance in any way. Paint would definitely be irreversible, vinyl wrap on the other hand is. They won’t be able to tell that you altered the appliance.
How to color match vinyl wrap to change appliance color
Yes, I was completely obsessed with finding a match to my cabinet color and a local vinyl car wrap company that would be willing to help me. Let me tell you, both presented a challenge. Those types of car shops aren’t really interested in a small job like this. They are used to custom-wrapping cars, trucks, and motorcycles for a lot of money. My type of project is too small. So I learned pretty early on that I wouldn’t find someone to wrap my dishwasher for me and that I would have to do it myself. (If you are local to me and are wondering where I got my vinyl, it is Scribbles and Drips)
The color-matching challenge
So you might think it is as easy as taking a cabinet door or drawer into the shop so they can match the color. Well, they would do that but it would cost me $200 just to color match. That doesn’t even include the actual vinyl yet.
I was also told by the car wrap shop that they used Pantone PMS colors. So I had to find a way to convert my cabinet color to a Pantone color. For those of you who aren’t familiar with color codes and systems, there are an unbelievably large number of color codes for different purposes and printing. If you use Photoshop, like me (I used to do Graphic Design) then you are familiar with color codes. It isn’t all that easy to communicate between those different codes even though it sounds like it is. You can’t trust your screen colors either and match that way, it never works.
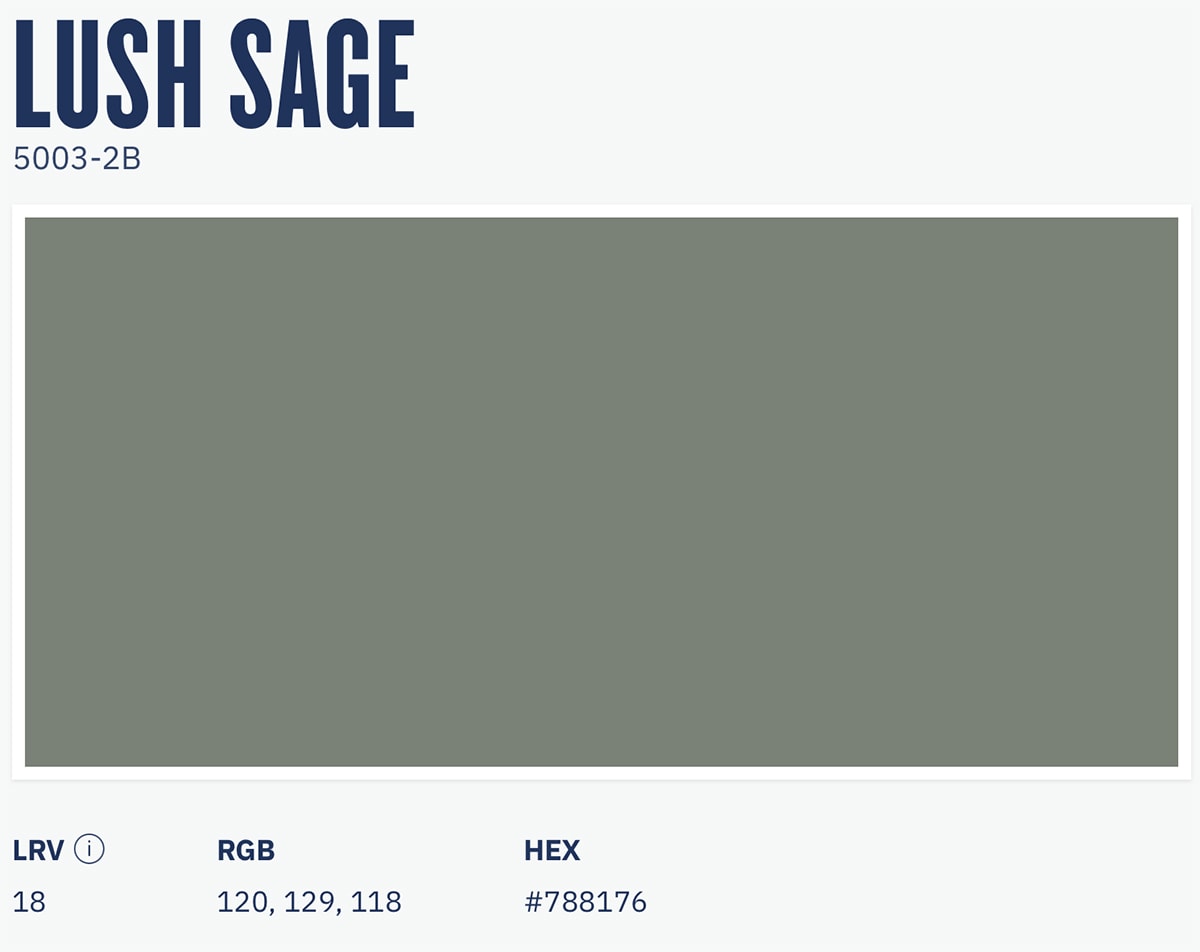
Step 1: Find your paint’s color codes
So I googled around. My color is Lush Sage 5003-2B by Valspar, and guess what? On their website, they give you other codes under the color name:
Step 2: Convert to Pantone or HEX
So those codes from the paint company are then usable on other websites. Pantone has their own color finder as well. Let me show you!
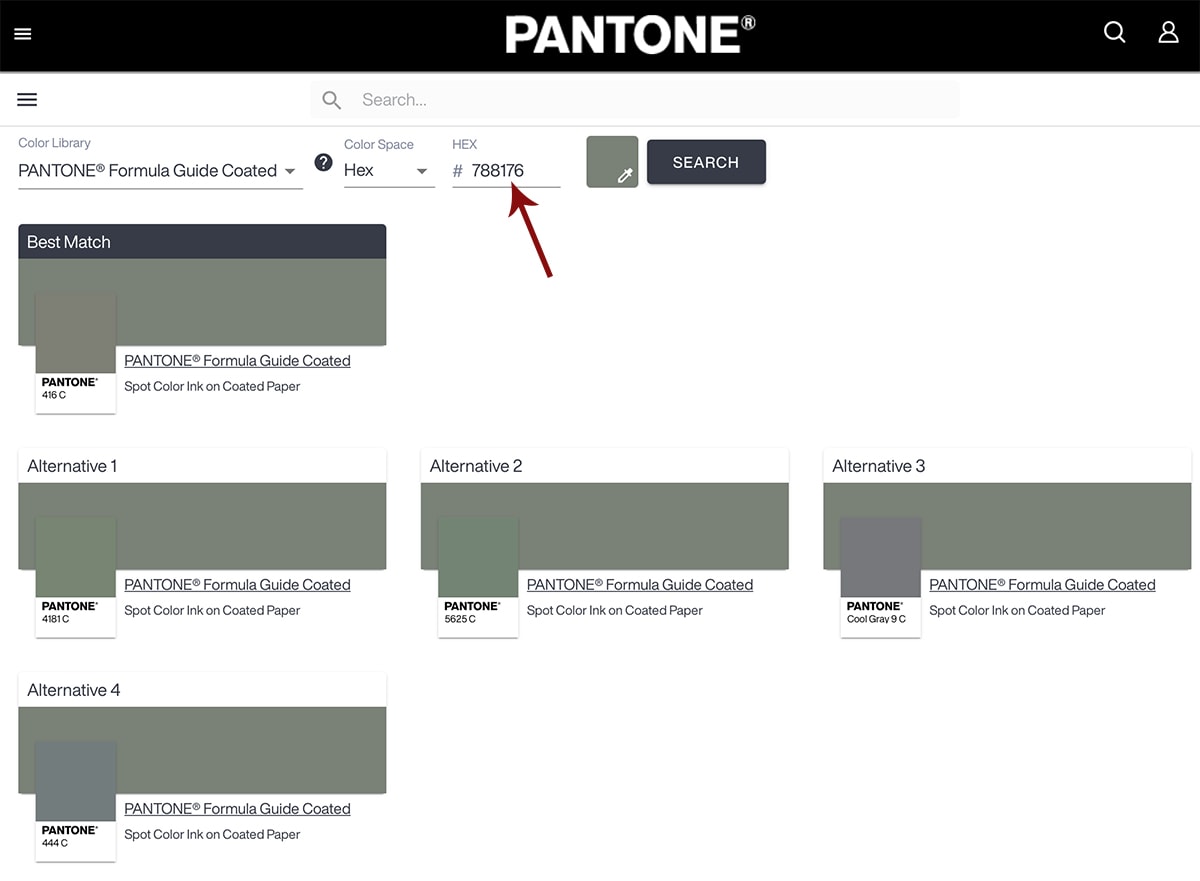
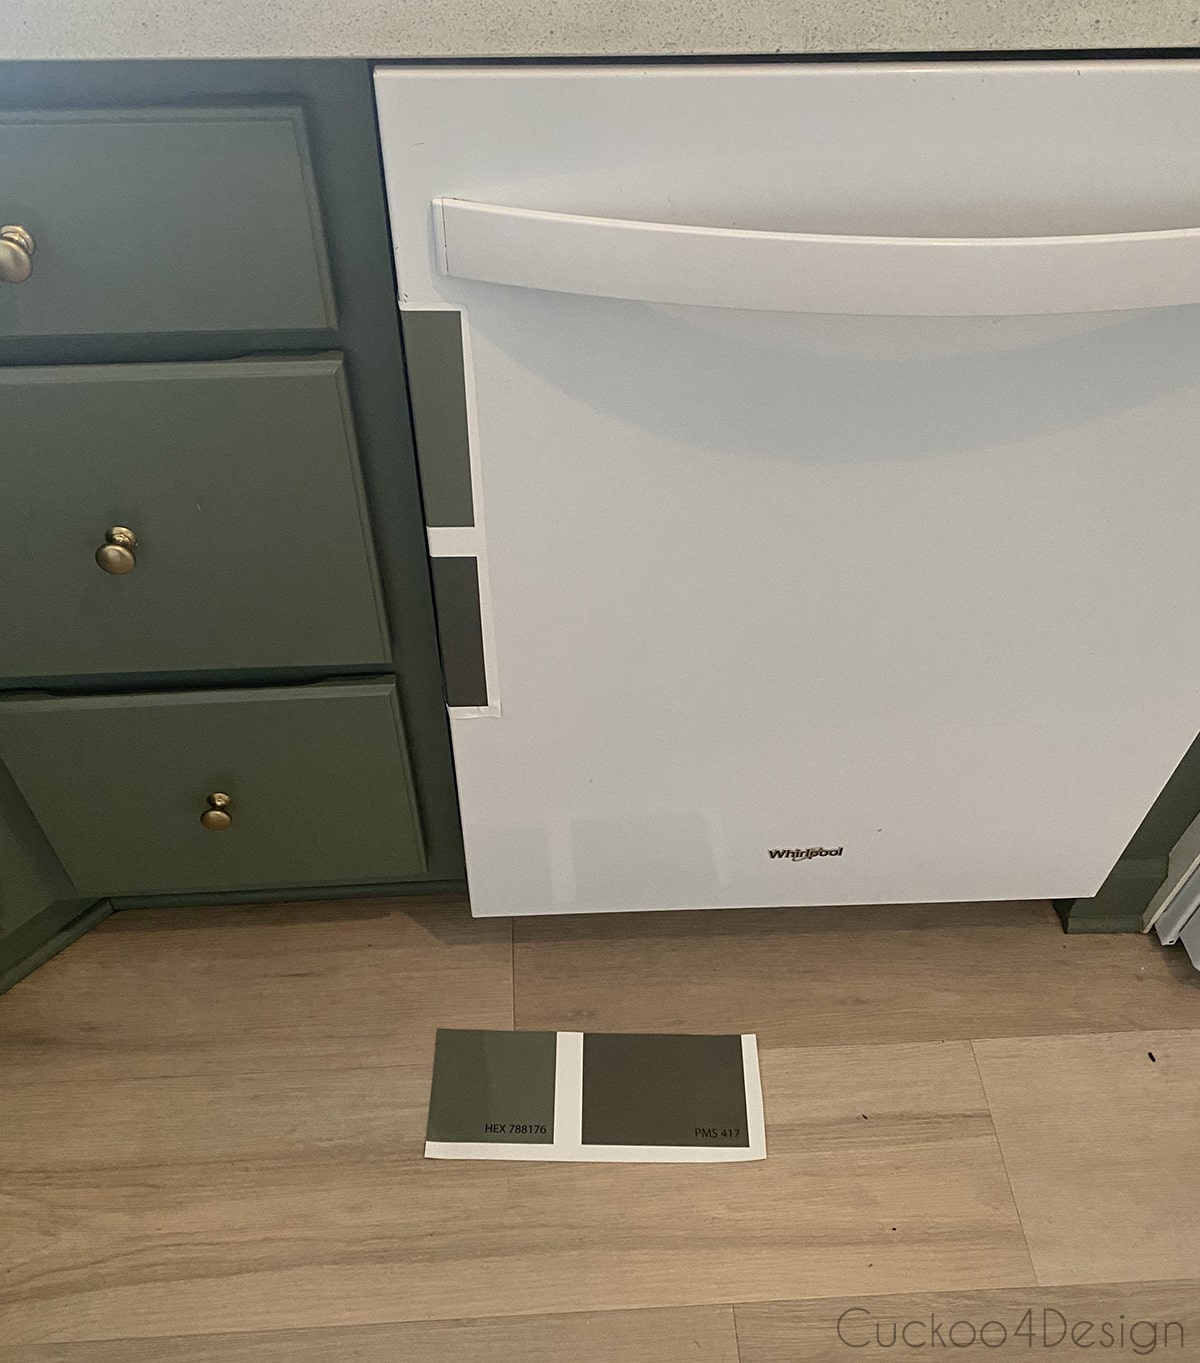
See the red arrow, that is where I entered the Hex color, and Pantone showed me all their colors. None of their matches appeared even close.
Step 3: Working with the car vinyl wrap shop
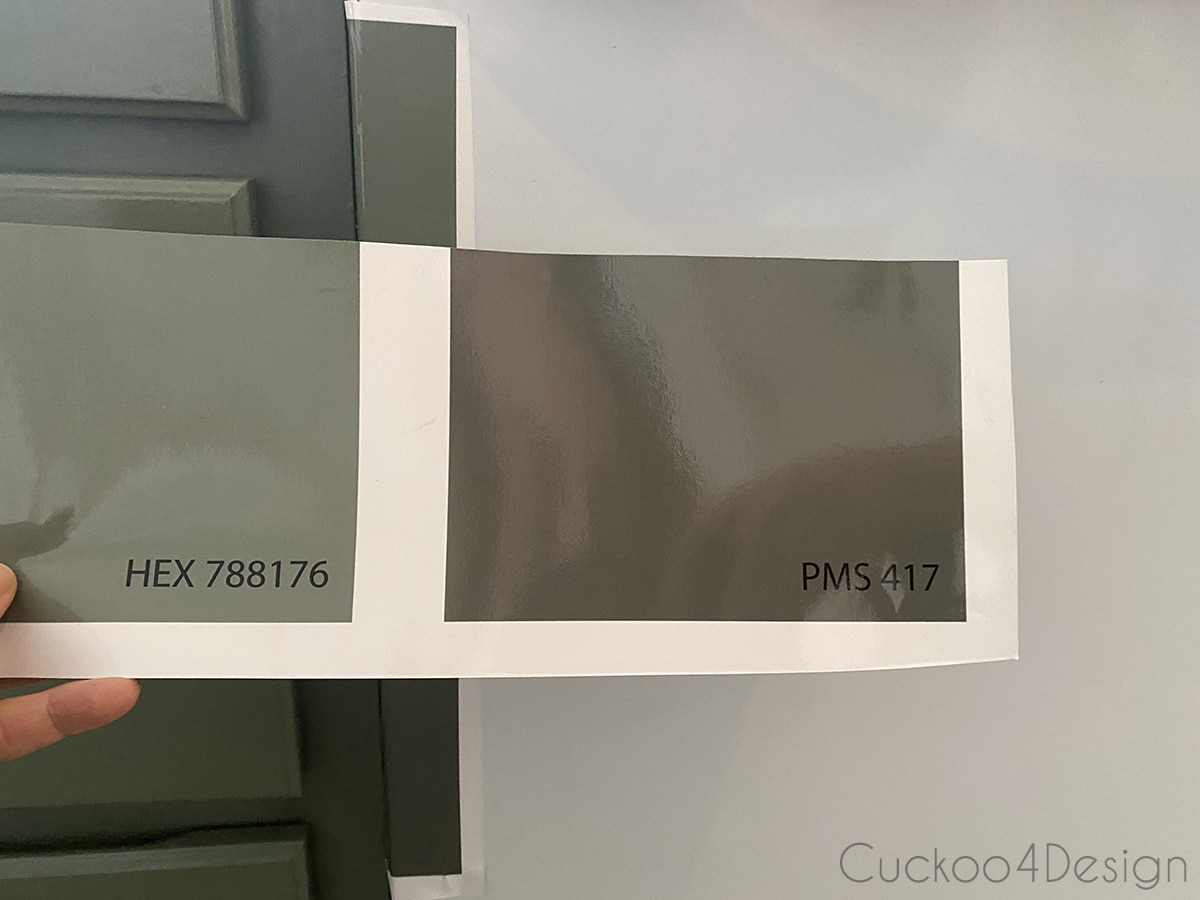
The car shop also told me they’d only print me two samples… that’s it. Not a variety of samples.
I sent them the above snapshot, and what I didn’t know was that they were able to print the Hex color. I received a sample for Hex #788176 and PMS 417. Lucky me that the Hex color was a perfect match. Yay!
TIP 1: If you are trying to match your paint color to other brands, then encycolorpedia is a great place to check. I entered my color and scrolled to the bottom, where it lists all the other color brands with similar or identical paint colors. Mind-blowing, right?
TIP 2: If you don’t know your cabinet color, try contacting the manufacturer to get a color code that you can work with.
Step 4: Choose your vinyl car wrap finish (gloss, matte, or satin)
The next challenge that presented itself was deciding on what finish to go with. The samples came in gloss and I wanted satin because that’s what my cabinets are in. Unfortunately, satin would have been even more expensive because they didn’t have satin on hand. I eventually settled for a piece of car vinyl wrap in a matte finish. The reason for that is that the gloss was so shiny that I could see myself in it. I definitely didn’t want that. And gloss really makes fingerprints stand out too.
What to do if you don’t know your cabinet color
- If you painted your cabinets yourself, check the paint can for the color name and brand.
- If the cabinets came with the house or were painted by someone else: Remove a cabinet door and take it to a paint store for color matching
- If you can find out the cabinet manufacturer, and contact them to find out the color name.
- Use a paint color matching app (like ColorSnap by Sherwin Williams)
- Check if there’s a sticker inside a cabinet with finish information.
Once you have the paint brand and color name, follow the steps above to convert it to HEX or Pantone codes for vinyl printing.
Why dishwashers should match your cabinets (unlike stoves)
This post may contain affiliate links from which I will earn a commission at no extra cost to you. View my full disclosure policy.
Here’s the thing about kitchen design: Stoves can be beautiful statement pieces. That’s why high-end brands like Café, Viking, and BlueStar offer ranges in bold colors like burgundy, navy, and forest green. Those colored stoves are meant to be focal points.
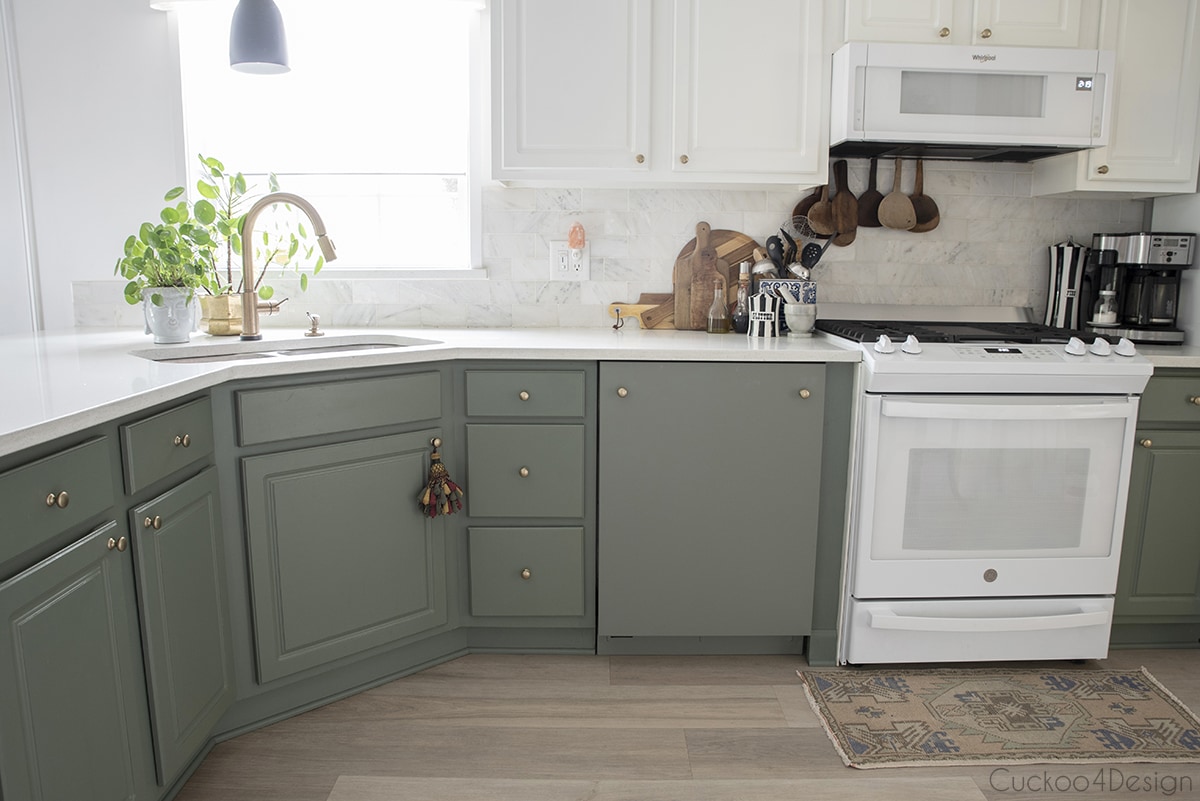
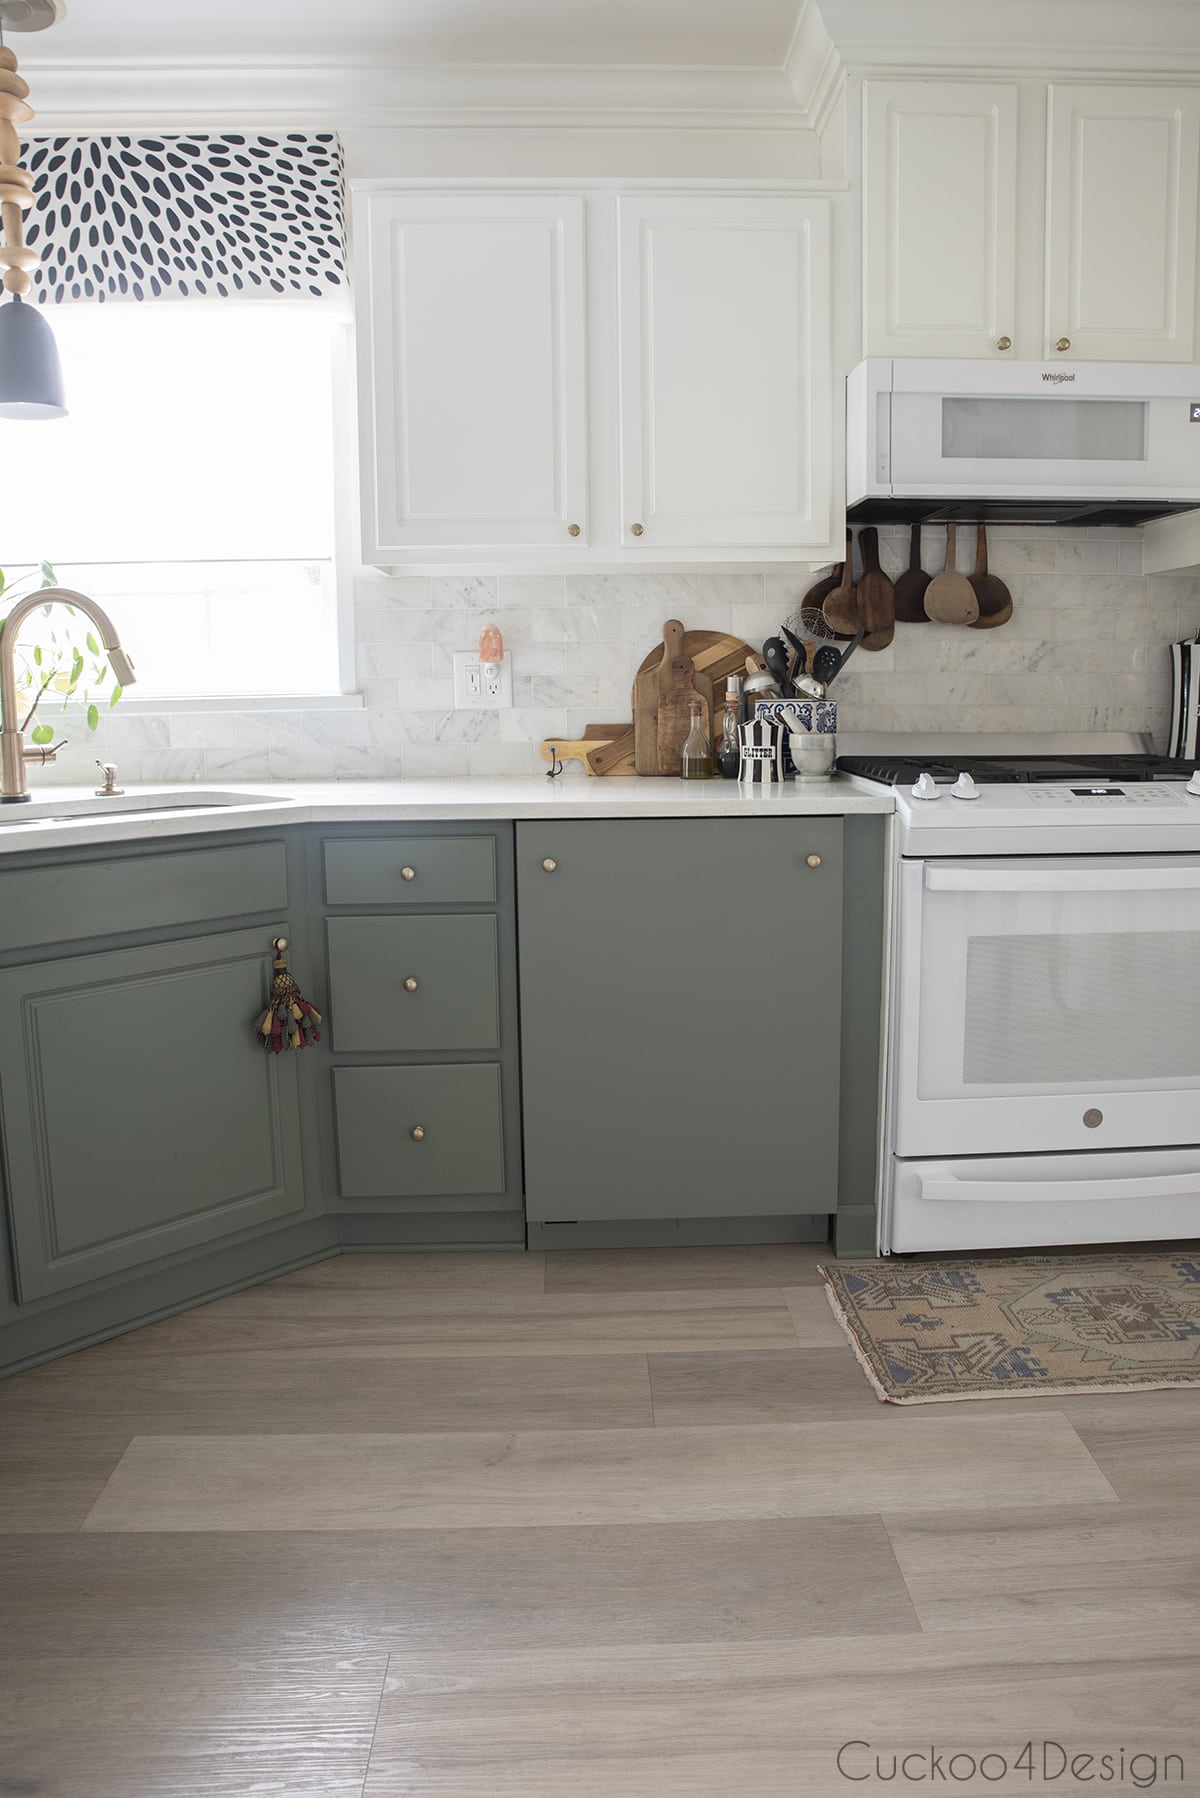
But dishwashers? They’re different. A brightly colored dishwasher doesn’t read as “designer choice” – it reads as “mismatched appliance.” That’s why cabinet-front dishwashers are so popular and expensive. They hide the dishwasher completely within the cabinetry. Since our dishwasher didn’t have the option for a cabinet front, I needed it to blend in perfectly with our green cabinets. This is why the color-matching process was so crucial.
How to apply appliance wrap
Now that you matched the vinyl to your cabinet color and had it printed somewhere, it’s time to apply it to your appliances, which, in my case, was my dishwasher.
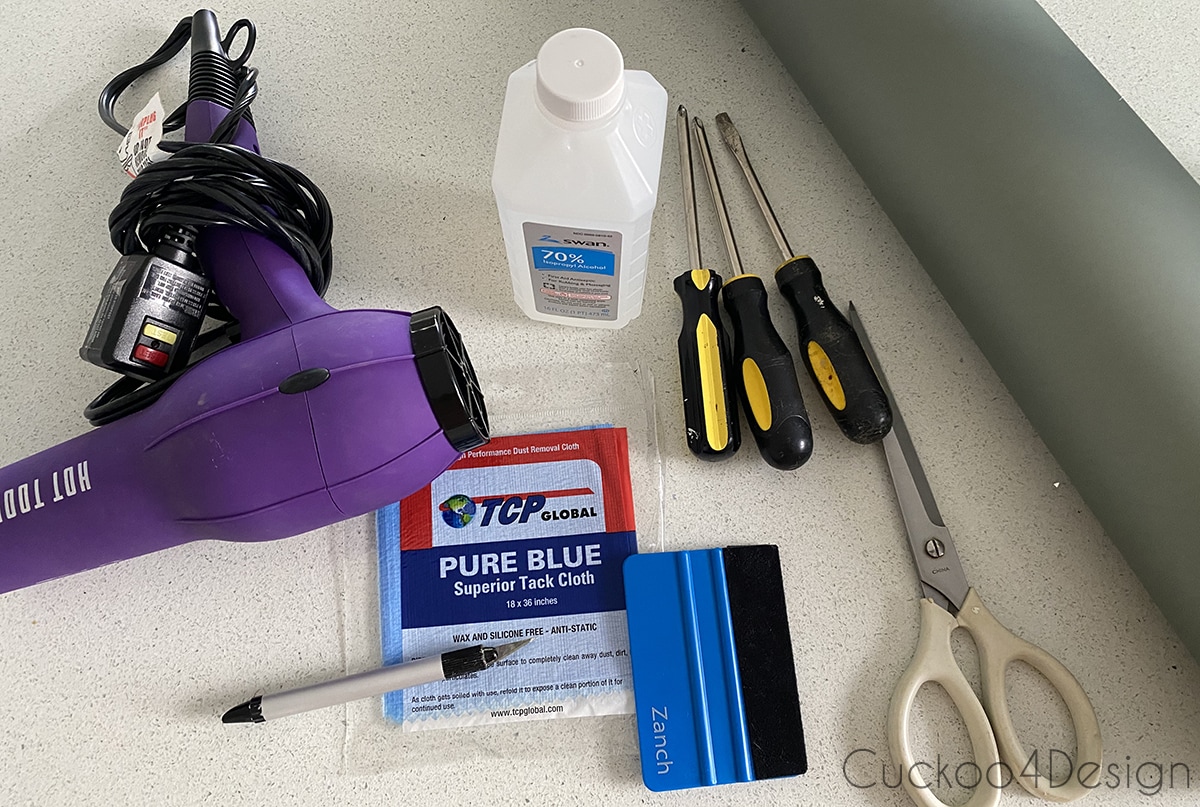
Materials needed
- sheet of car vinyl wrap (there are many colors readily available, the brand I received from the shop is Arlon)
- sharp crafting knife
- 70% alcohol and lint-free wipes
- professional-grade tack clothes
- lint-free gloves (optional because I’ve seen folks on YouTube apply wraps to cars without them)
- felt squeegee tool for vinyl applications, if you are doing something more intricate than a flat-paneled dishwasher, then you will need more different tools to get into the crevices.
- screwdrivers
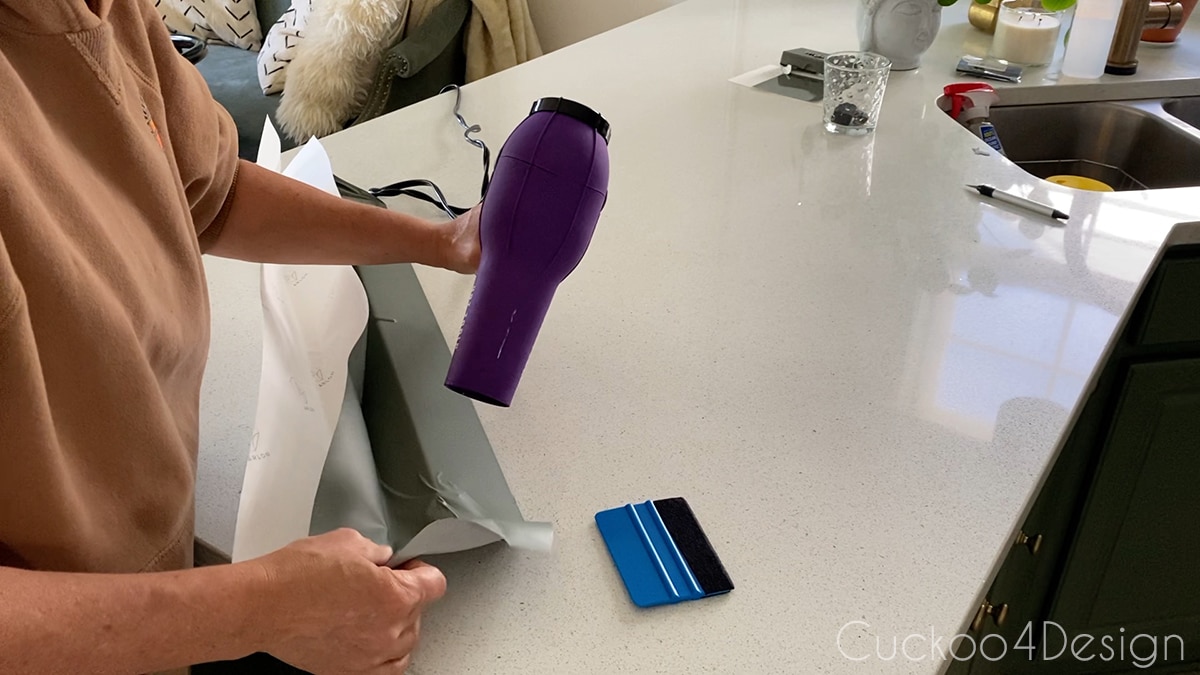
- a blow dryer or heat gun
- appliance owners manuals
Video tutorial
This is definitely where you should watch my video. It took me about 3 hours to finish the dishwasher. That includes taking the dishwasher door off, cleaning everything, adding the vinyl, and putting the dishwasher back together. Cutting that video down to a watchable video was the hard part. Nobody wants to watch a 3-hour video.
Use the triangle on the image to turn on the video. As always, if you are on a mobile device, please hold it horizontally for easier viewing, and if it doesn’t work here on my blog, then you can head on over to my YouTube channel to watch it.
Step-by-step car vinyl dishwasher application instructions
Before I started, I watched a lot of YouTube videos. CK Wraps has been my favorite channel. He is a very good teacher and makes me want to wrap a car. Not kidding! I even asked my husband if he’d let me try to wrap his motorcycle. LOL! He said “no”! Not sure why because it would be such a fun change and is completely removable while even protecting the original paint job. Wrapping a motorcycle is next-level hard though 😉 Wrapping a flat dishwasher is pretty easy.
This project is very similar to how I covered my Ikea dresser with peel-and-stick wallpaper to turn it into a piece of grasscloth furniture. The only difference is that you need a heat source like a blow dryer or heat gun to activate the adhesive so you can mold and stretch the vinyl. I just used my blow dryer on the highest setting.
The cool part about this vinyl is that it is stretchable and moldable when warmed up. You can keep reheating it and redoing sections. If you pull it off when it is cold and hold the heat source to it, it pretty much snaps back into its original shape.
The heat source also kind of shrink-wraps the vinyl around the shape you are wrapping.
I ended up practicing with one of the sample pieces on a makeup box, which you can also see in my video. That helped to get a feeling for the vinyl before starting.
Step 1: Turn off the power to the dishwasher
Don’t forget to turn off the fuse switch to your appliance to turn the electricity off before removing any appliance parts.
Step 2: Remove the door panel and toe kick of your dishwasher (or other appliance)
First, I checked my owner’s manual and another YouTube video to make sure I got instructions on how to take my appliance/dishwasher apart. I removed the dishwasher door and toe kick. It was pretty easy, actually. This part is obviously different for everyone else, according to whatever appliance you have. Make sure to check out your manuals, if you don’t have one, check out the manufacturer’s website, where you usually can find manuals to download.
Step 3. Deep clean all surfaces
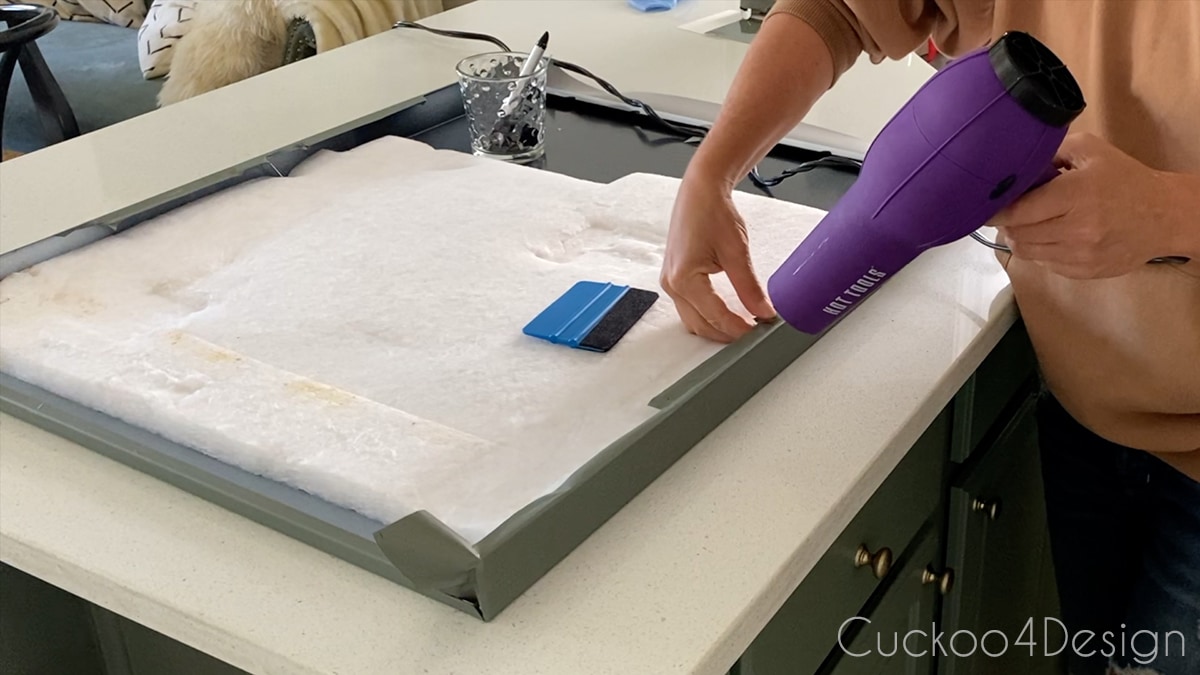
Clean the removed panels thoroughly, like painstakingly cleaning them by using rubbing alcohol on lint-free wipes. After the surface dries and you are confident that you removed all grease and dirt, follow with the tack cloths to remove any small dirt and dust specs because they will show up under the vinyl even if they are tiny.
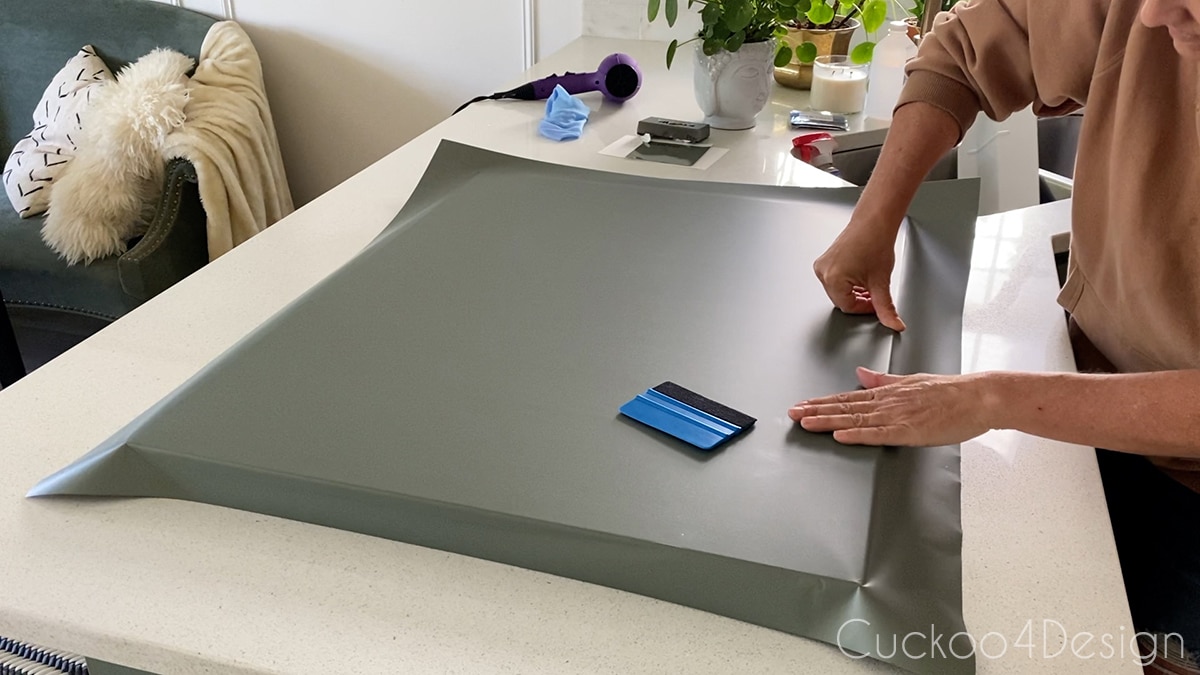
The actual vinyl application is best watched and documented in the video to see how I smoothed out the vinyl with the felt squeegee and my clean hands.
Step 4: Measure and cut your vinyl (with buffer)
I cut a small piece for the toe kick and then had the larger piece for the dishwasher door. I left a lot of overhang to make sure I had enough.
Step 5: Position and start the first edge
I started on one side of the dishwasher panel that wasn’t as visible as the left and right sides. Peel the backing off and position the vinyl on the side where you are starting.
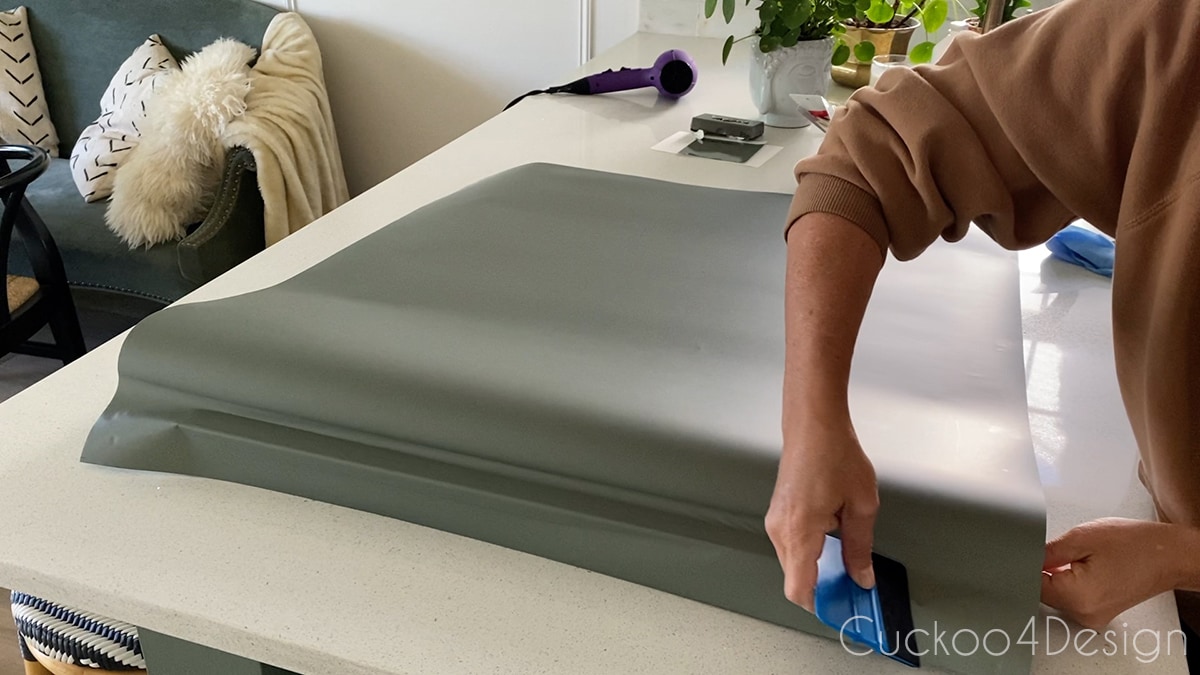
Step 6: Apply heat and smooth with a squeegee
I used the felt squeegee to remove all wrinkles and bubbles while pulling the backing off from behind.
For some parts, I used my clean hands (wearing fine gloves is even better) to smooth everything, which you can see above on the edges of the front panel.
Heat is required to activate the adhesive and to make the vinyl stretchable and moldable. You can pull it off again and again. When you add heat to it again, it pretty much snaps back into its original shape. Be careful not to overstretch the vinyl, though.
Step 7: Work around curves and edges
Wrap the vinyl around the edges, almost like wrapping a present.
The toe kick was a bit trickier because there are uneven parts, but it was definitely doable. Plus it’s not all that visible either.
Step 8: Trim excess vinyl
Once all vinyl is applied and smoothed, use a sharp utility knife to trim the excess vinyl along edges on the back.
Step 9: Final heat pass
Make sure you go over the entire front panel with heat again to make sure the adhesive is activated. Press down any edges that might have lifted and pay special attention to corners and edges
Step 10: Reassemble everything
Attach everything back onto the appliance. I ended up breaking one of the handle screws that were attached with LockTite, so I used cabinet knobs to replace the handle for now. I am contemplating making a custom handlebar for the dishwasher and stove yet.
To make the toe kick screws blend in with the colored vinyl, I used a bit of metal primer to prime the screws and then some of my cabinet paint to cover the screws and make them blend in with the color.
Troubleshooting common appliance wrap issues
Here are the most common appliance wrap problems and how to fix them.
- Wrinkles or/and bubbles in the applied vinyl: Redo the area again by carefully lifting and peeling the vinyl back. Reheat it again with the blow dryer and then try to reapply the vinyl while pushing out all the bubbles with your squeegee and gloved hands.
- Vinyl won’t stick in corners: This could happen if you didn’t use enough heat or if the corner isn’t clean. Peel the corner back, clean it again with more alcohol, wait for it to dry, and then re-stretch it over the corner with enough heat.
- Overheated/melted vinyl: Unfortunately this is an issue that can’t be fixed and why I used a blow dryer versus a heat gun because the blow dryer doesn’t get as hot.
Don’t rush! The beauty of vinyl is that it’s forgiving. Take breaks, reheat sections, and work carefully.
Finished look of the colored dishwasher
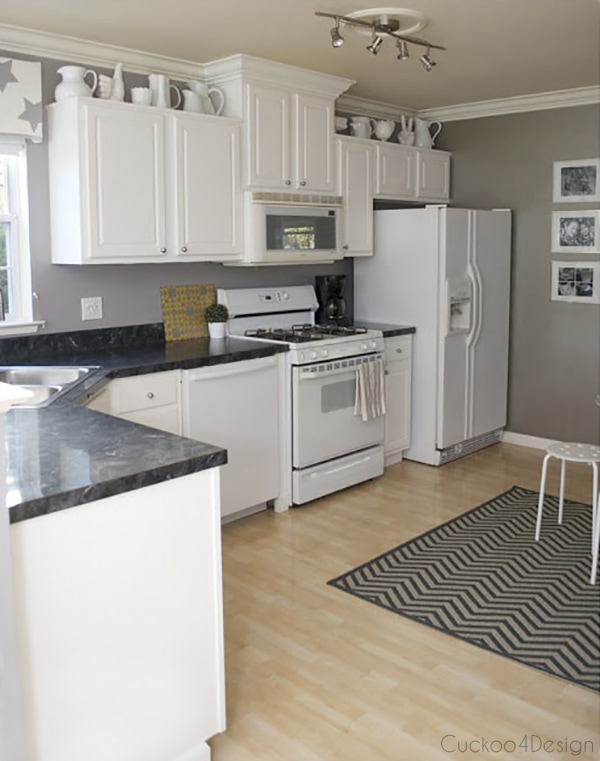
Here is a photo before and it’s definitely not bad either. The fact is that the family had scratched it all up since that photo and it had seen better days.
The finished result shows how effectively vinyl wrap can change an appliance’s color to match any design.
And here is a crapy cellphone before photo where you can slightly see some of the scratches:

And here is a really old photo of our kitchen to show you how much has changed. I’d still like to have all the cabinets go up to the ceiling at some point:
RELATED: I also recently wrote a blog post about updating a kitchen without replacing the cabinets. I’m sure you can find an idea to use for your kitchen remodel.
For those of you wondering if I am planning on still getting a different handle instead of the knobs… Yes, yes I am but the search for what has been taking longer than I thought.
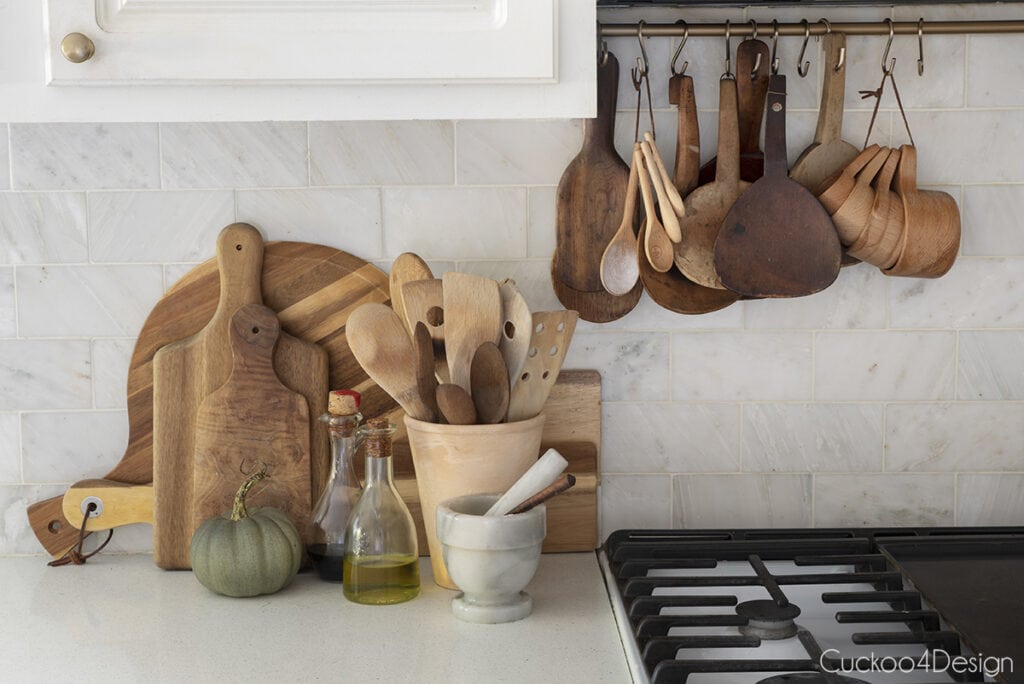
I also recently added a DIY kitchen utensil rack above the stove. It adds another unique touch to our kitchen that was once builder-grade.
And, I am now obviously side-eyeing that stove too. My mom already said, “you can’t leave that like this!” The question is what parts get covered and which ones don’t because there is also so much glass in the center. If I do cover the stove too then I also need matching handles for the dishwasher and stove and then… ugh the fridge might look strange too. Yup, that’s called a domino effect and is usually what happens.
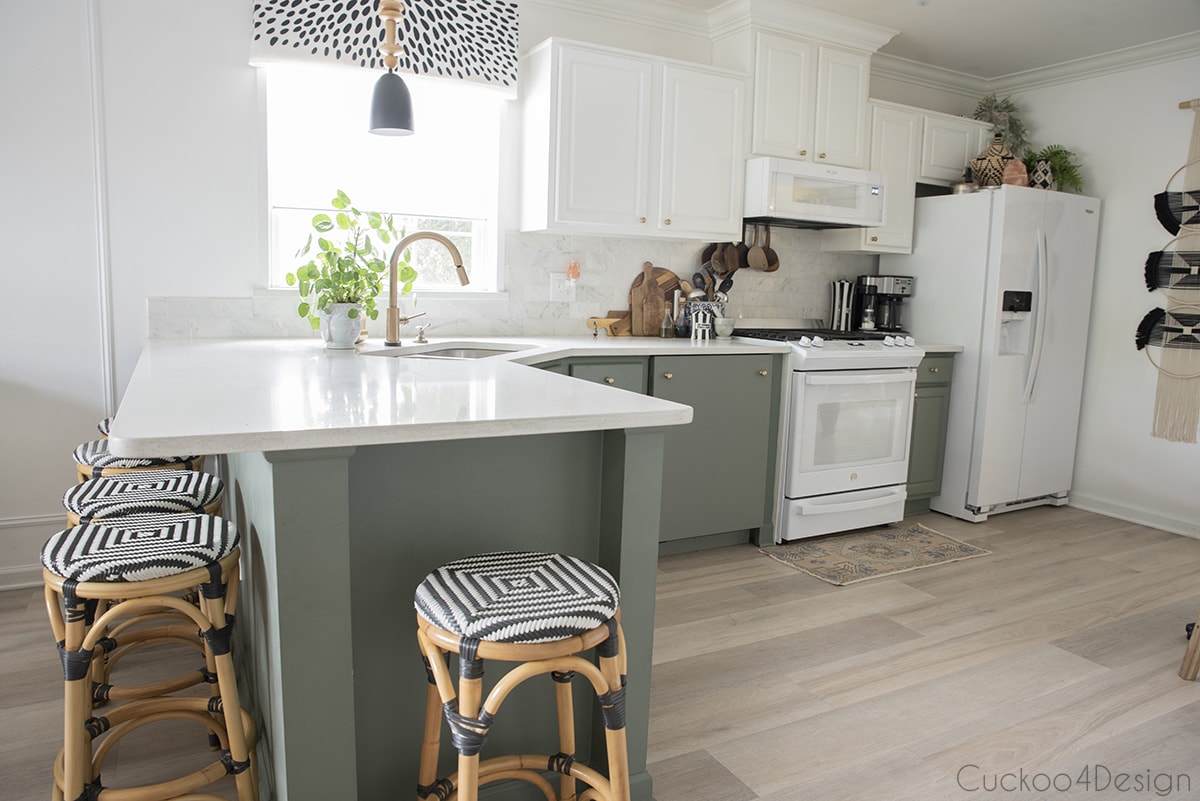
You might also like reading about how I cut down the half-wall kitchen counter to create a kitchen island.
I recently wrote a tutorial about how to make a sink skirt without sewing. It changed the look of the kitchen again. I know this look isn’t for everyone but I like the change for now.

If green kitchen cabinets aren’t your cup of tea then check out my best friend’s gray and white kitchen blog post where I’m also showing her kitchen island pendant lighting ideas.
FAQs about changing appliance colors with vinyl wrap
Yes! This method works on dishwashers, stoves, refrigerators, washers, dryers, microwaves, and even crockpots. Any appliance with a smooth surface. The technique I’m showing in this tutorial is the same for all appliances.
Only if you want them to match your cabinet color. Stoves and refrigerators can be accent colors, and there are many colors readily available online already. Simply buy pre-colored vinyl in whatever shade you want. Dishwashers typically look best when they match cabinetry.
I ended up practicing with one of the sample pieces on a makeup box instead of starting with an appliance. That helped to get a feeling for the vinyl before starting with an appliance.
My dishwasher was the perfect first appliance to try this on.
Yes! Car vinyl wrap is designed to withstand heat from car engines and hot summer days. Appliances don’t get nearly as hot on the exterior as a car does. I’ve had mine for 5 years without any issues. Just don’t wrap surfaces with direct heat like the inside of an oven, stovetop, or the inside of a microwave.
Most car vinyls state that they last about 5-7 years, depending on the outdoor environment. Since appliances don’t have to withstand any harsh weather or things flying at a moving car, it will last much longer indoors if you clean the vinyl gently. As I mentioned earlier, mine still looks perfect after 5 years. I simply clean mine with windex and that’s it. Don’t use scrubbing sponges or harsh cleaning chemicals!
Yes, that’s one of the biggest advantages! Heat the vinyl with a hair dryer and peel it off slowly. It won’t damage the original finish, making it warranty-safe and renter-friendly.
Since it’s completely removable and doesn’t alter the appliance mechanically, it shouldn’t void your warranty. You can remove it before any service calls!
Vinyl wrap needs smooth surfaces to adhere properly. If your appliance has a heavy texture, this method won’t work well.
Absolutely! The process is the same. Just make sure to clean it extremely well with alcohol to remove any oils or fingerprints.
See the pro tip in the color-matching section above! You can take a cabinet door to a paint store, use a color-matching app, or contact the cabinet manufacturer.
HEX and RGB are interchangeable digital formats and can be converted between one another using a variety of online color converters. Pantone colors, on the other hand, are based on physical ink recipes, which makes converting a digital HEX or RGB color to a Pantone equivalent (or vice versa) less accurate. Most of the time, you have to choose the closest swatch that isn’t an exact match.
This tutorial shows you how to convert between them using free online tools.
Yes! This vinyl wrap method works on multiple appliances. Here’s what you should know:
Refrigerators: Fridges work beautifully with this method – they have large, flat surfaces that are easy to wrap. Like stoves, you can choose to match cabinets OR make them a statement piece.
Washing Machines/Dryers: Great candidates for wrapping, especially front-loaders. Match them to your laundry room cabinets or choose a fun accent color.
Microwaves: Similar process to dishwashers. Most look best when they blend in.
Stoves/Ranges: Unlike dishwashers, which should blend in, stoves can be statement pieces in bold accent colors, or they can match your cabinets for a cohesive look. I wrapped my stove using this tutorial, but I also added custom wooden DIY wooden drawer pulls to create a high-end designer range look. Check out the full DIY stove makeover transformation with before/after photos and stove-specific challenges like dealing with the glass door.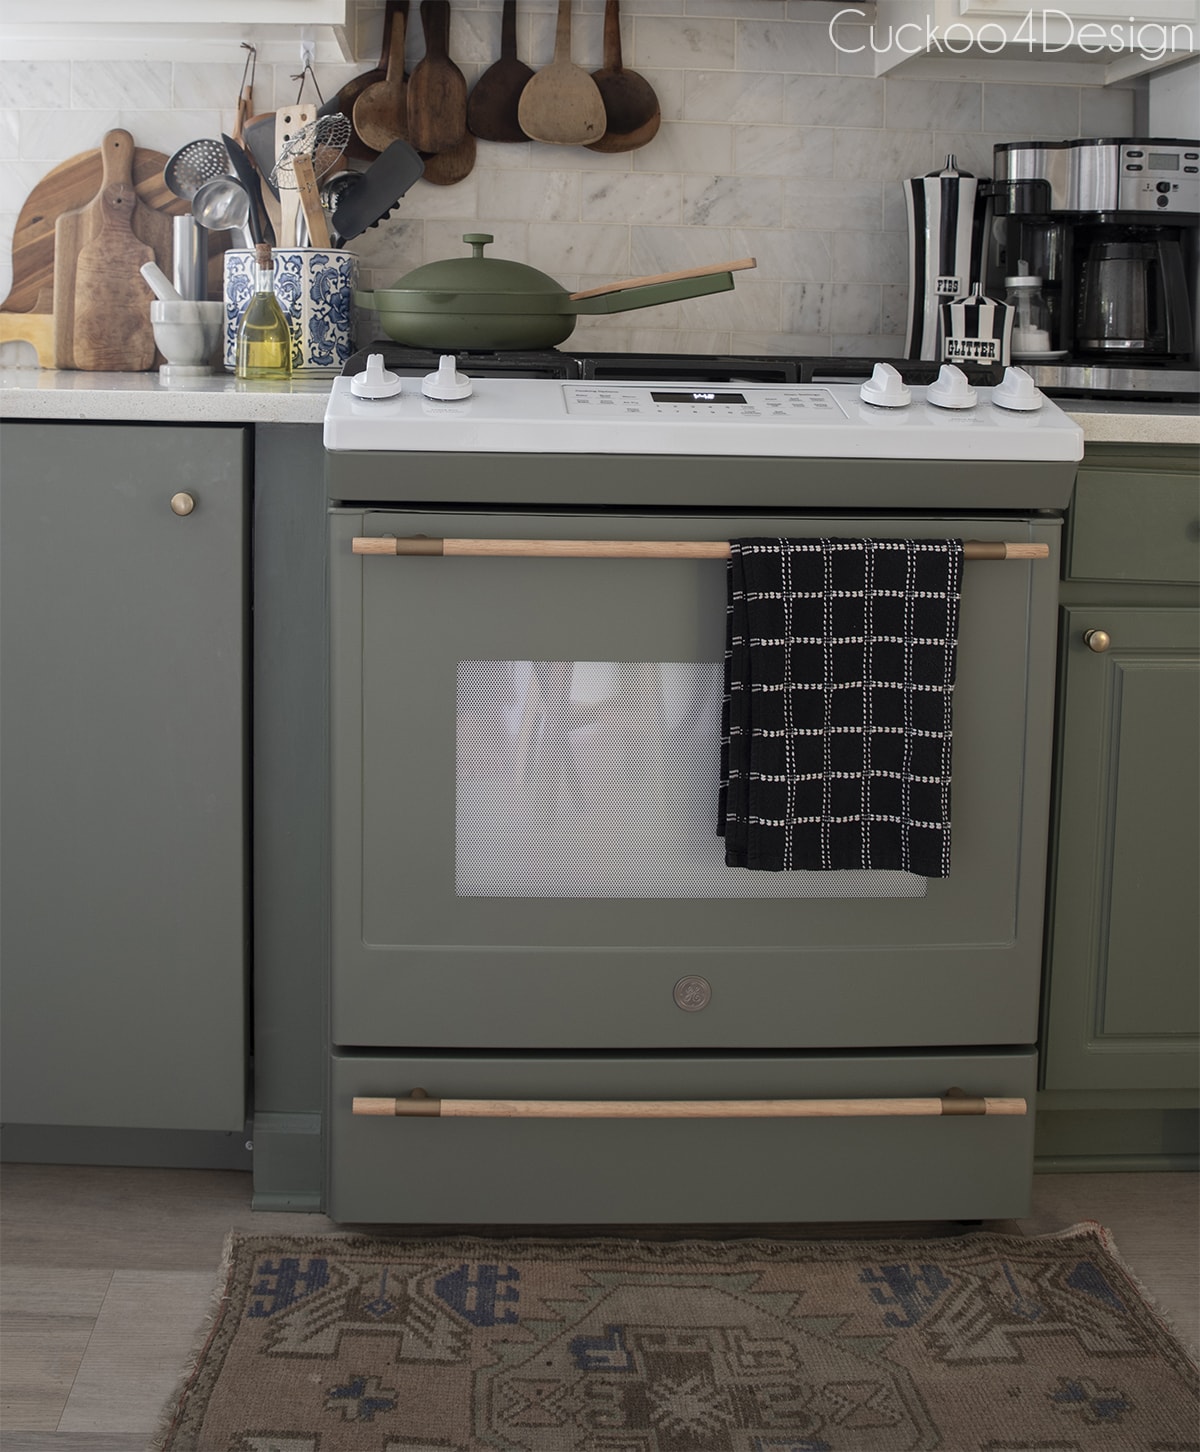
With the leftover vinyl pieces, I’m showing you how to disguise a crockpot and make it blend in with your kitchen as well. Such a great use for small scrap pieces of car vinyl.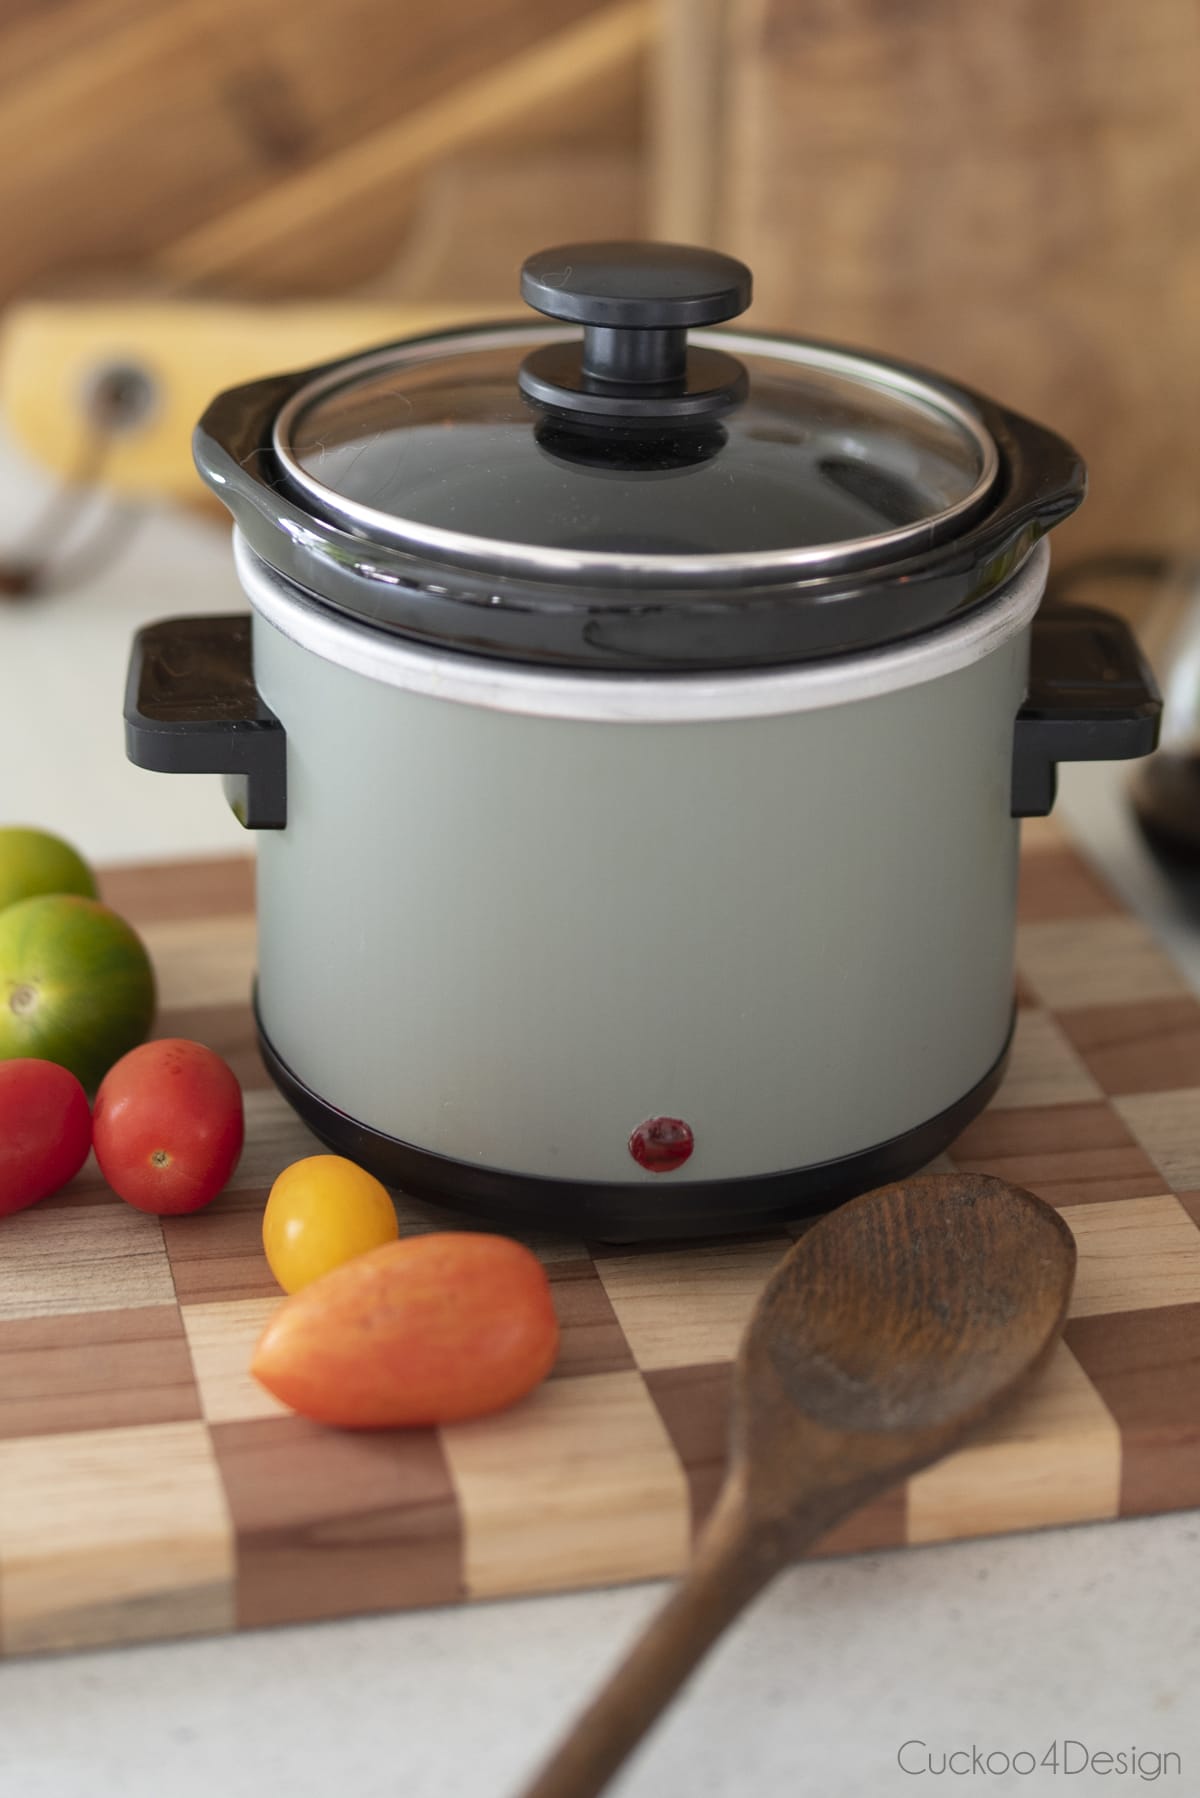
So what do you think? Do you love it as much as I do?
Like I said I really want to do something to my stove yet too to make it look custom. I always loved the look of Cafe Appliances but not the price. I also wanted to have the bottom drawer for extra storage which we can always use in our small home. Cafe stoves don’t have that drawer and have pretty legs instead.
Tschüß,

Amaze balls! That makes a huge difference! Good job!
Thank you Kristi, I think it makes a big difference too and changes the look of the kitchen.
Such a timely post for me. I have an all white kitchen and hate my size by side fridge. I’m looking at a top French door with bottom freezer and most everything out is stainless which would so with my kitchen. Do you know how this works on stainless?
Thanks again! ❤️
Hi Cassie, it should work the same way n stainless steel as well. Good luck!
That’s pretty amazing! It’s a perfect match to the cabinets, and you did an outstanding job applying the wrap.
Well thank you so much!
Amazing Julia! Looks so good !!!!
Thanks Stephanie!
Just amazing, looks so great, you did an excellent job. What a difference
Thanks so much Susie, I’m glad you like it!
You are totally the Bomb!
Haha, thanks Carol!
Wow! Who knew?! I actually like the knobs on the dishwasher too. So creative,
I actually do too. Maybe even just make handles for the stove, to make it look more custom
Julia this looks a-freakin’mazing my friend…. You figured out a way to blend this piece in with the cabinetry seamlessly!
🙂
Hi Meryl, thanks so much! I will figure out what to do with the stove too.
This looks incredible, Julia! Love the color and I am just so impressed with this idea!
Looks amazing.
Regarding the stove, since the “glue” is heat activated, that could be a problem when the stove gets very hot.
Will it bubble or discolor? You might test a small piece of the wrap to see how it does with ‘spatters’ of oil, food, or grease baked on.
I tested a potential white stone counter by leaving drops of oil, tomato sauce, and water for a day, and then for a week. I found the counter sample had water marks and stained badly. I was glad I discovered it before making a very expensive mistake. Good luck!!
Hi Jackie, nope it doesn’t cause any issues because cars get very hot as well. The vinyl is made just for that. Also, a car gets very dirty on the road so I think a stove and dishwasher is pretty similar when it comes to dirt and grease.
I so admire a DIY genius and you are one! As a military wife I was always trying to make a silk purse out of a sow’s ear. I needed your inspiration.
The dishwasher looks professional.
Wow thanks, Rebecca for the nice compliment!
Wow, before your article, I never even thought that car vinyl can be applied to such surfaces as a household appliance. This is genius! When my wife said that we need to do something with our technique, as it spoils the appearance of the kitchen and accentuates the attention, I immediately started looking for paint. But on one of the forums, I saw a link to your article, although I would never have thought of that. Your article tells in sufficient detail what exactly needs to be done and how to choose the shade that we need. I also like the fact that if something happens, we can always change the appearance of our technique back.
Hello,
I love your marble backsplash but I’ve been hesitant to install that because I was worried about it getting stained with red wine, tomato sauce, etc. Did you seal yours with something that makes it easy to clean? If so, what did you use?
thank you!
Hi Mary, I wrote a blog post about our backsplash with all the details https://cuckoo4design.com/backsplash-behind-scene/ and we’ve had it for years now without any issues. Hope that helps.
What was the cost for your vinyl all in all?? And how much vinyl did you get?! I just painted my cabinets this color and REALLY want to do this with the vinyl on my outdated appliances…including the fridge. ?
Hi Claire, I didn’t include the cost because this depends on the shop where you buy the vinyl from. It depends on what vinyl brand they use and how much they would charge you to print the color. For example, my oven door was $164 for the dishwasher and $197 for the stove. And I didn’t include the measurements because every appliance is different and you’d have to measure yours. I hope that helps.
Can you tell us where you ordered the brackets for the new handle on your stove? I’ve been wanting to do something similar and don’t like the handle on my stove. Do you find the diameter of the wooden rod is thick enough?
Hi Julie, sorry that I’m seeing your question late. Here is my blog post about the handles with all the details https://cuckoo4design.com/stylish-high-quality-diy-wooden-drawer-pulls/
Julia,
Wow, you are so talented and the lush sage on your lower cabinets is just beautiful. Both the dishwasher and stove look perfect! With the two-tone color scheme and your fabulous backsplash, your kitchen has such a fresh and welcoming vibe. Kudos to you!
I too am planning to wrap a spare fridge and a washer/dryer in my laundry room to match my indigo cabinets. You give me confidence to do it and how to go about doing it. I will check out your other posts too. Thank you!
Thanks Olga! Good luck with your project.
I love this idea! Transforming dull appliances with vinyl car wrap is such a creative solution. The colors you’ve chosen in your examples are vibrant and really bring life to the kitchen. I can’t wait to try this out on my old fridge! Thank you for the inspiration!
I absolutely love this DIY idea! Using vinyl car wrap to customize appliances is such a creative way to add personality to my kitchen. The tutorial is easy to follow, and I can’t wait to try it on my old mixer. Thanks for sharing this fabulous project!
I absolutely love this idea! Transforming appliances with vinyl car wrap is such a creative and budget-friendly way to add a splash of color to the kitchen. Can’t wait to try this on my old fridge—thanks for the inspiration!
I just received a new white refrigerator. Sadly it doesn’t match my white cabinets. We updated the entire kitchen and now the mismatch bothers me, so I’m looking for solutions. I love that you were able to color match your dishwasher and detailed how you accomplished it. I have upper cabinets in Sherwin Williams Snowbound and lowers in SW Rainwashed. I’m thinking matching the cabinet design with lower freezer in Rainwashed and upper refrigerator in Snowbound. This would tie it all together nicely. I was researching car wrap, but didn’t know how to get good color matches without a lot of trial and error. Then, I came across your tutorial. Thank so much!
Oh I’m so glad that this helped you, Dorothy! Good luck, and I’d love to see photos when you are done. That makes it all worth it to get to see it too.