

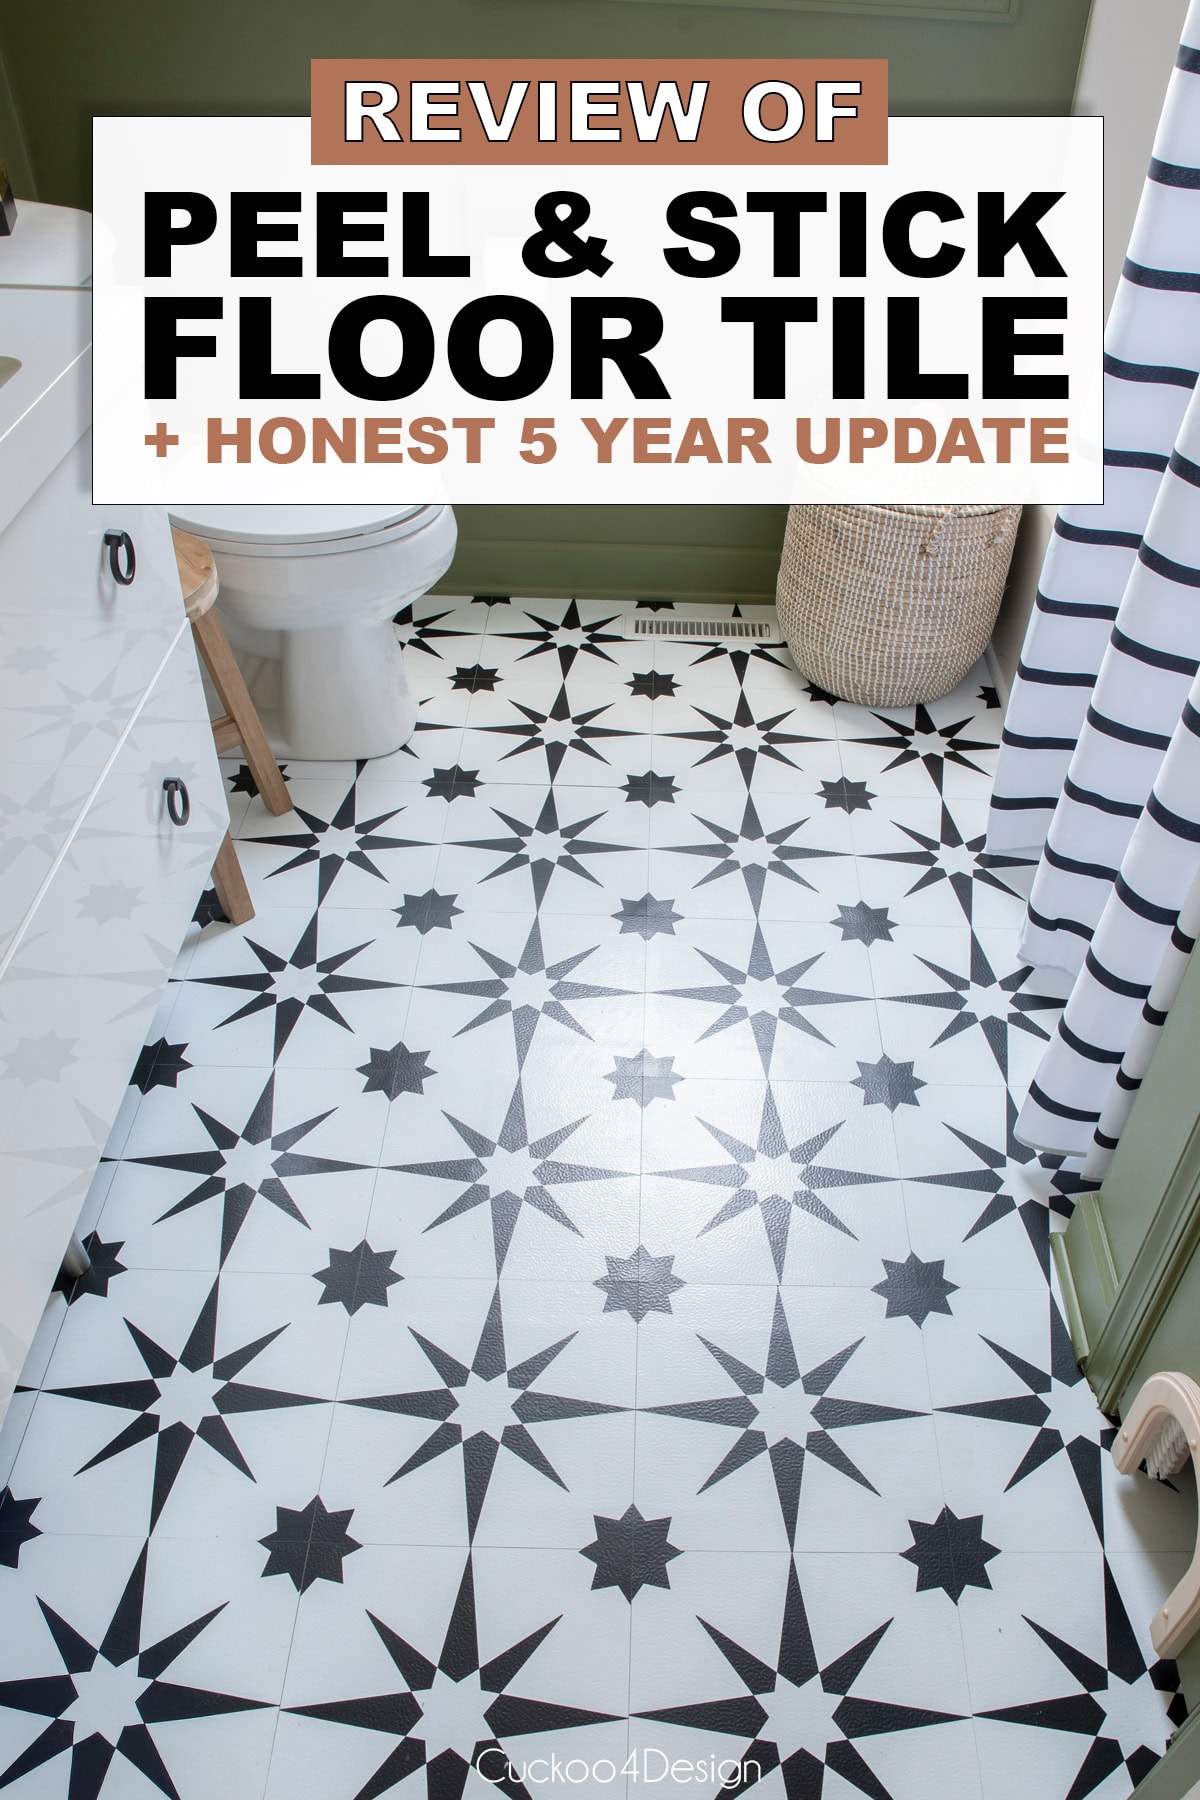
My honest review of cheap peel and stick floor tile
Last week, I shared the reveal of our budget bathroom makeover, and today I’m writing about my review of the cheap peel and stick floor tile I used for the makeover. The vinyl stick tiles make the biggest impact in this little room, and I still can’t believe that I paid under $100 for 5 boxes. I mean, I buy jackets and shoes that cost more than that. Originally, I wanted to rip everything out and make room for my dream walk-in shower, but it’s just not the right time to tackle such a project. I also know that making this makeover as cheap as possible would help others more than making this an extensive and expensive makeover.
So here it goes…
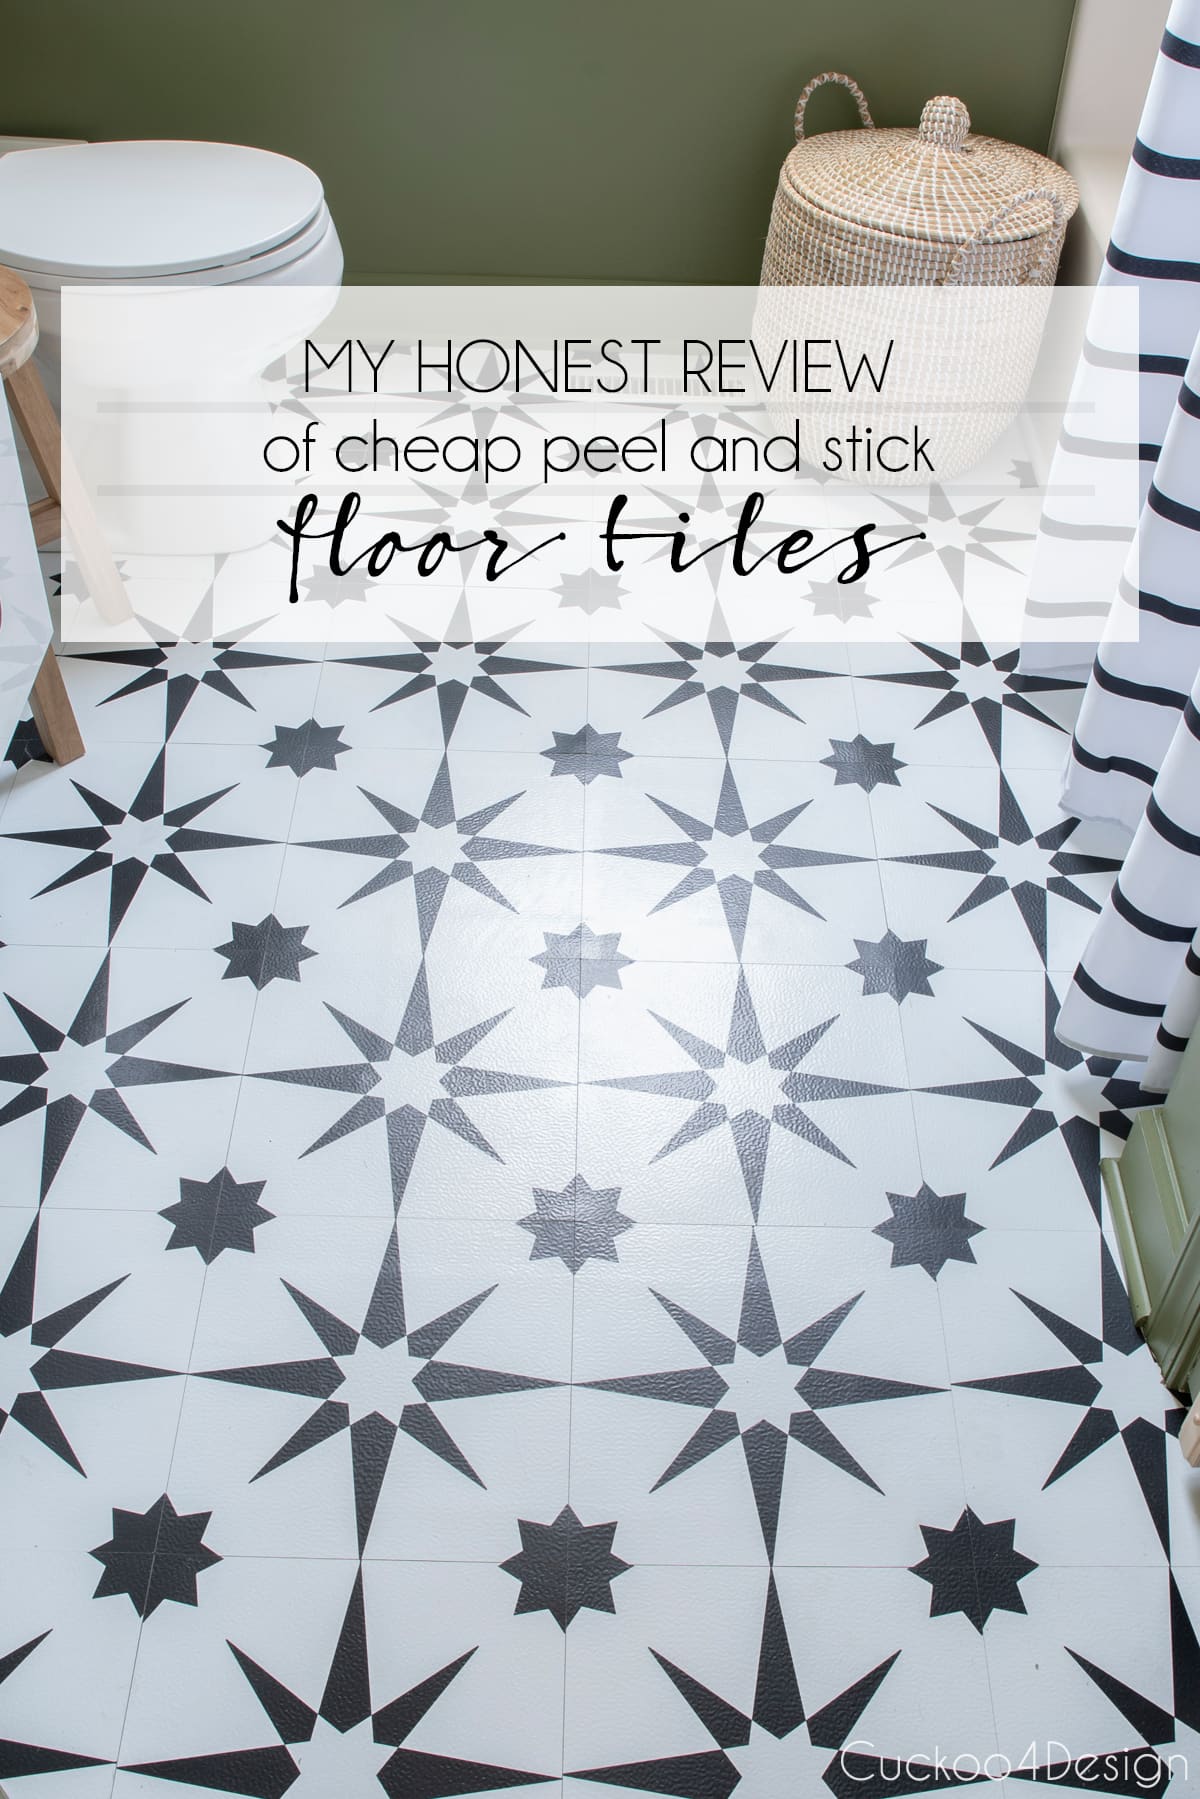
My honest review of cheap peel and stick floor tile
When I bought the cheap peel and stick tiles, I read all the reviews I could find to know what others were saying and whether I can confirm some of the pros and cons.
Some of the complaints reviewers had with these cheap peel and stick floor tiles were…
- the pattern doesn’t match up
- the tiles don’t stick well
- tiles have stains
- low quality
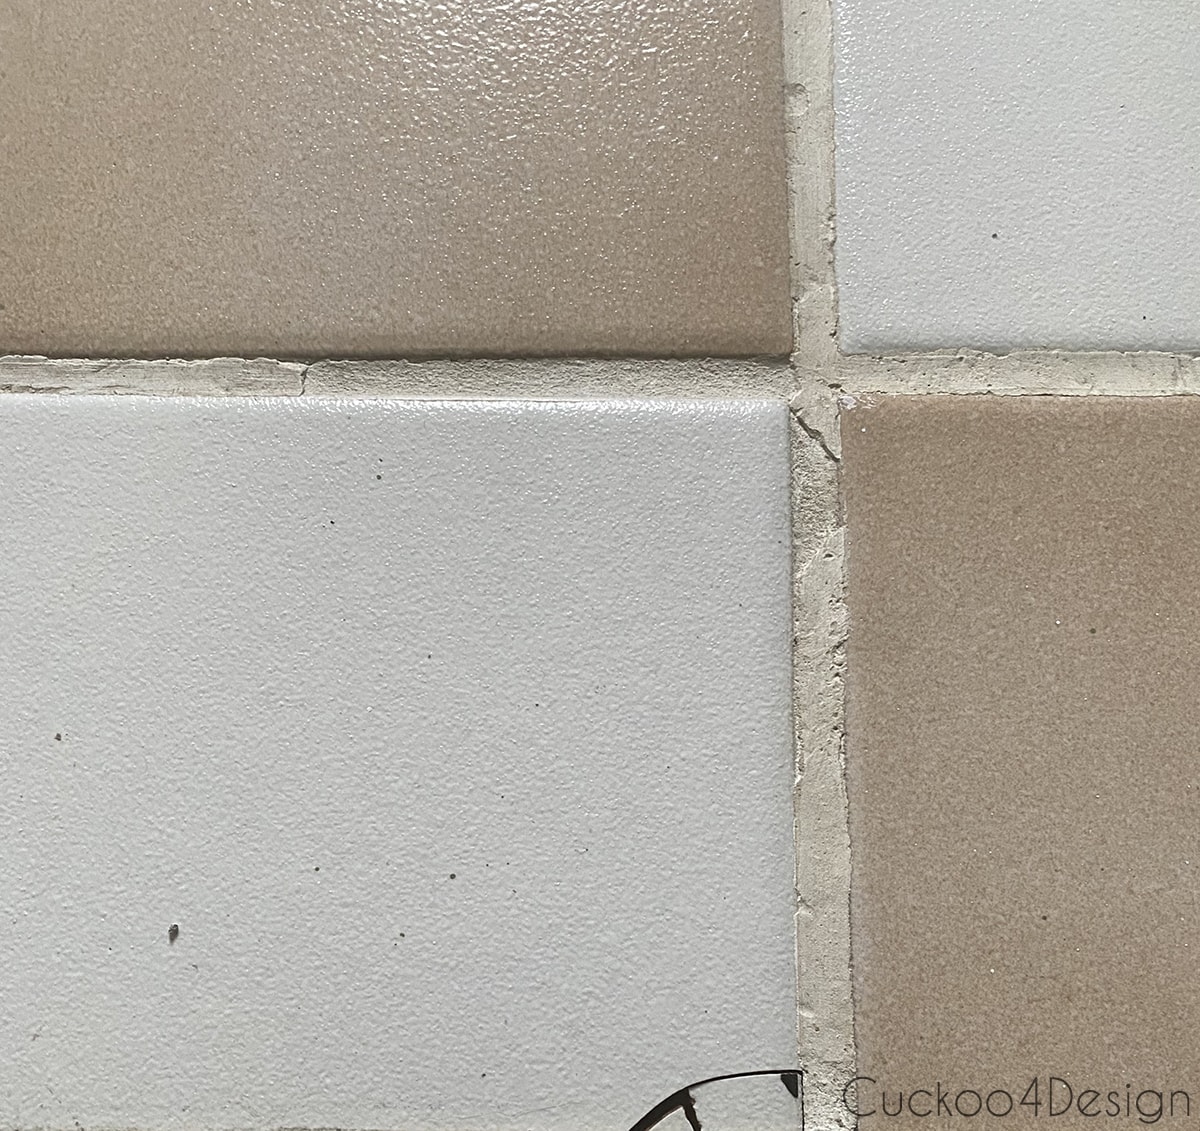
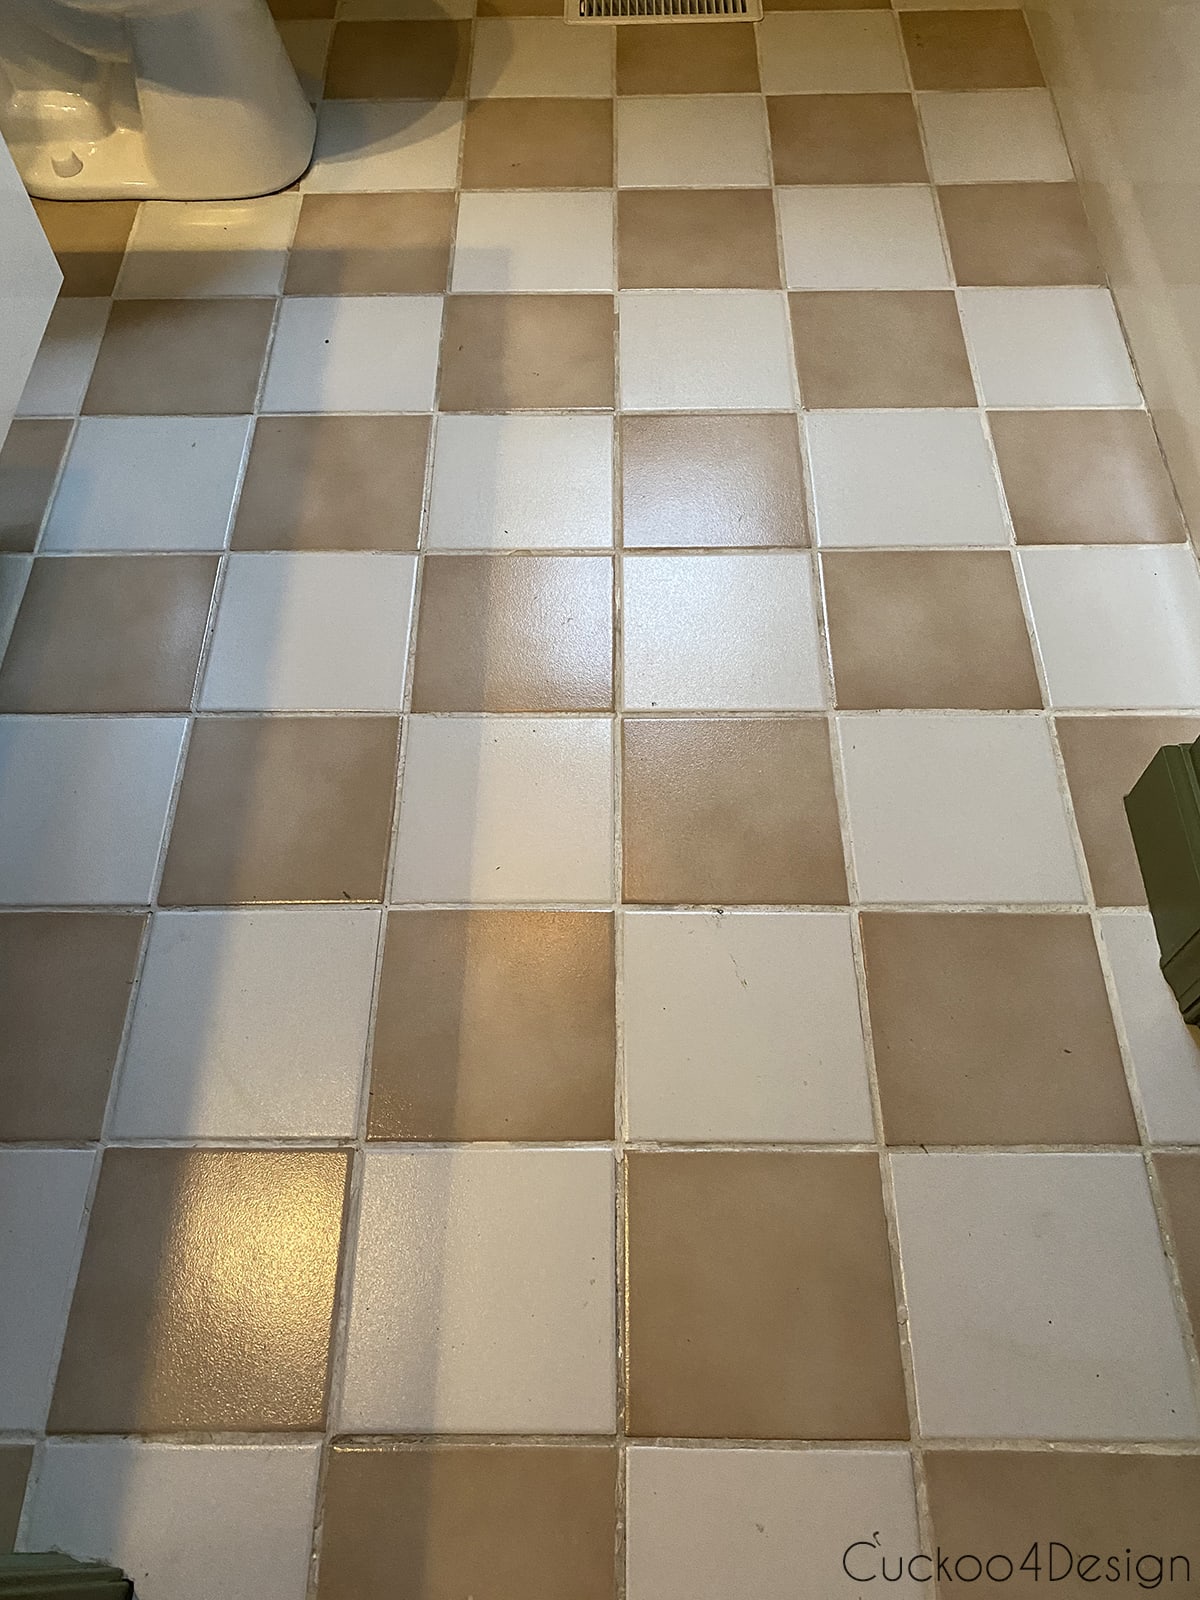
Before I get started with the review and installation though, I wanted to show you how bad the tile was looking in our bathroom. The grout was chipping, even the paint where I had tried to restore the grout was chipping. Some of the ceramic tiles were damaged and it was an overall bad look even though I still love the colors of the 20-year-old tile I originally chose.

Are you having tile issues? Also, check out my post about how to fix chipped tile that looks like wood.
So that was an overall view of the tile situation. The reason I decided not to rip it out and stick the tile to the floor underneath is that I wanted to see if you can stick them over the existing flooring. I know all of you renters want to know if this stick vinyl flooring is renter-friendly or not.
I also didn’t want to get an extra subfloor. I’m pretty sure our builder cut corners in that department because I noticed it was missing under our vanity.
When trying to determine how much square footage you have and how many boxes you need, you can use a tile square footage calculator. One package contains 10 tiles that each measure 12 x 12 inches and covers 10 square feet. Just make sure that you purchase extras for mistakes and in case you damage a tile down the road. I always find that very important.
Tools and supplies needed to install the cheap peel and stick floor tile
- ruler
- utility knife
- sharp scissors
- FloorPops FP2948 Altair Peel & Stick Floor Tile
- double-sided carpet tape (mine ended up being thicker than I wanted, make sure you find thin carpet tape. It still worked, though too)
- pencil
- painters tape
- quarter round molding for edges
- measuring tape
Make sure you give your floor a very good cleaning without any residue or dirt left on it. This part is very important and pretty much applies to all DIY projects.
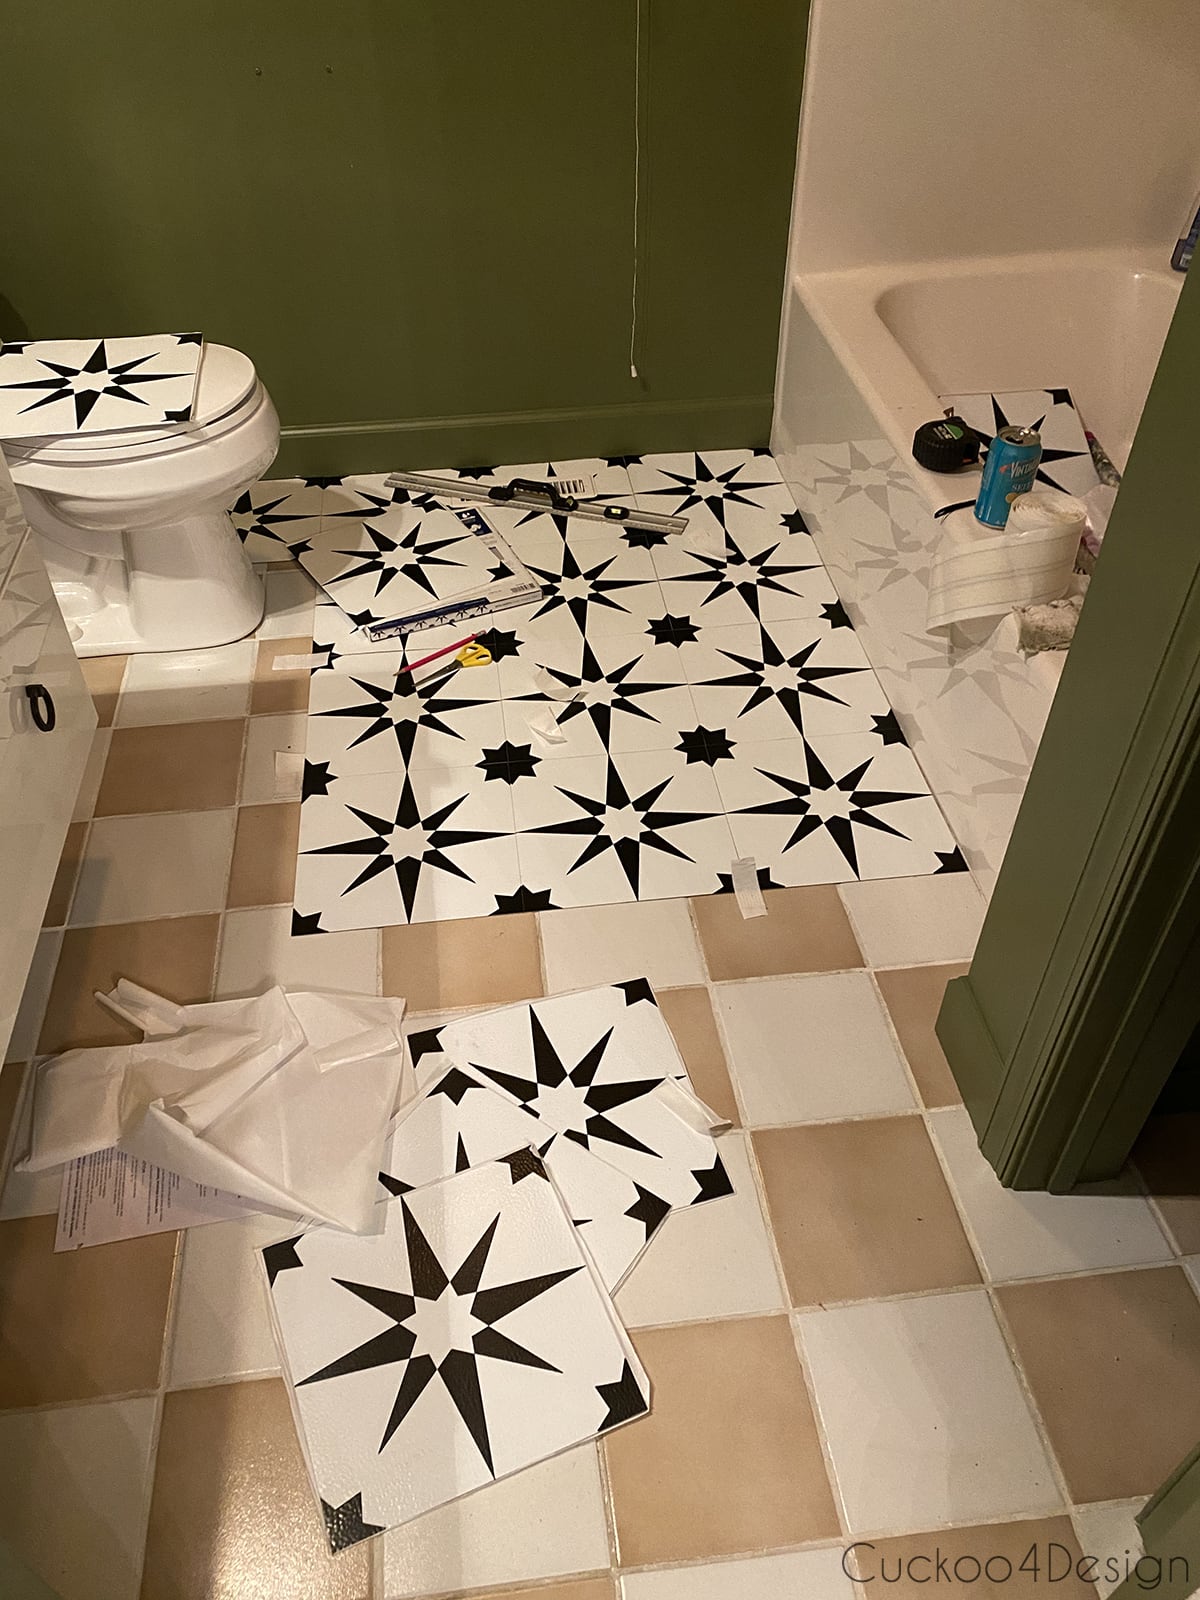
As I said, I bought 5 boxes of vinyl floor tile and before I started to apply them to the floor I laid them out as you see below to make sure how I wanted the placement to be. I wanted the tile to enter the closet with the seam in the middle because it makes cutting and fitting the odd cuts much easier.
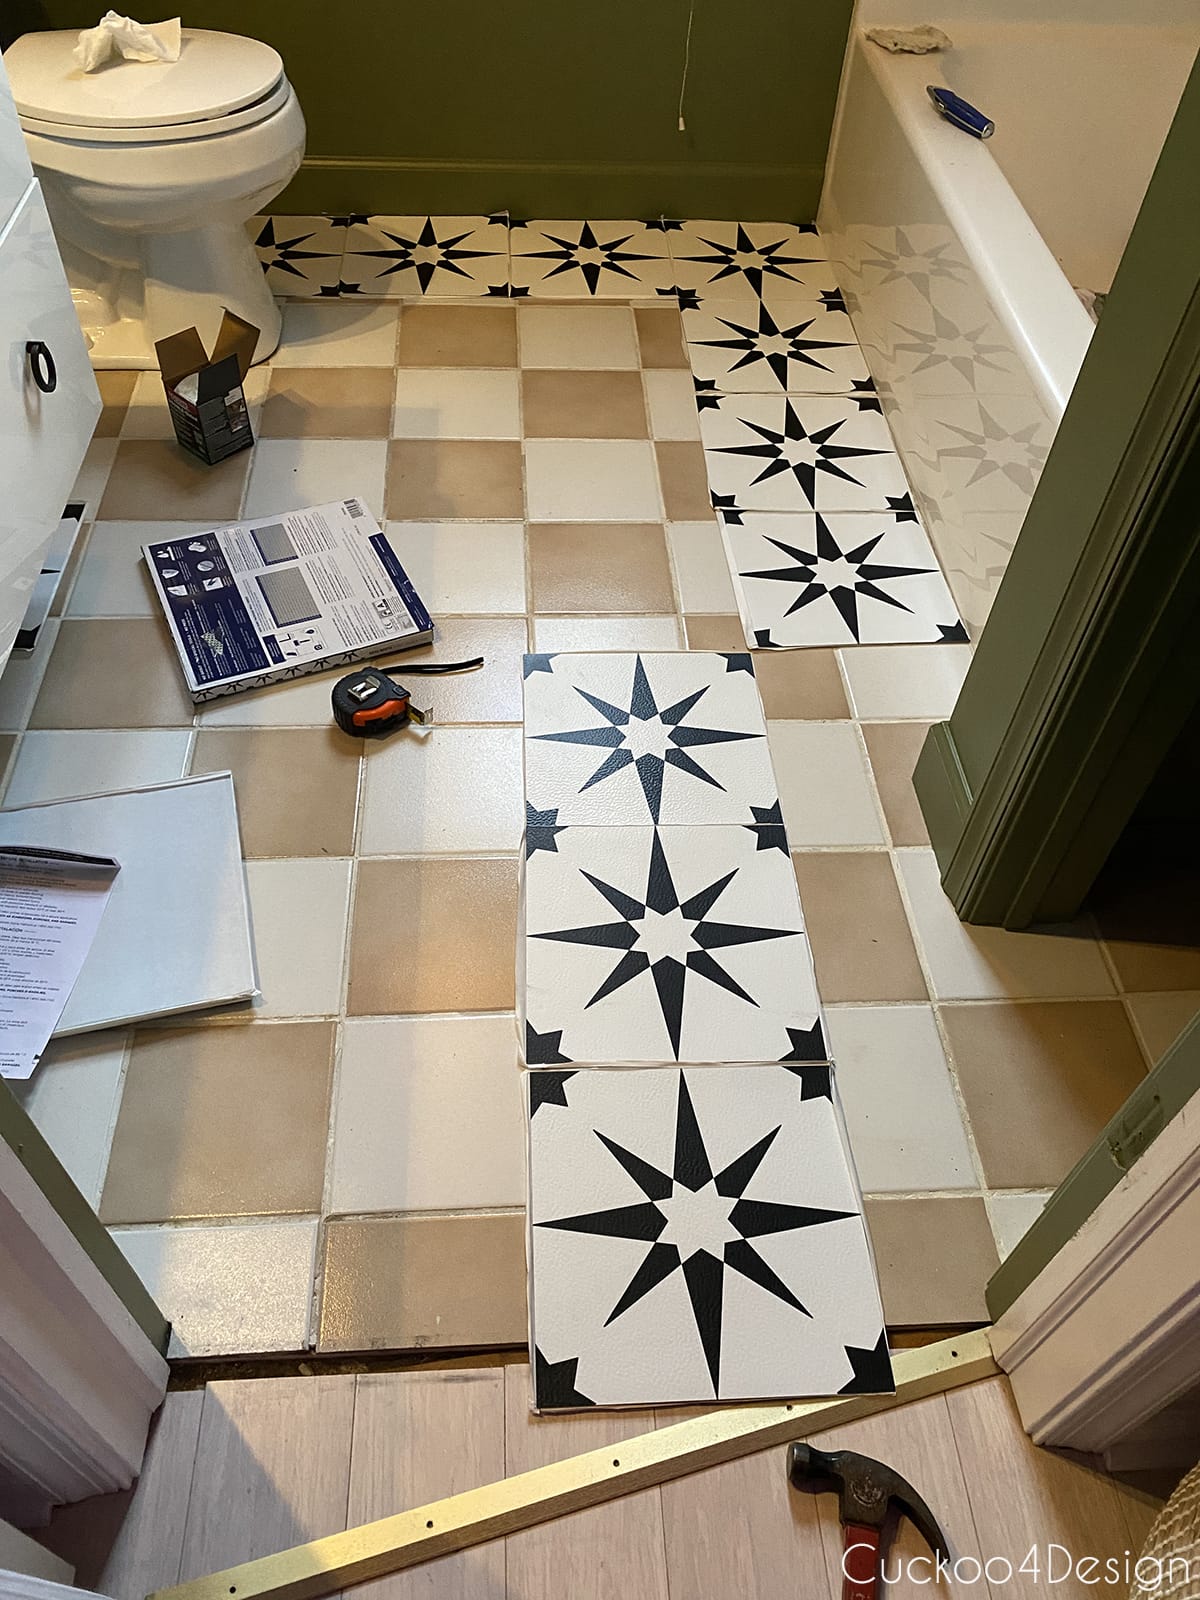
So I started in the far right corner by the tub. Don’t be discouraged that there might be a gap by the wall when you try to keep the tiles in line and square. The quarter-round molding will hide that at the end.
All you have to do to apply the tile to the floor is peel off the backing and stick them to the clean floor.

I noticed right away that the tile didn’t stick well in the corners so I made sure that I added some carpet tape squares as an extra adhesive under the corners as I went.

Below you can see what I mean.
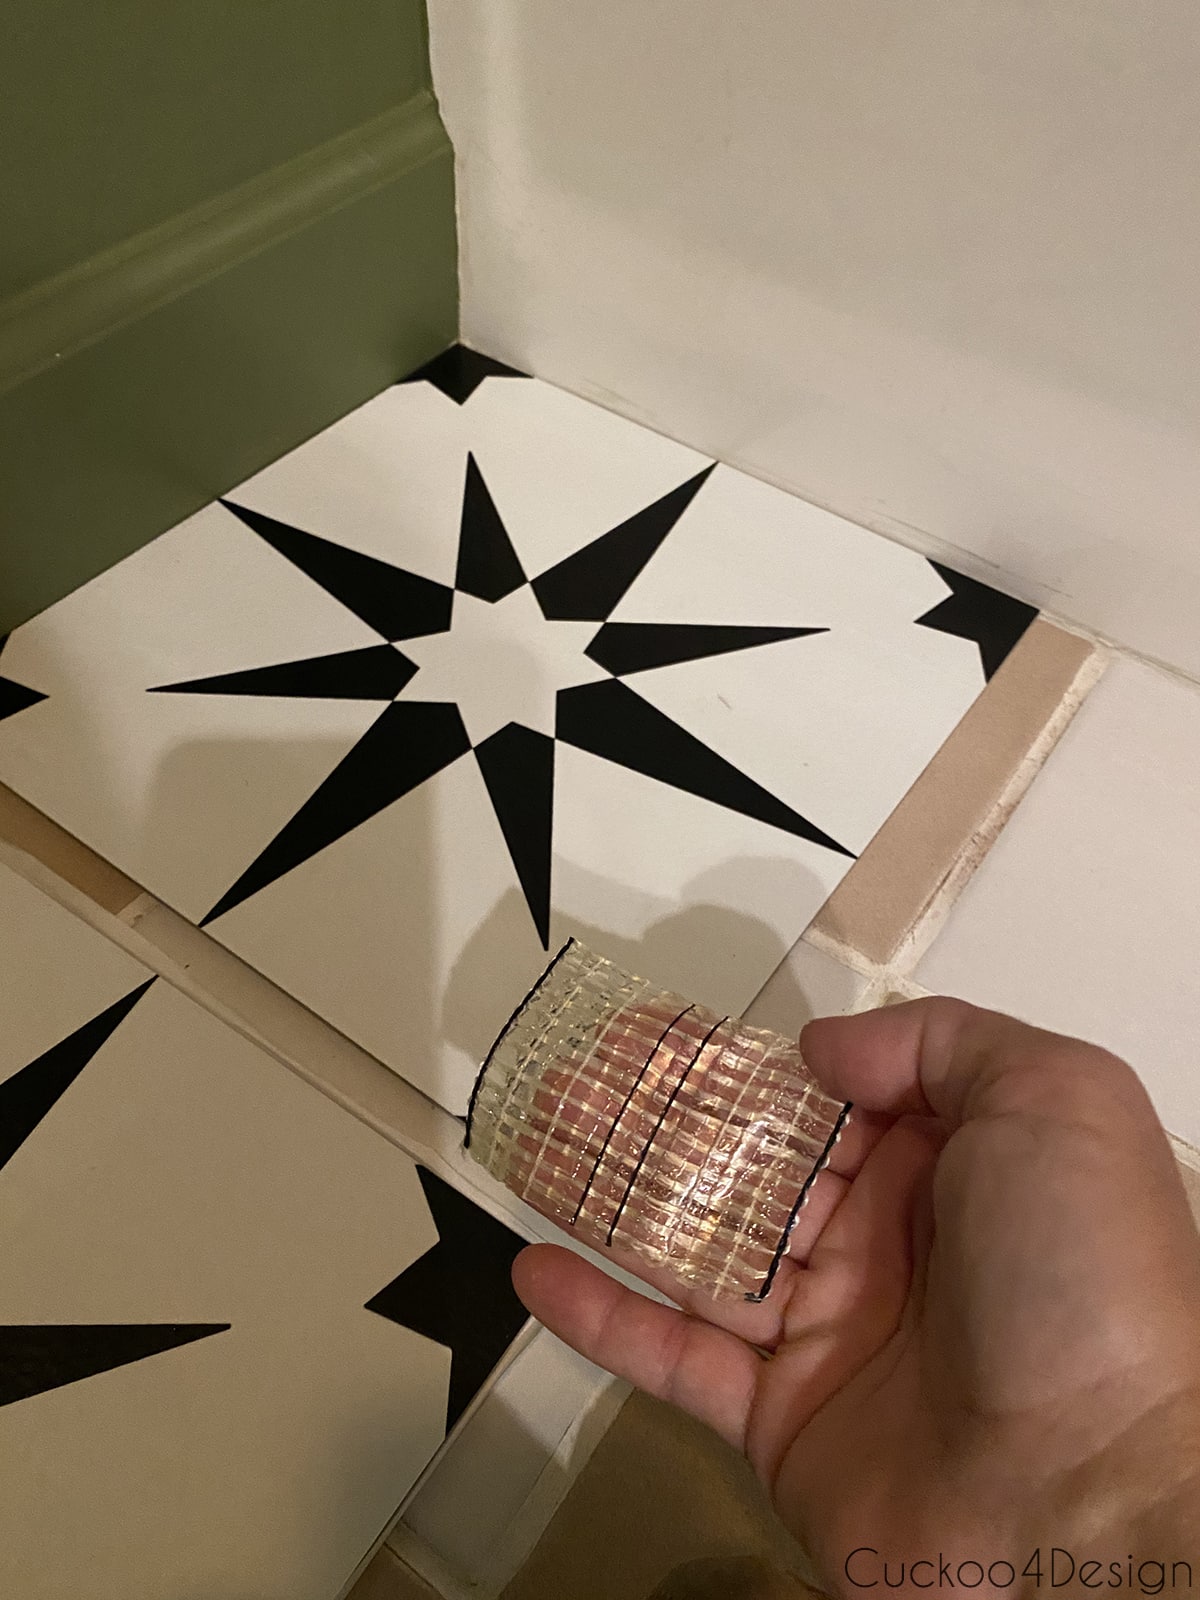
To be honest, that wasn’t enough in most places and I ended up cutting long rows of the carpet tape adhesive to make the seams stick better.
That doesn’t mean your project will be the same though. It might stick much better to other surfaces. You can easily lift the tiles back up and add more tape. It gets harder the more carpet tape you add because that stuff is super sticky. I have read that some people used vinyl floor mastic but I didn’t want to do that to the tile underneath because nothing would be removable after using that type of glue.

For the odd cuts, I used a ruler and pencil to mark and then big sharp scissors or my utility knife to cut the tile. It is pretty amazing how easy it is to cut the tile pieces.


I chose to remove the toilet to add the tiles because I don’t think the cuts would look great if you would choose to cut around the toilet and there would be so many including the pipes. I’m not saying it isn’t possible though.
Make sure you clean your underlying surface really well. Our toilet area was a mess! Yuck!

Below you can see how I applied the tape in long strips.

I ended up with the strip in the back to cut and was able to use one tile for two pieces.

For under the floating vanity, I used a car jack to slightly lift the vanity just so I could take the support leg out so I could apply the tile. It wasn’t all that hard to apply the tile under the floating vanity. I was a little scared it would be but nope it wasn’t.


I had bought one of those tools, a contour/profile duplicator, you see on commercials that is supposed to help with the odd cutouts as shown below.


But to be honest, I still rather make my own cutout template with painter’s tape. It simply works better for me that way. All I do is paste little pieces of painter’s tape into the shape of what I want to cut and then peel it off and apply it to the tile that I want to cut.

See the cuts going into the closet turned out pretty well this way!
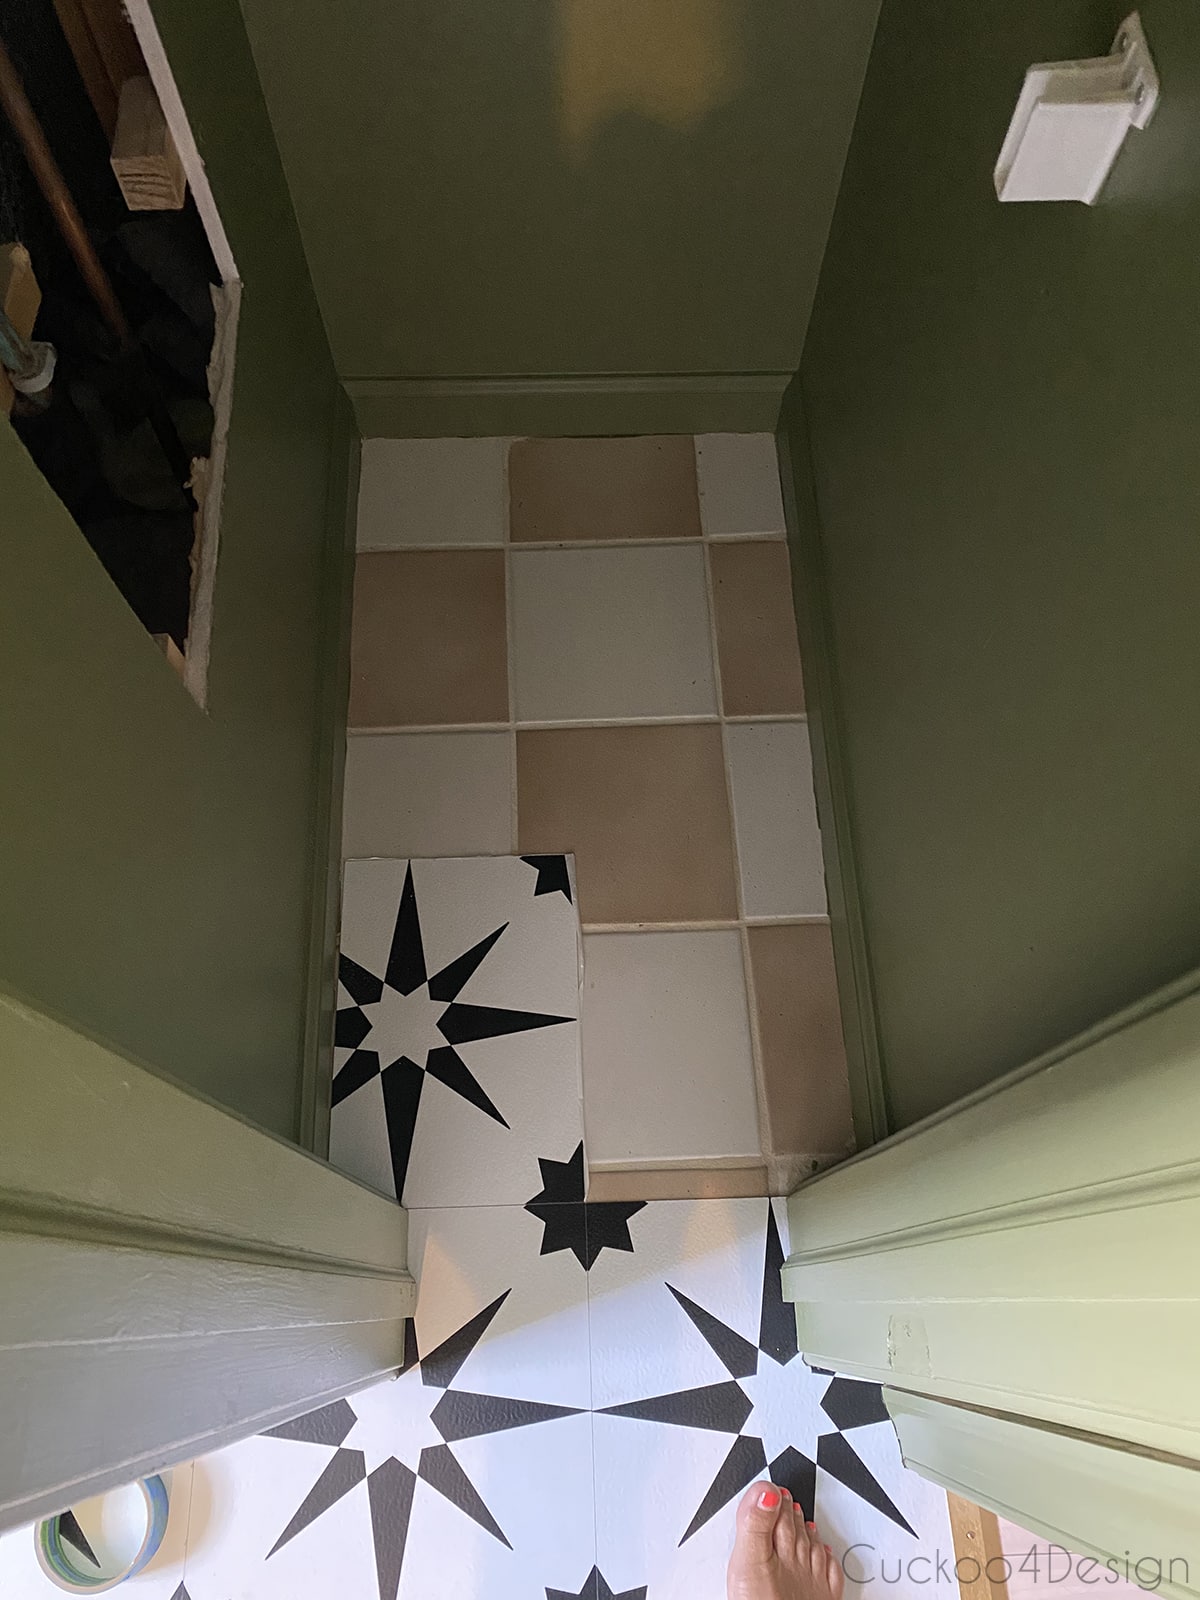
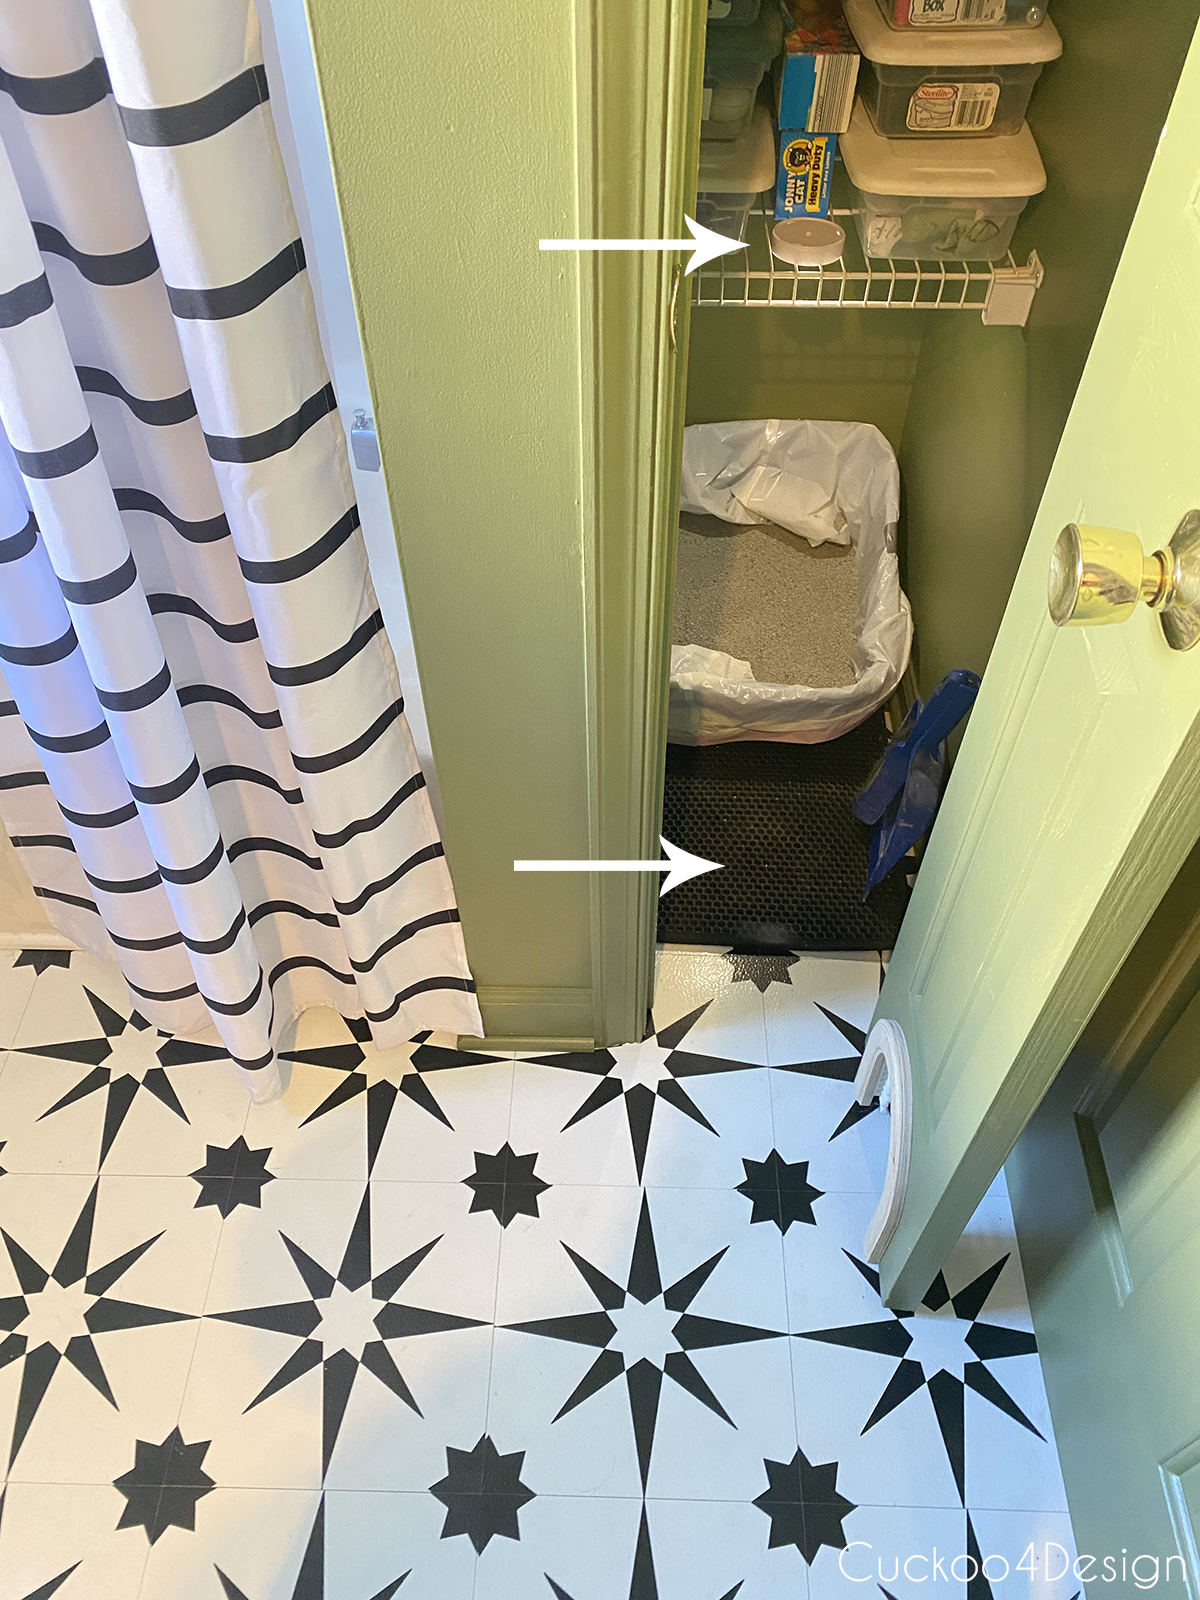
As a reminder, this is our litterbox closet, the hole on the left above is due to a leak we had from the tub going into our living room.
And when everything was done, I precut and painted the quarter round molding and added it to the existing molding with my brad nailer to hide the slight gaps around the wall. That really added the finishing touch to the project.
One of the most asked questions during my reveal post was how the inside of the litterbox closet looks, so here we go. The wall color looks almost lime green in the photo. Not sure if it is because of the fact that it was taken with my cellphone or because of the artificial lighting but that color is not the right color. (The color is called Gaucho by Valspar and you can check out my blog post about my favorite shades of dark green paint colors for more info)
The arrows point to the pug light that I use when cleaning the litterbox. I also use a litter tracking mat and the scooper is hanging on the wall to the left. (You can find the cat hole HERE)
We have 4 litterboxes in the house. Two upstairs in closets like this and 2 in the basement in a larger closet under the stairs.
What I wish I’d known before installing peel and stick floor tiles
- Don’t EVER use a magic eraser to clean this tile (look at the photo below, it dulls the tile and is super noticeable
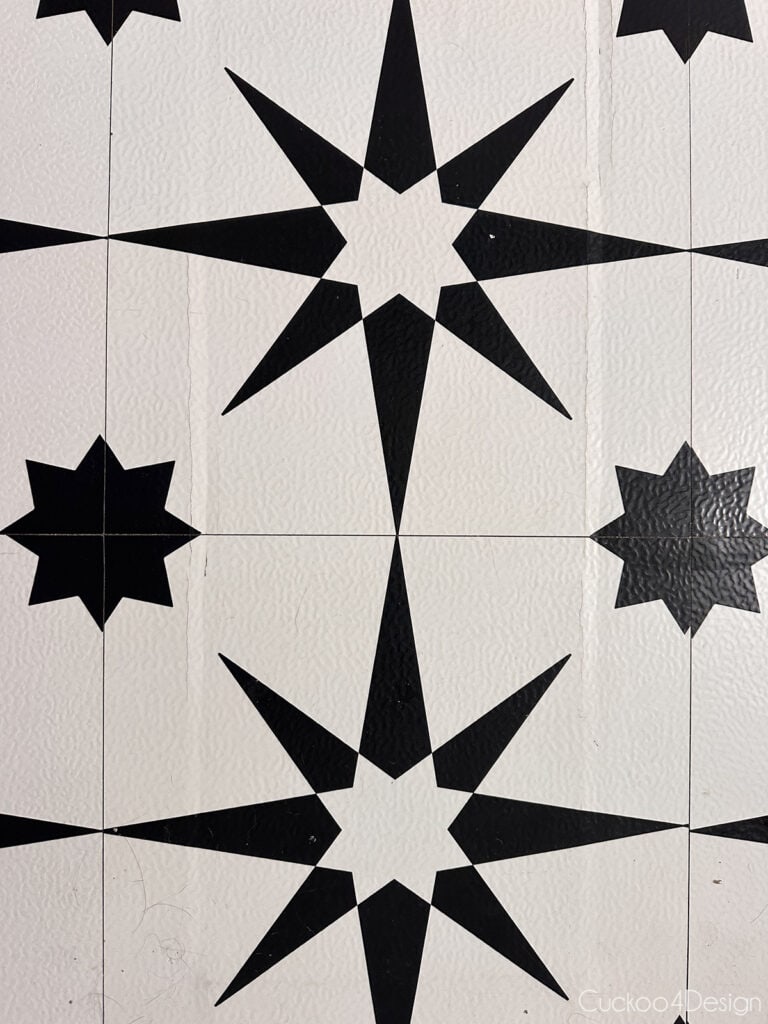
- Rotate the tiles before sticking them on the surface to minimize odd pattern offset. In the end, it is impossible to match the pattern perfectly. This might really bother someone who is a perfectionist. I tend to be that way but in the overall look it ended up being ok with me. It won’t be perfect and that’s ok because they are cheap and even with expensive handpainted tile this can happen.
- You might have to use other glue, like the carpet tape, to help the tile stick better. This was definitely a must for me, especially in areas where the floor underneath wasn’t perfect.
- Make sure you have extra tiles left to replace possible damaged ones from wear and tear as time passes.
- Some boxes do have tiles with stains or marks on them like some of the reviewers mentioned. Again, this tile is cheap and not perfect. I was able to find enough clean tiles though to finish my project and still have extras.
My final thoughts about this cheap peel and stick floor tile
- You can’t beat the cheap price! If you are on a budget and want a quick fix to simply like your space better then this tile is for you. Would ripping out the tile and adding beautiful new tile last longer? Yes!!! But you pay for that too and it would never be this cheap.
- The pattern is rather busy but since it is so cheap I didn’t fear that I would grow sick of it at some point. If I do, I’ll just take it off. You can go bold with confidence.
- My pros for this tile: THE PRICE! The fact that they offer beautiful unique patterns! The tile is renter-friendly, especially if you are able to use them without using the very sticky carpet tape. I’m not sure how hard that would be to remove over time though.
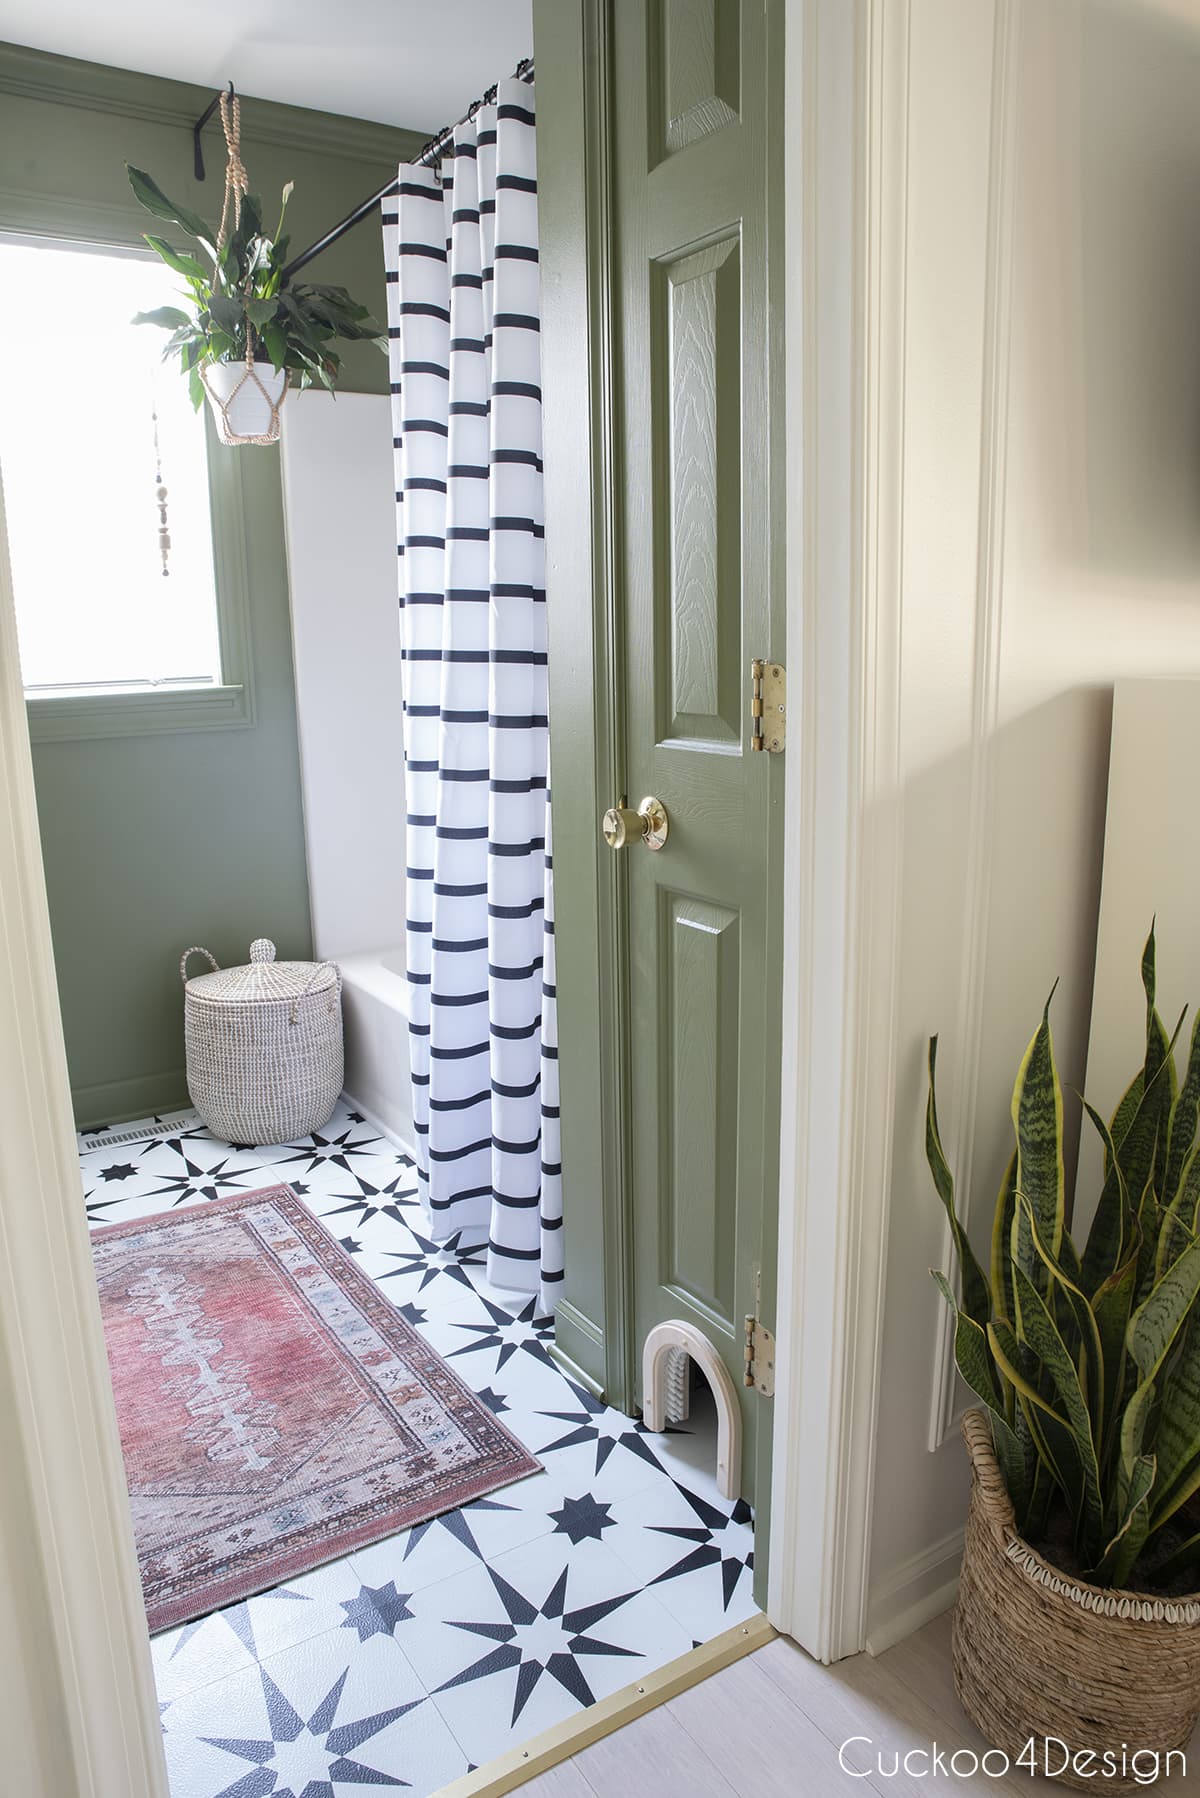
- Five years in: peel and stick floor tiles are worth it for budget renovations, renters, and anyone who likes to change things up when trends shift. I paid less for five boxes than I would for a good pair of sneakers. Just go in knowing they’re a temporary fix, not a forever floor and honestly, that’s exactly what makes them fun.
Any of these Tile patterns would have also looked great:
This post may contain affiliate links from which I will earn a commission at no extra cost to you. View my full disclosure policy.

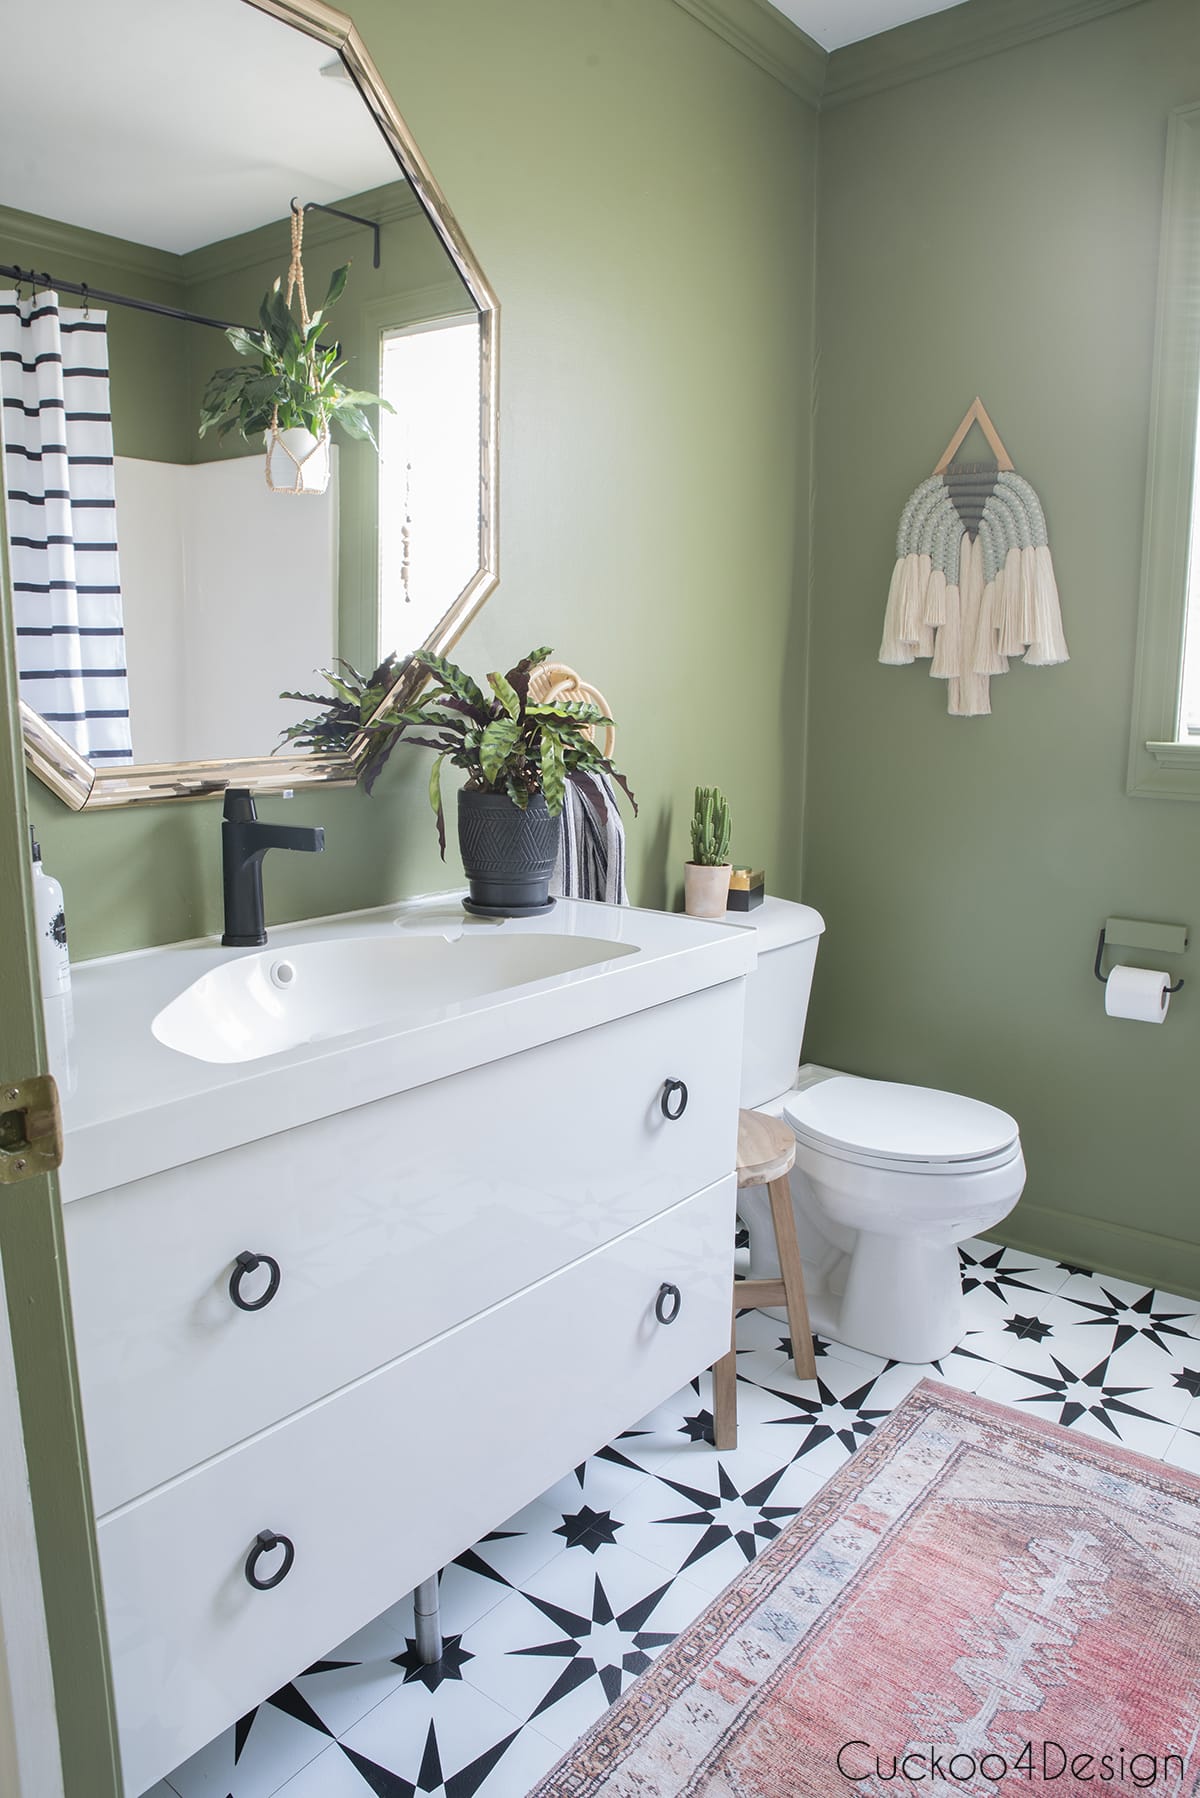
Make sure you check out my blog post with the full reveal of our budget bathroom makeover.
Use the image thumbnails below to shop:

Review update: how the tiles have held up since 2020
We’ve now had these vinyl peel and stick floor tiles for five years and here’s the honest bottom line.
The floor has been water-resistant and held up surprisingly well overall. It still looks close to how it did the day I installed it, which honestly surprised me given that this is a bathroom floor taking daily moisture and foot traffic.
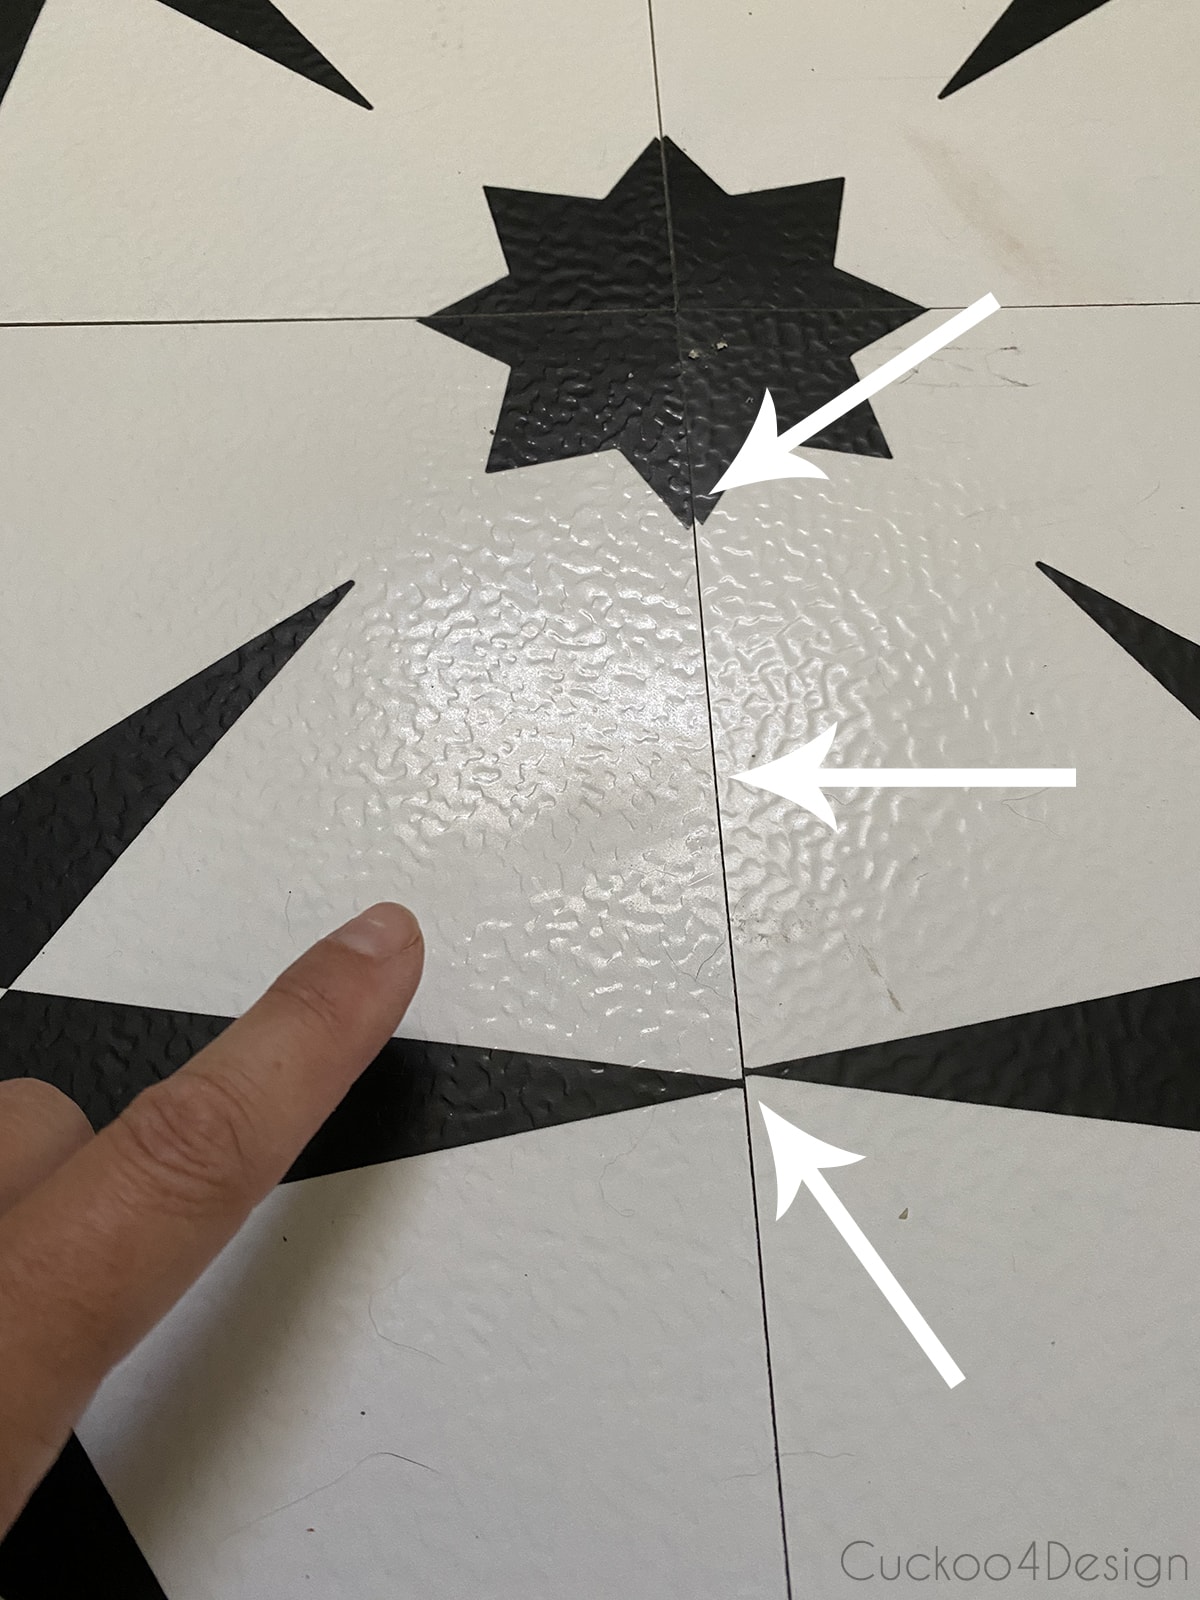
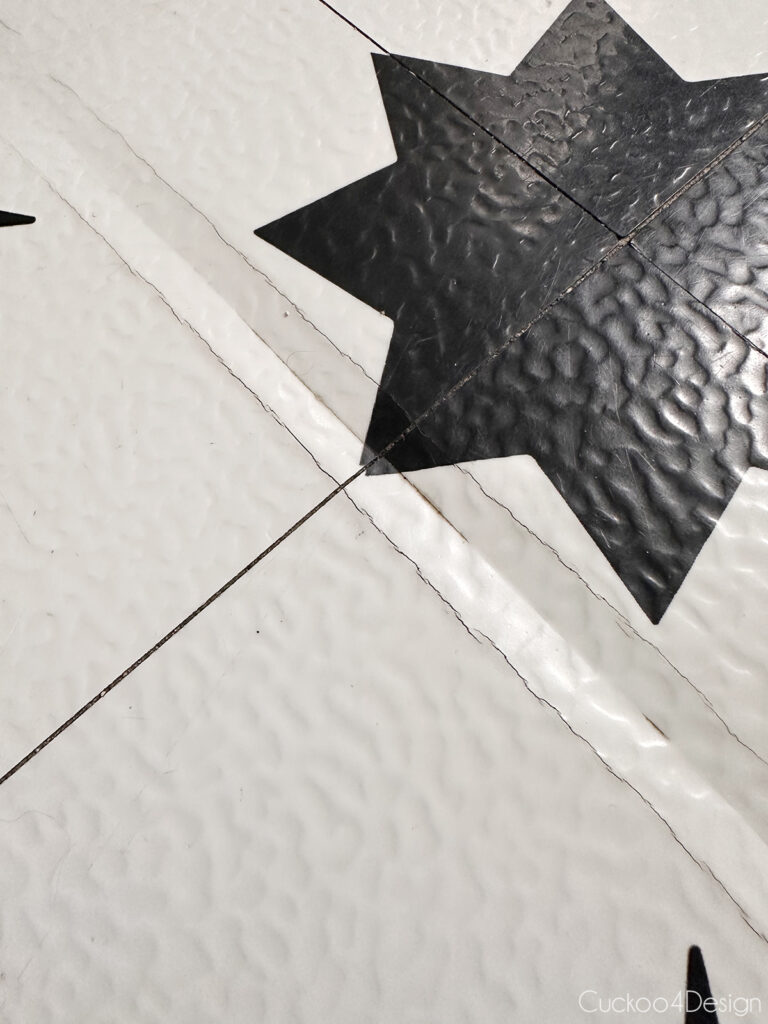
That said, there are a few things worth knowing. The outline of the old ceramic tiles underneath has started to show through the vinyl and you can see it in the photo below. In some of those areas there are also hairline cracks in the vinyl, which I think is related to the uneven surface underneath. The tiles have also started lifting under the vanity. I think it’s because that area gets no foot traffic and the natural pressure from walking keeps the rest of the floor pushed down, but under the floating vanity there’s nothing doing that job.
These self-adhesive tiles would still be a great choice for a kitchen or a dry laundry room installed over existing hard floors. For a bathroom, they work, just go in knowing that uneven surfaces underneath and low traffic areas will be the first places you’ll see wear.
More of my bathroom projects
That’s it for today. Let me know if you have any other questions so I can answer them and also update my post with the answers.
Tschüß,

Wow, very impressive! Looks great!
Thanks Autumn!
I love it I have been going back and forth about trying these tiles but u cleared up some things Great job
I’m glad I could help.
Looks amazing!
My question is….I have 1 inch by inch tile the whole floor and up the walls. How do you think it would a) stay level on the floor, and b) could it also go on the wall? (Or…perhaps i could paint the wall tile and ‘sticker-re-tile’ the floor only.
Hi Simone, I’m honestly not sure if your small tile would create an issue. Sorry! Painting the tile on the wall is a good idea!
Love it!! I’m in need of a budget bathroom makeover. Any thoughts on the peel & stick tile that you can actually use grout in the gaps? I have seen that and wonder your thoughts.
Yes, I have seen that too Gen. My friend Oscar of Oscar Bravo Home used vinyl tiles with grout that he bought at Home Depot. He could probably answer that question because I think these aren’t made for grout.
Looks great. I would warn others, though, that the pattern of the underlying floor will wear through on a highly trafficked area like a kitchen. Been there, done that. And removal of tile is not as easy as one would think. It does give a fresh look on a budget, though.
Thanks for that info Deb, that’s definitely good to know and I will keep an eye out for the tile pattern wearing through. Thankfully our bathroom doesn’t get that much traffic and when I rip this out, it will probably all go including the tile underneath to get that dream walk-in shower that I always wanted.
I am doing our hall bath on a budget. It will be either paint with stencil or peel and stick. Thank you for your detail assessment it helps. I wouldn’t notice the imperfections.
Another great project accomplished! Thanks for the details….I was wondering if I should get the edge duplicator, but like your idea better.
Julia! I love the look and more importantly I love your honest explanation of the process!
Congrats on another awesome project!
I have a linoleum floor that has deeper indents like grout lines. Do you feel those would need to be filled in with something or do you think the new tiles will stick just fine? Thank you! Great job on yours!! Love it!!
Hi Kelli, After having my floor for two years now, I can now see where the ceramic tile grout lines are underneath the vinyl tiles in some areas. It doesn’t really bother me but if something like that would bother you then you might want to fill those indents.
I wonder about moisture effect. Does it peel off when wet at a long time? How long do you have it now?
I’ve had it for about a year and haven’t had any issues.
Do you know if you can use a steam mop on the tile?
Sorry, I don’t know but that would be a great question to ask on the Amazon listing where you can ask questions about the product.
Do you know if this product can be used on walls as a backsplash?
I don’t see why not. My friend used something similar in her camper as a backsplash.
You will need to use a strong adhesive. I attempted this and the tiles fell off the wall within ten minutes without it.
Oh good to know!
Nice job! Is it slippery when wet?
No it’s. not because it has some surface texture.
We are getting our rental ready to sell and will be installing the hexagon pattern of this same brand. Your floor looks great, and now I’m not so nervous about about taking on this project. We’ll be implementing most of your helpful hints, including the pug light in the litter closet in our own home. By the way, we have the same cat door. Thank you.
Oh good luck! I hope you’ll love the floor.
Hi Julia, I enjoyed your review as I have had my eye on this tile for a while. Your bathroom is exactly like mine with the exception of the sink and toilet. I am very interested in the door to your linen closet as I have kitty litter on mine as well. Can you share where you got your door from? Thanks, Elaine
HI Elaine, I don’t know where the door is from. It came with the house. Sorry I can’t be more helpful.
What’s it like to clean? What do you use to clean it with? Does debris get stuck in between the tiles?
I’m concerned if I use a swifter or something the dust and dog hair would get in between the tiles?
Hi April, They are super easy to clean and I clean them just like the rest of our floors which is usually a vacuum and wet Swiffer. I personally haven’t had any issues with dirt getting stuck between the tiles.
I read on another review that there was a strong odor with these tiles that did not dissipate over time. Did you notice this at all? Thanks for your detailed review.
Hi Gwen, I actually didn’t have any issues with odor which is why I didn’t mention that in my cons. I definitely would have. They also held up great over time now.
I love the tile you chose, can you tell me where you purchased it. Thank you so much for all the information. It was very helpful.
Hi Tess, the exact link to the Amazon shop where I bought them is in my “Tools and supplies needed” list in the blog post. Hope that helps.
How did it work over the grout? It doesn’t look like your tile stickers match your files perfectly. Are there dents/grooves where the grout is underneath?
Hi Liz! No, the peel-and-stick vinyl tiles are not the size of the ceramic tiles. I’ve had them since early 2020 and they only recently started showing where the grout lines are on the actual tiles underneath. So far it’s not bad though and I don’t mind. I personally feel that I still definitely got my money’s worth. Eventually, I still want to rip it all out but for the time being it was definitely worth it. If you are looking for a permanent long time solution then they might not be for you.
Your bathroom is exactly the colour and design of tile I had planned for a cheap makeover of my bathroom…including the macrame hanger! I’m so glad I found your blog!! Do you get water damage or mould between the tiles? And how do you prevent this? Thanks
Hi Claire, I’m glad you like it. So far we had no issue with any mold and we’ve had them for a couple fo years now. Hope that helps and good luck!
These peel-and-stick floor tiles are like the rebellious teenagers of home decor. Stick ’em where you want, but good luck getting them to stay in line! My floors now have a personality—quirky, unpredictable, and occasionally rebellious. It’s the ‘punk rock’ of interior design. 10/10 for the unexpected entertainment!
LOL that is hilarious. Thankfully my floor isn’t behaving like a rebellious teenager.
I’m looking to use these tiles and I’m just wondering how slippery they are when wet? I would need to put them in my large open shower as it takes up most of the floor space in my bathroom. Outside of the shower there would be a floor mat so not so much of an issue. Concerned about the inside of the shower though.
Hi Shannon, I would not recommend these for inside a shower because water could get through to the subflooring since there is no grout.
It’s great to see a thorough review that covers all aspects of this product. Definitely helpful for making an informed decision on whether peel-and-stick tiles are the right choice for my project!
“Great read! I really appreciate the fresh perspective you shared—it’s challenging the usual way of thinking in such an engaging way. Looking forward to more insightful content from you!
Great review! I love how you shared both the pros and cons of the peel and stick tiles. Your tips on installation and maintenance were super helpful, especially for someone considering a budget-friendly flooring option. Can’t wait to try it out myself!
Hi. I came across your post while researching this option. Thank you for all the information. You did a great job. The bathroom looks nice. I especially like the kitty door for the litterbox. I will add the tile pattern you covered is very popular now. Have you considered regrouting the original tile? Happy New Year!
Hi Katherine, I did regroute some of the tile in my other bathroom which has the same tile. In this bathroom it wasn’t in the greatest shape which is why I covered it. Happy New Year to you too.