

How to build an outdoor cat tunnel
I have never talked in detail about how I actually built the outdoor cat tunnel leading from and to my outdoor cat enclosure in our yard. When we adopted two young cats (meet my cats), I thought it was the perfect time to extend our catio with some more tunnels, and that project gave me the opportunity to finally write a proper step-by-step tutorial. These tunnels have now been in use for years and have held up beautifully. Cat tunnels are such a great way to let your cats safely enjoy the outdoors, even if you don’t have the room for a full cat enclosure.
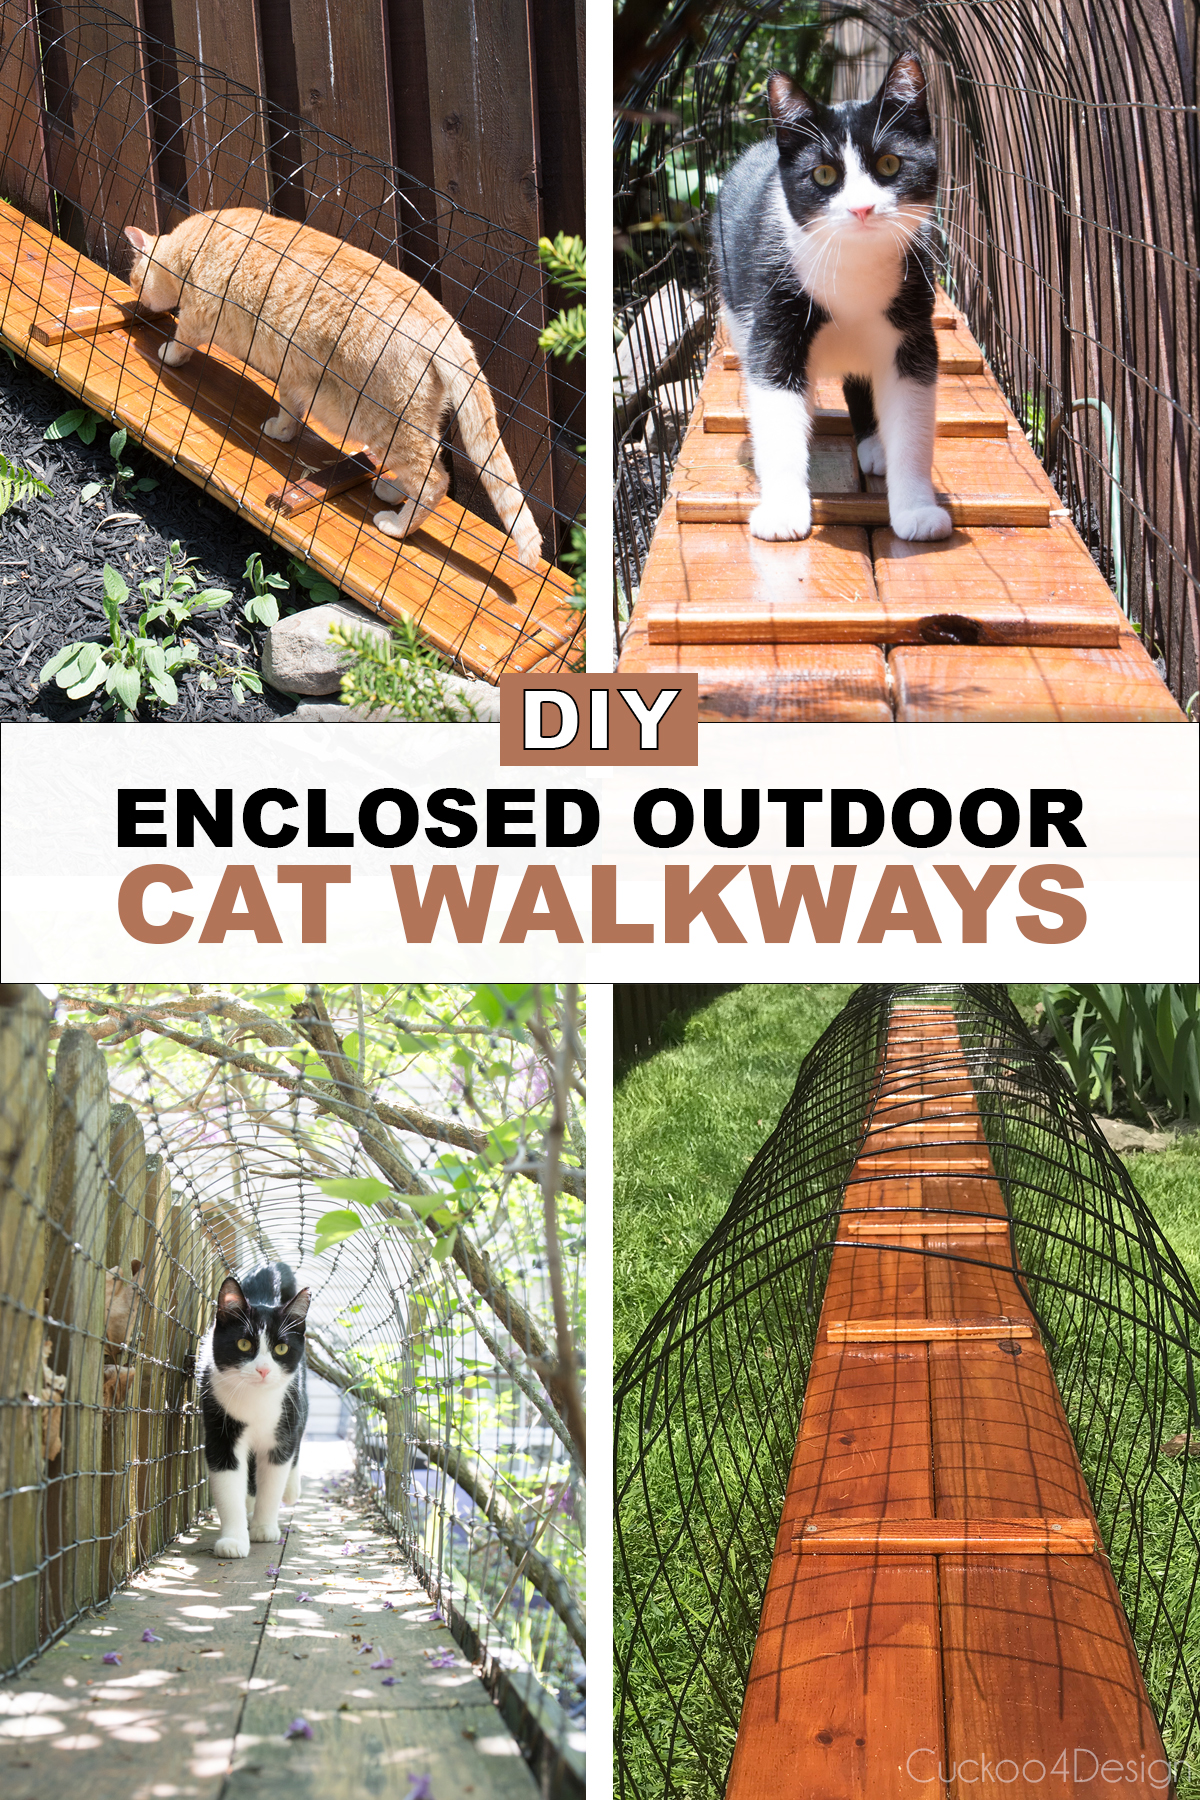
How to Build a DIY Outdoor Cat Tunnel
This post may contain affiliate links from which I will earn a commission at no extra cost to you. View my full disclosure policy.
There is a big difference between outdoor cat tunnels and indoor cat tunnels. The indoor version is for entertainment and mental stimulation. They mostly crinkle or keep the cats entertained with some attached cat toys which make them play tunnels.
The outdoor cat tunnel’s sole purpose is to keep the kitties safe while enjoying the backyard and fresh air.
How big does a cat tunnel need to be?
Before you start planning and building your outdoor cat tunnel project, you need to make sure that the size of the tunnel will fit your cat. My cats have always big regular size but if you have large cats then you might want to build your tunnels a different size.
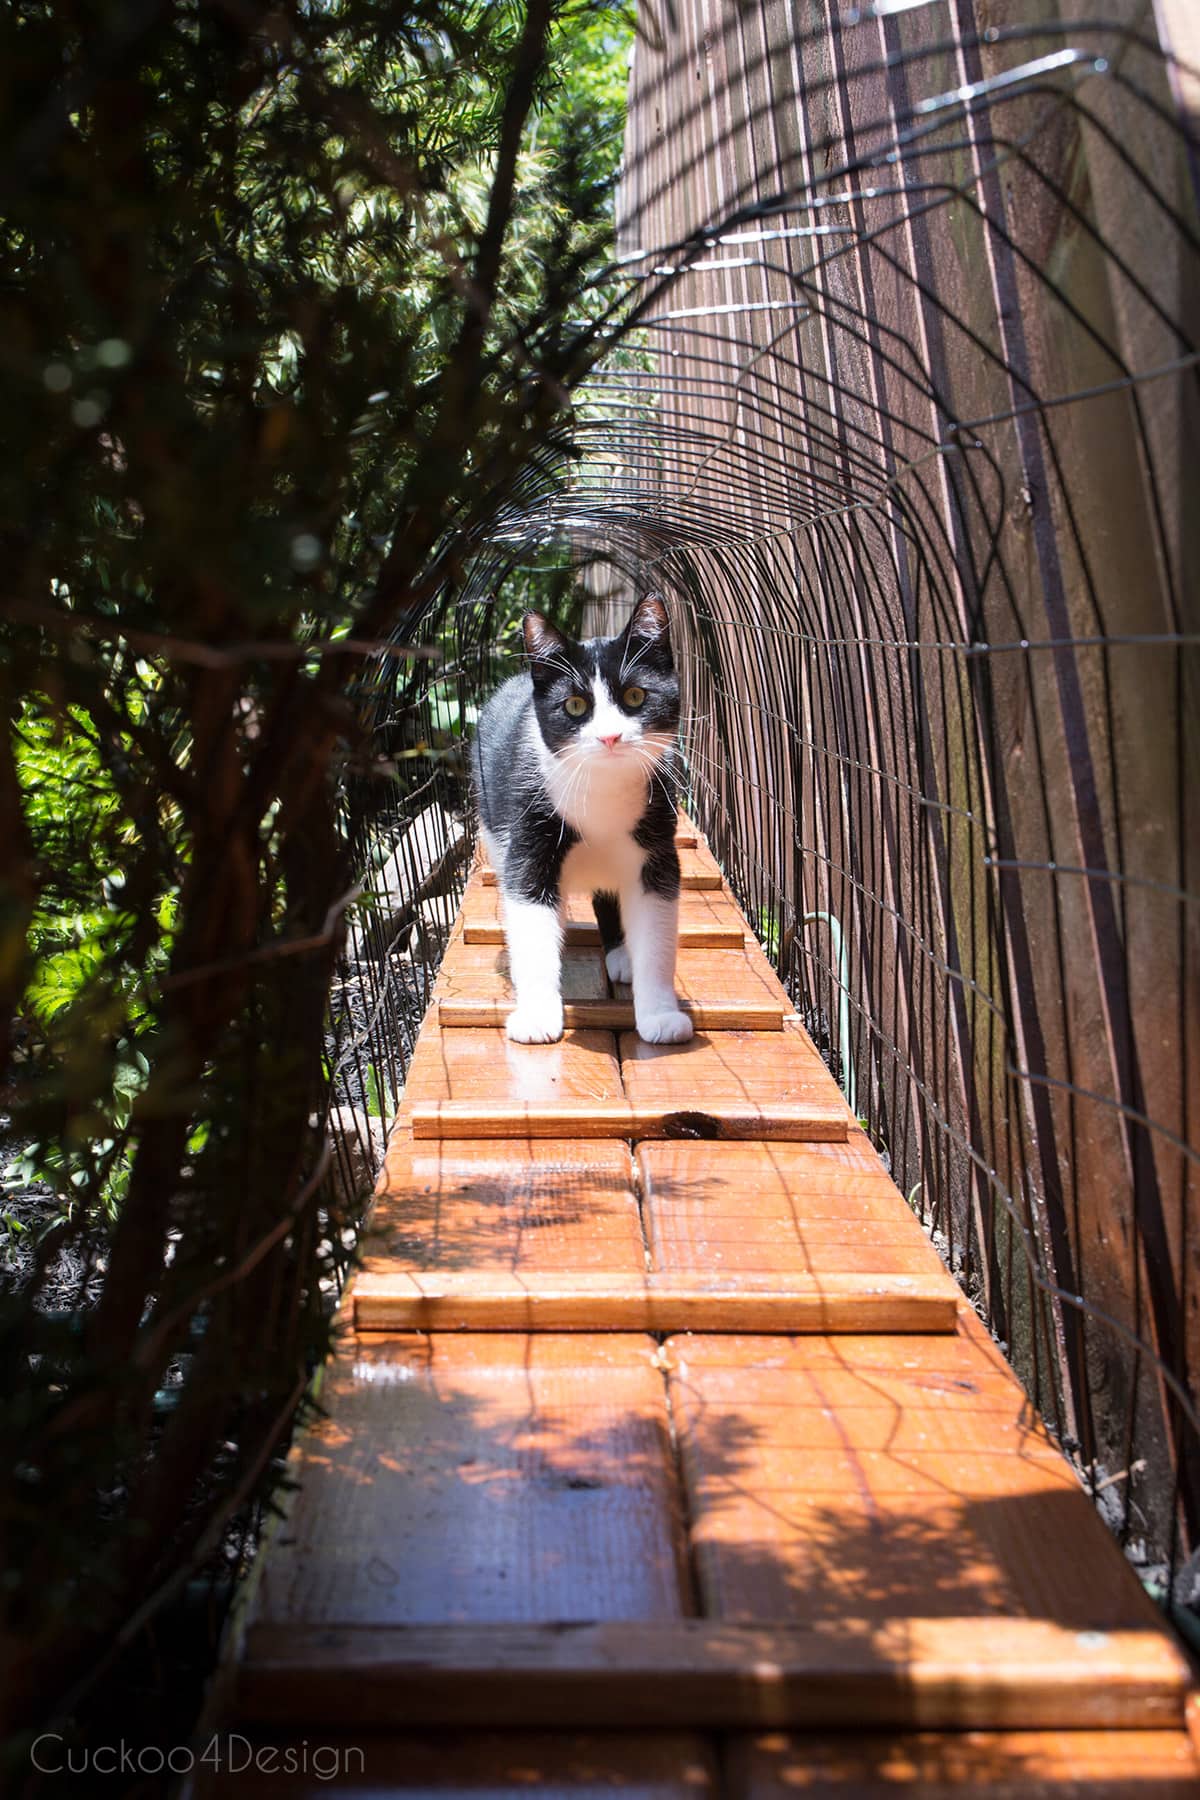
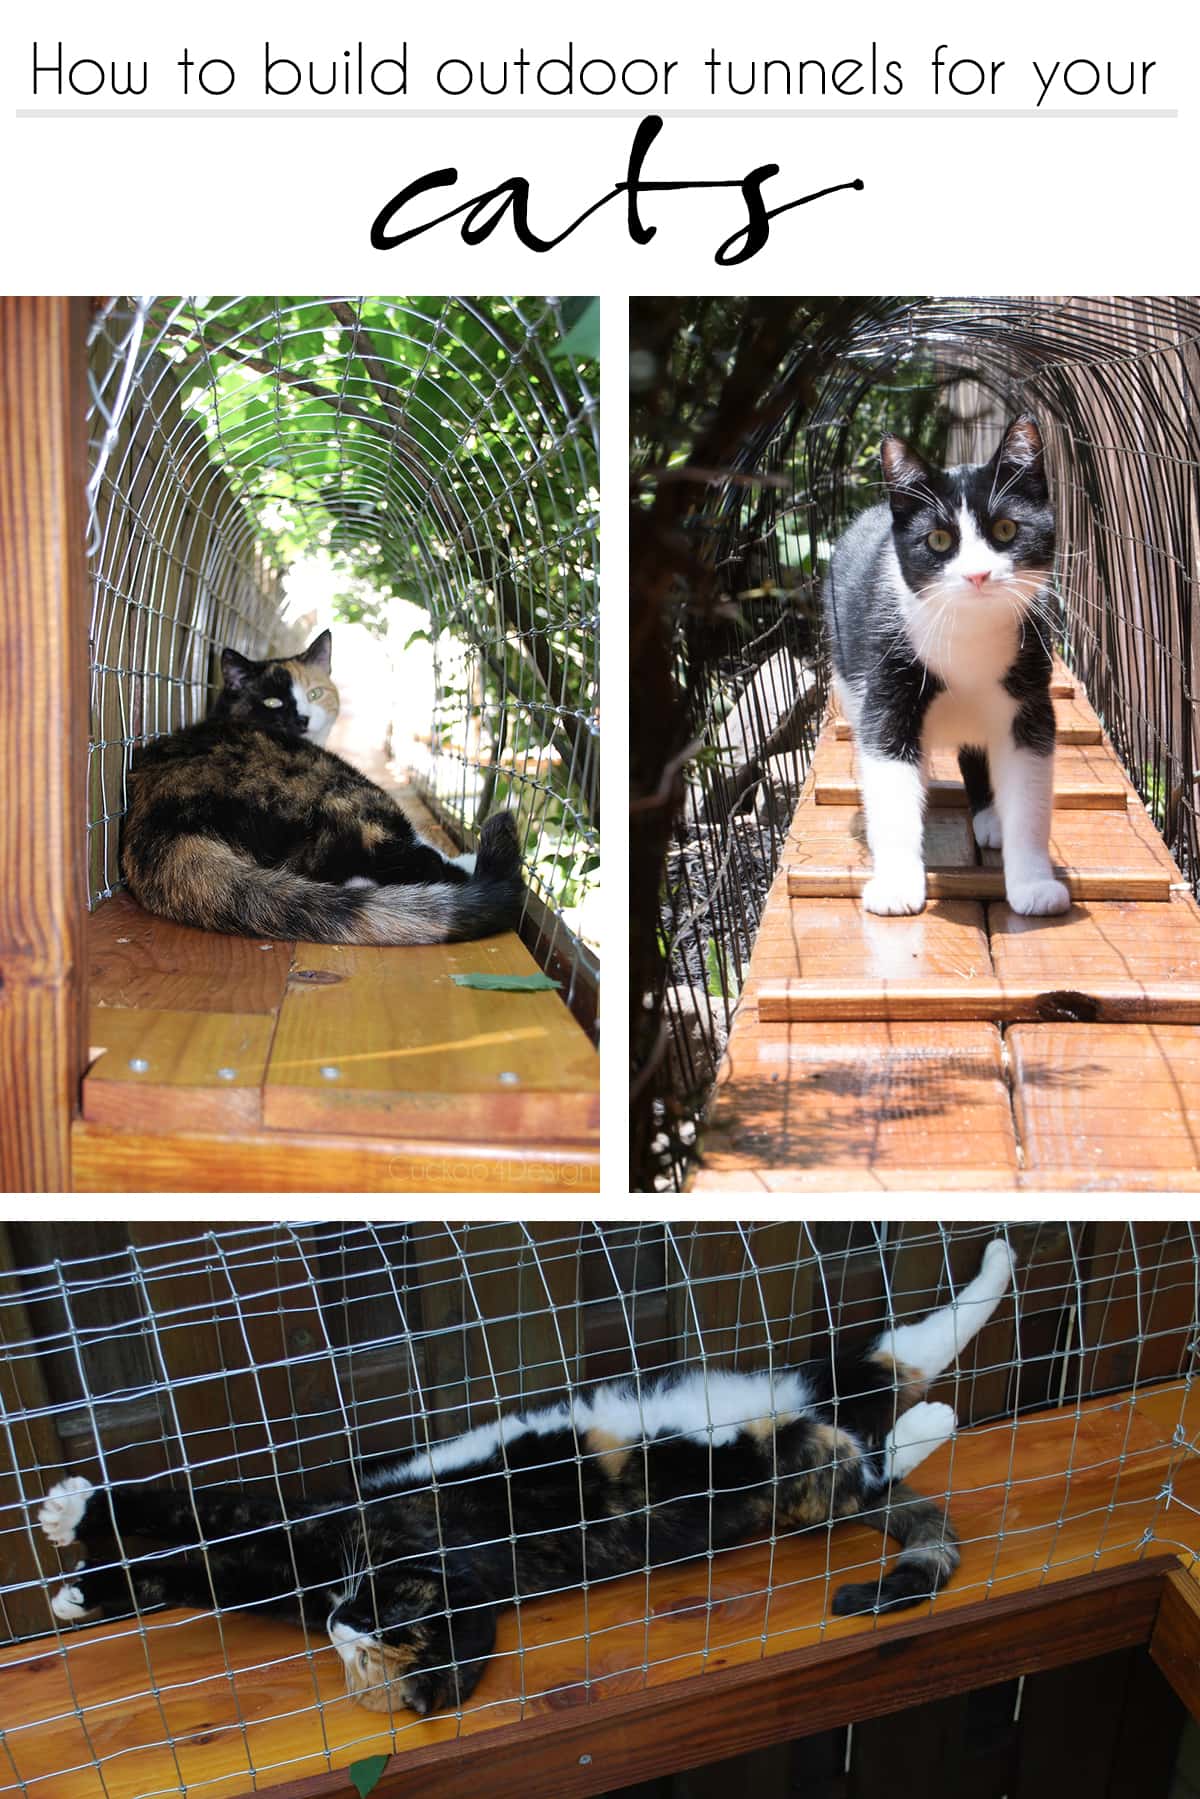
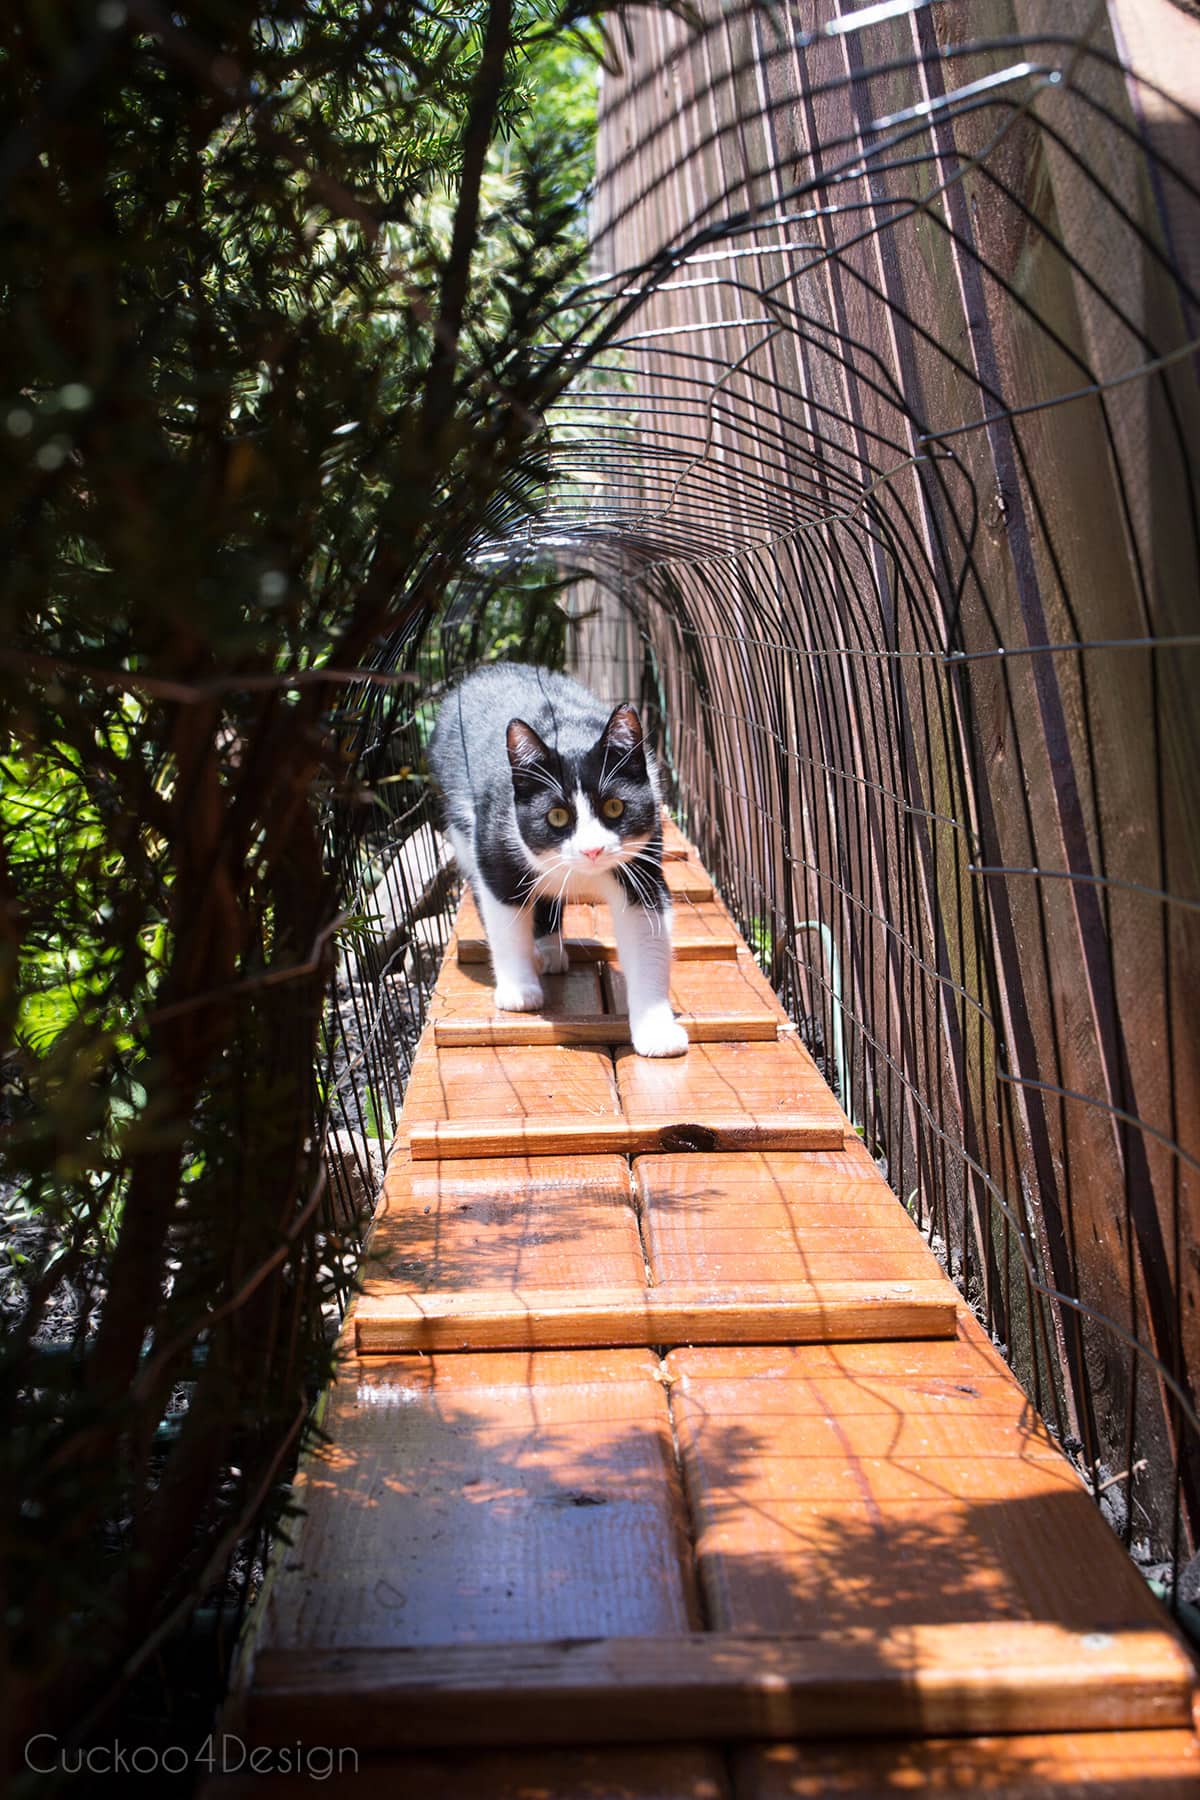
Most cat tunnels are about 13 to 14 inches in diameter. My tunnel’s walking surface is 11 inches wide and the mesh part of the tunnel is 14 inches high.
Supplies needed for outdoor cat tunnel
- deck planks, the number of planks needed depends on the length of the tunnel you want to build
- pressure-treated 2×4 lumber
- deck screws
- galvanized fence staples
- wire fencing/pet fencing, I chose vinyl-coated gauge wire this time around but you can also just use galvanized mesh
- outdoor wood stain
- brush for staining
- (mineral spirits or turpentine for cleaning the brush)
Tools
- drill (right size of drill bit for your screws)
- hammer
- measuring tape
- wire cutter

Building instructions
For the tunnels along the top of my fence leading to the cat enclosure, I used cedar fence planks because they are a lot lighter than the pressure-treated deck planks. Those lighter tunnels along the top of our fence were attached with shelf brackets that I made myself out of wood but I’m sure you can buy them as well. Just make sure that they are weatherproof.
Deck planks are cheaper but a lot heavier. The extra weight is better for my floor tunnels since I didn’t want the kids to be able to pick the tunnels up and mess with them. The cheaper price tag was also a bonus.
Step 1: Apply wood stain to all the wood
I stained all the wooden pieces before I even started building anything, and let them all dry. To me, it’s much easier this way. I love using this stain. It’s a great, rich color and really protects the wood. But you can certainly build the tunnel first and stain it before adding the wire fence to it.

Step 2:Measure and sketch out your project on paper
Measure everything before starting the project! This simple step is always the most important part. And every project’s measurements are different.
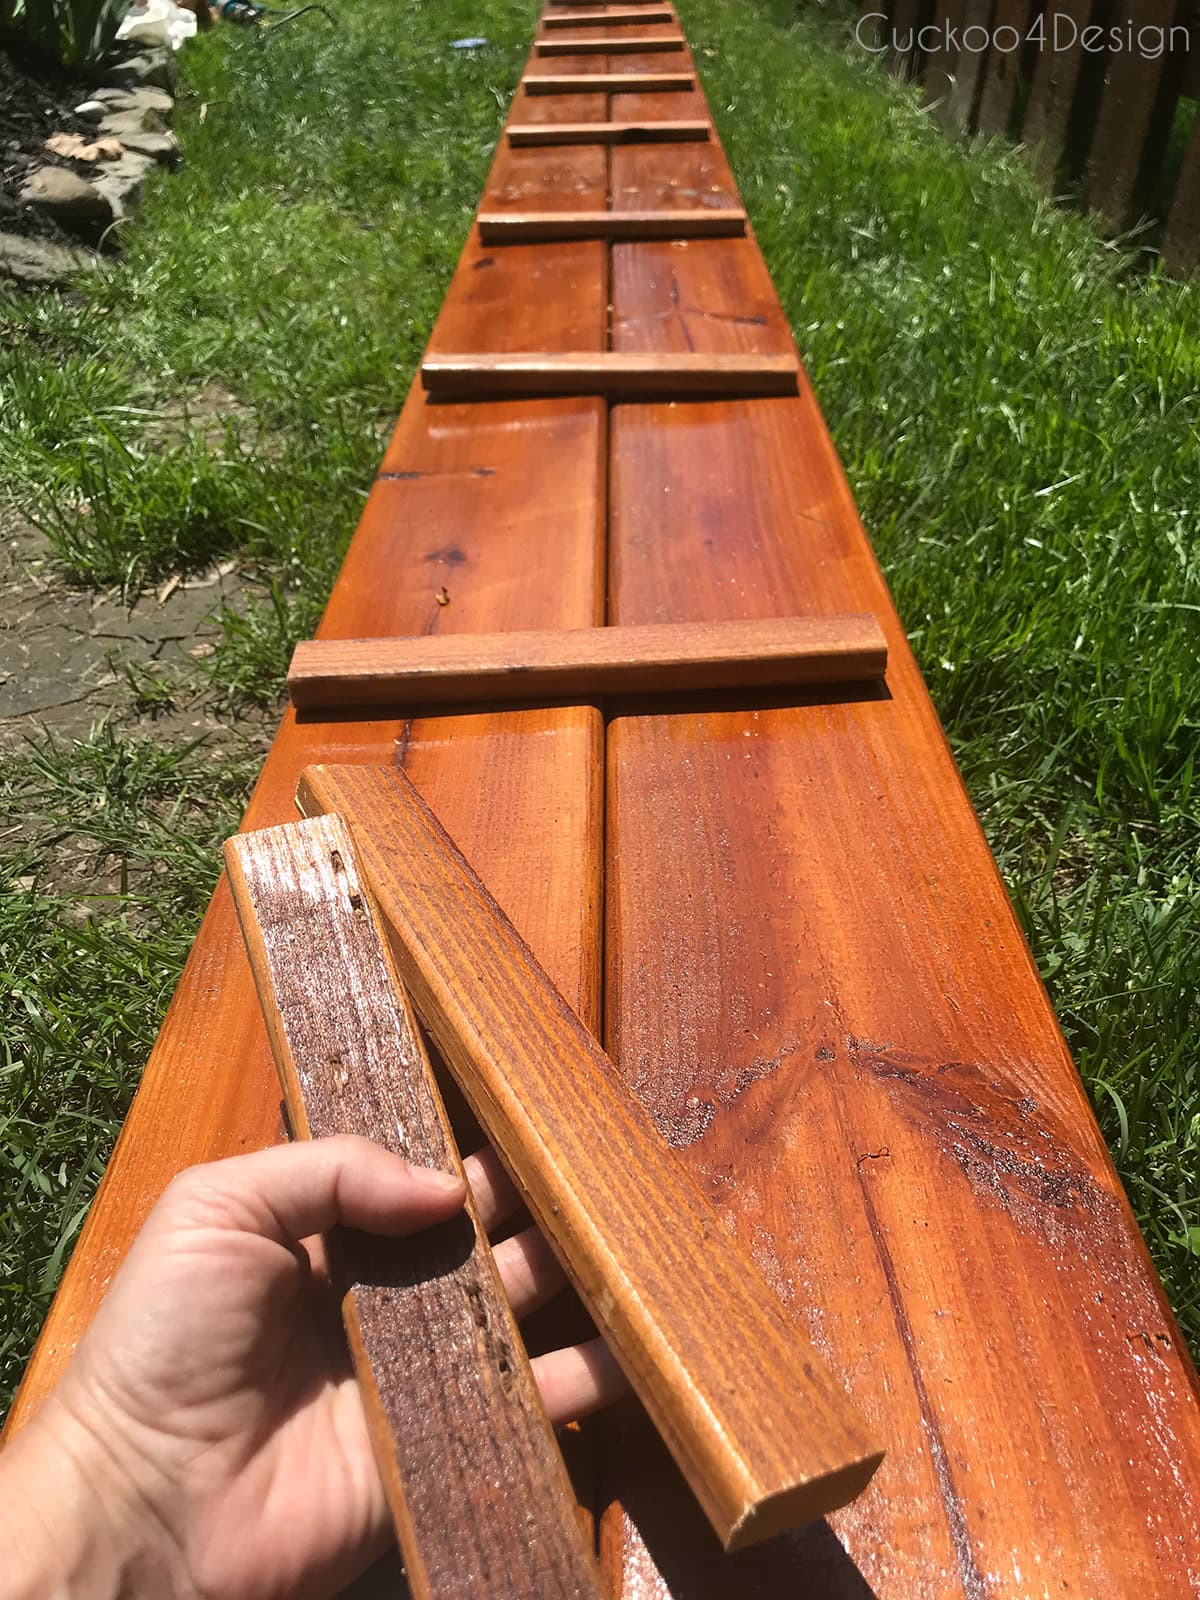
Step 3:Cut 2x4s into pieces to match the width of two deck planks
Cut the 2×4 lumber in strips to match the width of two deck planks lined up next to each other. These pieces will be the bottom support pieces that keep the cat tunnels together.

Step 4:Cut some deck planks in half
I cut one of the deck planks in half, so I could stagger the pieces, which ensures more stability. It’s not a must, but it certainly helps. Depending on how many tunnels you are building, you might have to cut more in half. For one tunnel, one is enough.
Step 5:Cut smaller pieces of wood if your tunnel is on an incline
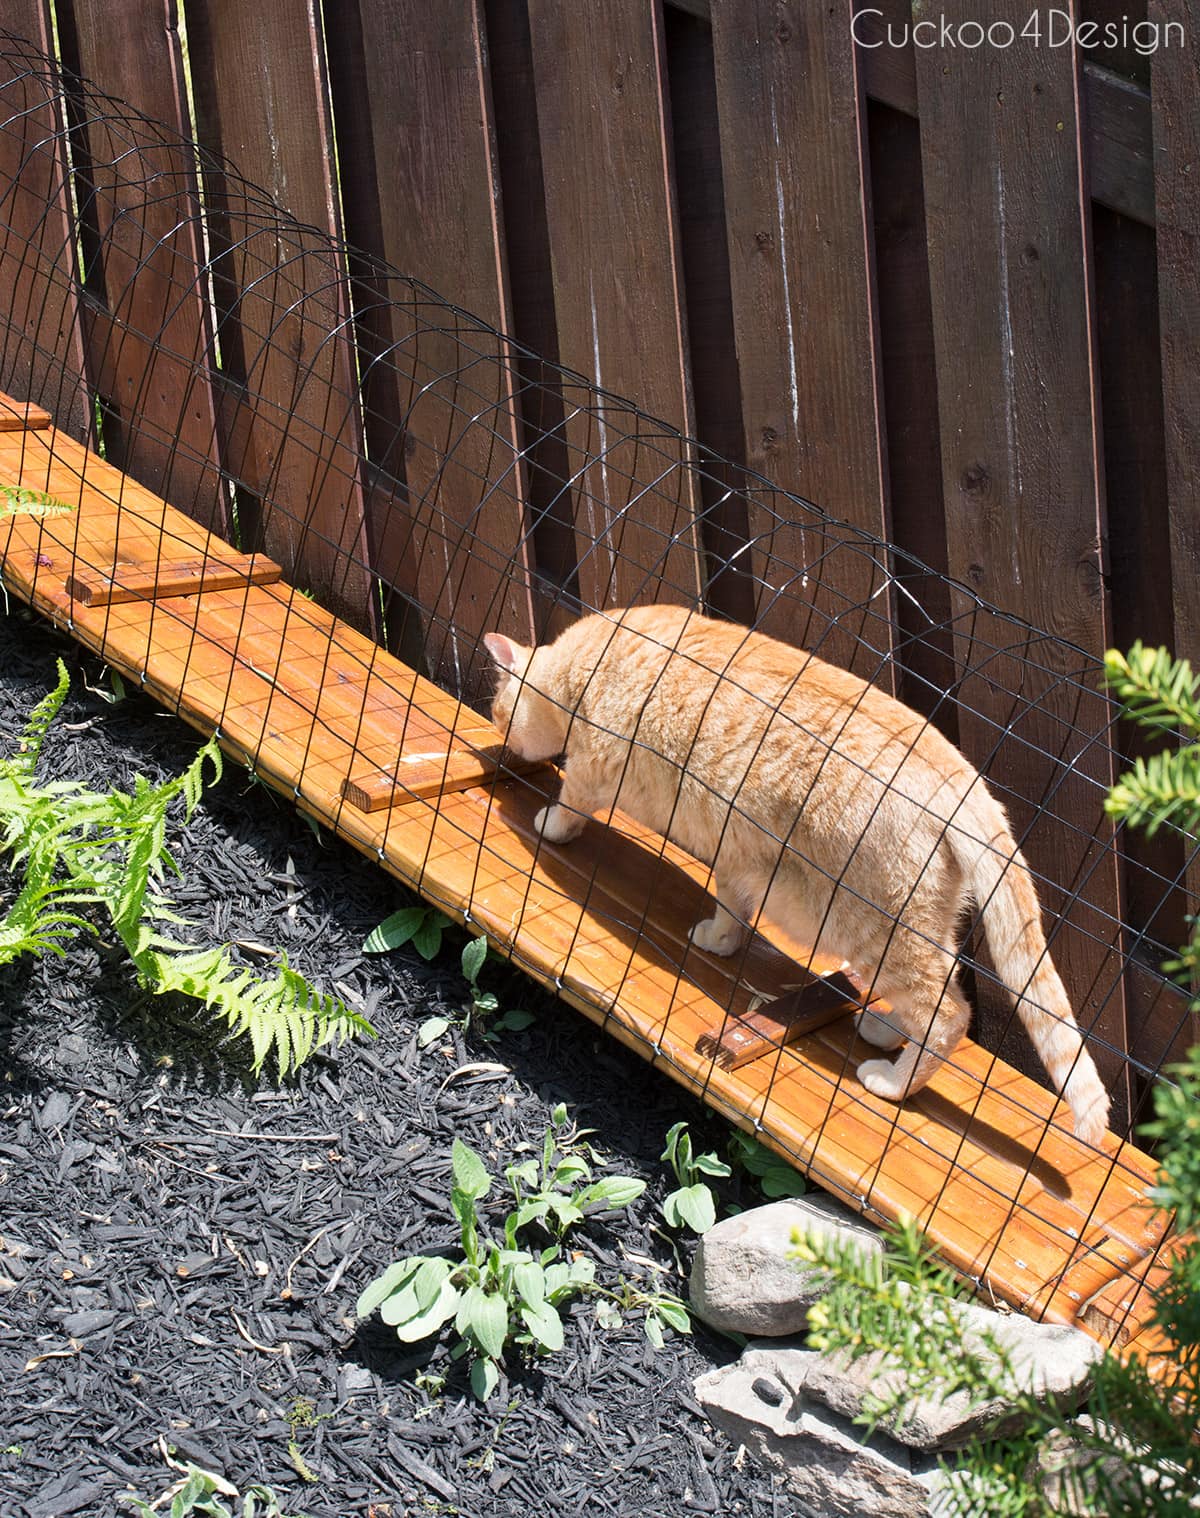
For my design, I needed some extra pieces of wood to add to the tunnel surface because our walkway is on a steep incline/hill, and I wanted the cats to have something to hold on to. It’s more like a ladder going up the hill. I did not include this step in our regular tunnels along the fence. It is only necessary on an incline.
Step 6:Lay your 2x4s on the ground with planks on top
Now it’s time to assemble the bottom part of the cat tunnels. Lay the 2×4 pieces on the ground and add the planks on top.

Step 7:Pre-drill-holes through planks and 2x4s
Then pre-drill the holes where the planks attach to the 2x4s. This is very important because if you don’t pre-drill the holes, the wood will crack. Use a drill bit that is slightly smaller than the screws.

Step 8:Drill screws through pre-drilled holes
Use two to three screws to attach each plank end to the 2x4s through the pre-drilled holes.

Step 9:Lay plank walkway on its side
When you have one large tunnel walkway, it is time to attach the wire fencing. I used 3 planks (2 hole pieces, 1 cut in half) for this tutorial. We made it this big because otherwise, it would have been too heavy to carry, which is another factor to watch out for. Lay the walkway part on its side so you can lay out the wire on top.
(I later attached additional tunnel sections to expand the system.)
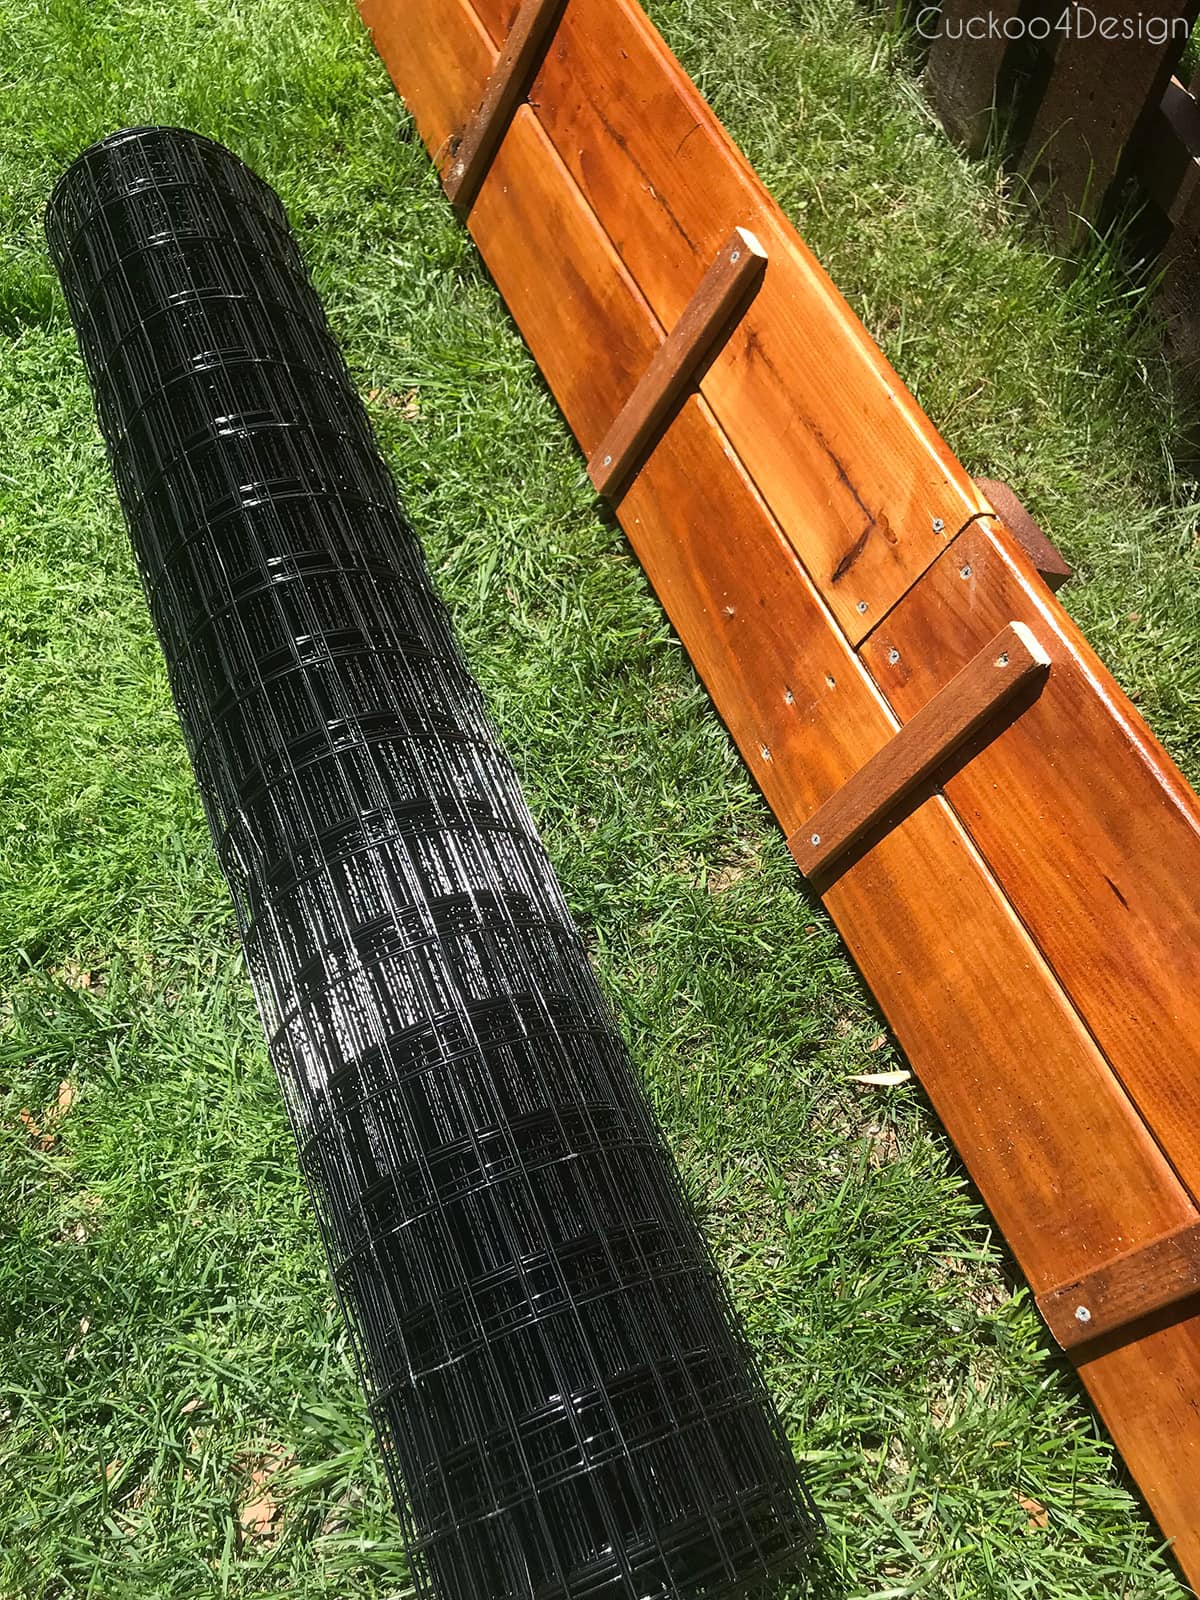
Step 10:Trim the wire mesh width
I trimmed the width of the wire fence with a wire cutter since I didn’t want the tunnel to be too tall, but this is optional.
Also, cut the wire fence to the length of the tunnel.

Step 11:Attach wire fence to walkway with fencing staples
Attach the wire fence with the fencing staples and hammer to one side of the plank. I hammered staples into every second rectangle of the wire.

Step 12:Attach wire fence to other side of the tunnel
Now turn the planks and fencing around and bend it over the walkway part, and hammer in the galvanized fence staples on that side as well.

Step 13:Move tunnel to where you want it
To move the tunnel to its final destination. Either connect it to a cat enclosure or add more tunnels to create a tunnel system. You definitely need two people since they are rather heavy and durable.
For this cat tunnel project I chose not to finish the edges of the tunnel with another piece of wood but for the tunnels running along the side of our patio where everything is more visible, I did hide the staples. (see below photos)
The finished outdoor cat tunnels in our yard
Below you can see the wooden shelf brackets that I made to attach the lighter tunnels to the fence.

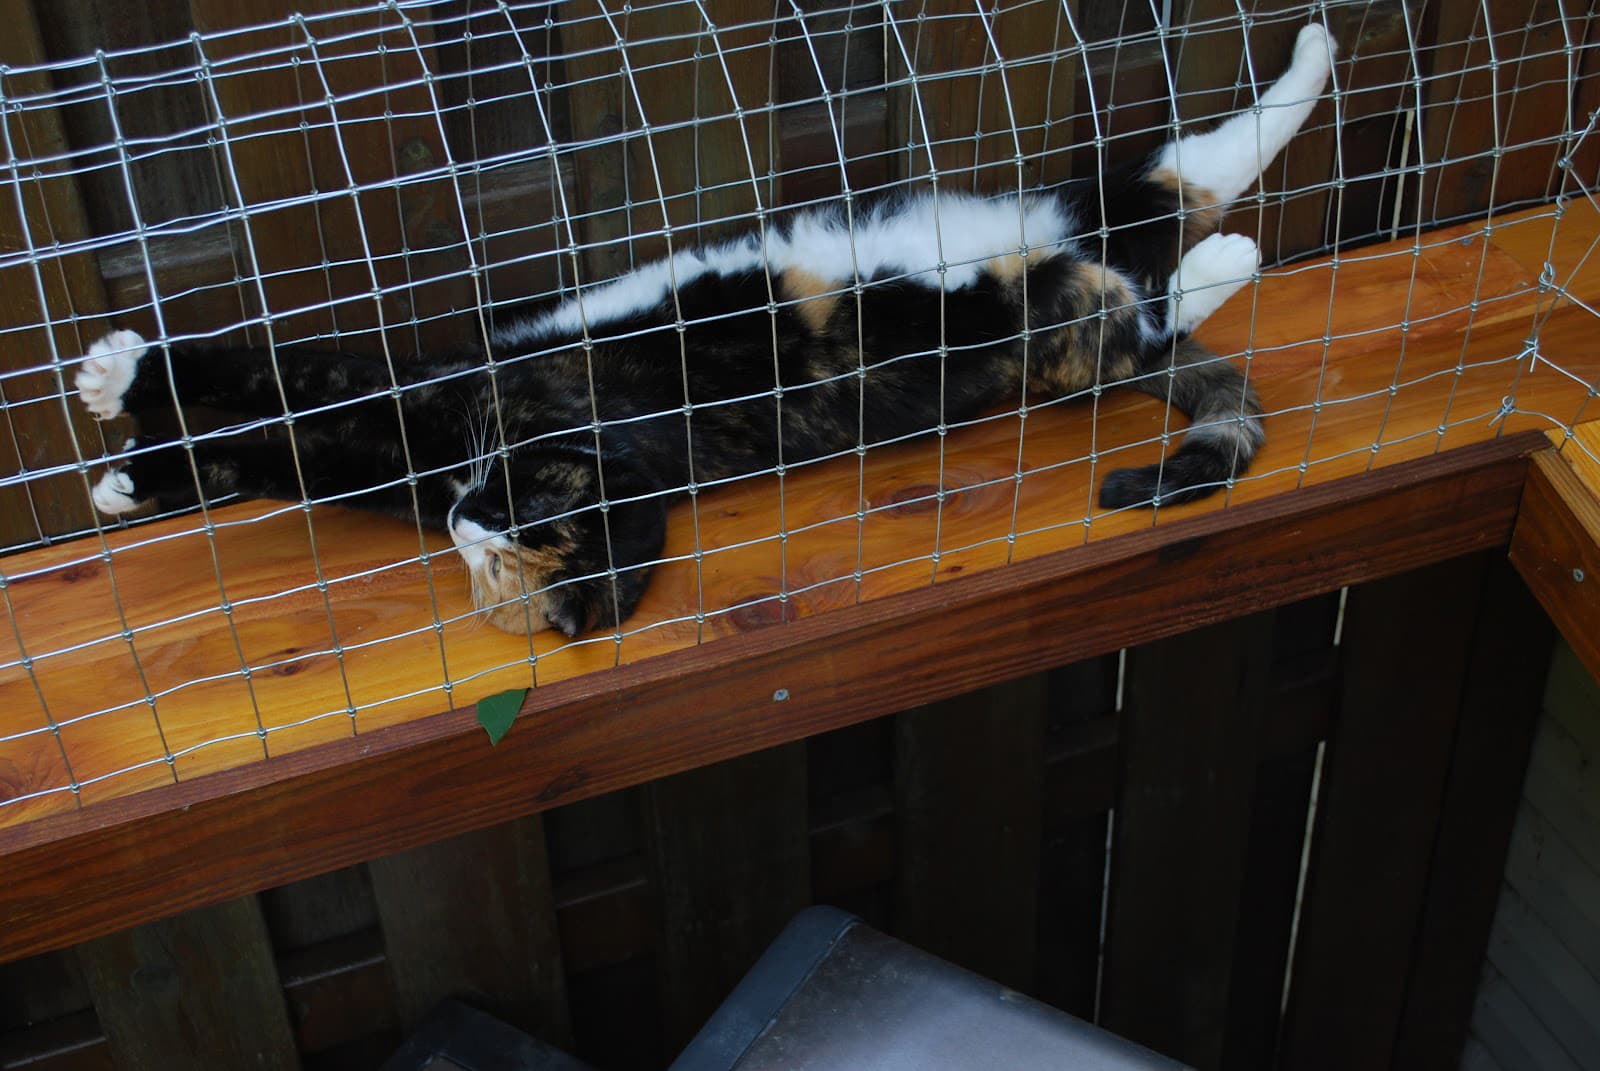
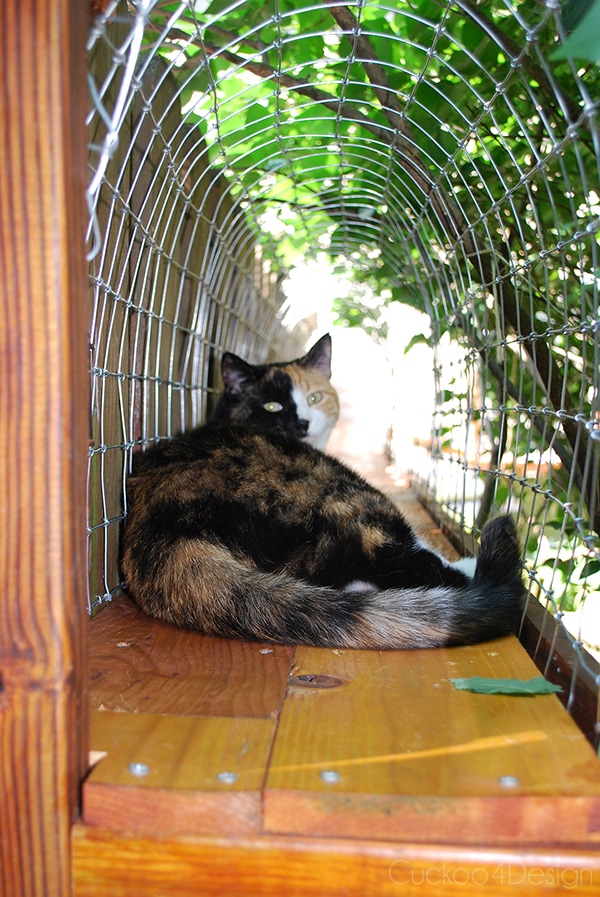
And here are the kitties using the tunnels and exploring.
And if you are wondering, I temporarily closed the end with a small piece of fence while I planned the next section.
Maya also loves the tunnels. I feel like calling them walkways though because that’s what they really are.
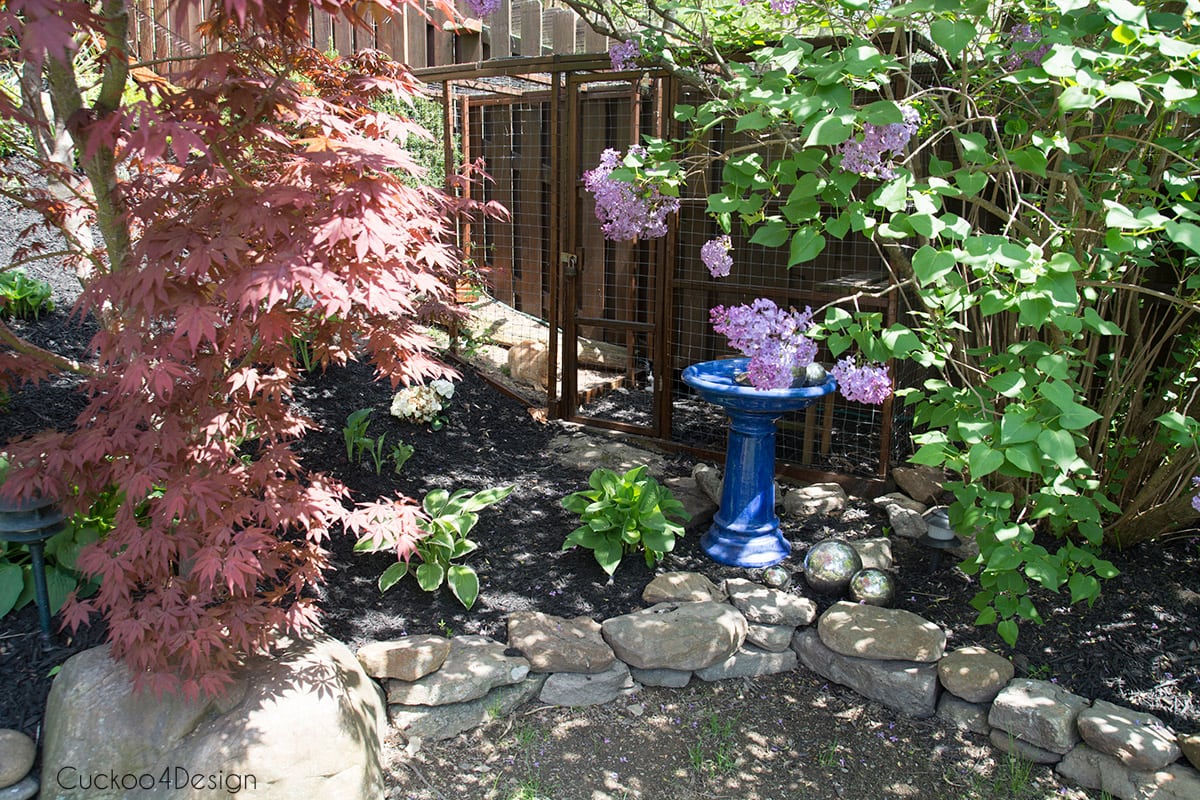
Willy loves it out here. You can see how the wood aged over the years. They are very durable and have held up great over the years. I need to figure out a way to stain it again. Above is our Lilly cat in the same spot as Willy is walking below.

I actually stained the entire outdoor cat run again which is now nicely nestled in between all of our plants.
I didn’t just attach outdoor cat tunnels to my fence, but also outdoor fence art.
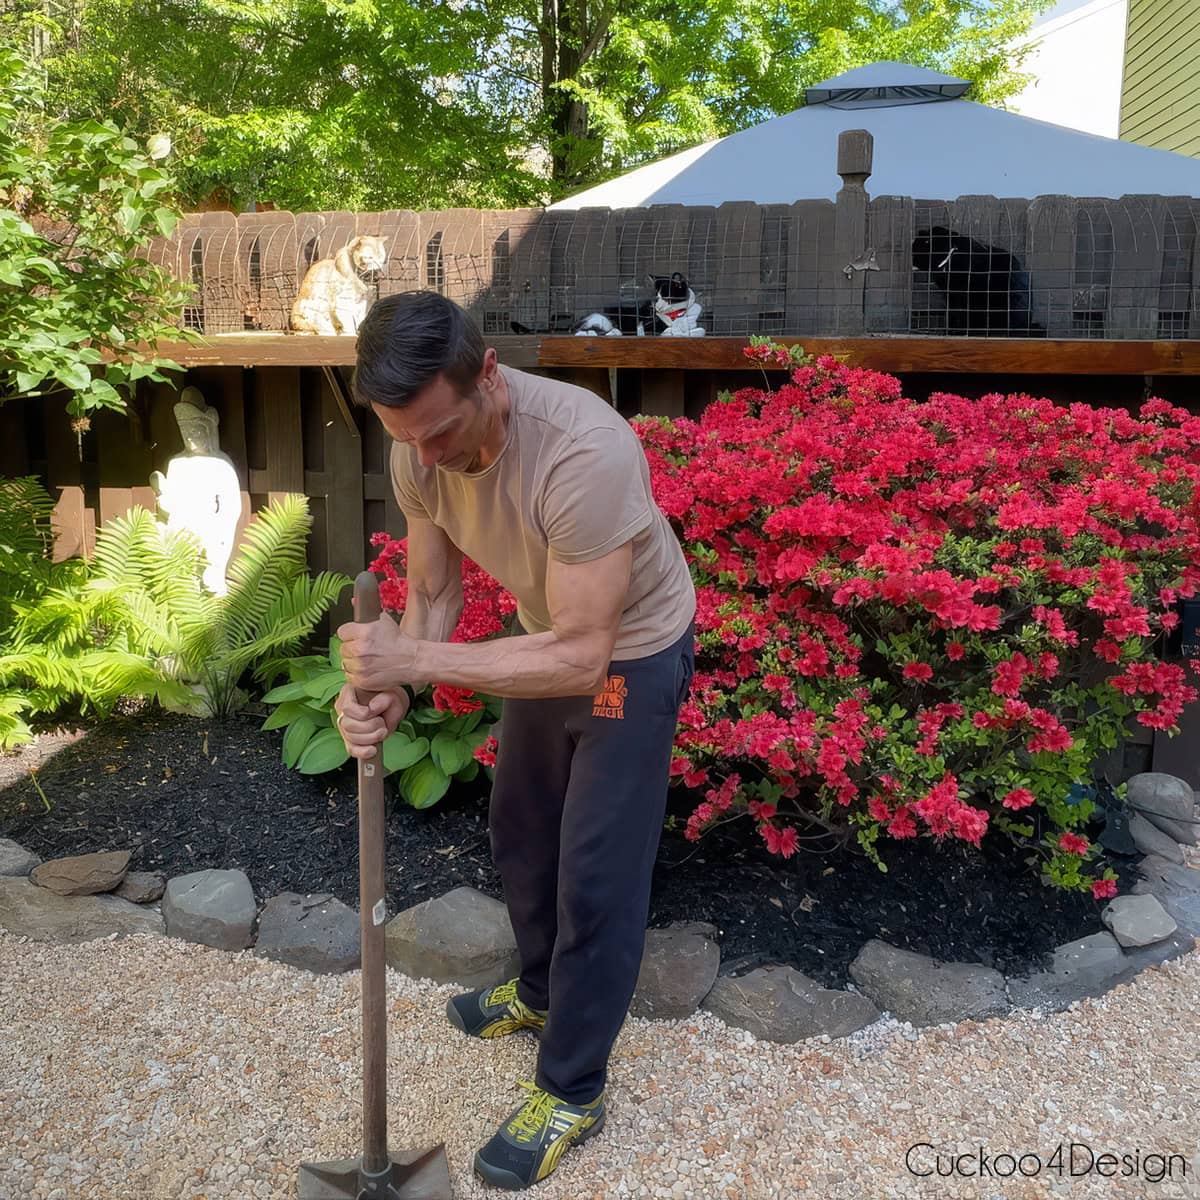
Below is a rare view of three cats sitting in the tunnel together to supervise dad while replacing the grass with gravel.
Here is my poor skinny old lady Lucy. She just turned 19 and is the last of our old lady crew.

You can build one of these tunnels (or buy a prefabricated cat tunnel) leading from a window in your house using the same window insert I used and then run that tunnel to a premade enclosure pictured below (the thumbnail image will take you to the source).


It is so much fun to see them explore and use their outdoor space. The tunnels in my original cat enclosure lasted 12 years before they needed any repairs, and when a section finally rotted, I documented the whole fix. If you are dealing with rotted boards on an existing enclosure, I also wrote about how I repaired a rotted section in my original DIY cat enclosure. Making enclosed tunnels or walkways for your cats is a great way for them to watch birds and butterflies, even if you don’t have room for a full outdoor enclosure. They really are much more fun than just sitting in a cage, don’t you think?

Outdoor Cat Tunnel Ideas
One thing worth mentioning before we get started: you can buy finished mesh cat tunnels online, but those soft, collapsible tunnels are not safe for unsupervised outdoor use. They offer no real protection against raccoons, foxes, or other wildlife that could tear through the fabric. If your cats are going to be outside in their tunnel without you watching, a solid wood and wire mesh construction like this one is the only safe option.

There are so many ways to use outdoor cat tunnels beyond just a straight run along a fence. Here are a few ideas to inspire your own setup.
A tunnel running along the top of a fence is a great space saver if your yard is small. The cats get an elevated walkway with a bird’s-eye view, and you barely notice it from below. A ground-level tunnel winding through garden beds looks beautiful once the plants grow up around it and the whole thing disappears into the greenery. If your cats are indoor only, a tunnel leading directly from a window to a small enclosure is enough to give them fresh air and enrichment without ever touching the ground. And if you have more space, connecting multiple enclosures with catio tunnels creates a whole system your cats can explore for hours.
All of these ideas use the same basic construction method described above. Start with one tunnel section, get comfortable with the process, and expand from there. Once you build your first one you will wonder why you waited so long.
You can also buy finished wooden outdoor cat tunnels, but they are rather expensive, and building your own is definitely a more affordable option.
An online friend of mine with a solid, secure fence used a cat proof fence topper so her cats could enjoy her yard, which is another great idea. It wasn’t doable in our yard though with all the plants and trees that they could climb to get over the fence topper.
More cat enclosure ideas
- Several amazing DIY outdoor cat enclosures connected by tunnels and covered with roofing panels in a beautiful garden.
- Unique outdoor cat jungle gym with a tree house on top of an old stone chimney and connected by tunnels
- Outdoor cat enclosures connected to house, leading to other enclosures by tunnels
- DIY Ikea catio

More cat DIYs
- Amazing DIY litter box enclosure built with Ikea kitchen cabinets
- Build your own outdoor heated igloo cat house for stray and feral cats
- The best heated cat houses for feral cats and strays
- I made a macrame cat hammock to hang in a window so my cats could look outside
- DIY pet portrait as tributes for my kitties who have crossed the rainbow bridge
- I built an outdoor cat ladder for a former stray to give him access to my son’s bedroom.


Tschüß,


How to build an outdoor cat tunnel
Learn how to build a DIY outdoor cat tunnel using wire mesh and deck planks. Includes sizing tips and step-by-step building instructions.
Materials
- deck planks (the amount of planks needed depends on the length of the tunnel you want to build)
- pressure treated 2×4 lumber
- deck screws
- galvanized fence staples
- wire fencing/pet fencing (I chose vinyl-coated gauge wire this time around but you can also just use galvanized mesh)
- outdoor wood stain
- mineral spirits or turpentine for cleaning the brush
Tools
- drill (right size of drill bit for your screws)
- hammer
- measuring tape
- brush for staining
- wire cutter
Instructions
- Apply wood stain to all the wood
Stain all the wooden pieces before you start building, and let them all dry. It’s much easier this way. But you can certainly build the tunnel first and stain it before adding the wire fence to it.
- Measure and sketch out your project on paper
Measure everything and sketch it out on a piece of paper before starting the project! This simple step is always the most important part. And every project's measurements are different. - Cut 2x4s into pieces to match the width of two deck planks
Cut the 2×4 lumber in strips to match up with the width of two deck planks lined up next to each other. These pieces will be the bottom support pieces that keep the cat tunnels together.
- Cut some deck planks in half
I cut one of the deck planks in half, so I could stagger the pieces, which ensures more stability. It's not a must, but it certainly helps. Depending on how many tunnels you are building, you might have to cut more in half. For one tunnel, one is enough. - Cut smaller pieces of wood if your tunnel is on an incline
For my design, I needed some extra pieces of wood to add to the tunnel surface because our walkway is on a steep incline/hill, and I wanted the cats to have something to hold on to. It’s more like a ladder going up the hill. I did not include this step in our regular tunnels along the fence. It is only necessary on an incline.
- Lay your 2x4s on the ground with planks on top
Now it’s time to assemble the bottom part of the cat tunnels. Lay the 2×4 pieces on the ground and add the planks on top. Make sure to stagger the planks with a 2x4 under the staggered section.
- Pre-drill-holes through planks and 2x4s
Then pre-drill the holes where the planks attach to the 2x4s. This is very important because if you don’t pre-drill the holes, the wood will crack. Use a drill bit that is slightly smaller than the screws. - Drill screws through pre-drilled holes
Use two to three screws to attach each plank end to the 2x4s through the pre-drilled holes.
- Lay plank walkway on its side
When you have one large tunnel walkway, it is time to attach the wire fencing. I used 3 planks (2 hole pieces, 1 cut in half) for this tutorial. We made it this big because otherwise, it would have been too heavy to carry, which is another factor to watch out for. Lay the walkway part on its side so you can lay out the wire on top. - Trim the wire mesh width and length
I trimmed the width of the wire fence with a wire cutter since I didn’t want the tunnel to be too tall, but this is optional.
Also, cut the wire fence to the length of the tunnel. - Attach wire fence to walkway with fencing staples
Attach the wire fence with the fencing staples and hammer to one side of the plank. A staple every second wire mesh rectangle of the fence should be enough. - Attach wire fence to other side of the tunnel
Now turn the planks and fencing around and bend it over the walkway part, and hammer in the galvanized fence staples on that side as well.
- Move tunnel to where you want it
To move the tunnel to its final destination. Either connect it to a cat enclosure or add more tunnels to create a tunnel system. You definitely need two people since they are rather heavy and durable.
Notes
- you can use a tunnel like this to lead from a cat door to a cat enclosure or catio
- you can use tunnels to run from a cat door through your yard without an enclosure
your cats are so lucky to have you!!!
Thanks Cassie, I hope so 😉
Thank you for this! I used your guide to build a tunnel that bridged from a catio on my porch to an enclosure (with the cat fencing) at the end of my yard. The tunnel runs above head from catio to fence, then down along the fence line at a foot above the ground, back up across a gate then down to an opening in their fenced in area. Getting the angles all right was a challenge but your guide gave me the foundation! Thank you!
Oh I’m glad it worked out for you. I’d love to see some photos!
I just love your walkways & enclosures! Such a kind creative way to improve an indoor cats life.
The best part is when they walk out there for the first time. Especially when you adopt a cat that has never been outside
Your fur children are very happy with the tunnel….bless you
Yes they are and thanks so much Debby
Brilliant, Julia! I love it…and I know the cats do too.
Yes I’m pretty sure they love it too. I can’t wait to continue with the build once my back is better and the fence post is fixed.
That is so cool! I love that you do this for your cats. Job so well done!
Thanks Diane! The job needs to get finished yet though when the weather plays along, my back is healed and the fence post fixed. Hopefully I can continue soon.
I think I’ve fallen in love with Willy. The pictures of him in the tunnel are absolutely adorable! Such sweet kitties you have.
Thanks Alison, he has the best personality. He’s part monkey, lemur, dog, cat and human. Such a funny little guy.
I love this–such lucky kitties!
Julia,
I absolutely love your ideas! Your cat tunnels and cat cage are brilliant!! Your cats are very lucky !!!
Thanks Aileen, it’s so fun to see them enjoy it
I enjoyed reading about your cat tunnels. It has given me inspiration and ideas for one to run between my daughters house and mine!
Oh good luck! I’m sure the kitties will love it.
Great idea, I made a catio myself-in 1990, I’m not a good carpenter but my 4 cats love it-even in the winter to get a breath of fresh air and look at the birds and sun…I think it’s best NOT to use pressure treated wood or stain or paint- because of the arsenic & chemicals -Cats love kicking their paws-i know the wood will last longer, but still a risk..they sell plastic coated wood maybe not as risky-costly, not sure thou…I really like the Tunnel idea, cats diffently love being outside and your NOT ever worried because their not lost,or free roaming onto a street-cars or other animals like a fox saying hello…lol
I completely agree Gene. I do feel ok about having the pressure treated and stained wood so far though. I’ve had our enclosure for over 15 years now and my first set of cats all passed away at a very high age (19, 20, and 22 years old) and lived a mostly healthy life while using this enclosure for years. I did use a small amount of pressure-treated wood though.
What a great tutorial very well done
Thank you Jill!
This is absolutly adorable and brought tears to my eyes. we have five cats and I always feel guilty not letting them out in thn garden. I wanna make this but I have a question about something that always worried me. What about bugs, ticks, or parasites? Also what about other stray cats outside? don’t you worry if they come in contact behind net and fight or get sickness from them? (we have a few stray cats outside with FIV and other sicknesses.) it would help to know what you did about such things! thanks!
Hi there, yes that can all be cause for concern. We’ve had our enclosure and tunnels now for a bit over 10 years and I’ve never had any major issues. They have brought in various small animals that ventured into their enclosure including snakes (and a tick here and there but not many) which wasn’t fun for us but they were having fun 😉 I trapped and neutered some cats in our neighborhood and caught one male who just stuck around our yard. He was definitely someone’s pet before and had a rough life. We love him. He also has FIV and our indoor cats hate him and he doesn’t like them either. Occasionally they fight standing on opposite sides of the enclosure mesh but so far so good. He has access to our son’s bedroom now so he can be safe from bad weather and snuggle in bed. I hope I can keep them all safe and healthy! My husband’s cousin is our vet and I’m doing this all under her supervision. Sorry, I know this isn’t much help.
Your cat tunnels are fabulous as is your catio and yard. I’m moving soon and can’t wait to add walkways etc. to the back yard for my cats. I you wouldn’t mind answering a few questions I was wondering what has held up better over the years, the plain galvanized hardware cloth or the vinyl-coated one? How about the cedar vs pressure treated deck boards for the walkways? Also, what are the large metal L-brackets you used to support the metal walkways? I don’t see a link to them so if you bent a metal strap, what guage is that? Thank you and I look forward to future blogs as I signed up to keep up.
Hi Chris, everything held up great! The only thing that I had to replace recently and showed in my enclosure post are the cedar planks in the oldest part of the cat enclosure right by the house. I didn’t link the L-brackets because I didn’t see them on the the website but I found them in the area where you buy supplies for building decks at the home improvement store. I hope that helps and good luck!
I love this! We have a catio for our 4 cats, and we used to open it’s door to let them hang around the yard during the day, but our one year old recently took off for 48 hours and spooked me really good. He hurt his jaw and was exhausted too. Now I’m to afraid to let them back out. I think I will expand their catio and incorporate some of these tunnels into the garden fencing! Thanks for the idea!
Oh, poor baby! Good luck Sarah, and I’d love to see it all when it’s done.