

DIY Modern Macrame Wall Hanging | Easy Unique Design
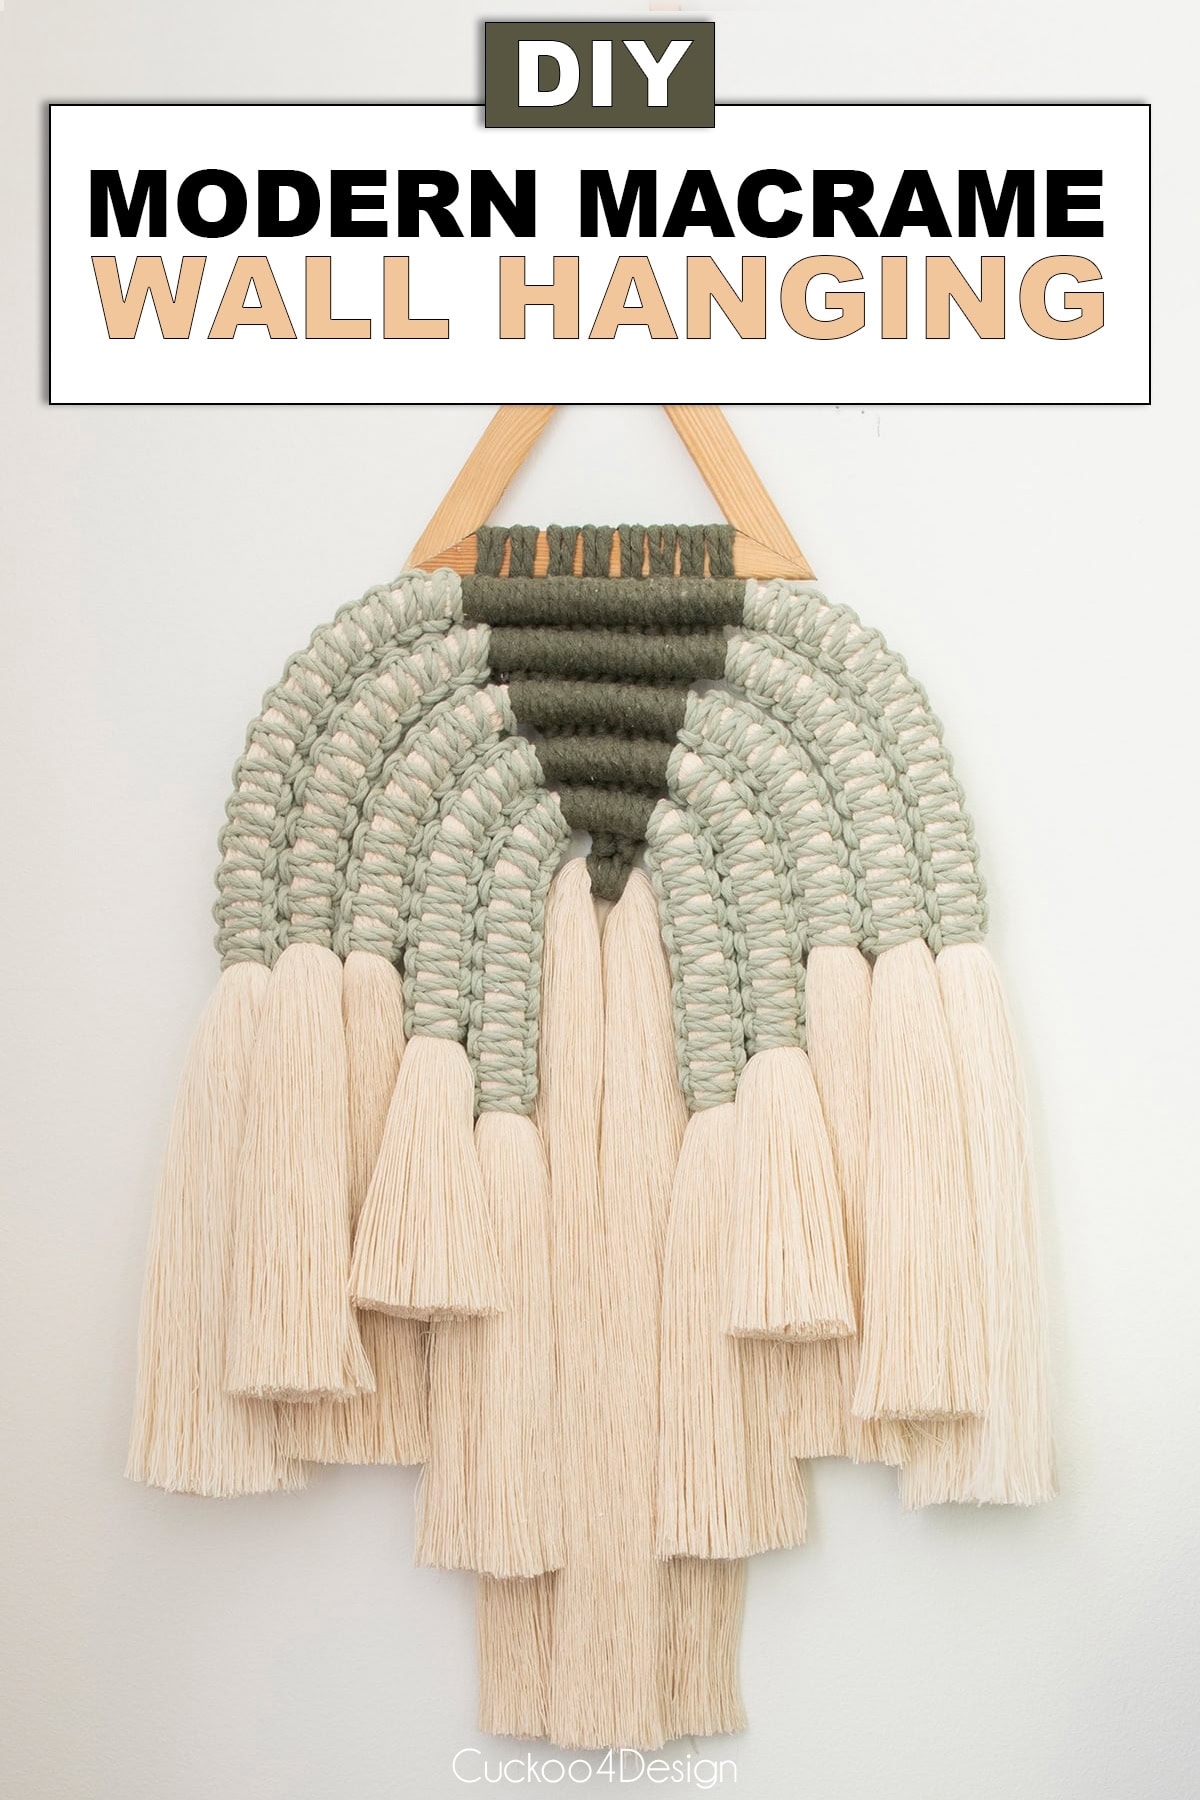
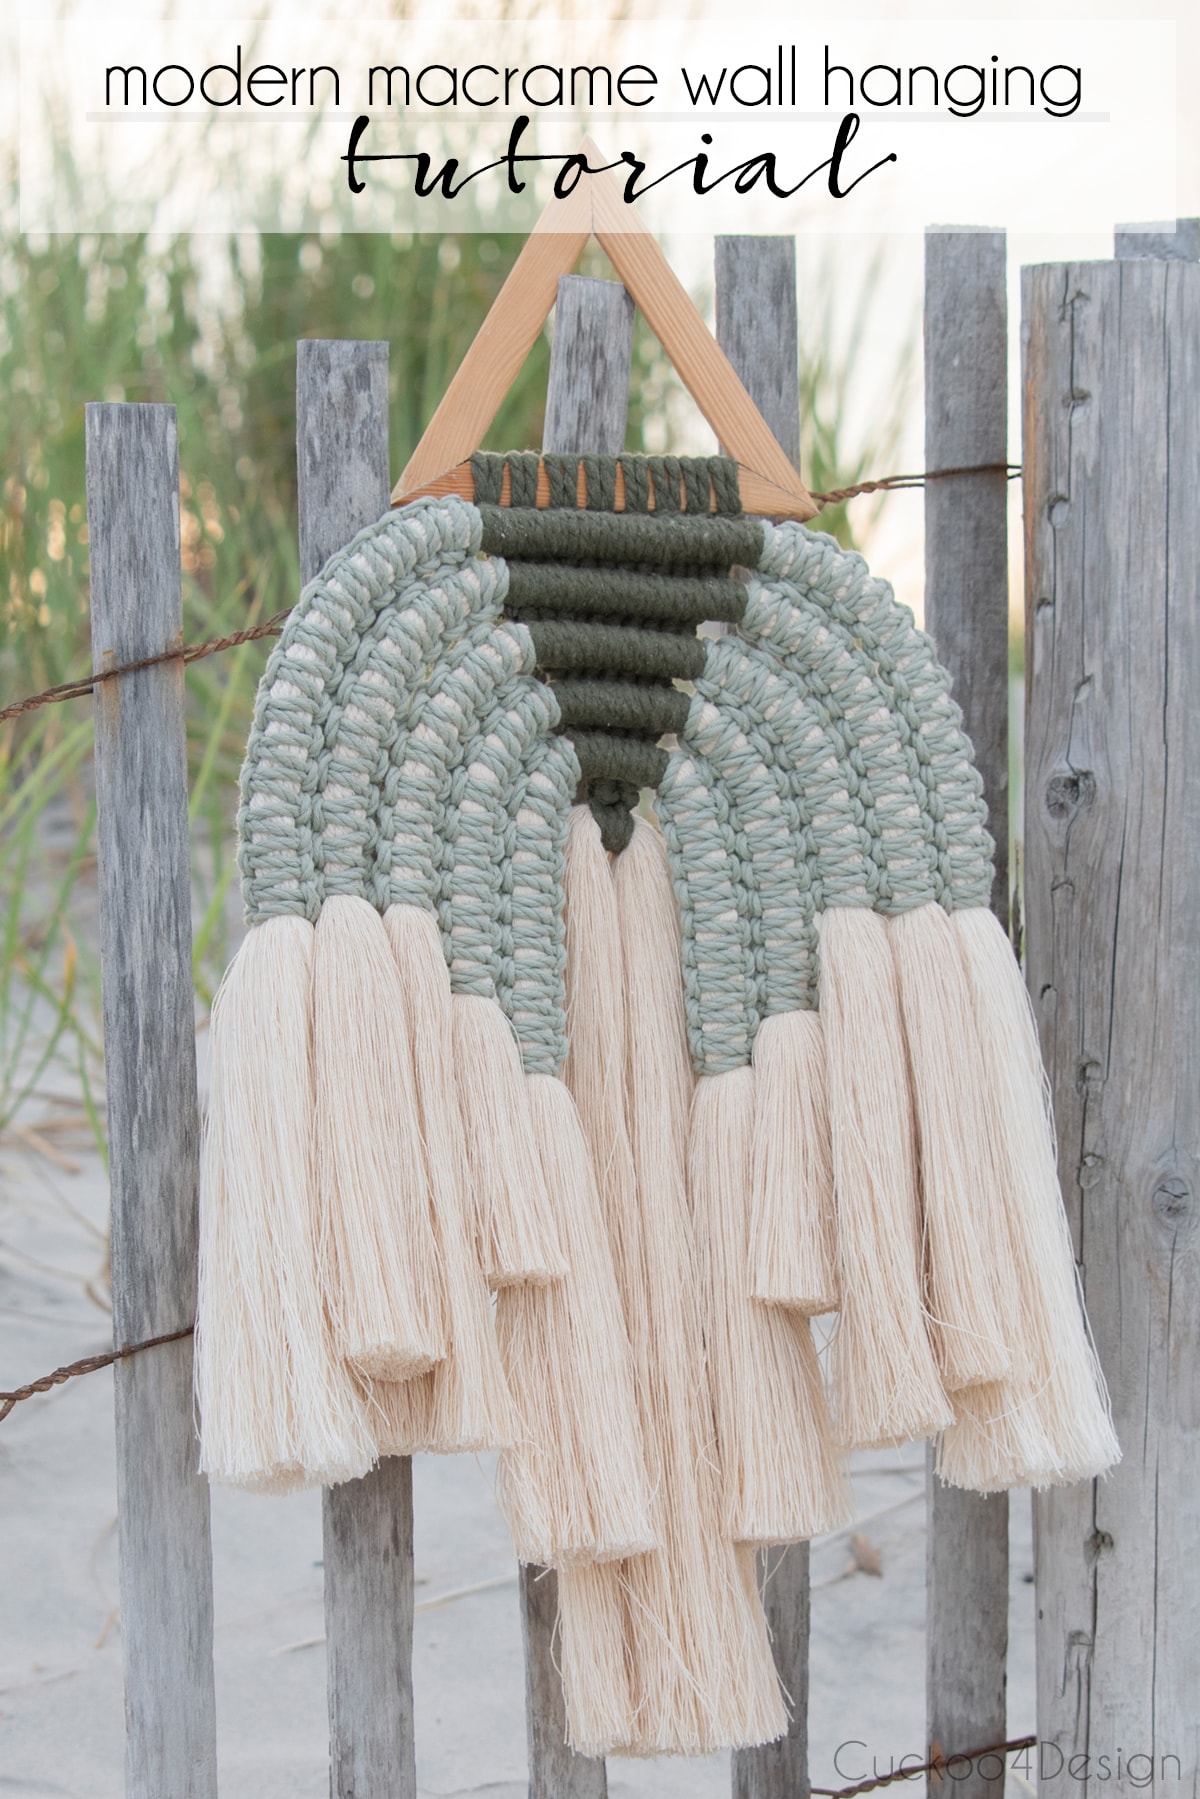
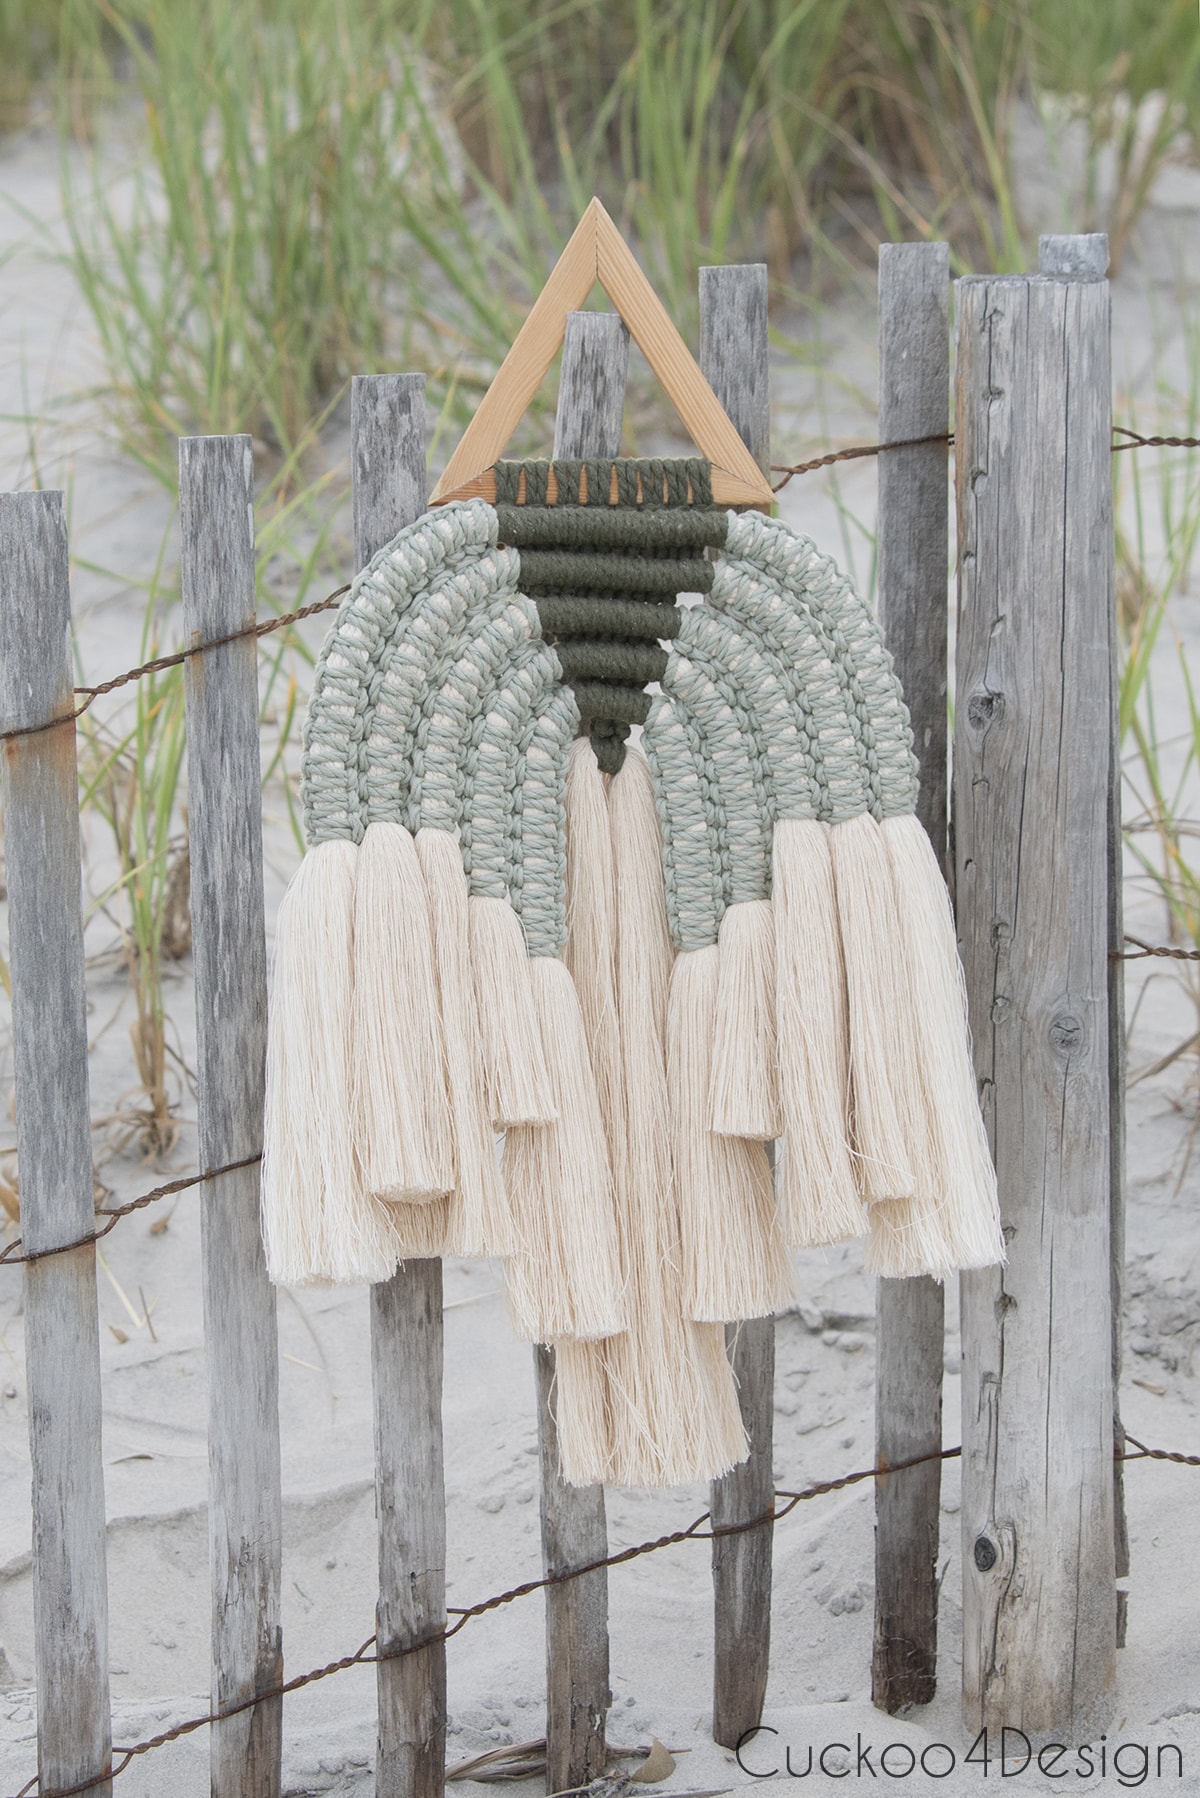
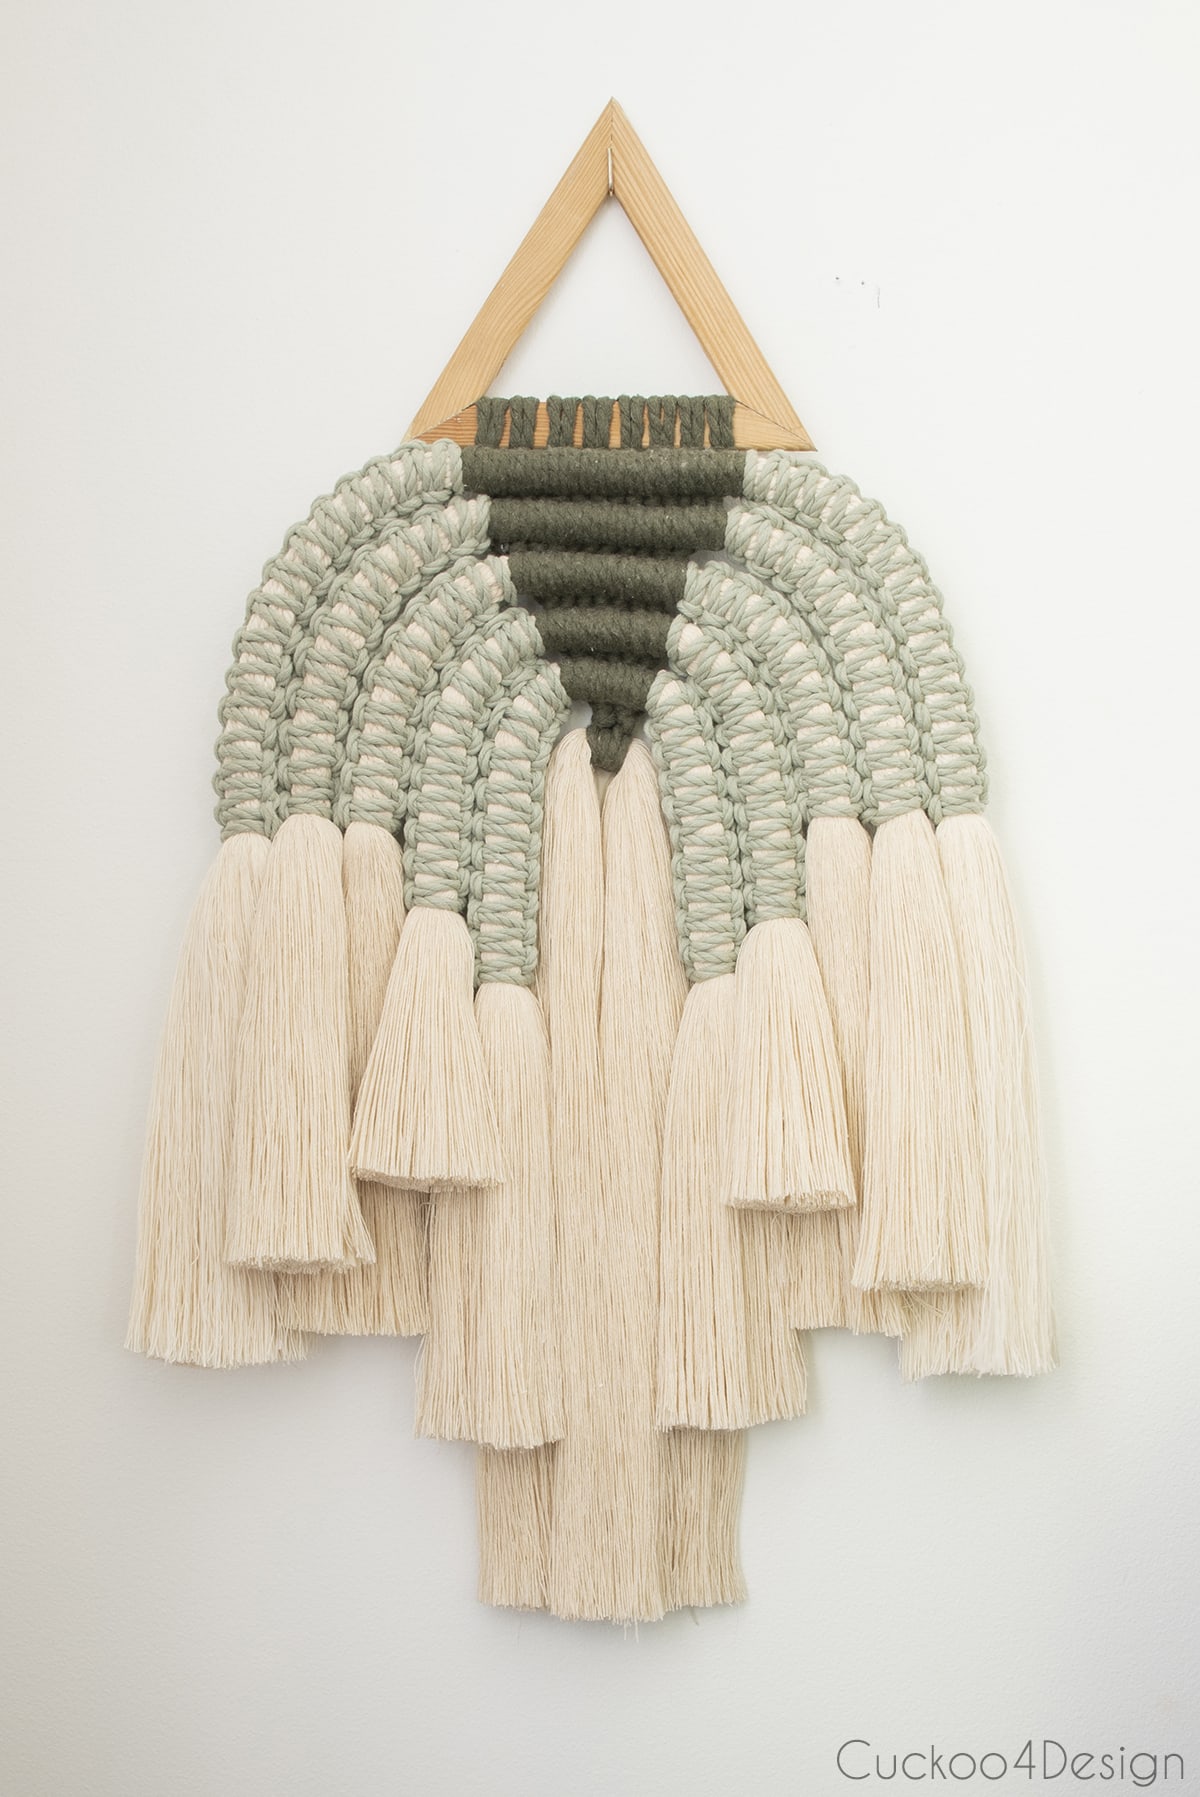
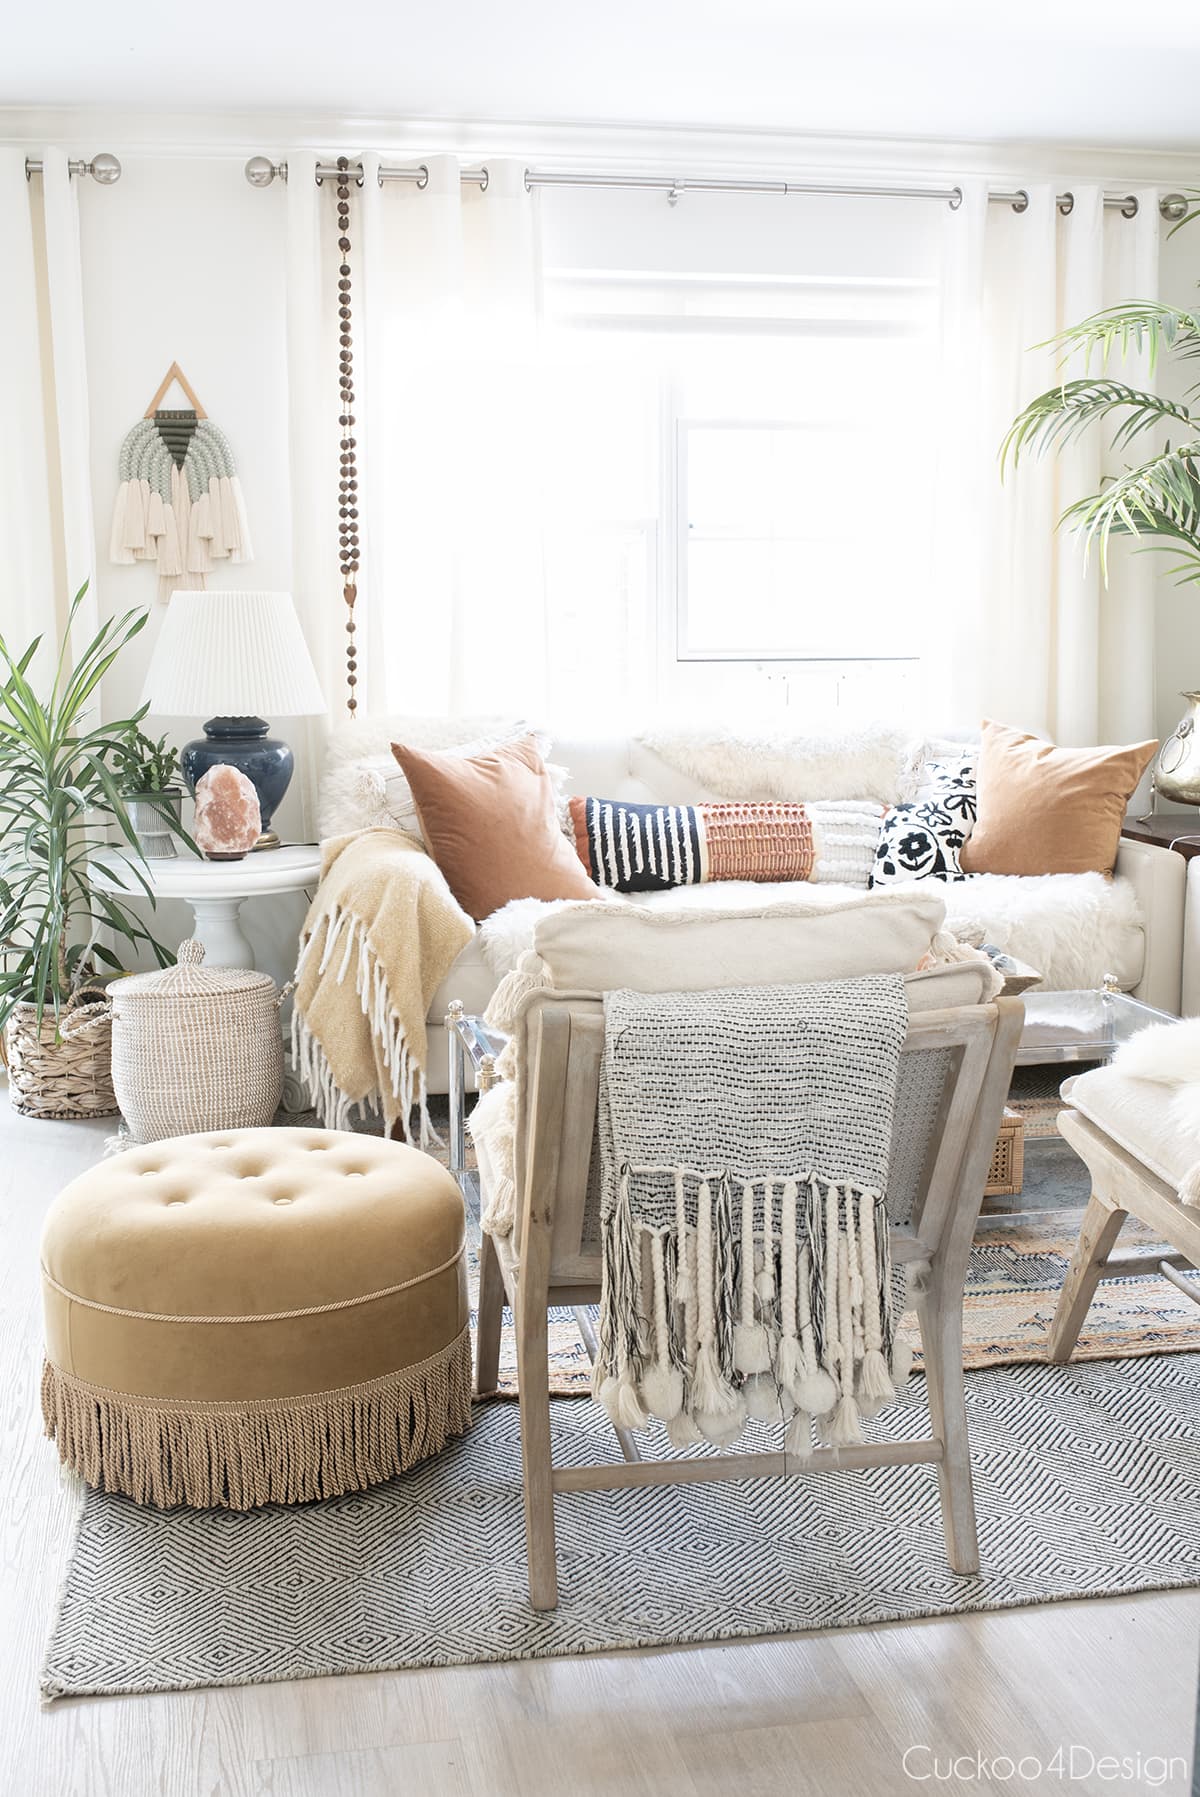
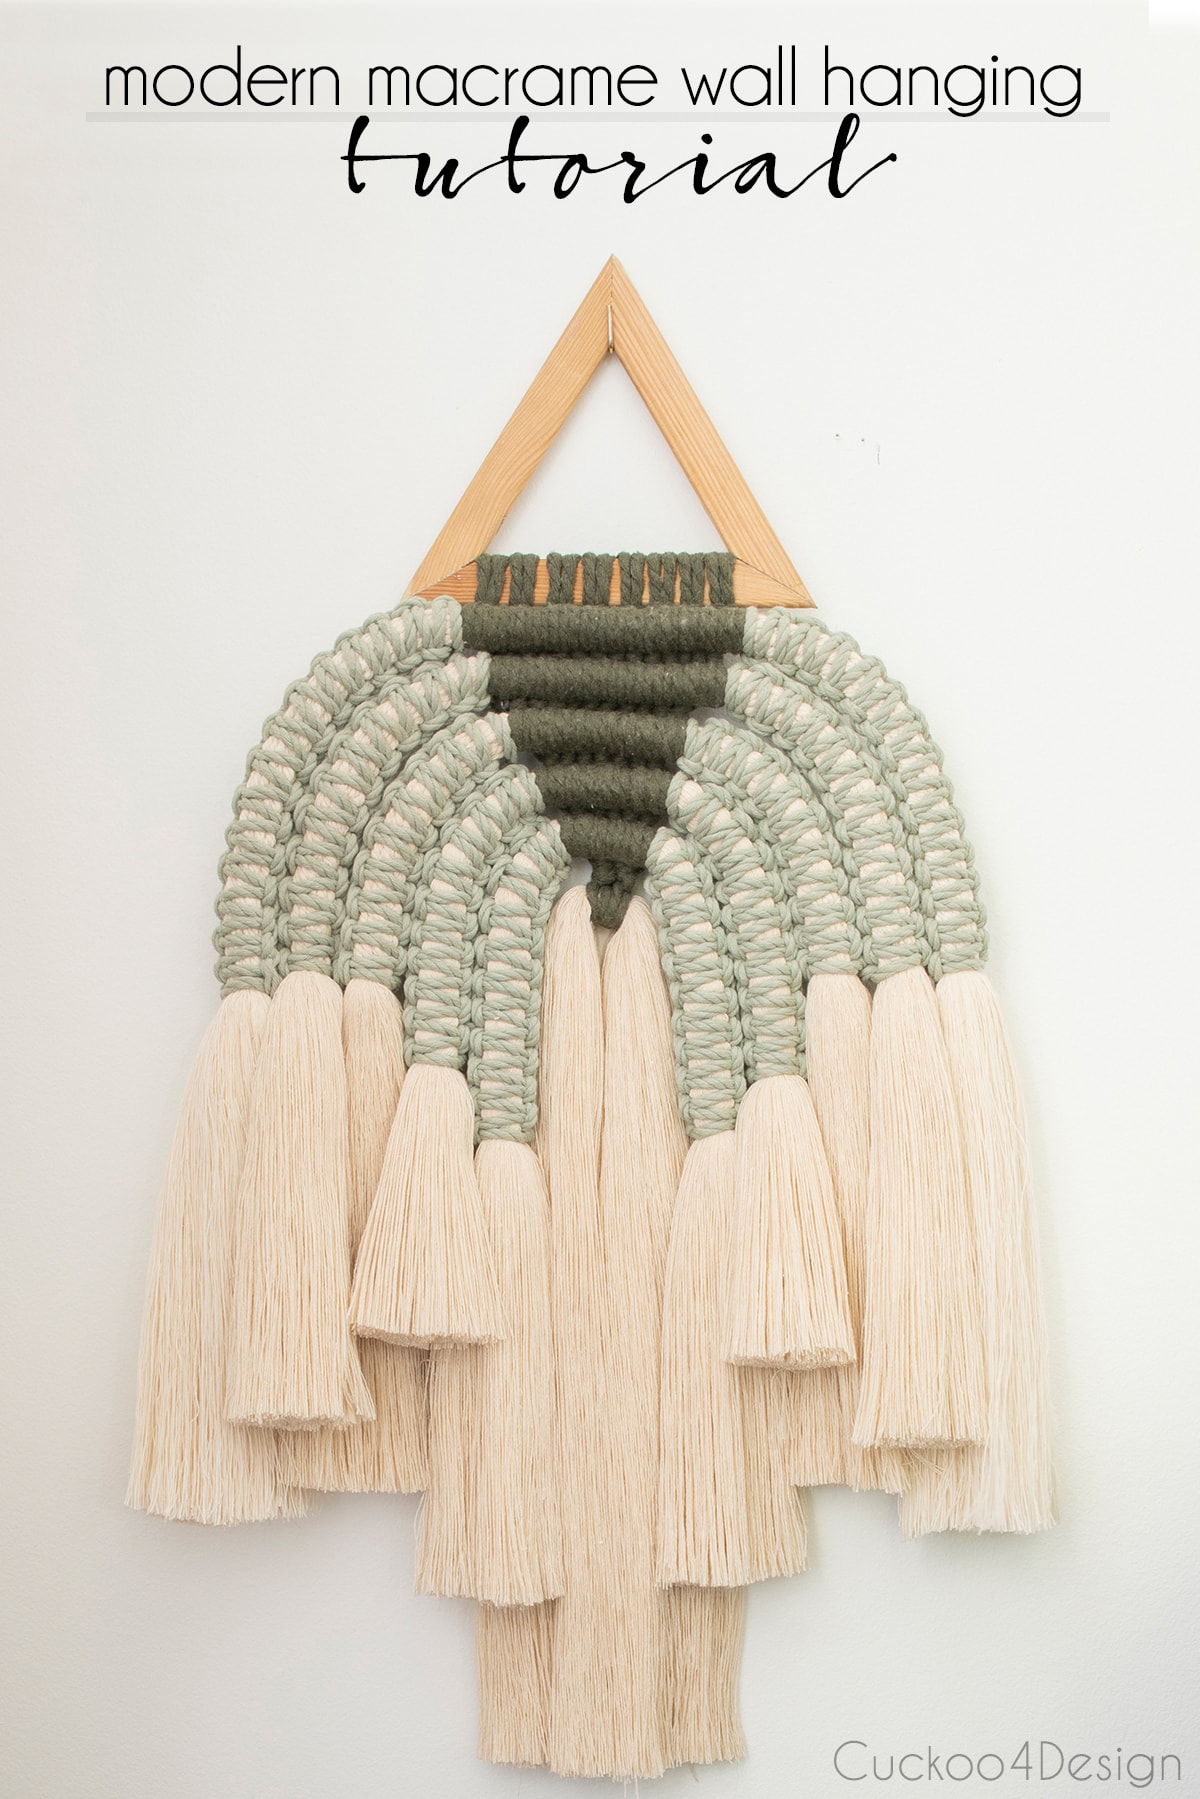
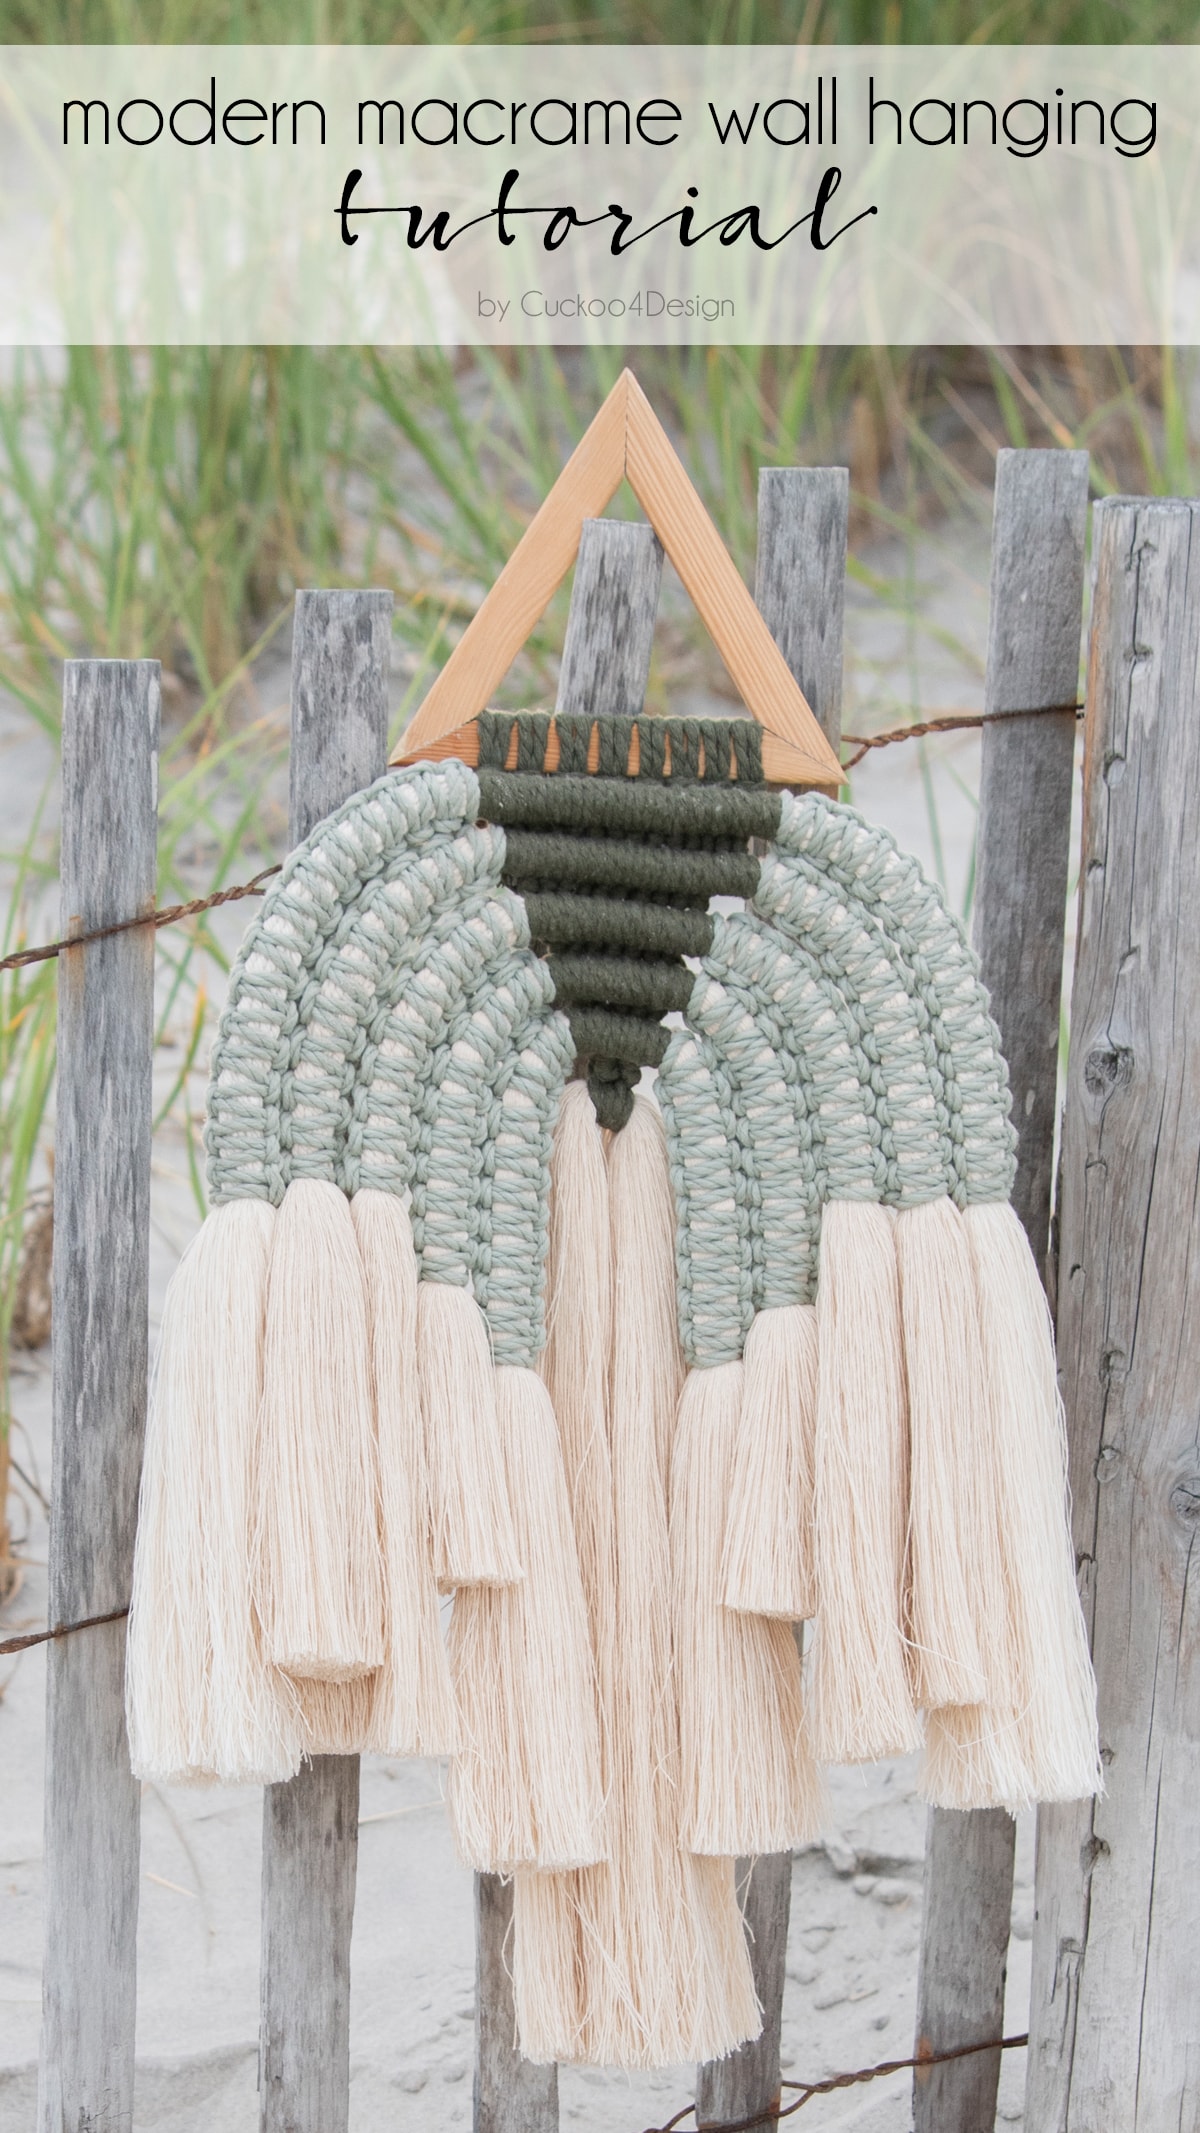
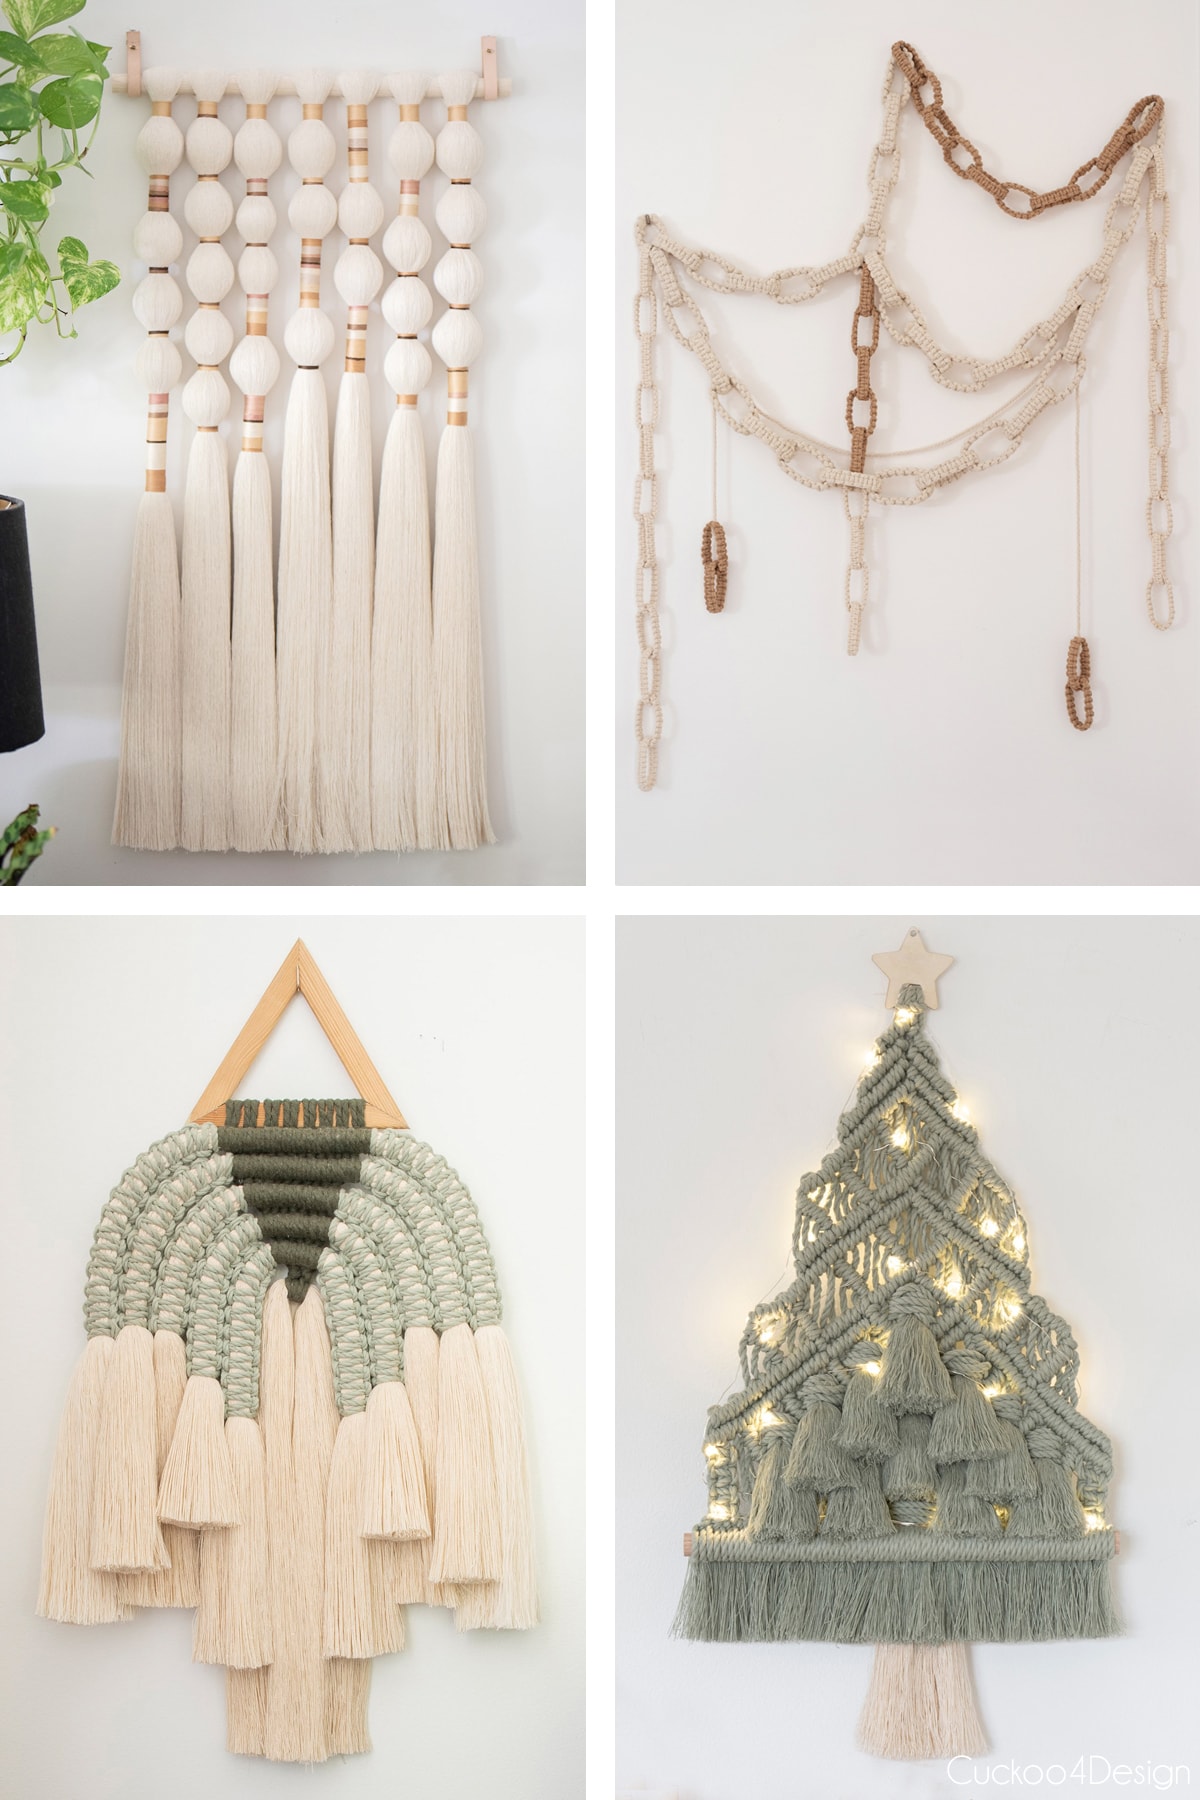
I created this unique modern macrame wall hanging using three beautiful colors: ivory, sage green, and dark green macrame yarn. The chunky layered bundles and combed fringe create a textural, contemporary look that’s completely different from traditional boho macrame.
Years ago, I saw a stunning vintage pastel ’80s macrame wall hanging at a friend’s house, and I’ve wanted to recreate that staggered chunky look ever since. I’ve seen similar modern versions with combed yarn, and I loved the idea of using just three colors for a bold, contemporary twist. This tutorial uses just three simple knots and unraveled combed yarn to create a beautifully thick, layered effect that looks way more complicated than it actually is.
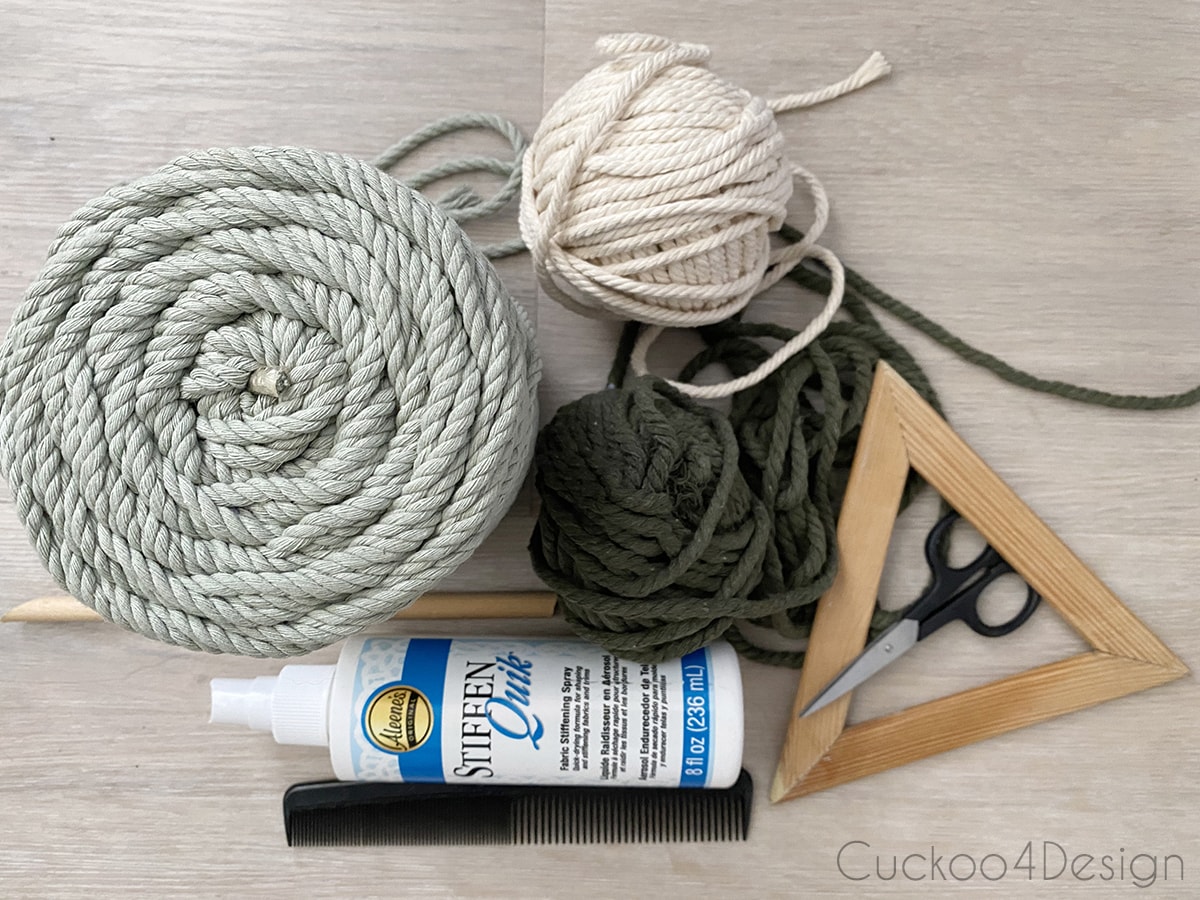
Materials needed
- light green macrame cord (I bought my sage green yarn from this listing HERE, but it looks like they aren’t offering it anymore. You could try this light green cord instead, or any custom colors you like.)
- dark green macrame cord
- ivory macrame cord
- wood or metal crafting triangle frames or wooden rod (I cut and glued mine, but don’t have a tutorial for it, it wasn’t easy either. I think it’s better just to buy one)
- sharp scissors
- fabric stiffener
- straightening iron
- comb
- measuring tape
- large needle for yarn
- craft glue
Macrame yarn measurements needed:
- 84 pieces of 40″ ivory macrame cord
- 10 pieces of 40″ sage green macrame cord
- 8 pieces of 85″ dark green macrame cord
The macramé knots used in this project are Square Knots, Double Half Hitch Knots, and Lark’s Head Knots.
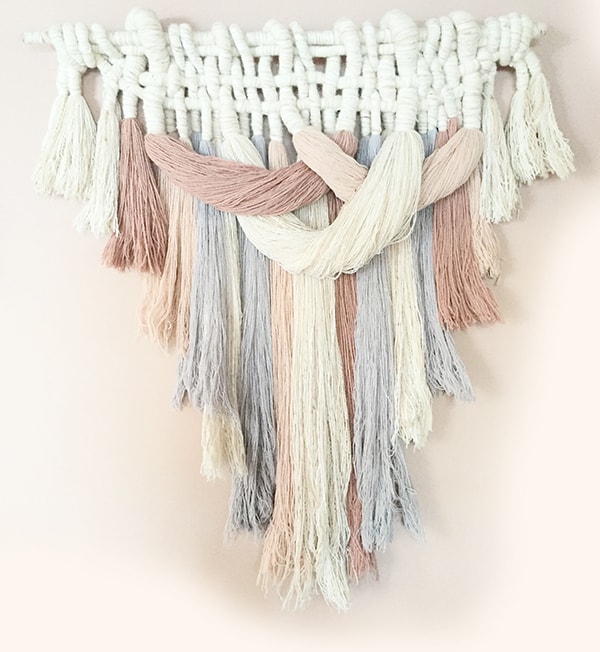
The wall hanging below is the actual piece that I saw at my friend’s house. Isn’t it lovely?
Video tutorial
This post may contain affiliate links from which I will earn a commission at no extra cost to you. View my full disclosure policy.
Below you can find my video tutorial on how to make this modern macrame wall hanging. I recommend watching it to get a better understanding of some of the steps and knots.
Use the triangle on the image to turn on the video. If you are on a cellphone or other device, turn it horizontally for better viewing. If it doesn’t load for some reason, then you can also watch it on my YouTube Channel instead.
Step-by-step instructions
When I started this piece, I wasn’t really sure how long or wide I wanted everything, so I started out with really long strands of macrame yarn to make sure I had enough in the end. This way, I wasted a lot of yarn, which isn’t all that bad for me because I use a lot of scraps for my other projects. This, however, makes it a little hard for me to tell you the exact measurements of what you need because I started out so big.
Step 1: Attach dark green yarn to triangle frame
The dark green is only available in a thicker yarn, but I didn’t want everything to be too chunky, so I unraveled it and used two twisted strands for the project. This way, I had a thinner yarn.
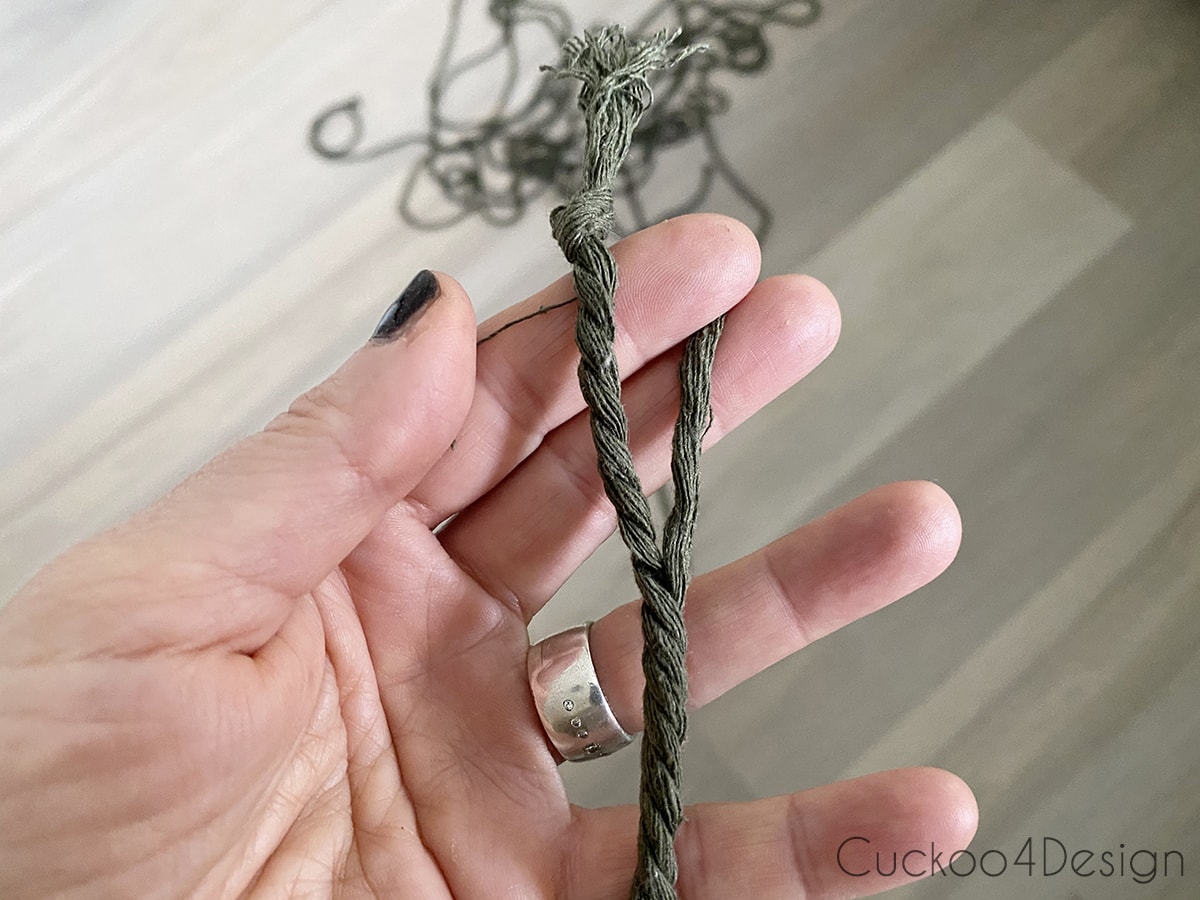
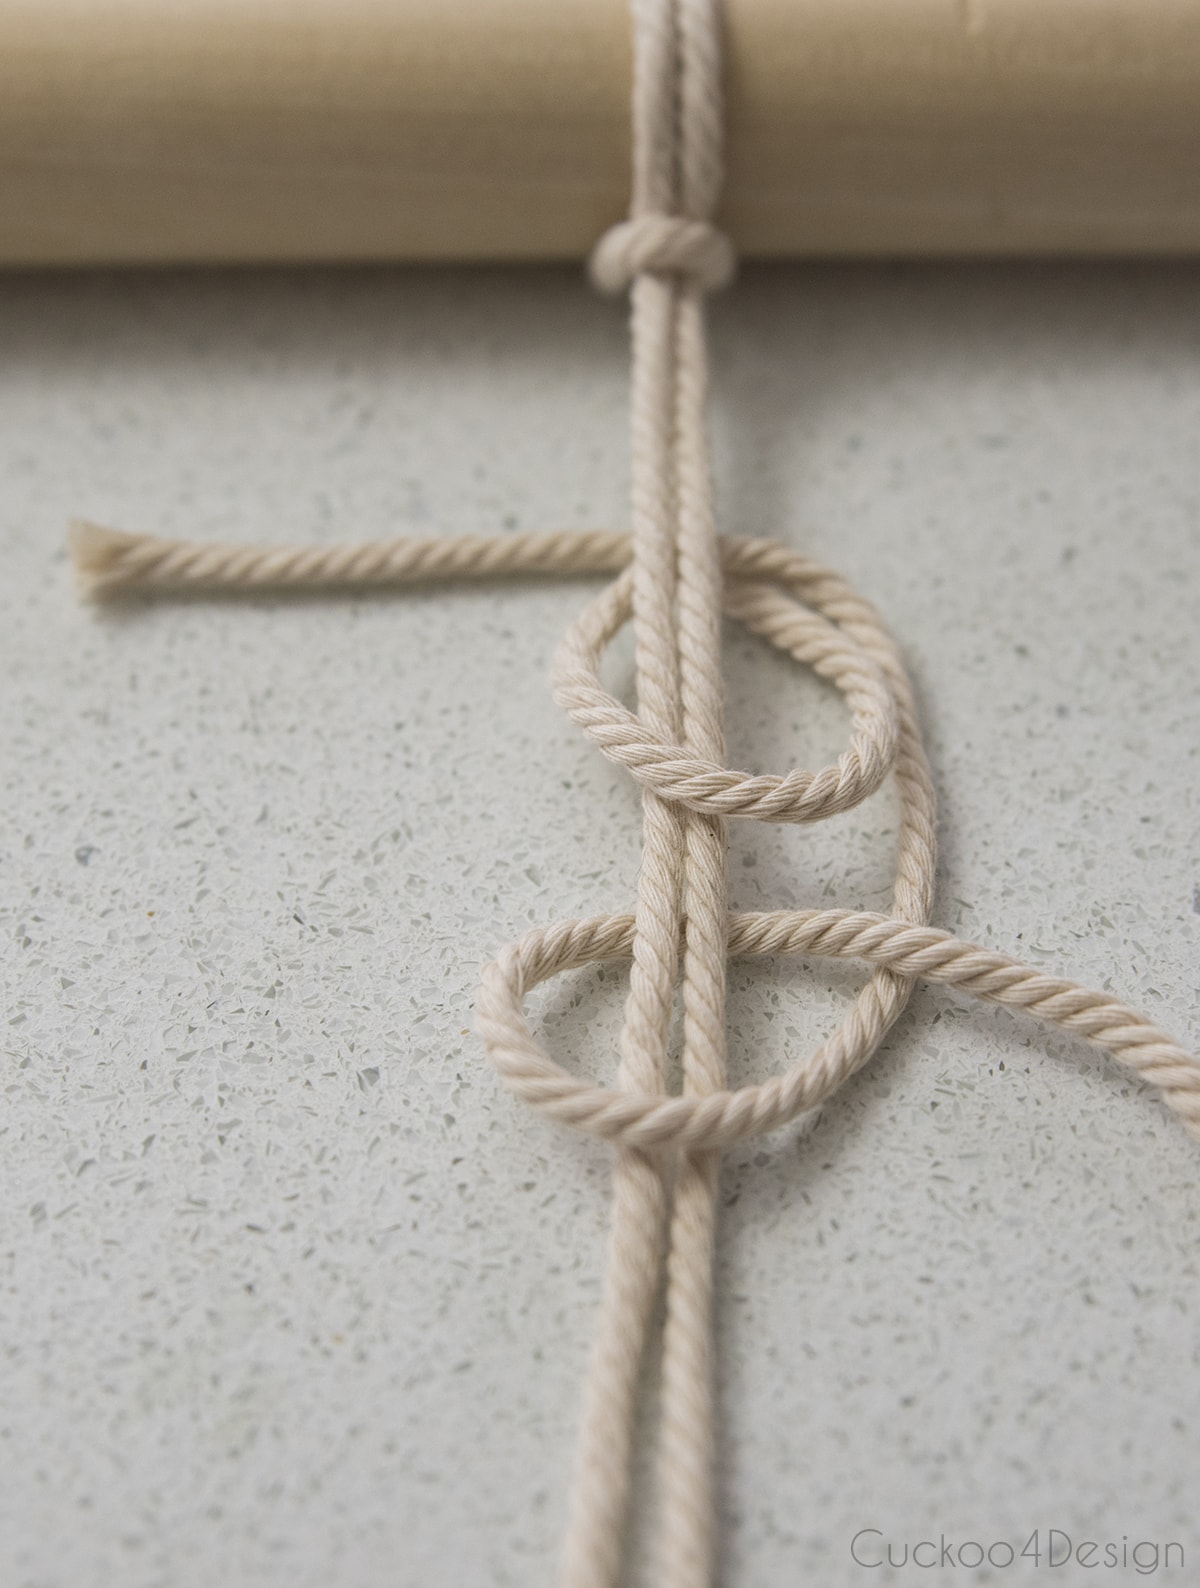
Attach 8 strands of 85″ dark green macrame yarn to the rod or triangle with Lark’s Head knots, which involves folding the yarn in half and looping it onto the piece of wood or metal as shown below.
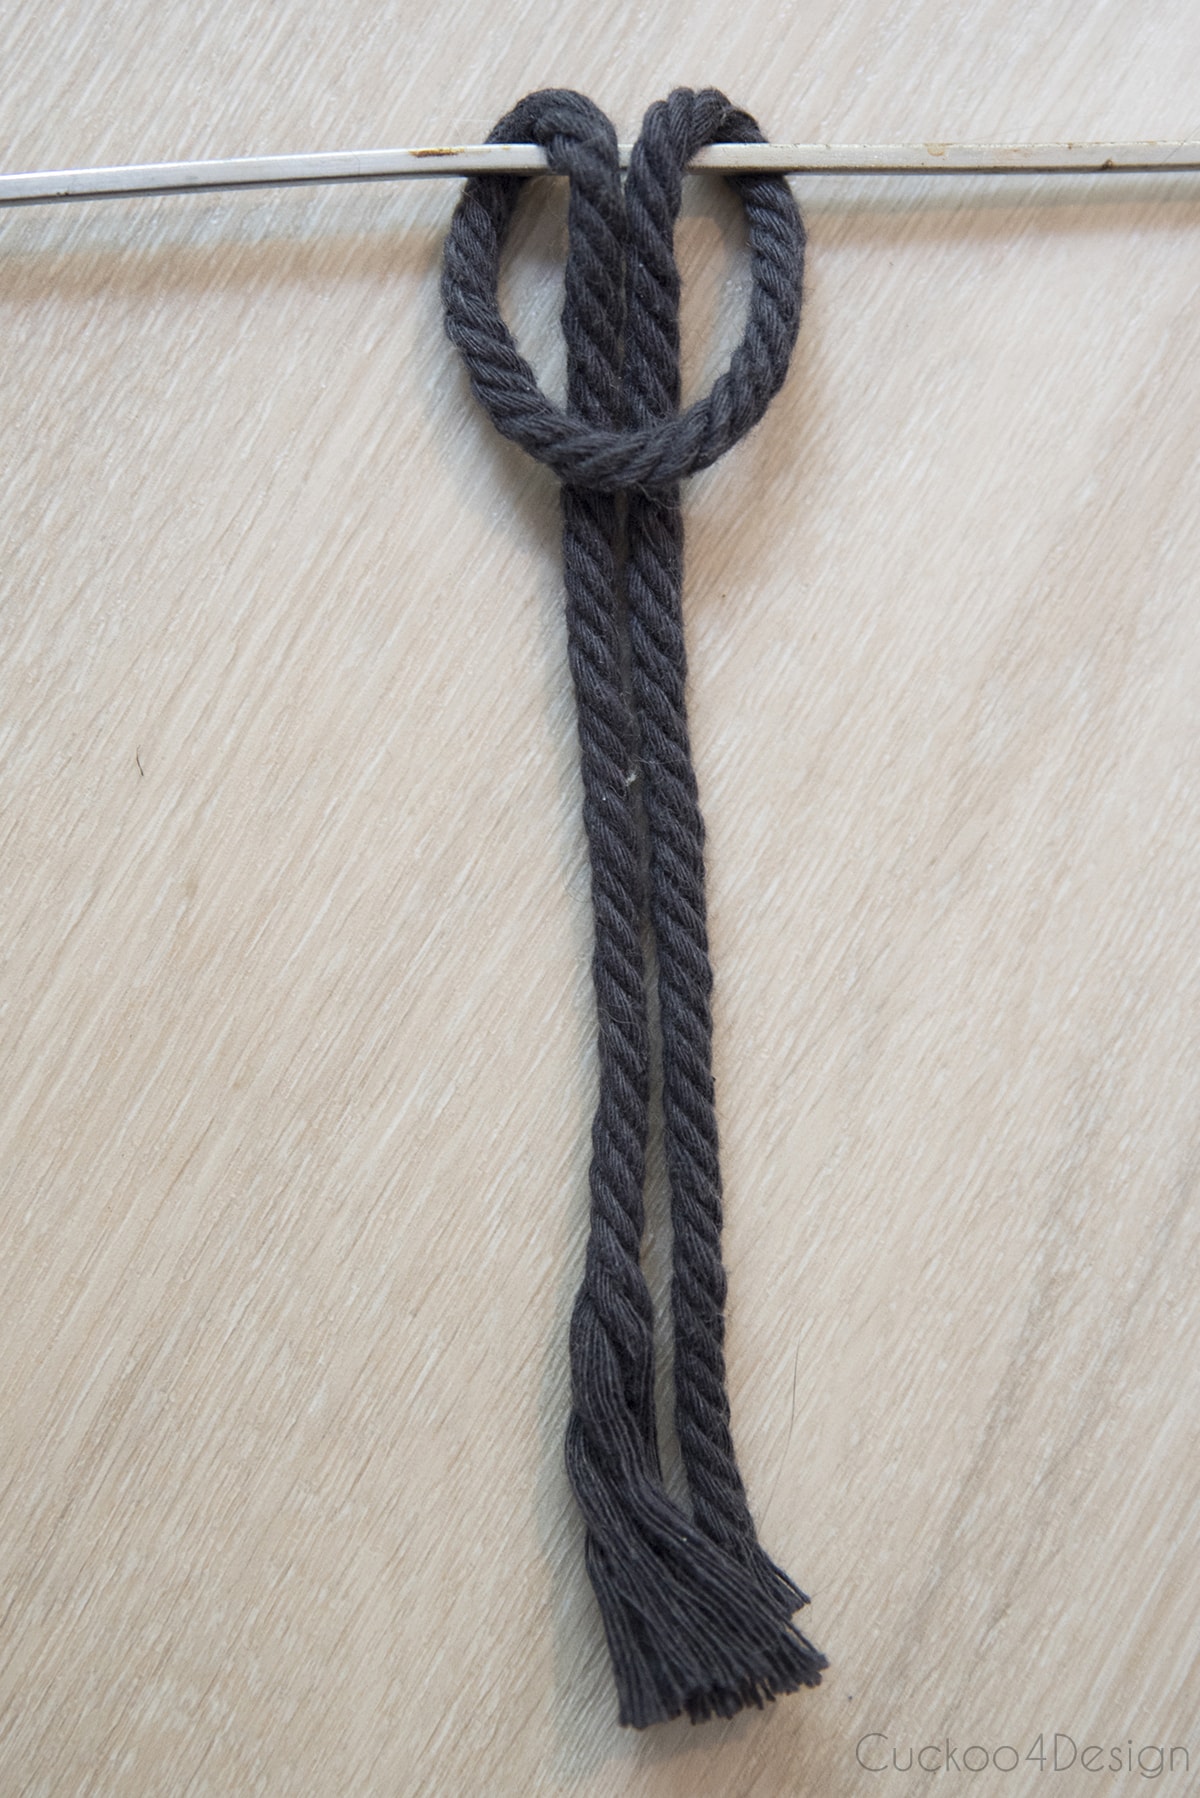
Taping my triangle to the kitchen countertop made things a bit easier.
Step 2: Cut ivory yarn for bundles
I then cut 40″ strands of ivory macrame yarn for the chunky strands that are hanging down. Each chunky wrapped strand bundle holds 14 pieces of 40″ pieces of ivory macrame yarn. So you’ll need 84 pieces of 40″ pieces of ivory macrame yarn.
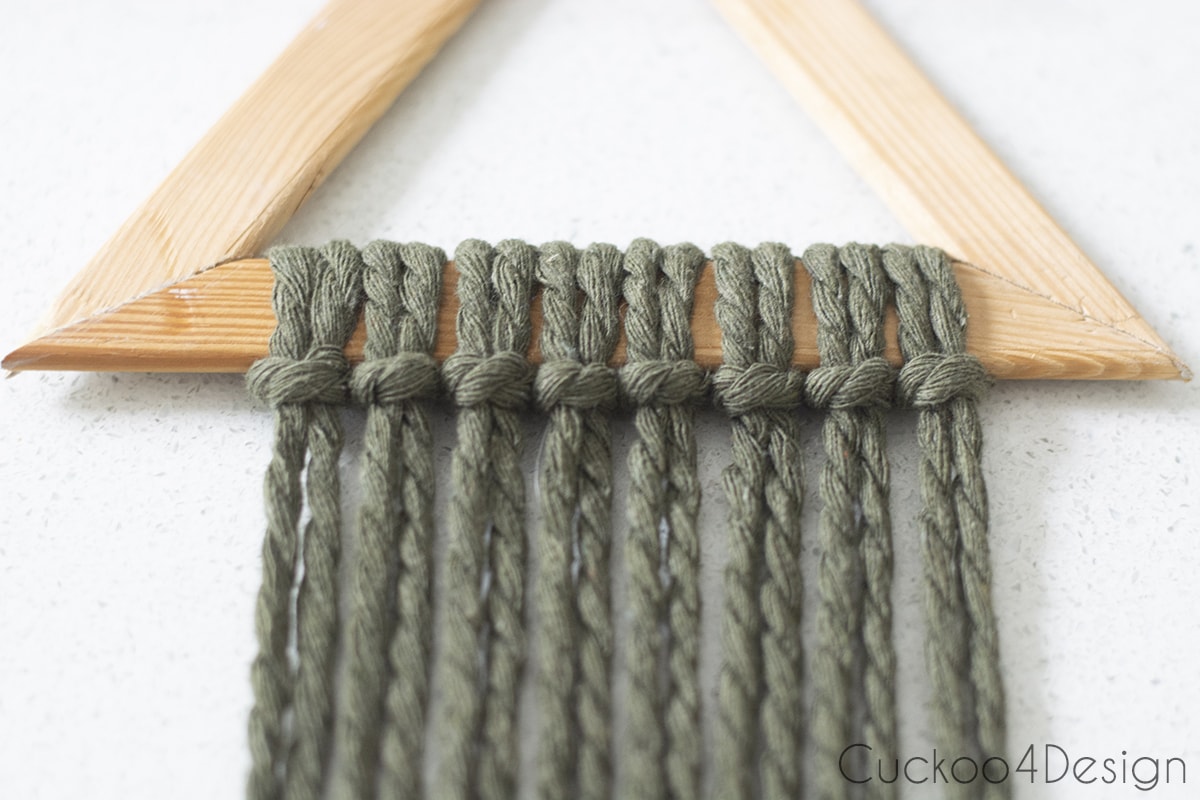
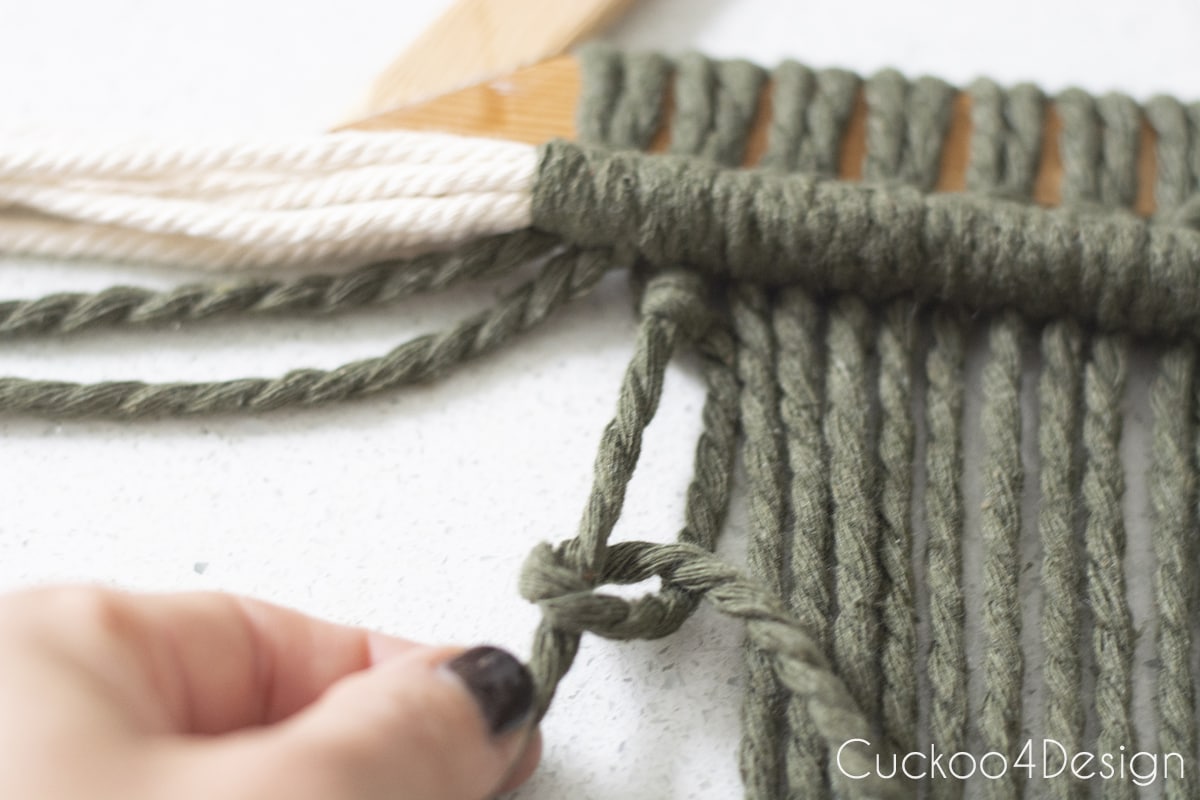
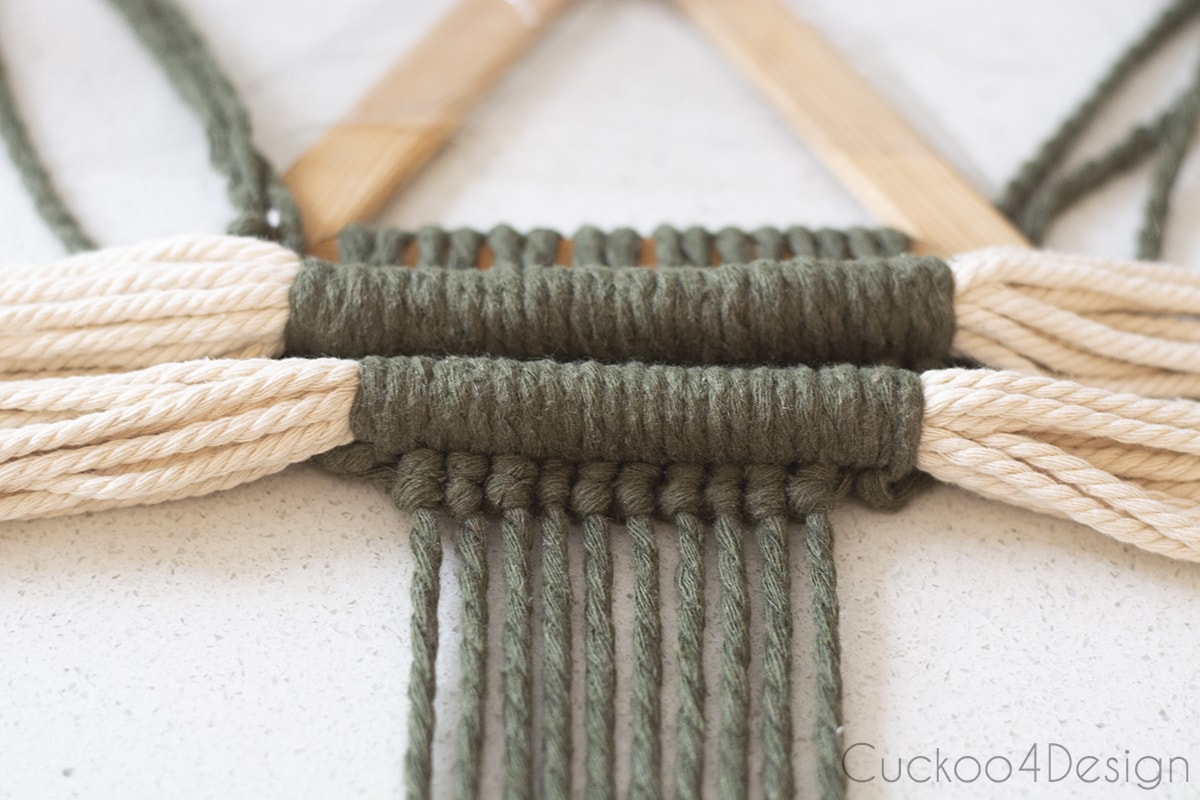
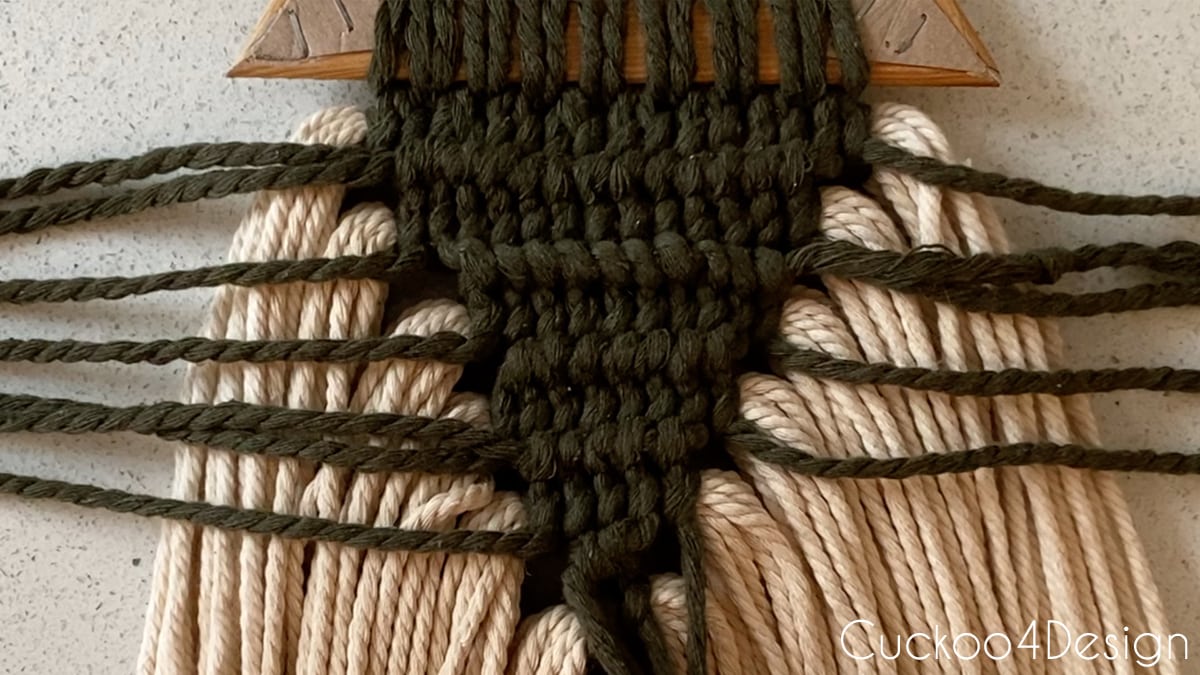
Step 3: Knotting dark green wrapped bundles
Next, lay 14 pieces under the rows of Lark’s head knots.
Those strands will get tied to the piece with Double Half Hitch knots. I used all Double Half Hitch Knots in my macrame planter sleeve tutorial. If you want to check out how else you can use this macrame knot.
Below you can see how to loop the dark green yarn over the ivory yarn to form the knots.
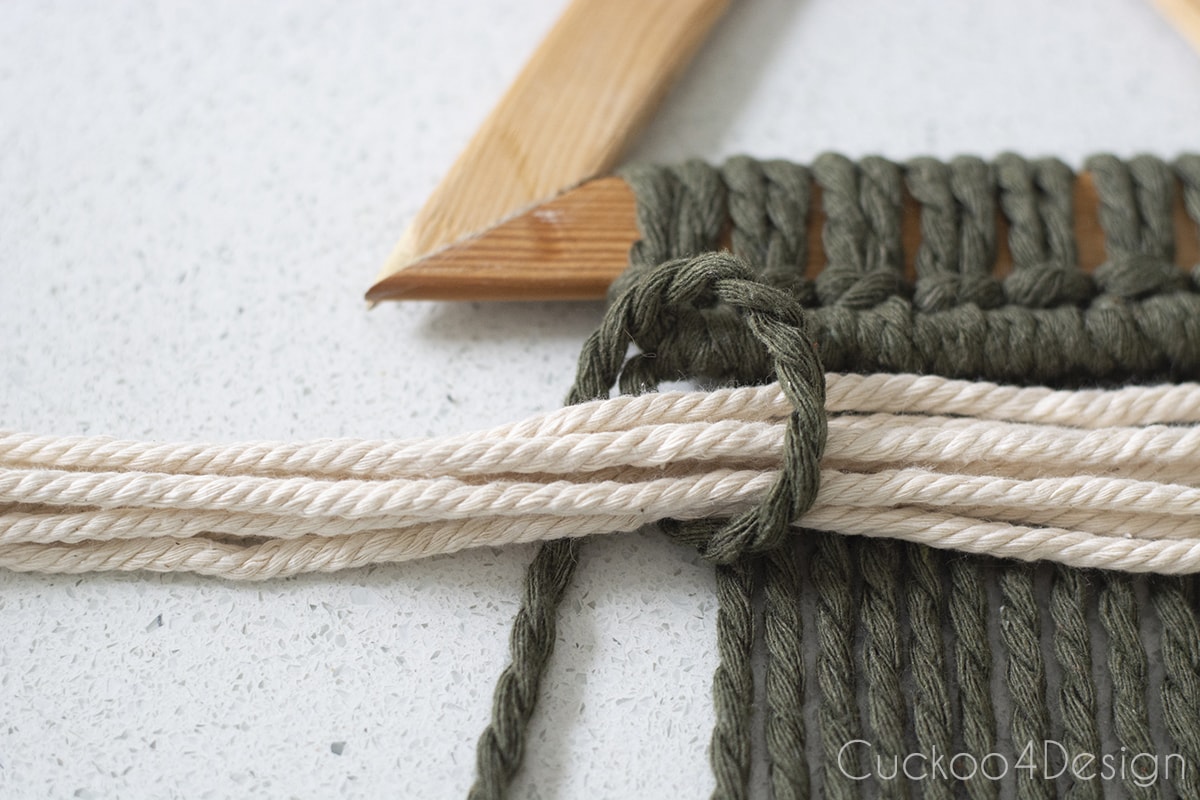
Repeat this all the way to the other side with each dark green strand and make sure that you pull everything as tight as possible.
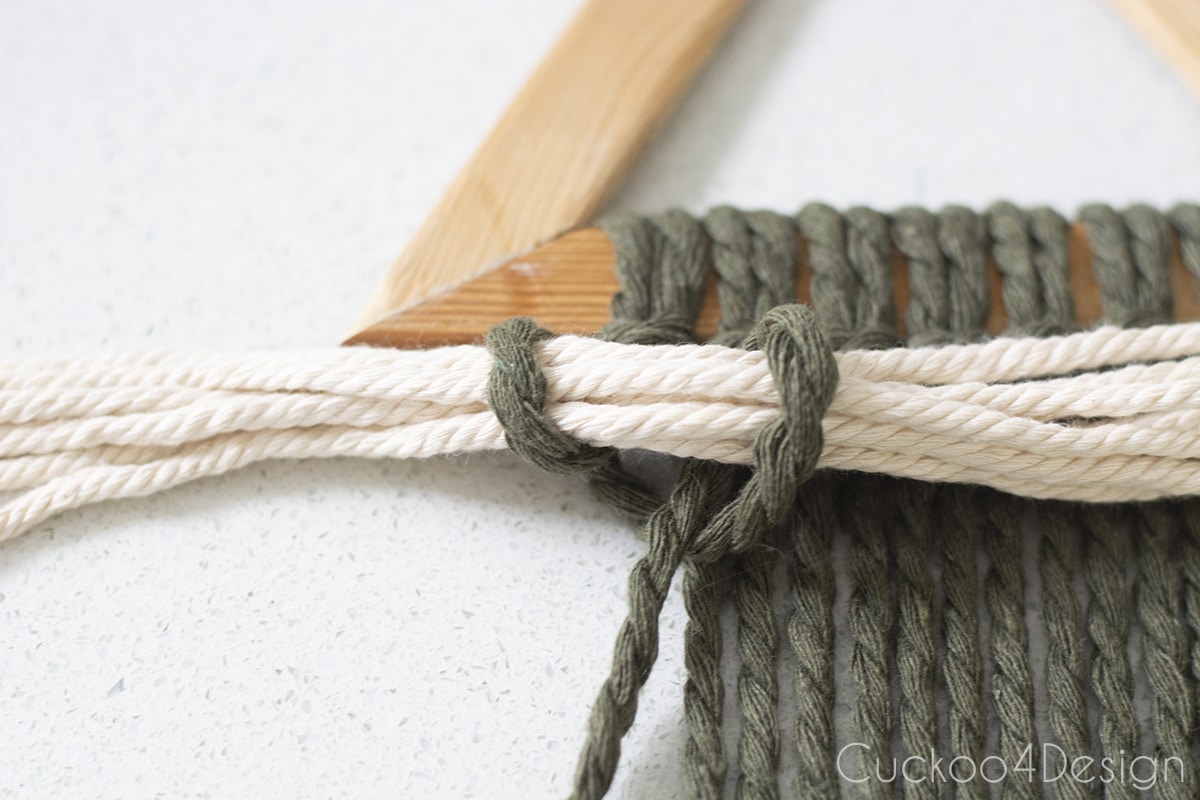
This forms a very tight row that is almost like a sausage 🙂
Before you add the next tight roll of yarn, you have to add another row of Double Half Hitch Knots first, but this time vertically. This helps keep a bit of a gap between the chunky rolls of strands.
Below is the loop the way I used it in the planter sleeve tutorial, so you can see it better.

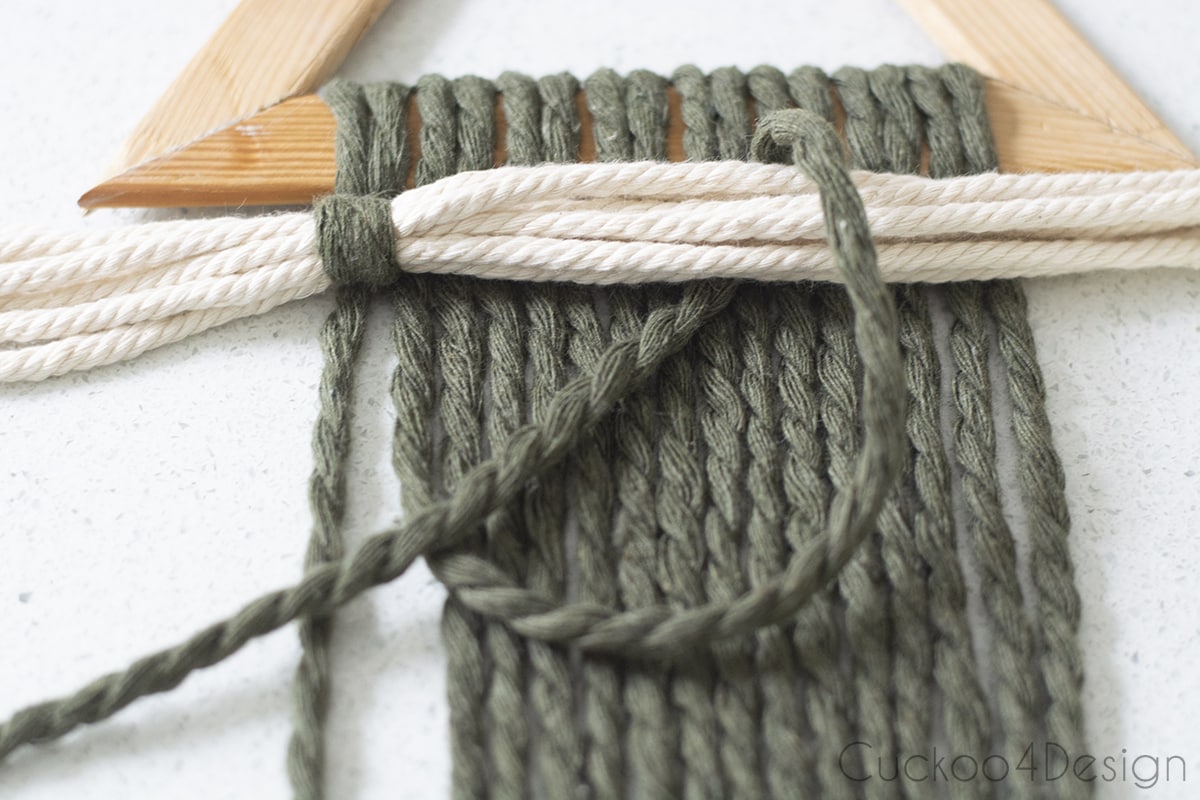
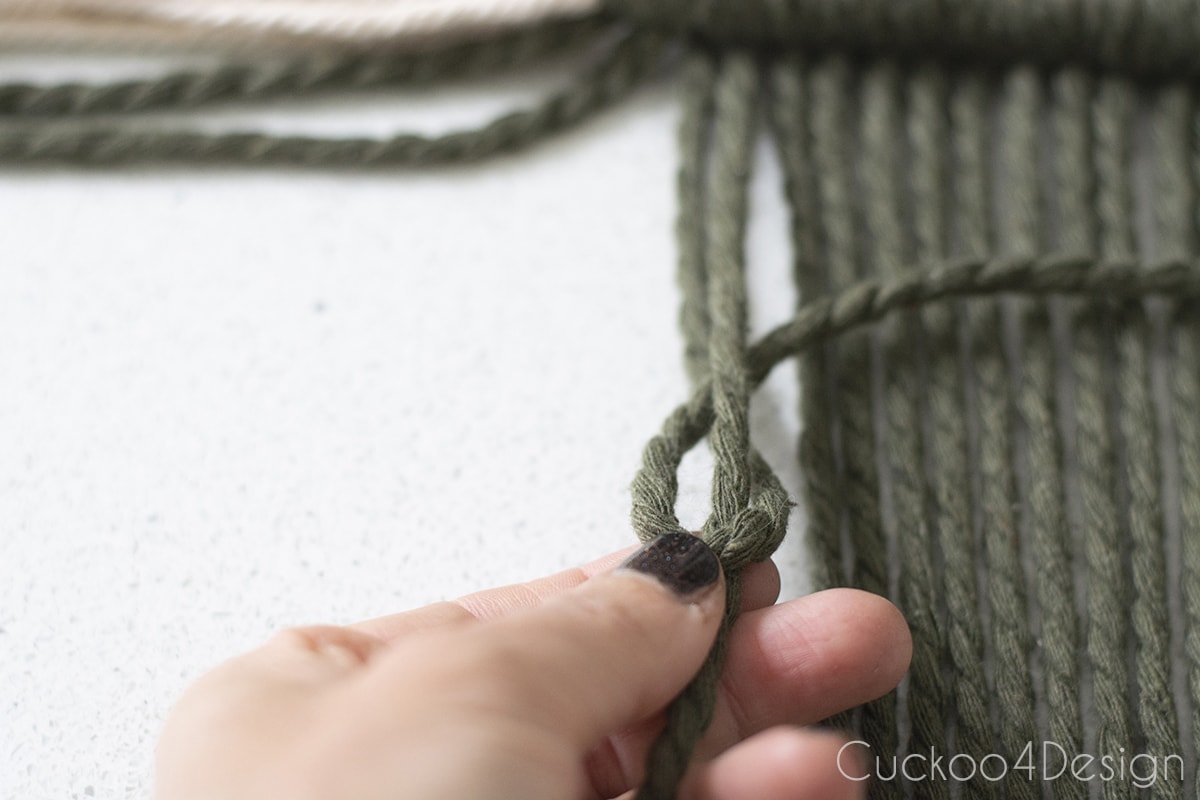
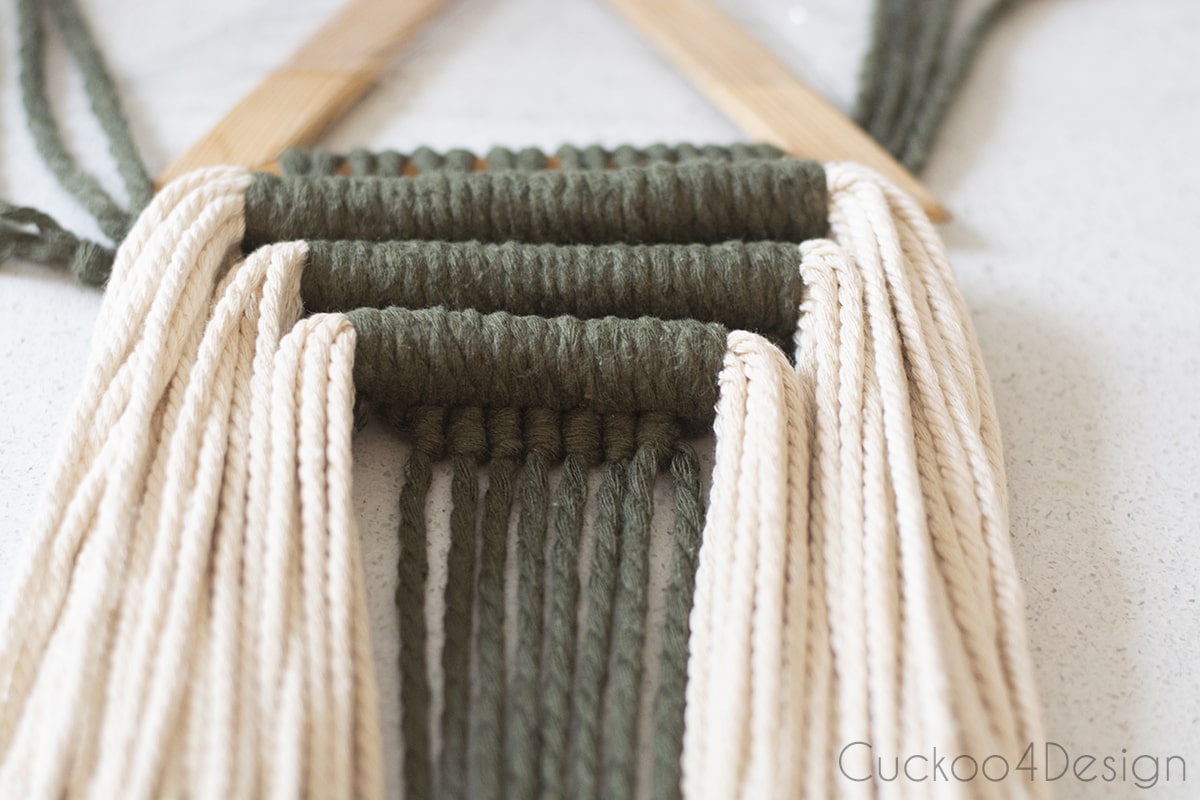
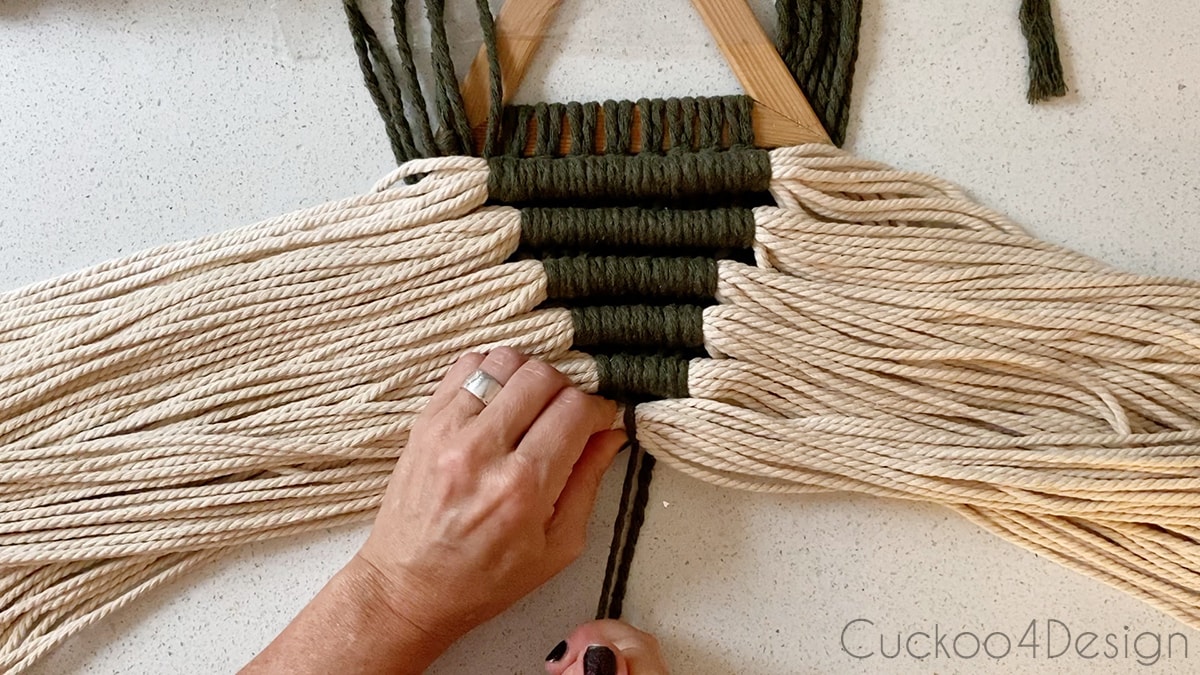
After that, I gathered ONE strand of dark green macrame cord on the left and right outside of the piece and tucked them behind the triangle. The above photo has two strands (slapping my palm to the forehead here) because I must have taken this photo when I didn’t really know what I was going to do yet. In the actual video, you can see that it is one strand each on the sides. This creates the staggering effect of the dark green yarn mirroring another triangle with the dark green yarn.
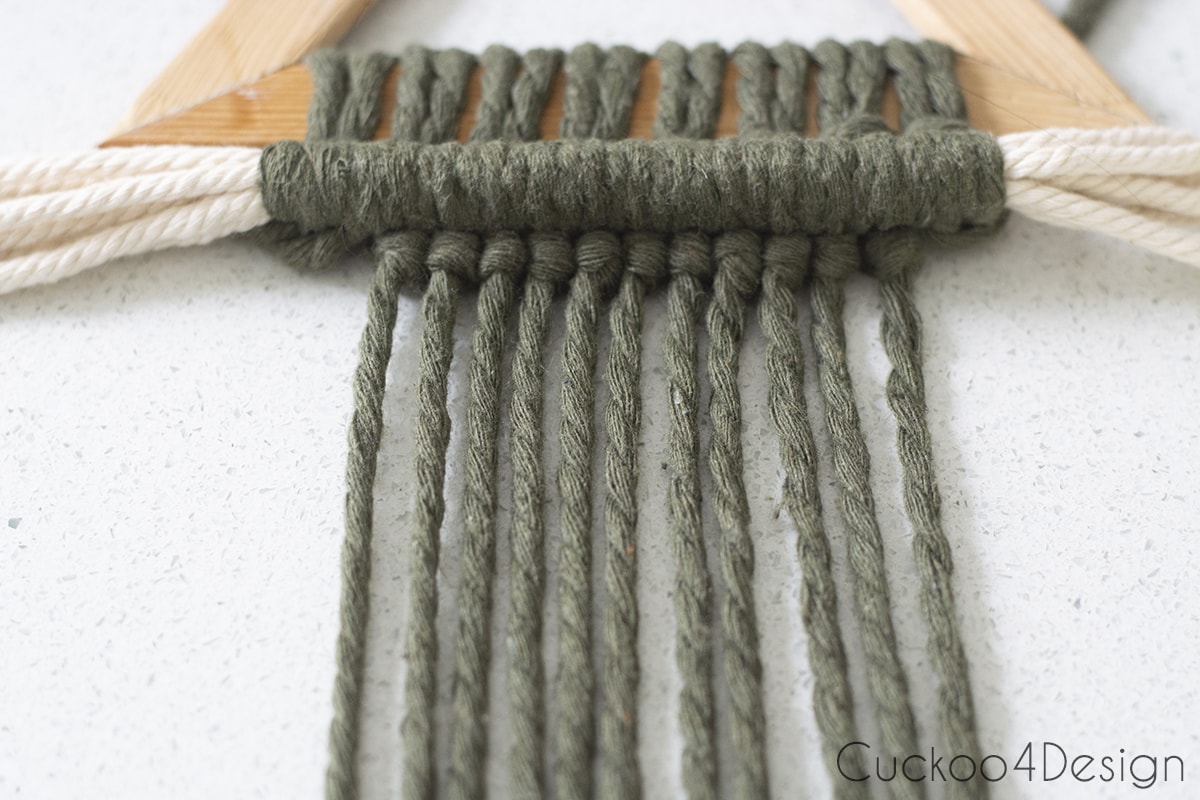
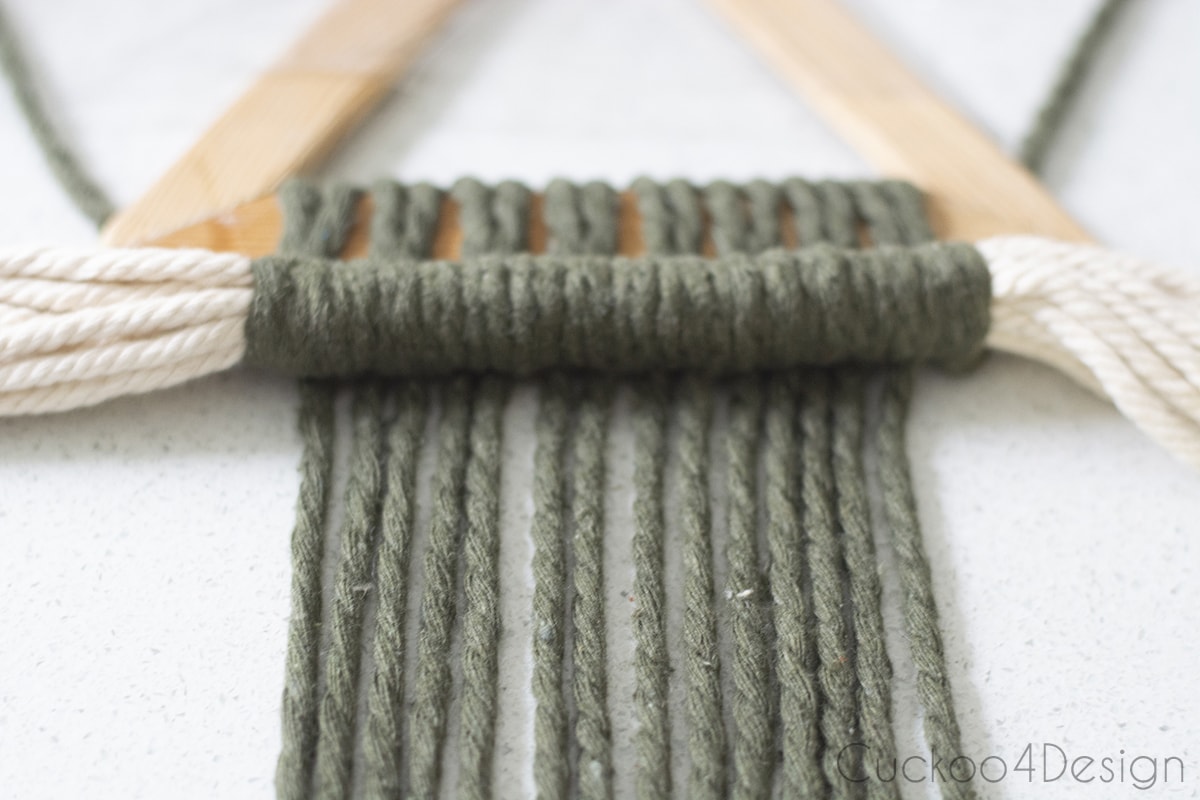
Add another row of chunky ivory yarn with the rows of Double Half Hitch Knots.
Keep repeating what I showed you above until you reach the end of the triangle.
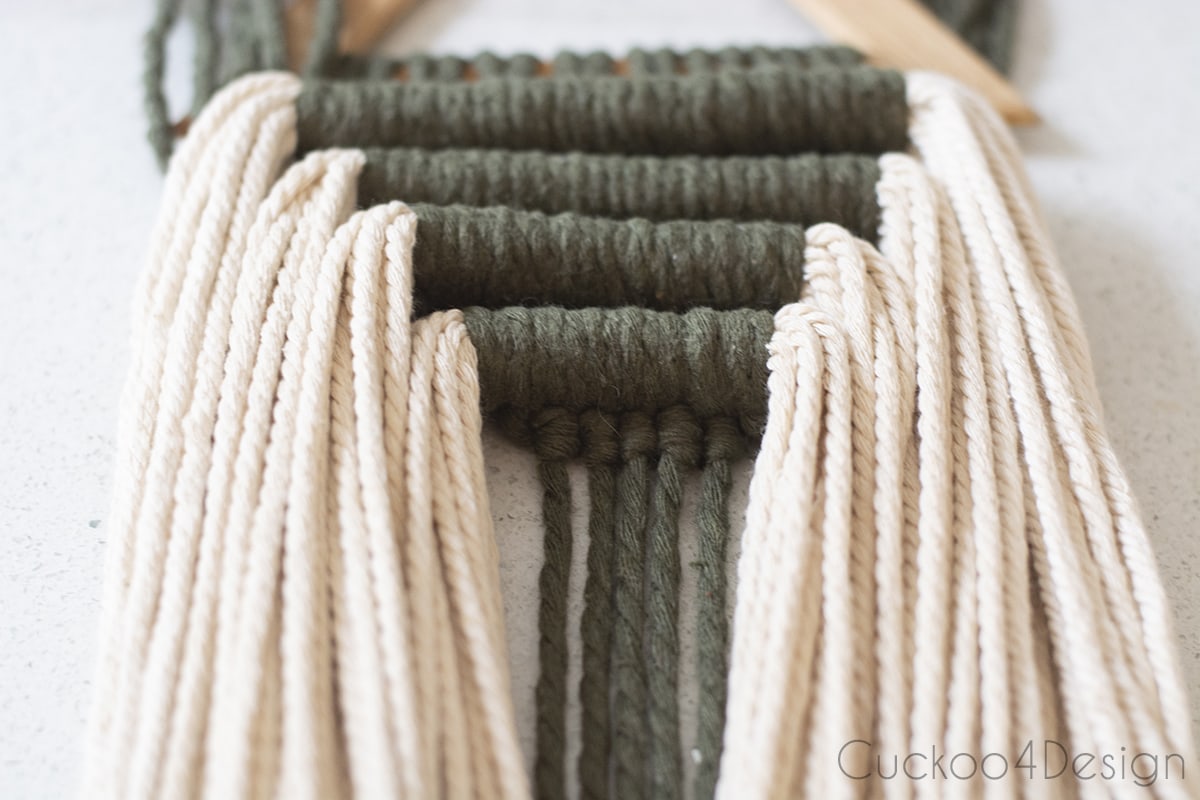
When you reached the end, I attached the last 14 strands of ivory yarn with the two last remaining strands of dark green yarn as shown below.
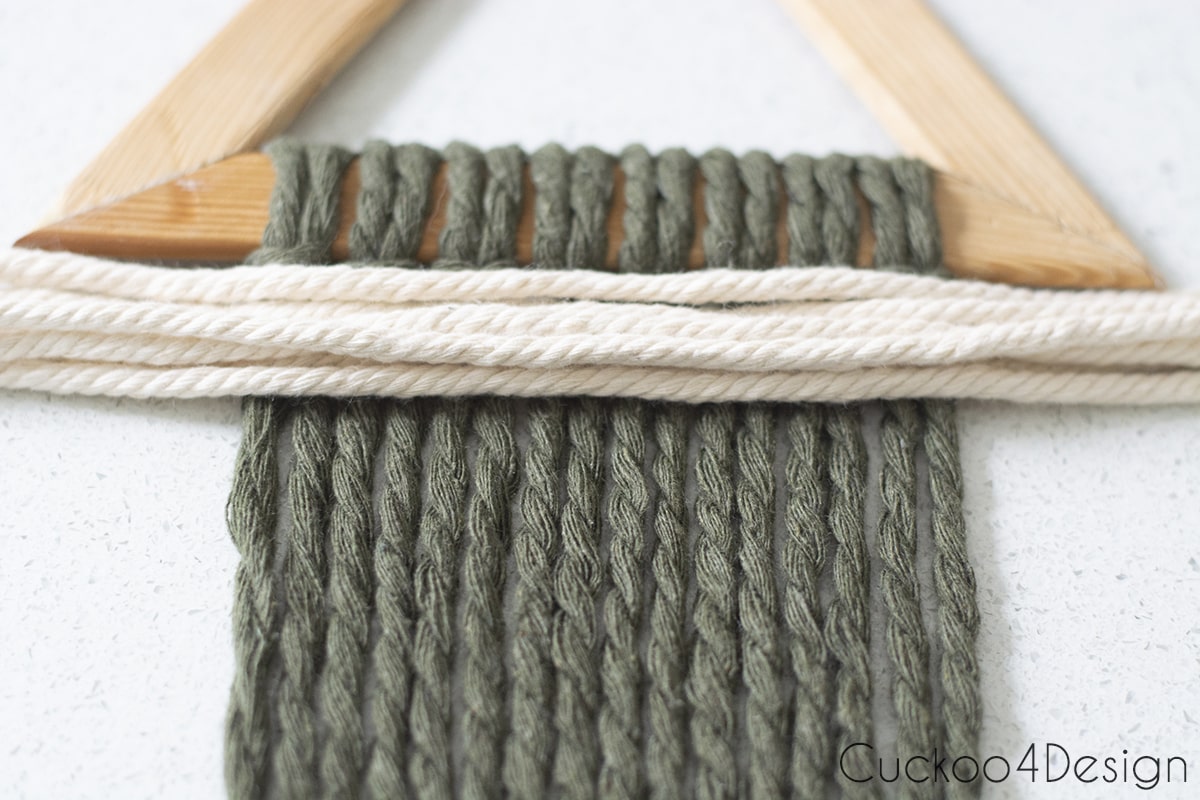
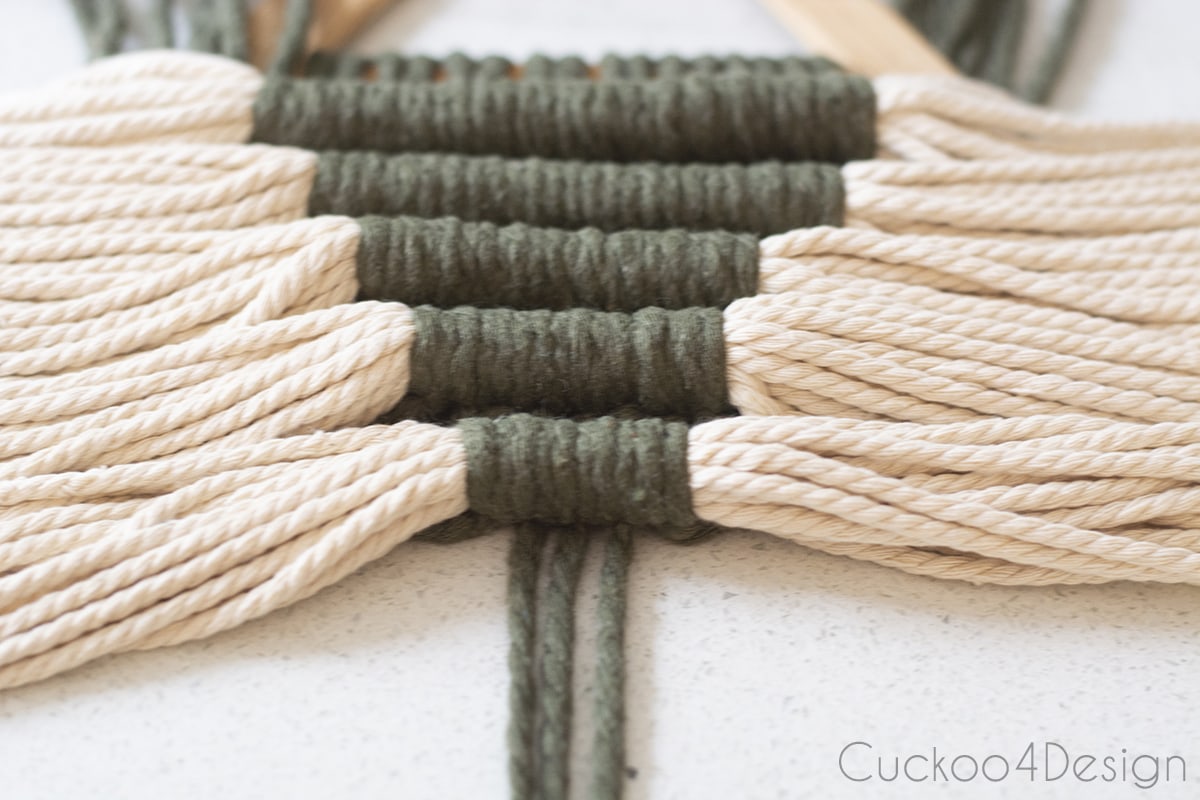
Step 4: Knotting sage green wrapped sections
Next, I cut the sage green strands of macrame yarn for the sides of the dark green triangle. There are 10 x 40″ pieces of sage green yarn needed. You simply fold a sage green strand in half to make sure it is equal in length and then tie that strand to the ivory chunky strands, followed by square knots.
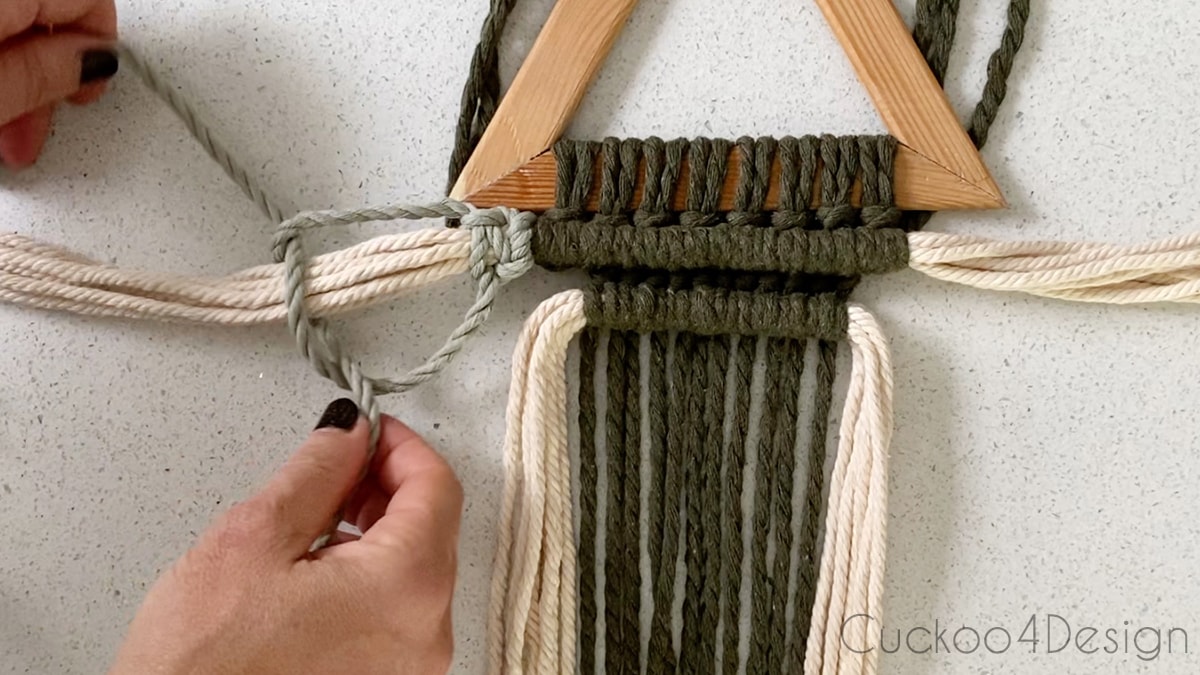
Below you can see several stacked rows of sage green square knots.
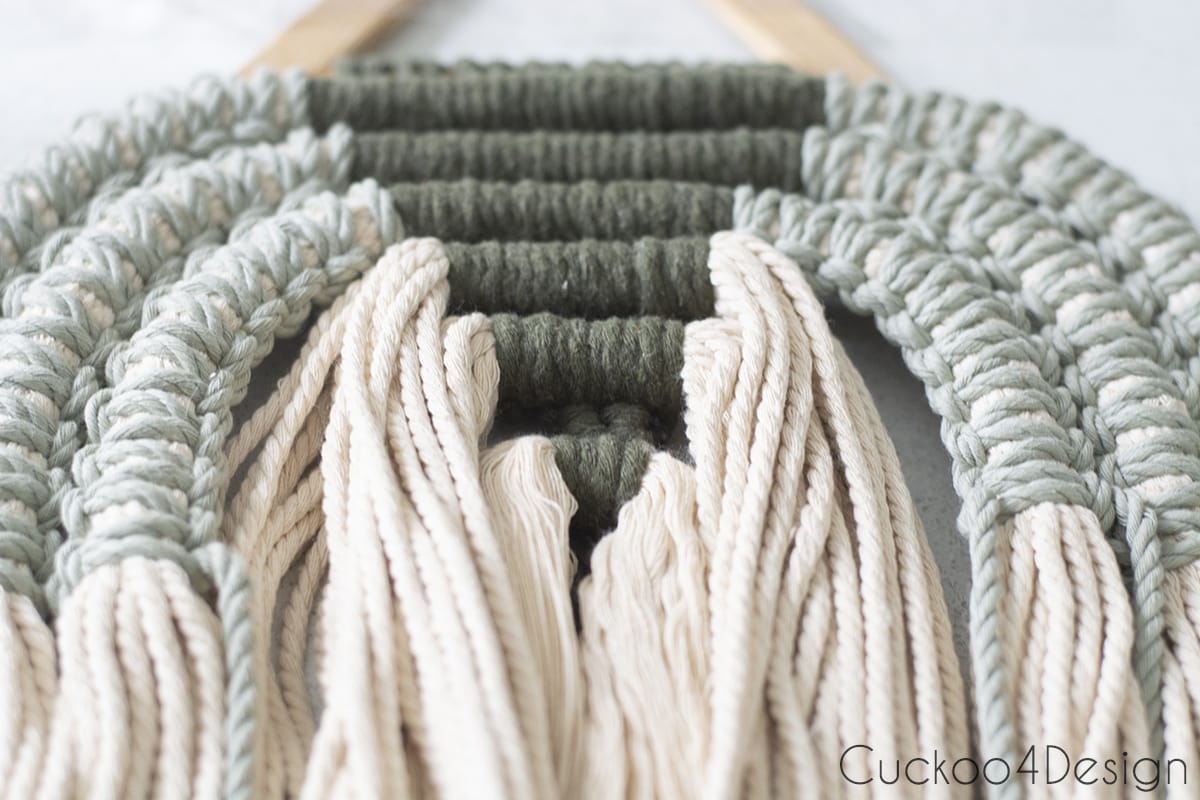
By the way, I used the leftover sage-green macrame yarn to make a macrame Christmas tree, and I love how it turned out. The color is perfect for it.
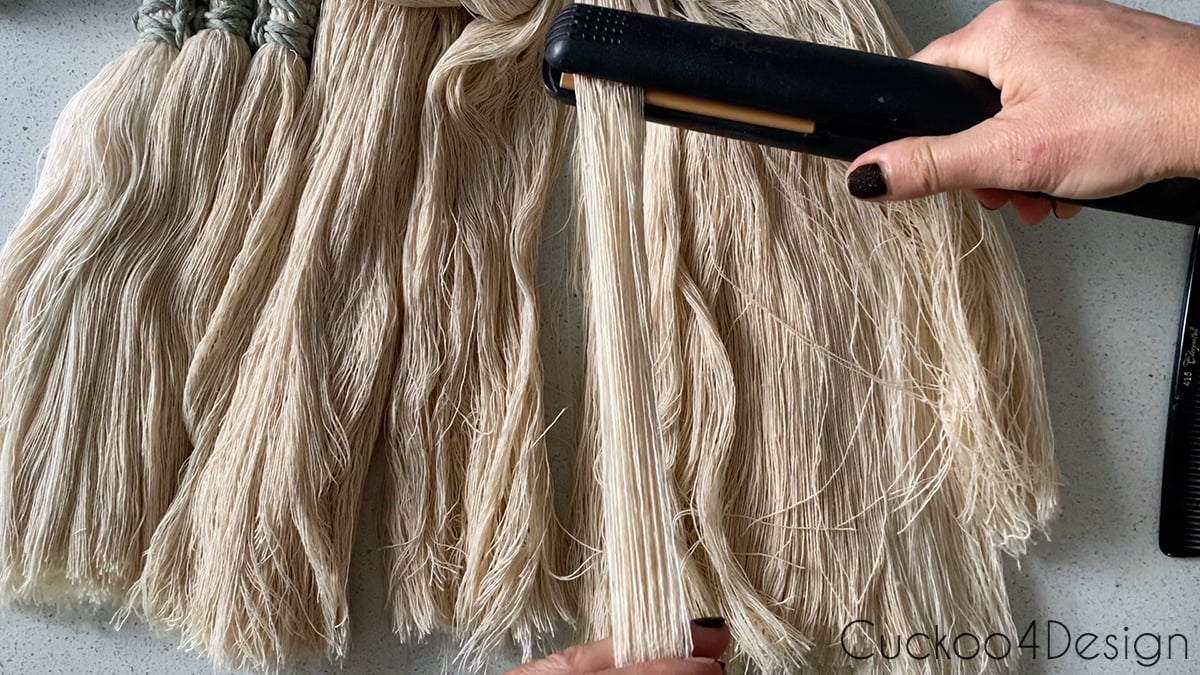
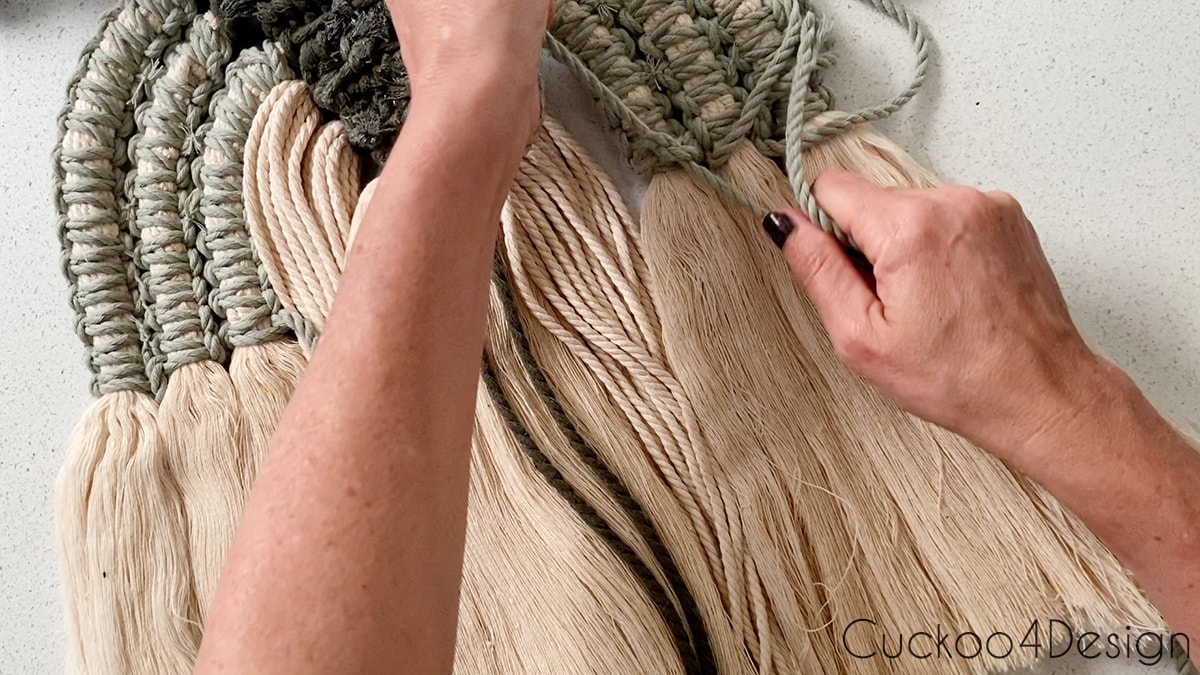
Step 5: Comb, straighten, and trim the ivory yarn bundles
The most time-consuming part of the piece is opening and unraveling the ivory strands and straightening them. This is also where I sprayed the yarn with fabric stiffener and used my comb and hair straightening iron to dry, flatten, and straighten the ivory macrame yarn.

Step 6: Clean up the backside
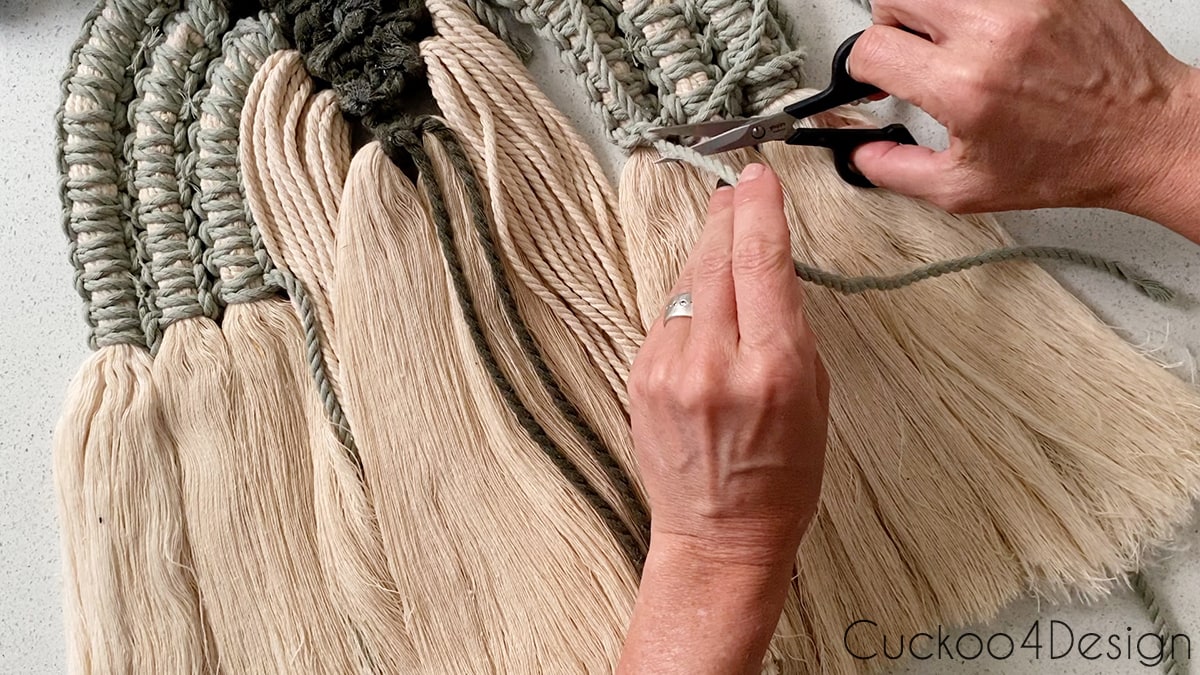
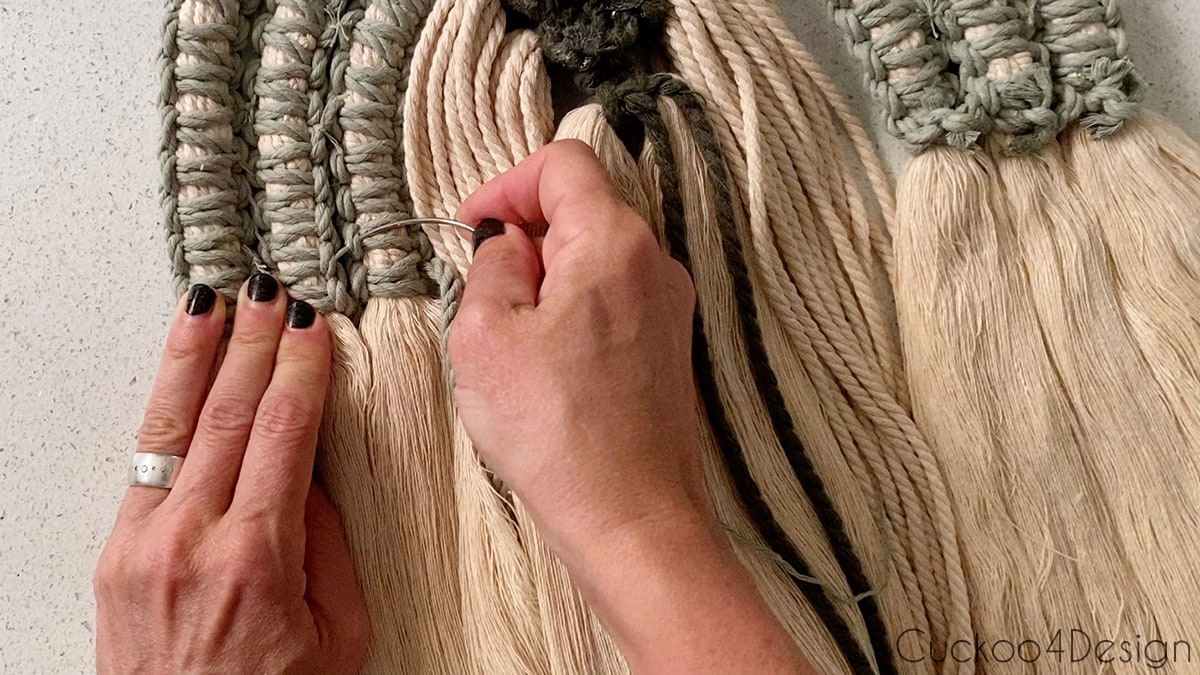
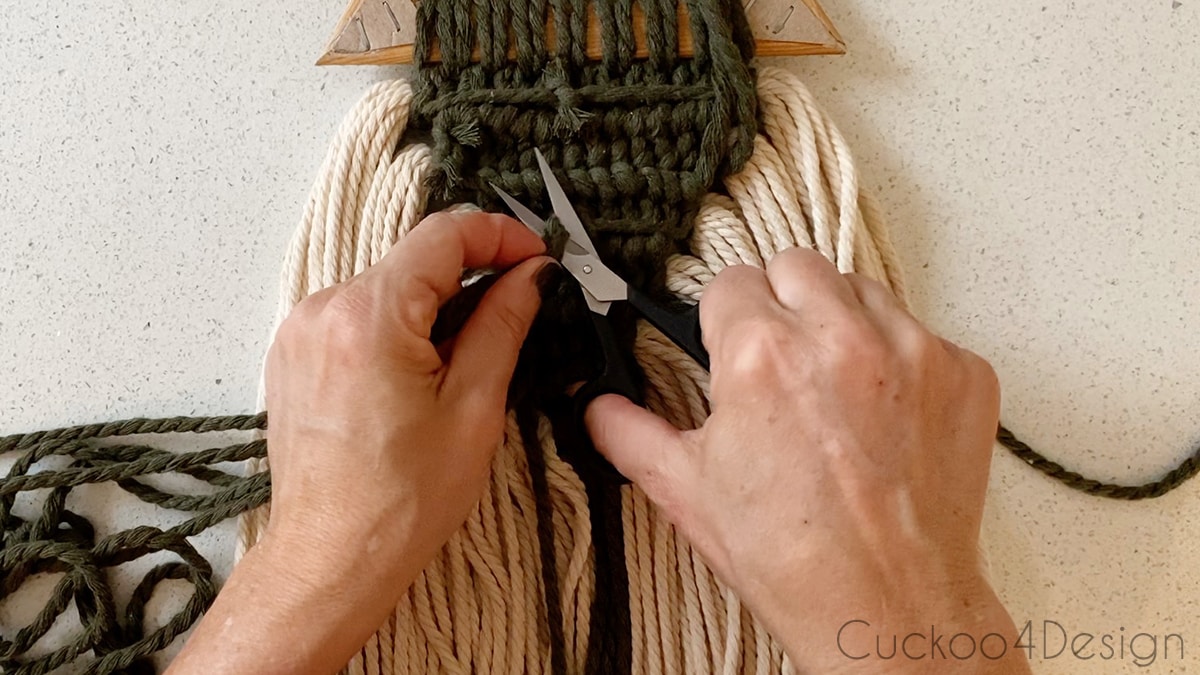
I turned the piece around and tied the sage green yarn in knots. To make sure it wouldn’t open up, I added some craft glue to the knots before cutting the strands for a cleaner look. Make sure this is definitely done on the backside of the modern macrame piece and not on the front.
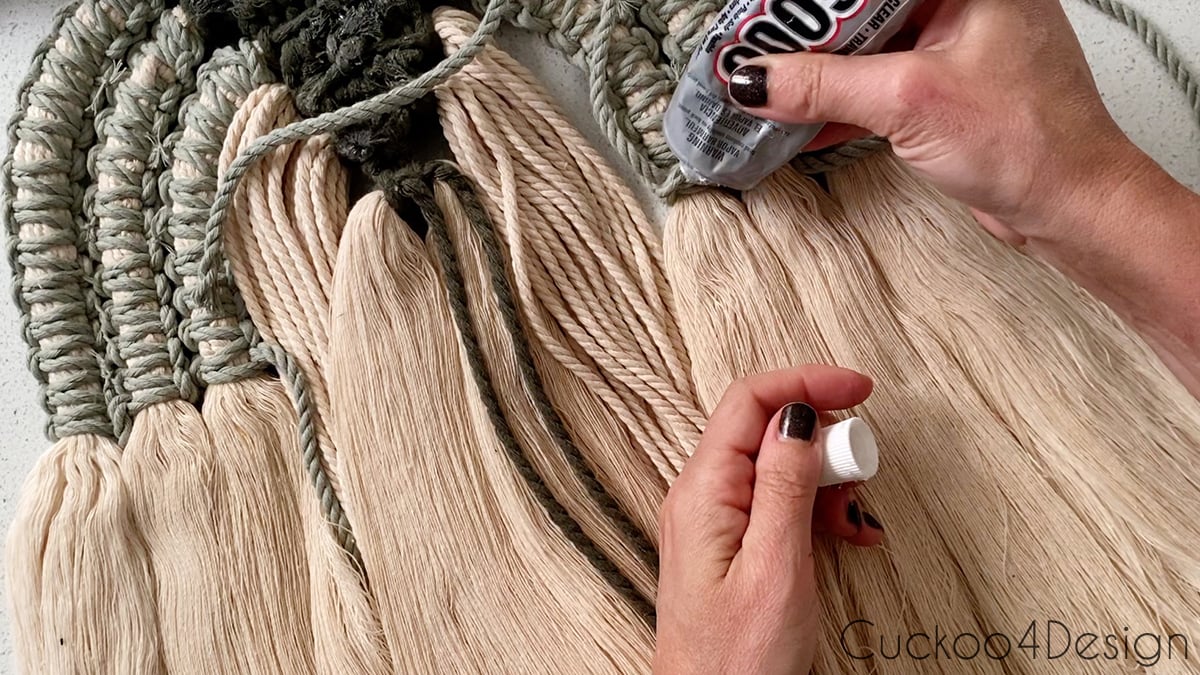
I used the curved needle and pieces of unraveled sage-colored yarn to sew the square knot pieces together so the strands stay securely in place.
I also knotted the dark green strands that are leftover from tucking them away to create the triangle with craft glue.
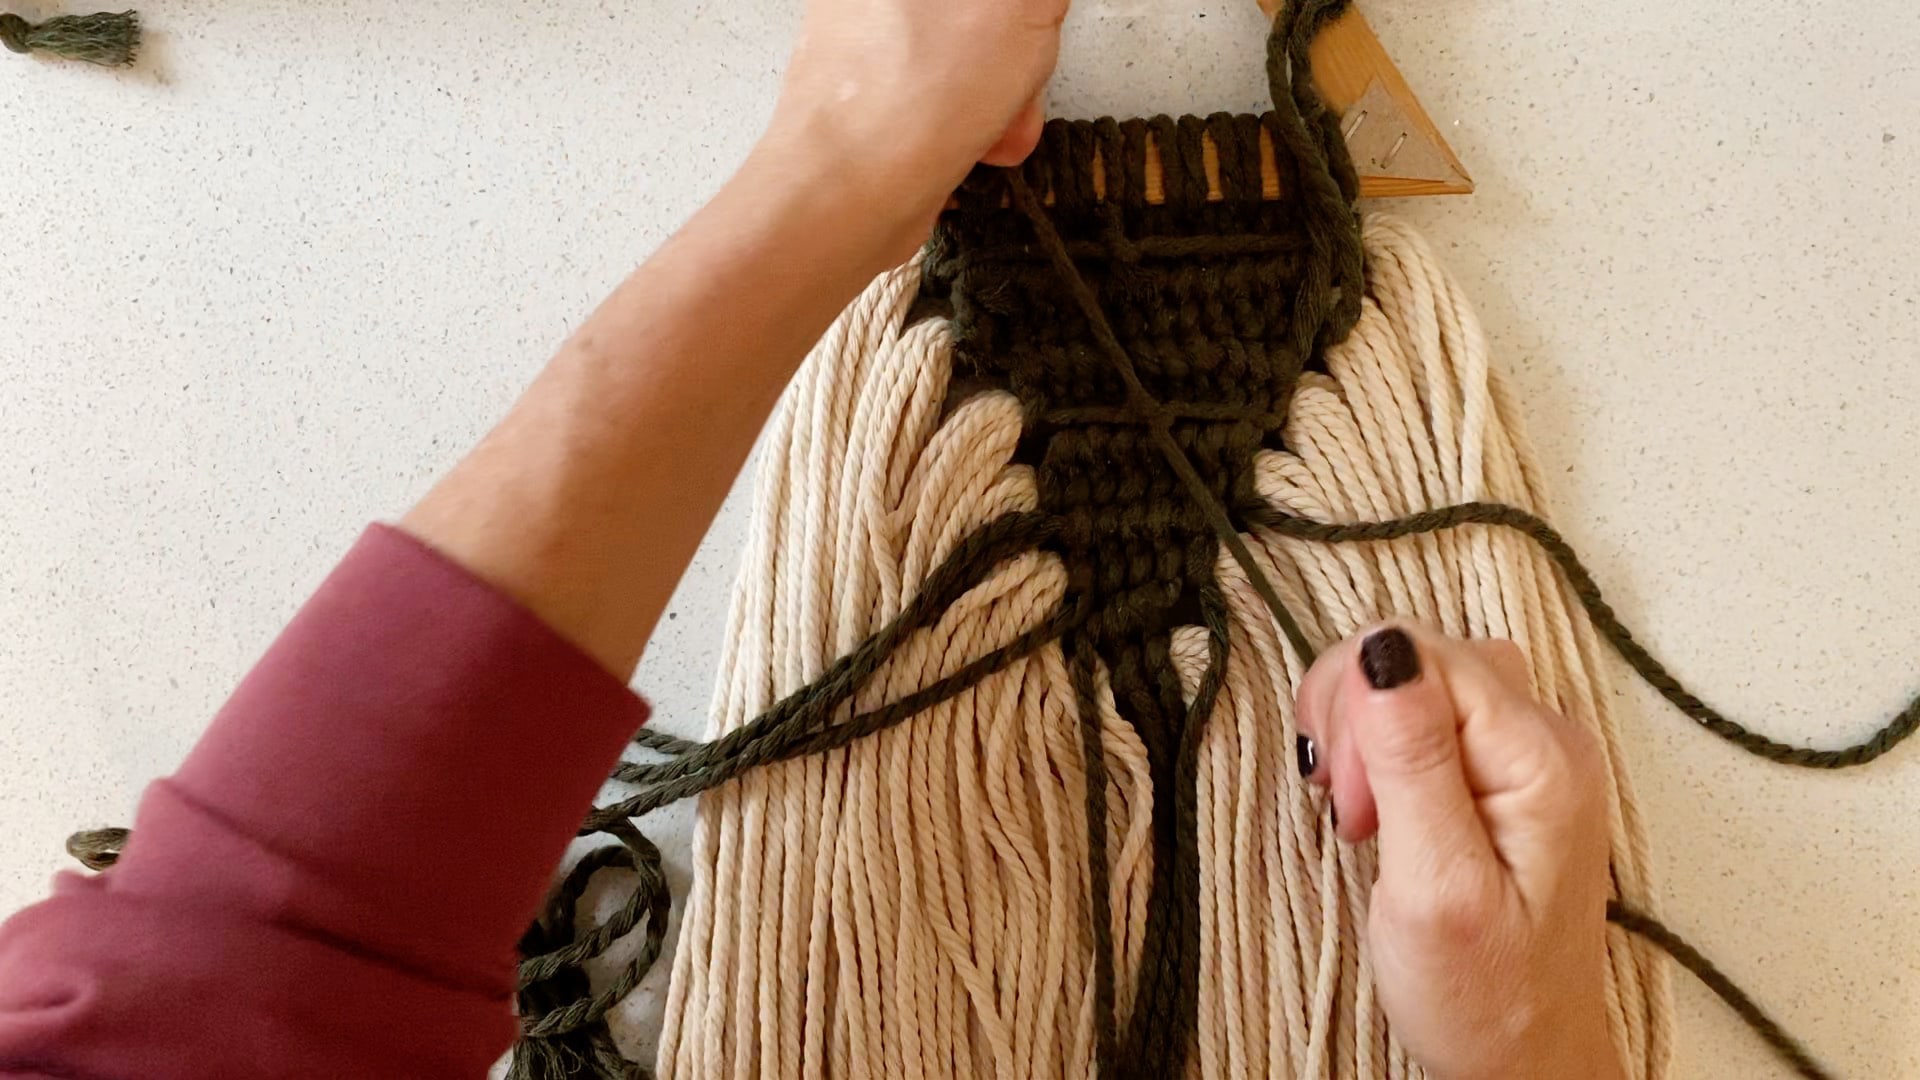
Cut the dark green strands neatly as well.
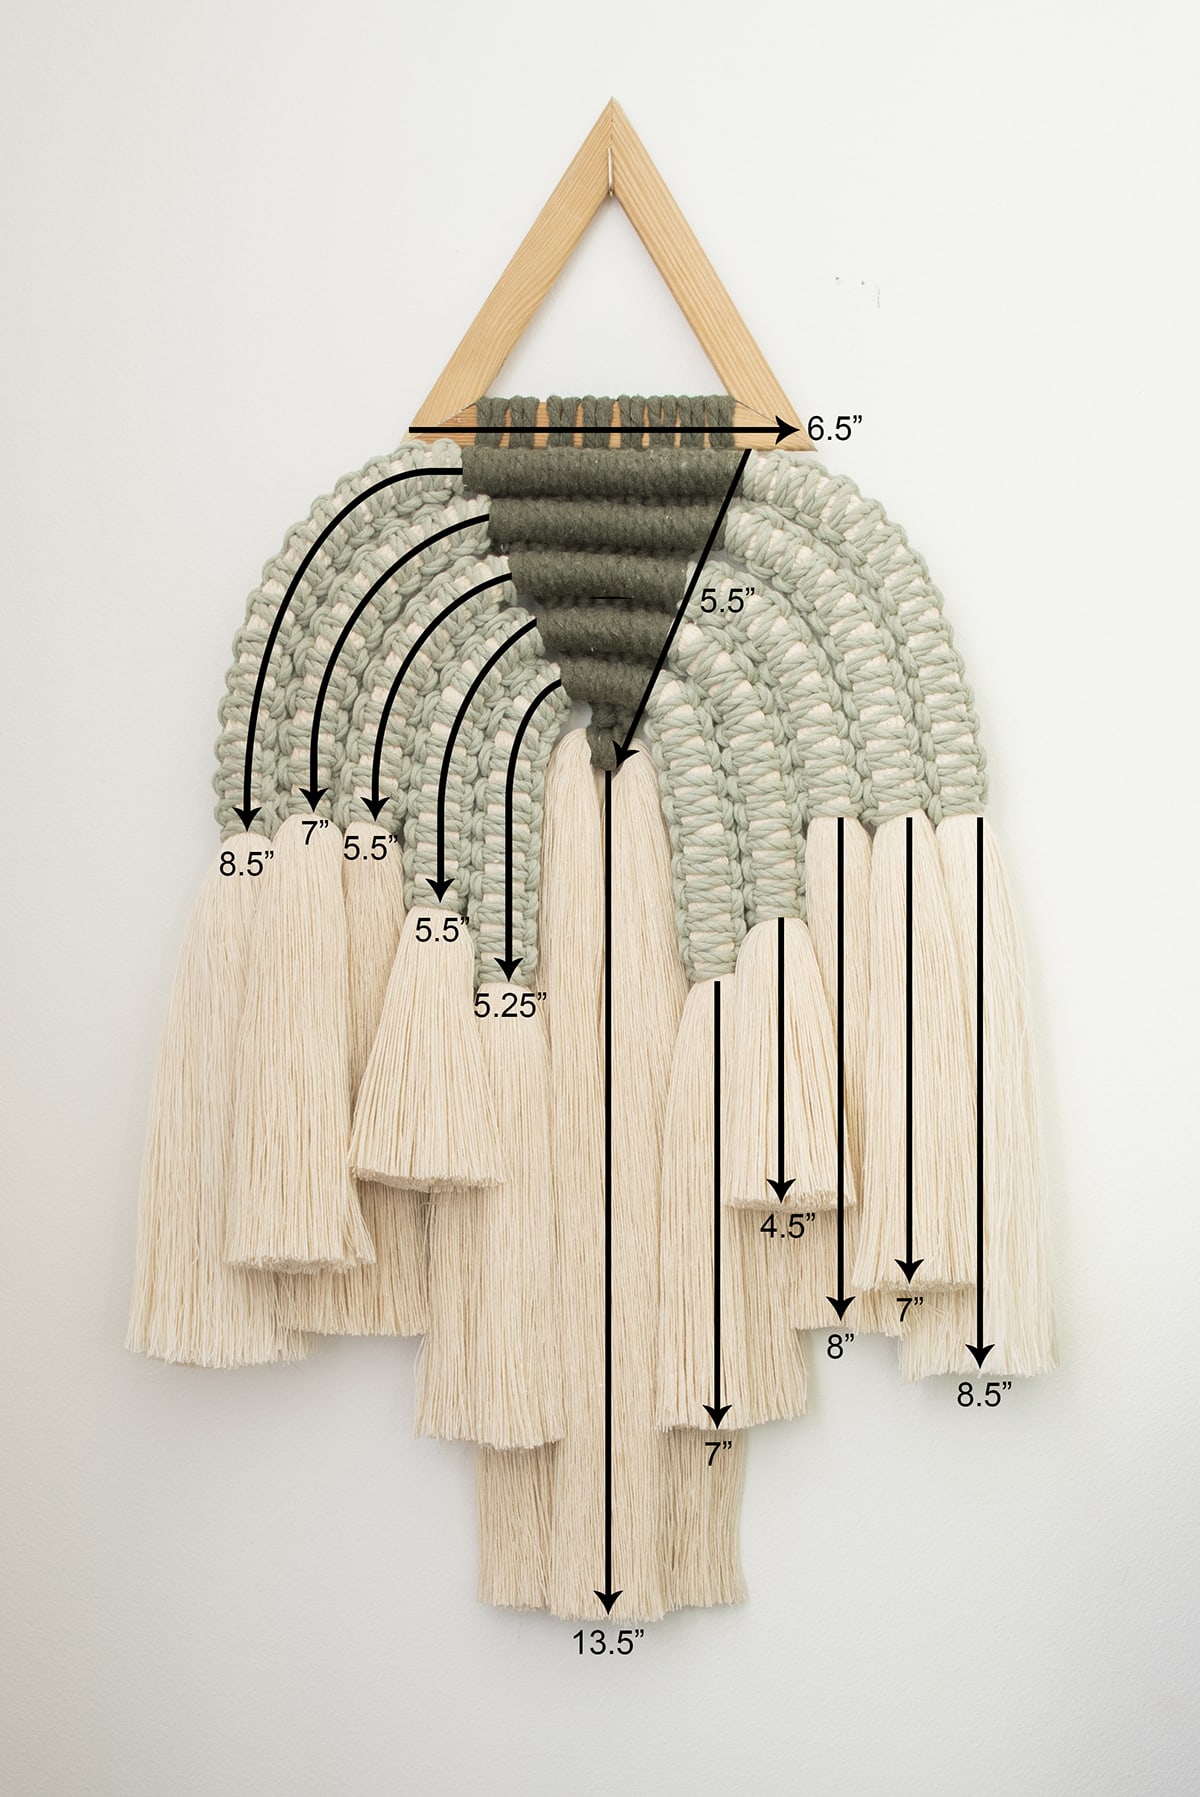
To finish the modern macrame wall hanging, cut the thick ivory strands to your desired length or use my measurements.
The exact measurements of this unique modern wall art piece
Photos of the finished modern macrame wall hanging
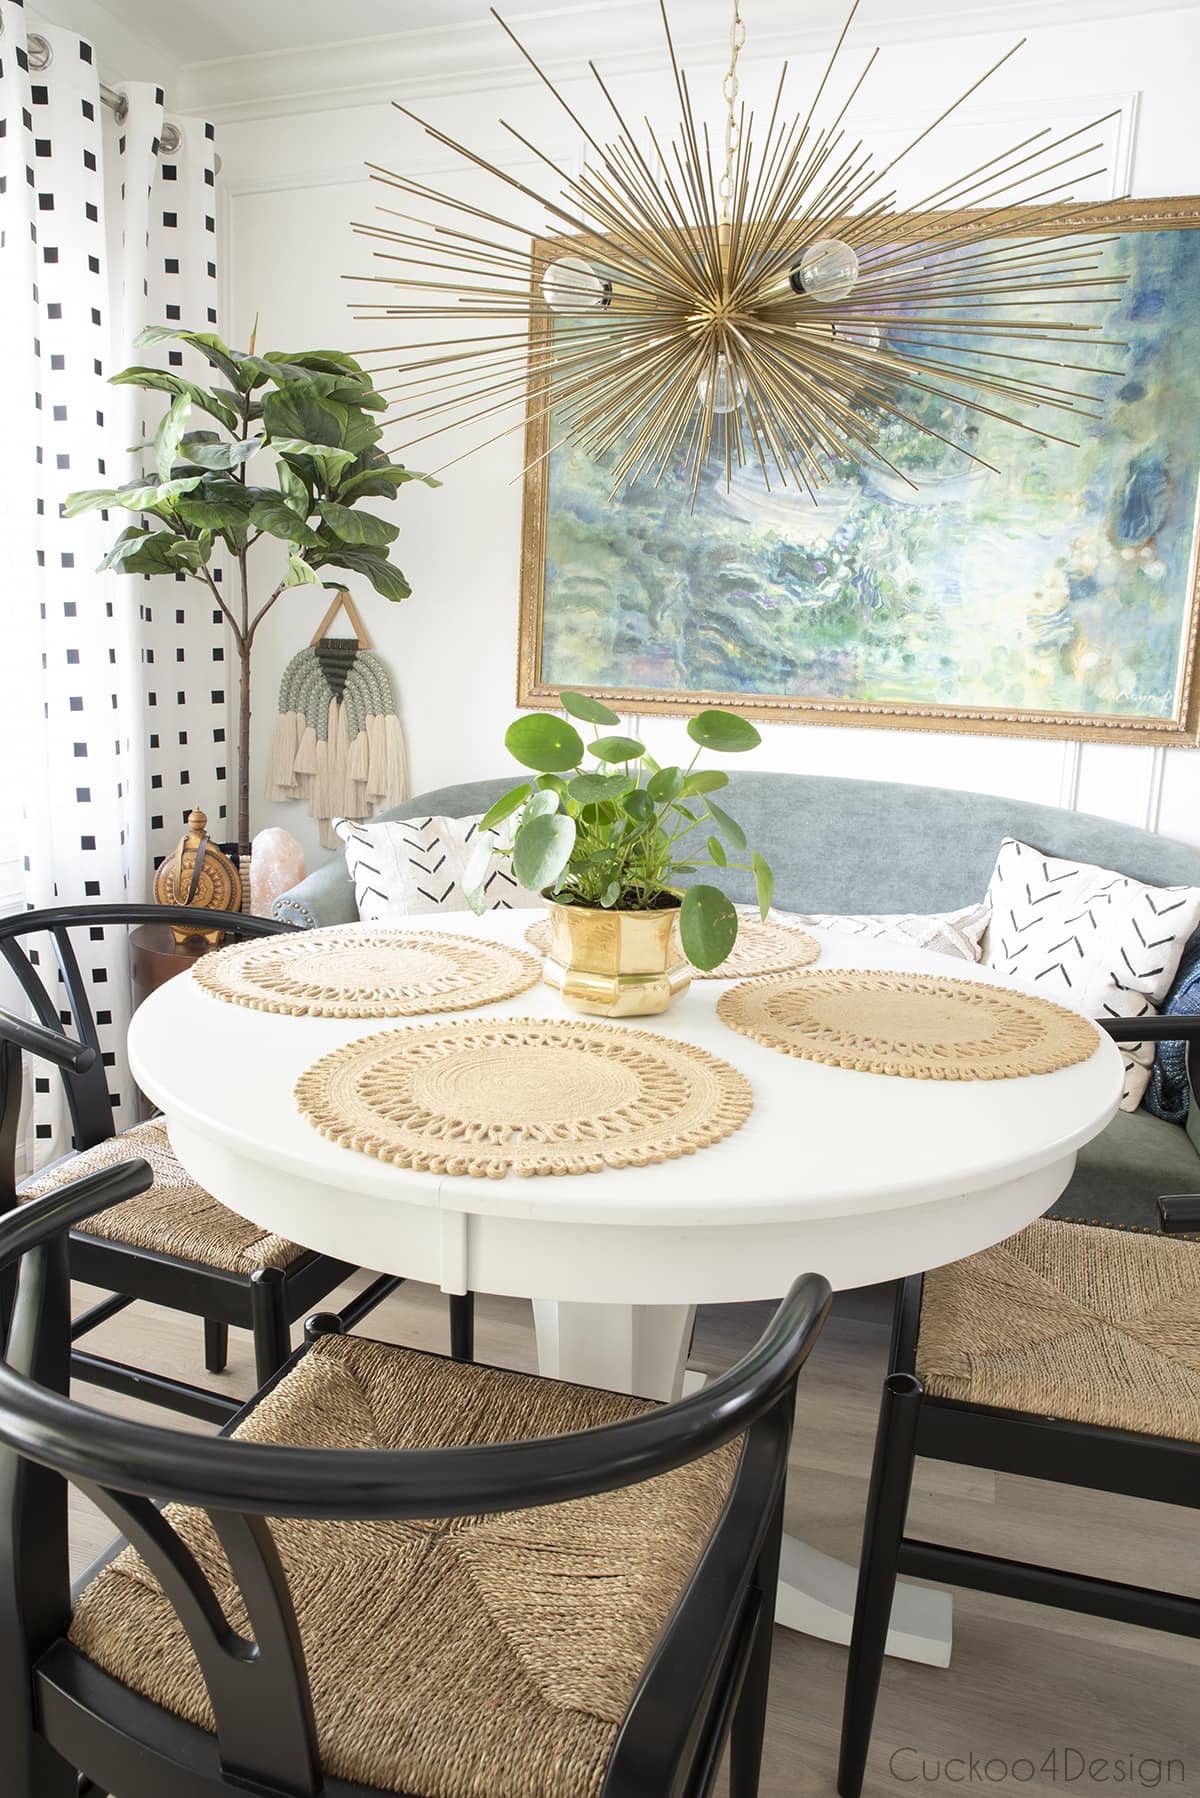

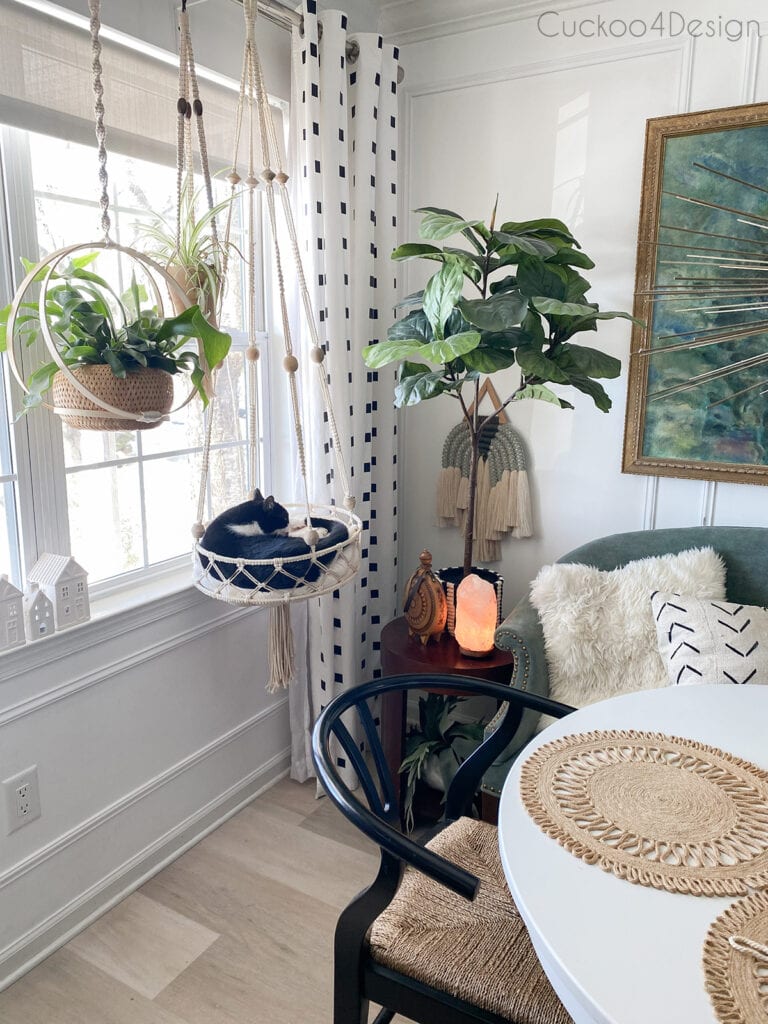
And below you can see the modern macrame wall hanging behind my macrame cat bed and my hanging basket with hoops.

This modern macrame wall hanging looks way more complicated than it actually is, and is a nice macrame pattern to try for any beginner. So if you like it as much as I do, then give this easy tutorial a try and make your own.
More of my unique macrame projects
I love that macrame has made such a huge comeback in the past couple of years because it is relaxing and fun to make. I have many other tutorials that you can also give a try.
- fringed square Knot bracelet
- DIY macrame earrings
- macrame feather
- macrame basket
- simple macrame plant hanger tutorial
- How to make a chain link garland with macrame yarn
- This elegant pipa knot wall hanging is one of my other favorites.
- cotton rope macrame tassel garland tutorial

When I get asked if I’d sell my macrame pieces, I always decline because there is a lot of work, time, and money for the materials going into each one of them, and the price for them would be pretty high. Most people aren’t willing to pay for that because they are used to getting these types of macrame decorations for cheap at places like HomeGoods and Amazon, where they were made in sweatshops, and those poor people who made them don’t get the hourly rate they should. It always makes me sad, and is the reason why I’d rather offer tutorials and free macrame patterns on my blog.
Tschüß,

LOVE this one, julia! You are SO freaking clever!
Hi i do tour tutorial but i hace a problemas wish bang.
Can you tell me show the look so perfect on you.
Im Candelaria from chile 🙂
ty
Hi Candelaria! Maybe if you use a straightening iron and the starch? Could be that your yarn is different from mine too?? I’m not sure.