

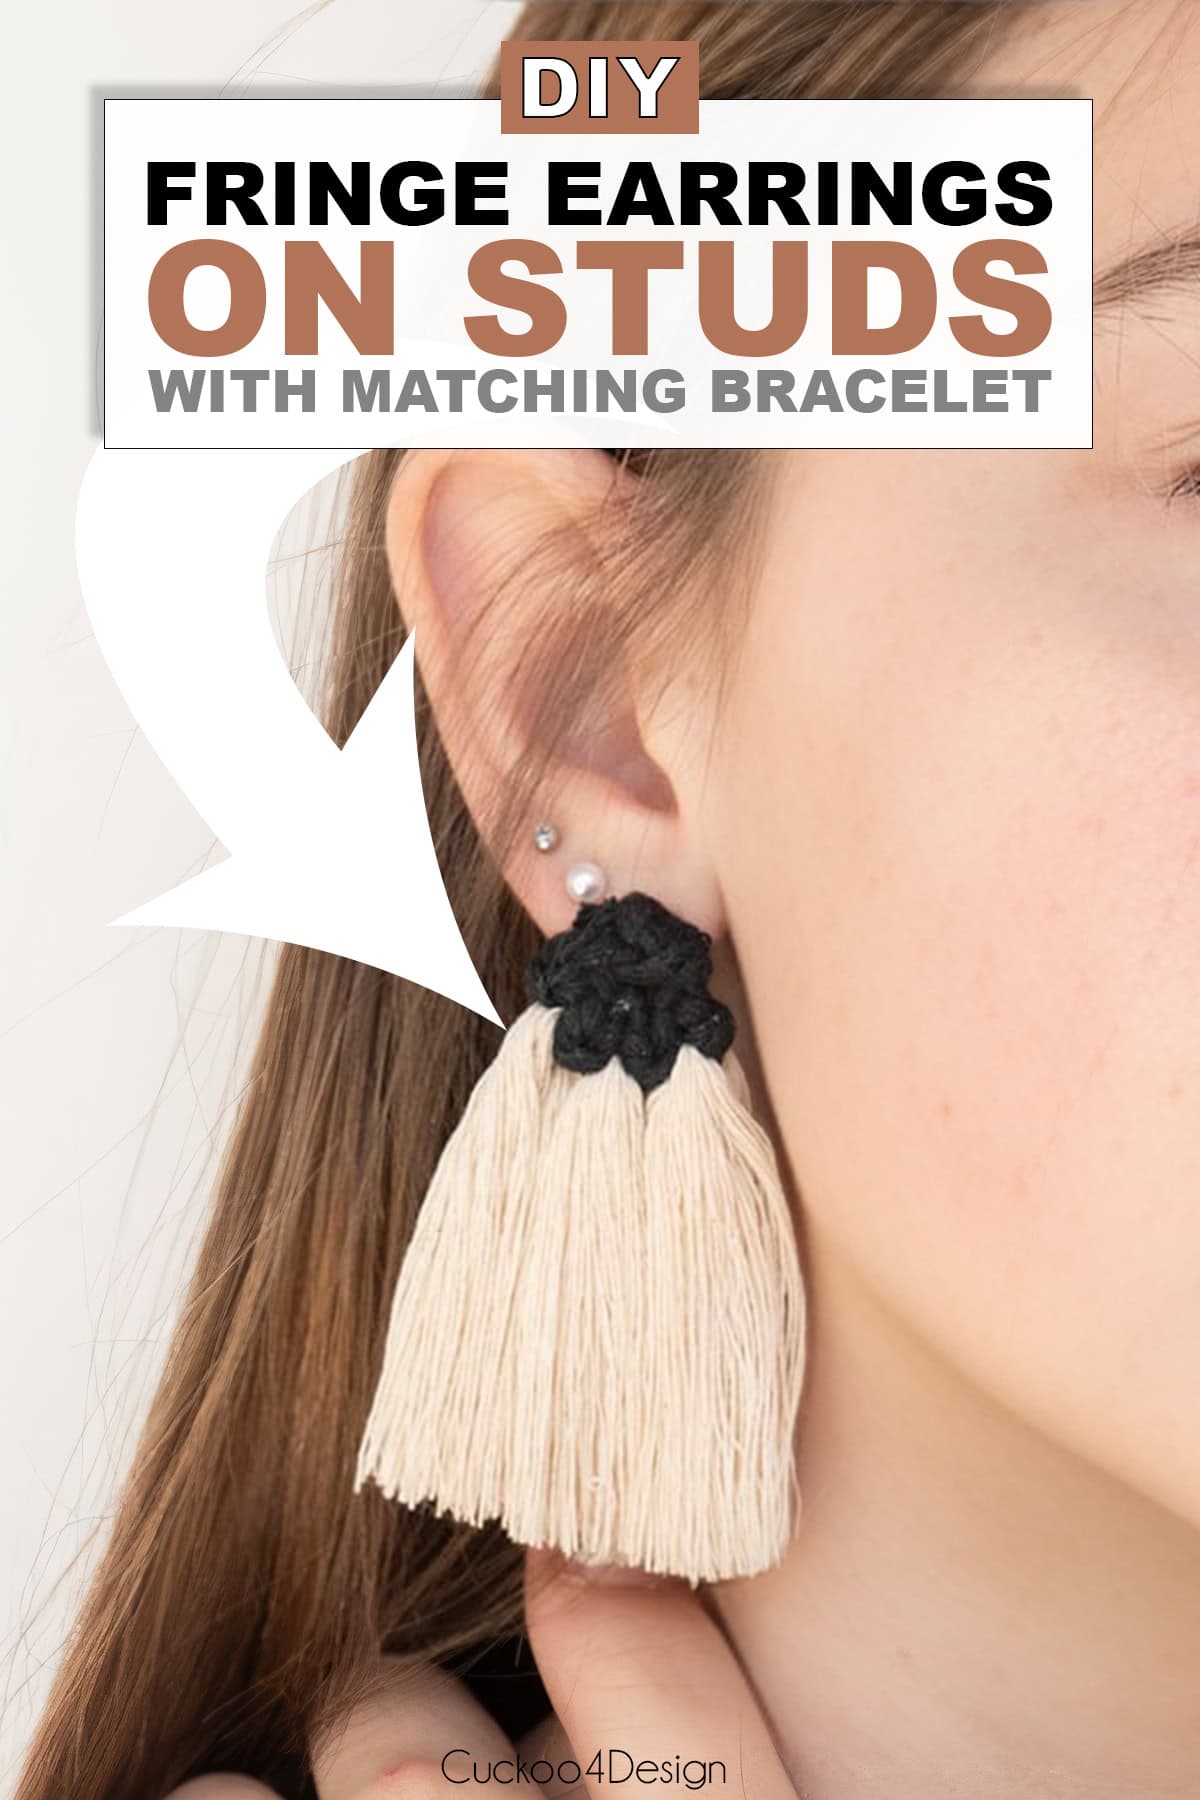
How to make fringe earrings on studs instead of hoops
My earlobes are pretty stretched out, and I have difficulty wearing my DIY macrame earrings, which are on hoops. That is why I wanted to come up with a pretty version involving stud earrings instead. I’m showing you today how to make your fringe earrings on studs, and no beads are needed for this tutorial.
This tutorial is very similar to my boho fringe square knot bracelet that I just shared with you and they could definitely be worn together.

Materials needed for the fringe earrings
- black 4mm macrame cord
- ivory 4mm macrame cord
- 8mm studd earrings for crafting
- clear strong craft glue
- small spring clamps
- fabric stiffener
- scissors
- measuring tape
- comb
- toothpicks

Beginner fringe earring video tutorial
Below is my video tutorial. Use the triangle on the image to turn on the video or head to my YouTube channel to watch.
Instructions on how to make the boho fringe earrings on studs
This post may contain affiliate links from which I will earn a commission at no extra cost to you. View my full disclosure policy.
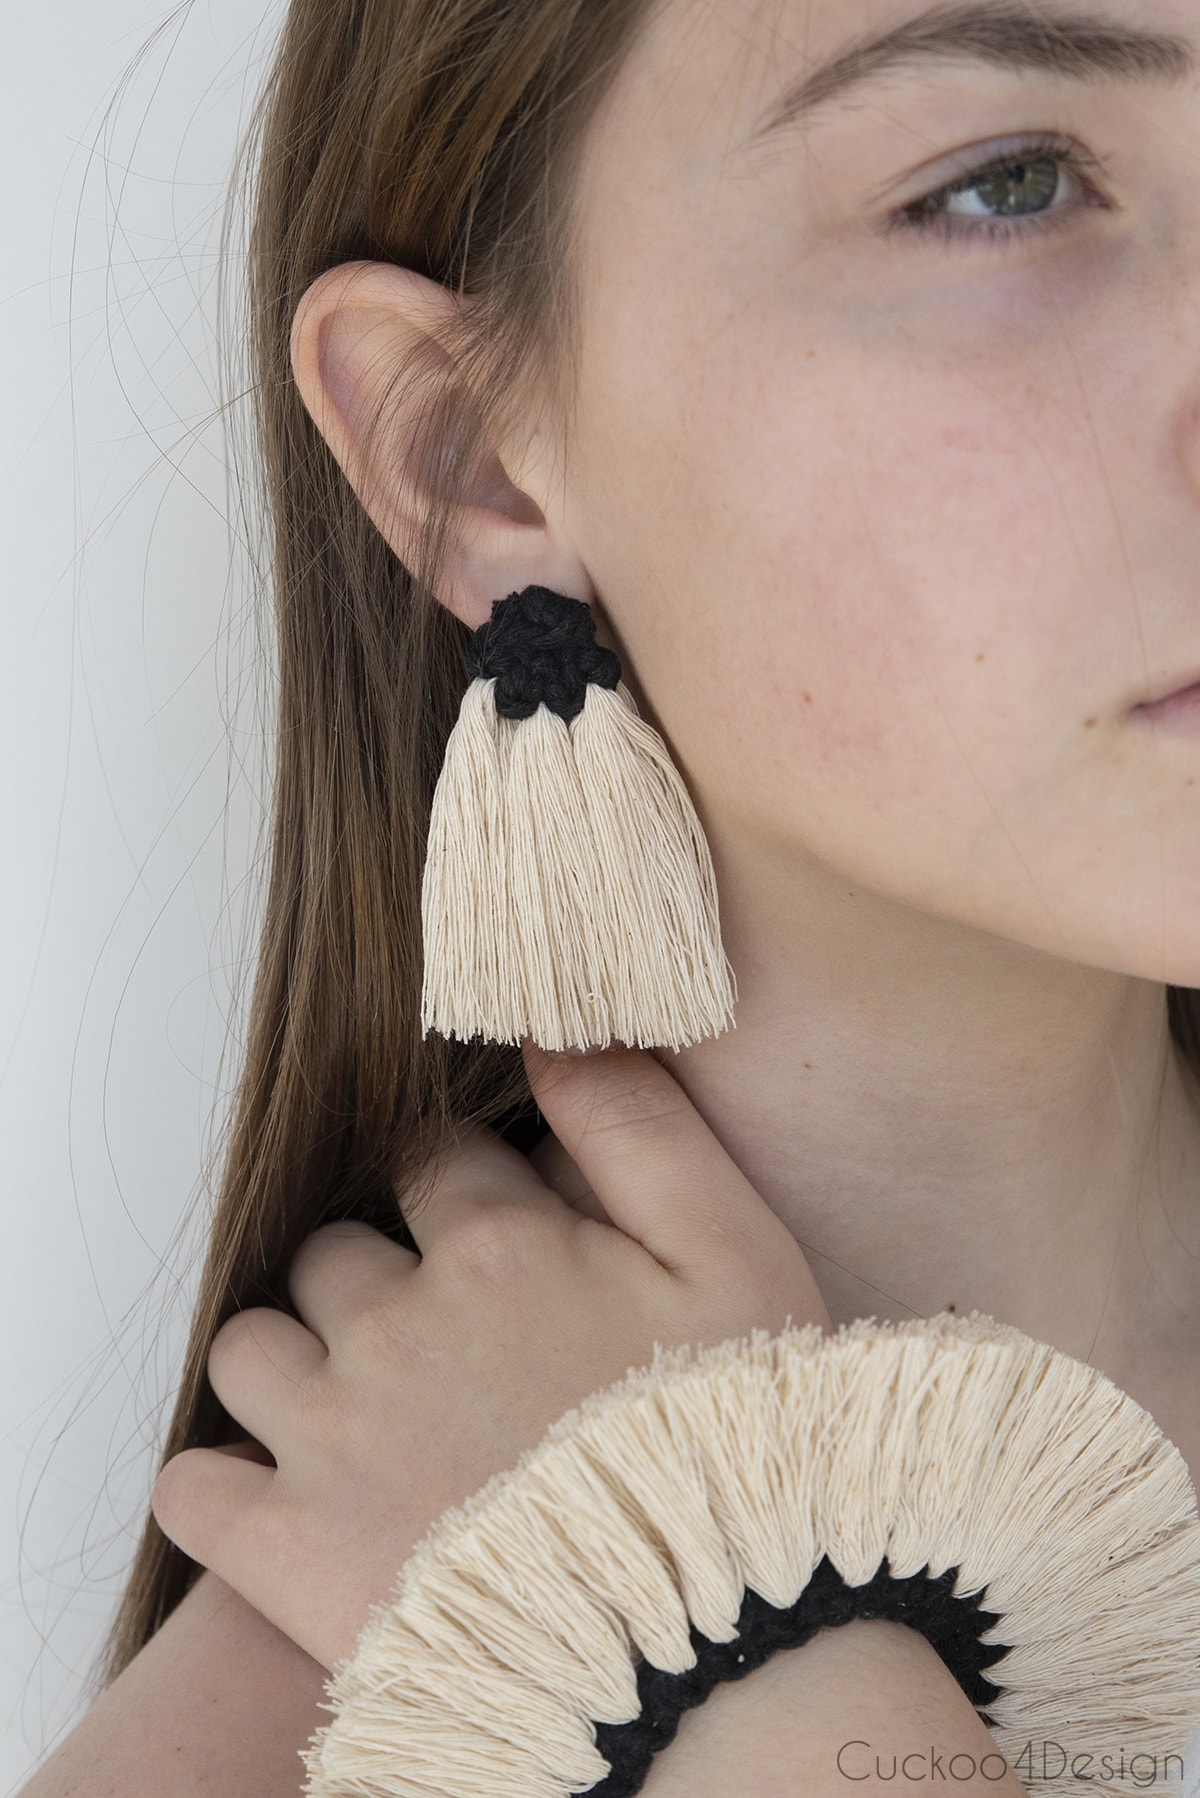
As I mentioned above, hoop earrings are not the right accessory for me anymore. Thankfully, the fringe earrings are pretty lightweight, and the studs combined with lobe wonder stickers work very well for me. I decided to let my daughter model them again for you. It’s easier for me to just take photos of her than to try to take some of myself. Plus, she’s a lot prettier than me 😉
When I researched fringe earrings, all the tutorials included small beads. Why is that? Whoever said that fringe earrings had to include seed beads? My earrings are made with thick fringe, and I don’t know what else to call them, maybe tassel fringe earrings? What would you call them? Also, beading fringe earrings is tedious, and you need a good eye. My beginner fringe earring tutorial is quick, easy, and super affordable.
Anyways, I was able to use the same macrame yarn that I’ve been using for all my other projects and the only different thing you might need is the earring studs unless you maybe have old ones at home that you can just glue the fringe earrings to. We have plenty of those lying around the house.
Step 1: Cut the pieces of yarn needed
Cut 6 pieces of 4-inch long ivory macrame cord (or however long you want your fringe to be), 1 piece of 10-inch long black macrame cord, and 1 piece of 30-inch long black macrame cord
Step 2: Separate the black cord into two strands
To make the fringe earrings lighter in weight, I separated the 2 strands of black cord into two pieces to get thinner, lighter yarn.

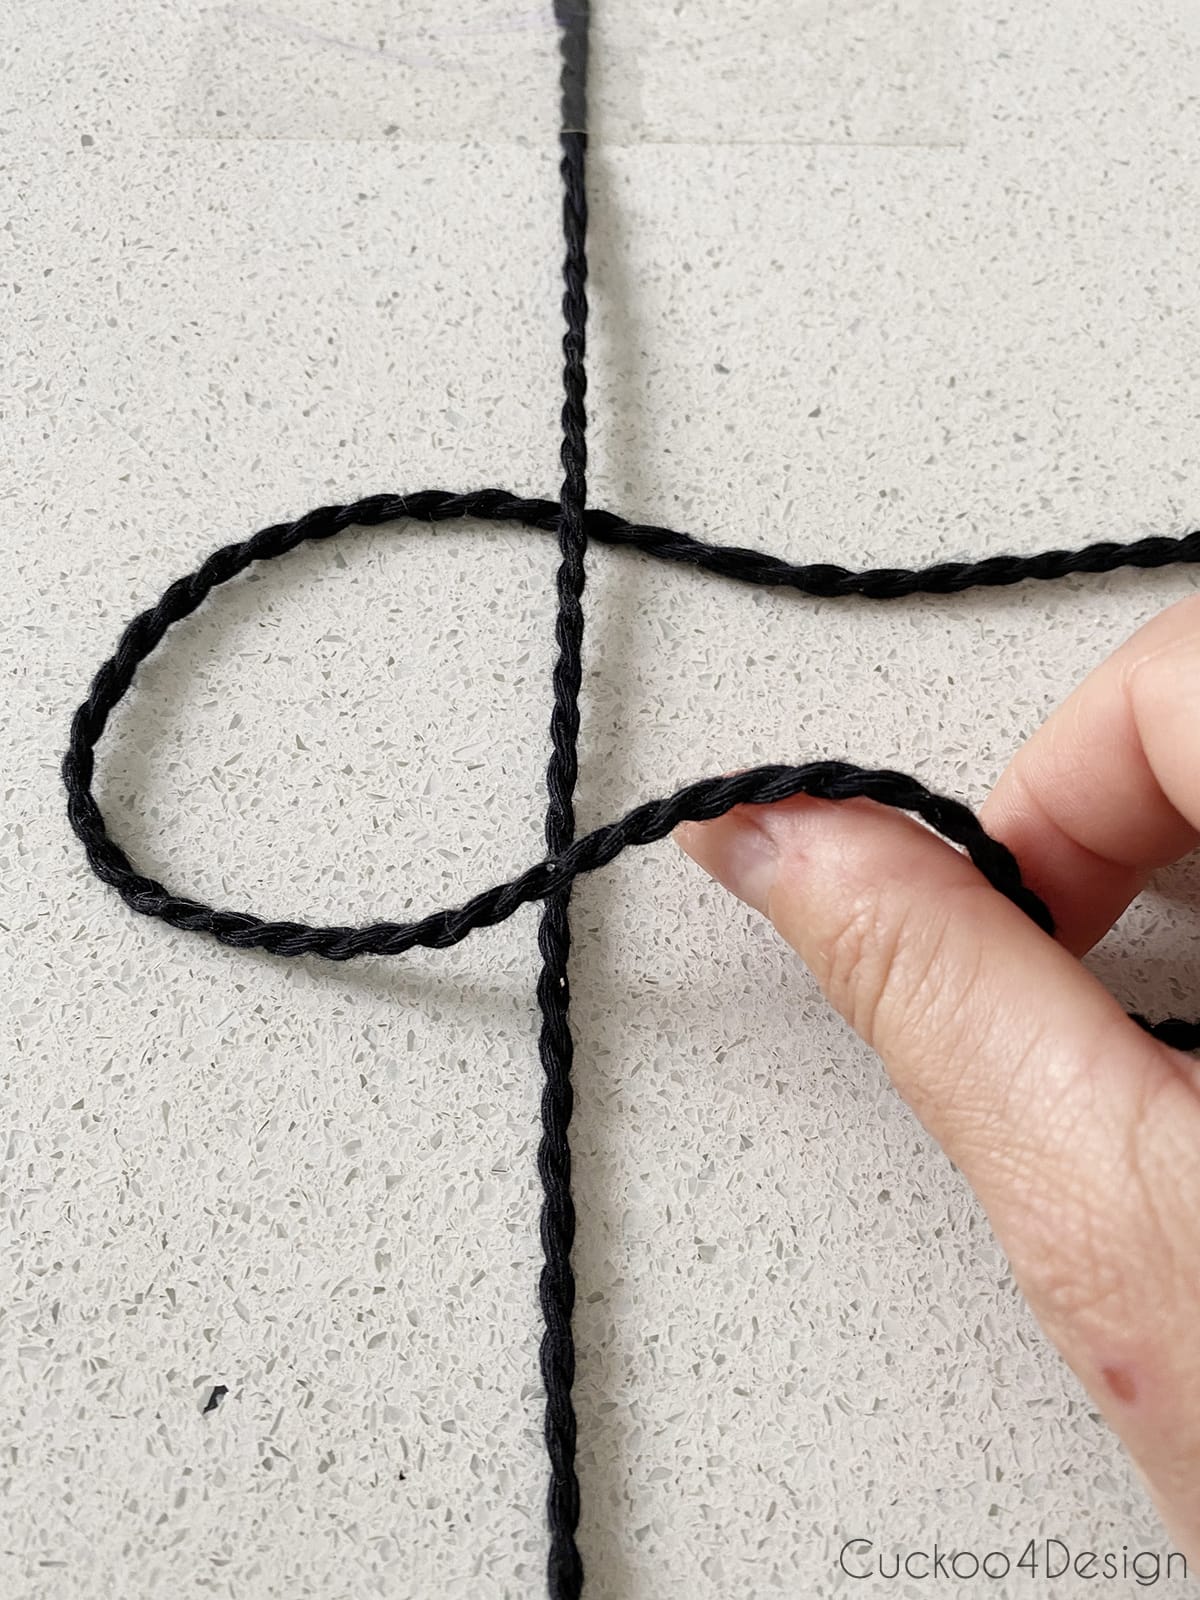
Step 3: Tape the 10-inch piece of yarn to a flat surface
Tape the 10-inch piece of yarn to a flat surface and place the second 30-inch piece of cord behind it in a cross shape.

Step 4: Knot the crossed yarn to the taped piece of yarn
Fold the left string over the center and the right string behind and through the loop about 3 inches down the string from where you taped it (as pictured below). In macrame terms, this is the first part of a Square Knot. Pull that tight knot very tight.
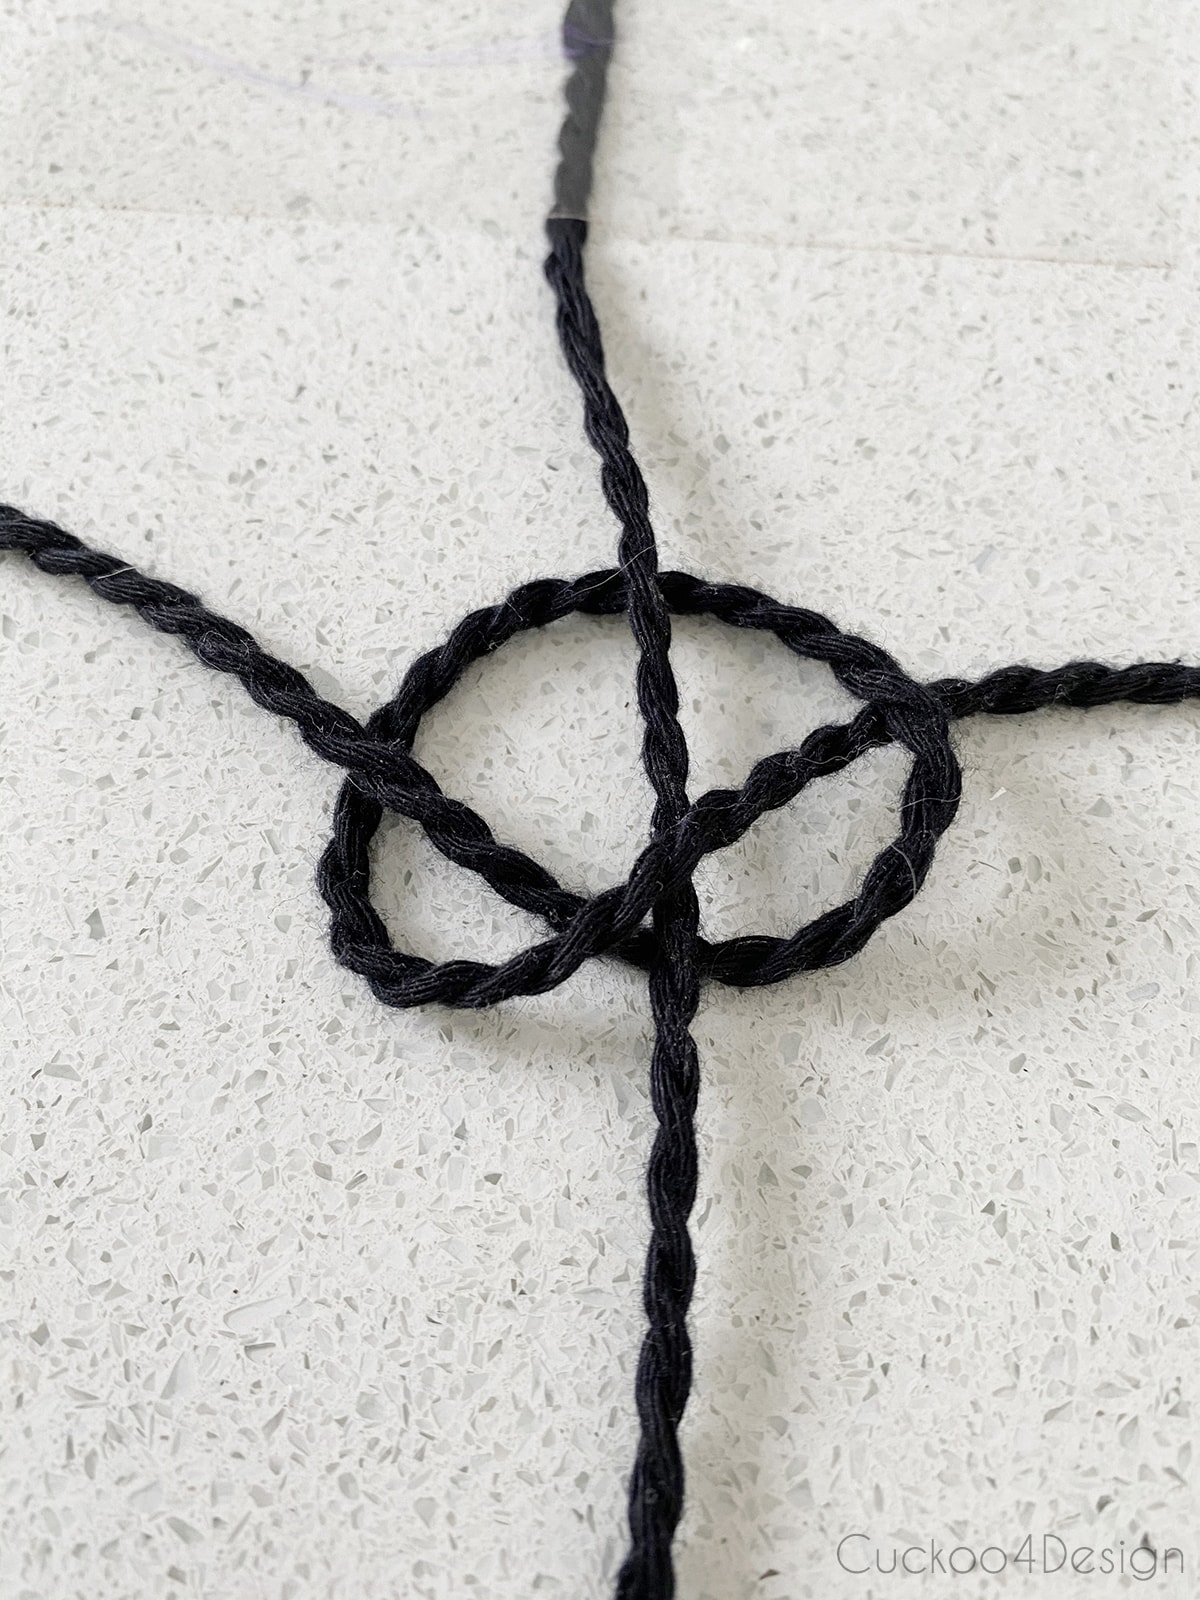
Step 5: Form a second knot
Then fold the right string over the center string with the left one through the back loop, which creates the second part of a Square Knot.

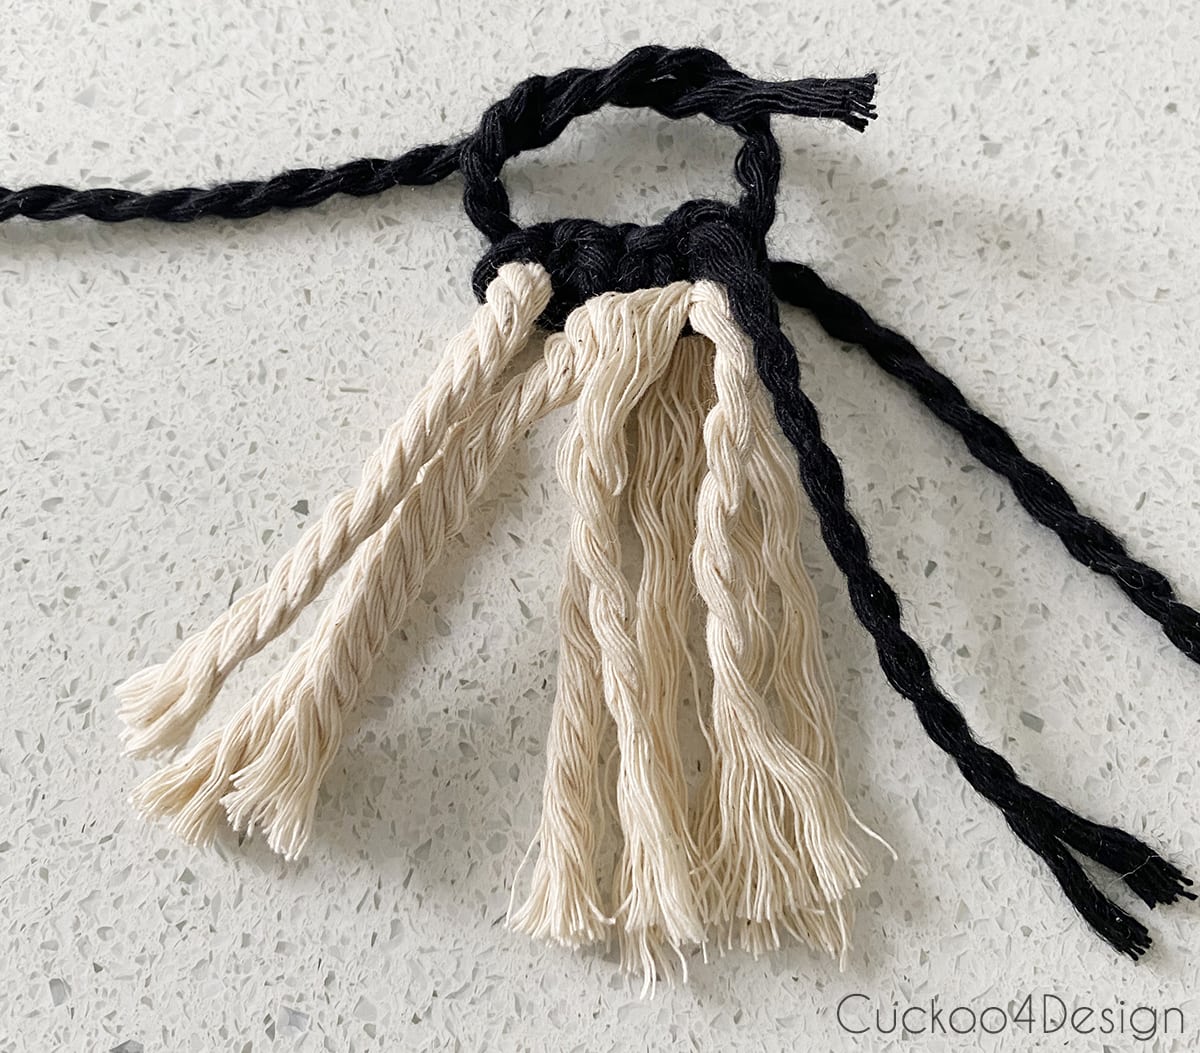
Step 6: Add the first piece of fringe
Now it is time to start adding the ivory pieces of yarn to the square knot loop by threading your ivory piece of yarn through the knot. The piece should be folded in half over the black yarn loop
You can clamp the strand in place while tying the knot but that is optional. Pull the black yarn knot tight again to keep the fringe in place.

Step 7: Repeat steps 4 through 6 two more times to add two more pieces of the fringe
Remember, you need to fold the left string over first and pull that knot tight.

The fringe always gets added when you fold the right string over after that. You should now have three pieces of yarn added. Since it is folded in half you have 6 pieces of ivory fringe.

Step 8: Tie the lead center string together in a knot
Tie the beginning and end of the lead center string together to form a finished end piece. Pull tight!
Step 9: Add clear craft glue to the backside of the black knots
Add some clear craft glue with the tip of a toothpick and tie everything into a knot one more time. Be careful not to get glue on the front of the fringe earring.

Below you can see the backside which is ok to be somewhat messy. Cut off the remaining black yarn pieces.

And clamp the top knotted earring piece, so the glue can dry securely.

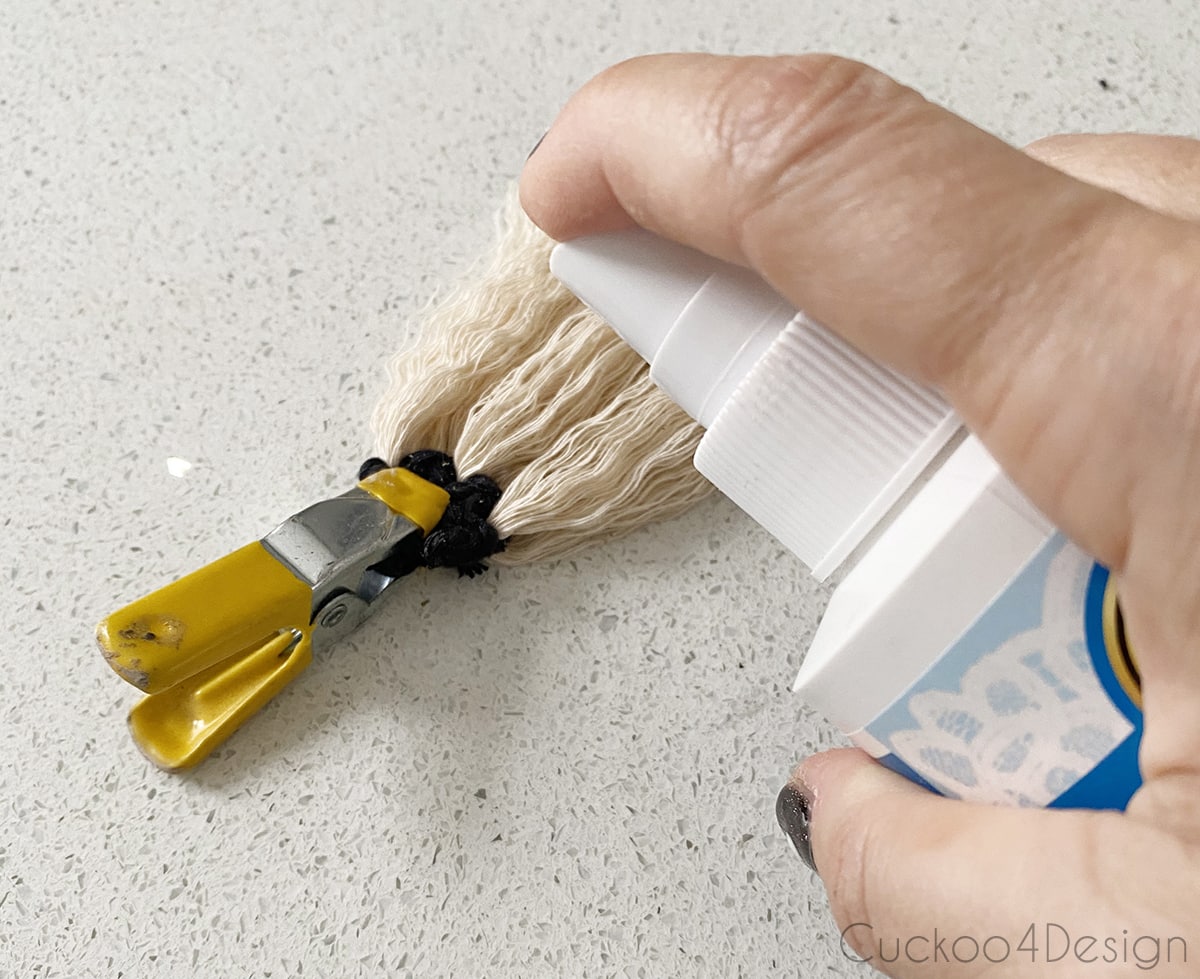
Step 10: Comb, stiffen, and trim the fringe
While the glued knots are drying you can unravel the macrame fringe with your hands and comb it.

Comb everything well so you can trim the ends to the desired length.

You can add fabric stiffener to the ends as I did but this is totally optional because they also look pretty without the stiffener. Without the stiffener, the fringe earrings are slightly fluffier and would blow in the wind. You decide what you like.
Trim the fringe to whatever length you like.
Step 11: Glue the fringe earring to the stud
When the black knot is dry you can glue the stud earring to the backside of the black knotted cluster of Square Knots.

Step 12: Repeat everything to make your second fringe earring
Repeat all the steps to make your second fringe earring. Also, make sure you cut both of them at the same length.
And you are done.
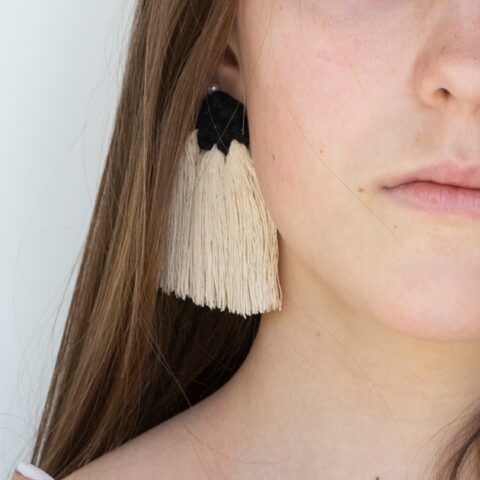
Finished boho fringe earrings on studs
I especially love how the finished earrings look with an updo. They kind of look like large boho tassel earrings or chandelier earrings don’t they? As I mentioned earlier, I’m having a hard time naming these pretty stud earrings. Still taking suggestions 😉
In my video tutorial above, you can see me wearing them as well.

Also, check out the macrame square knot bracelet tutorial pictured in the photo below that matches the earrings perfectly.


I hope you like this idea for statement earrings. I wear my own fringe earrings all the time, especially in the summer. They look very pretty combined with my favorite summer tunic dresses.
If you want to try out some other macrame projects that aren’t jewelry then you should check out my super easy macrame feathers, macrame leaf, tassel keychain, modern macrame wall hanging, how to make a macrame necklace (3 different ways), or maybe this macrame stone wrap for your purse. These are just to name a few!
Tschüß,

How to make fringe earrings on studs
Black and white macrame yarn are the perfect material for these super cute fringe earrings on studs instead of hoops. Such an easy tutorial!
Materials
- black 4mm macrame cord
- ivory 4mm macrame cord
- 8mm stud earrings for crafting
- clear strong craft glue
- fabric stiffener
- toothpicks
Tools
- scissors
- measuring tape
- comb
- small spring clamps
Instructions
- Cut 6 pieces of 4-inch long ivory macrame cord (or however long you want your fringe to be), 1 piece of 10-inch long black macrame cord, and 1 piece of 30-inch long black macrame cord
- To make the fringe earrings lighter in weight, I separated the 2 strands of black cord into two pieces to get thinner lighter yarn.
- Tape the 10-inch piece of yarn to a flat surface and place the second 30-inch piece of cord behind it in a cross shape.
- Fold the left string over the center and the right string behind and through the loop about 3 inches down the string from where you taped it (as pictured below). In macrame terms, this is the first part of a Square Knot. Pull that tight knot very tight.
- Then fold the right string over the center string with the left one through the back loop which creates the second part of a Square Knot.
- Now it is time to start adding the ivory pieces of yarn to the square knot loop by threading your ivory piece of yarn through the knot. The piece should be folded in half over the black yarn loop.
You can clamp the strand in place while tying the knot but that is optional. Pull the black yarn knot tight again to keep the fringe in place. - Repeat steps 4 through 6 two more times to add two more pieces of fringe. Remember you need to fold the left string over first and pull that knot tight. The fringe always gets added when you fold the right string over after that. You should now have three pieces of yarn added. Since it is folded in half you have 6 pieces of ivory fringe.
- Tie the beginning and end of the lead center string together to form a finished end piece. Pull tight!
- Add some clear craft glue with the tip of a toothpick and tie everything into a knot one more time. Be careful not to get glue on the front of the fringe earring. Cut off the remaining black yarn pieces and clamp the top knotted earring piece, so the glue can dry securely.
- While the glued knots are drying you can unravel the macrame fringe with your hands and comb it. Comb everything well so you can trim the ends to the desired length.
You can add fabric stiffener to the ends as I did but this is totally optional because they also look pretty without the stiffener. Without the stiffener, the fringe earrings are slightly fluffier and would blow in the wind. You decide what you like and trim the fringe to whatever length you like. - When the black knot is dry you can glue the stud earring to the backside of the black knotted cluster of Square Knots.
- Repeat all the steps to make your second fringe earring. Also, make sure you cut both of them at the same length.
And you are done.
Notes
You can make these fringe earrings in whatever color combo or length that you would like.
these are soooo cool, and you have a beautiful model!
Thank you! Now what else could I make 😉
Very pretty, the jewelry and the model! You should have an Etsy store, or maybe you do.
Thank you Judie, I actually do have one but haven’t really sold any macrame. The shipping is such a pain at times 🙁