

Stylish DIY Tassel Keychain
Hi, my name is Julia and I’m addicted to making tassels. What is it with women and tassels? I’ve made so many over the years. Today I want to share how I made a DIY tassel keychain that I will either use with my keys, on my cellphone wristlet, or maybe even my purse.
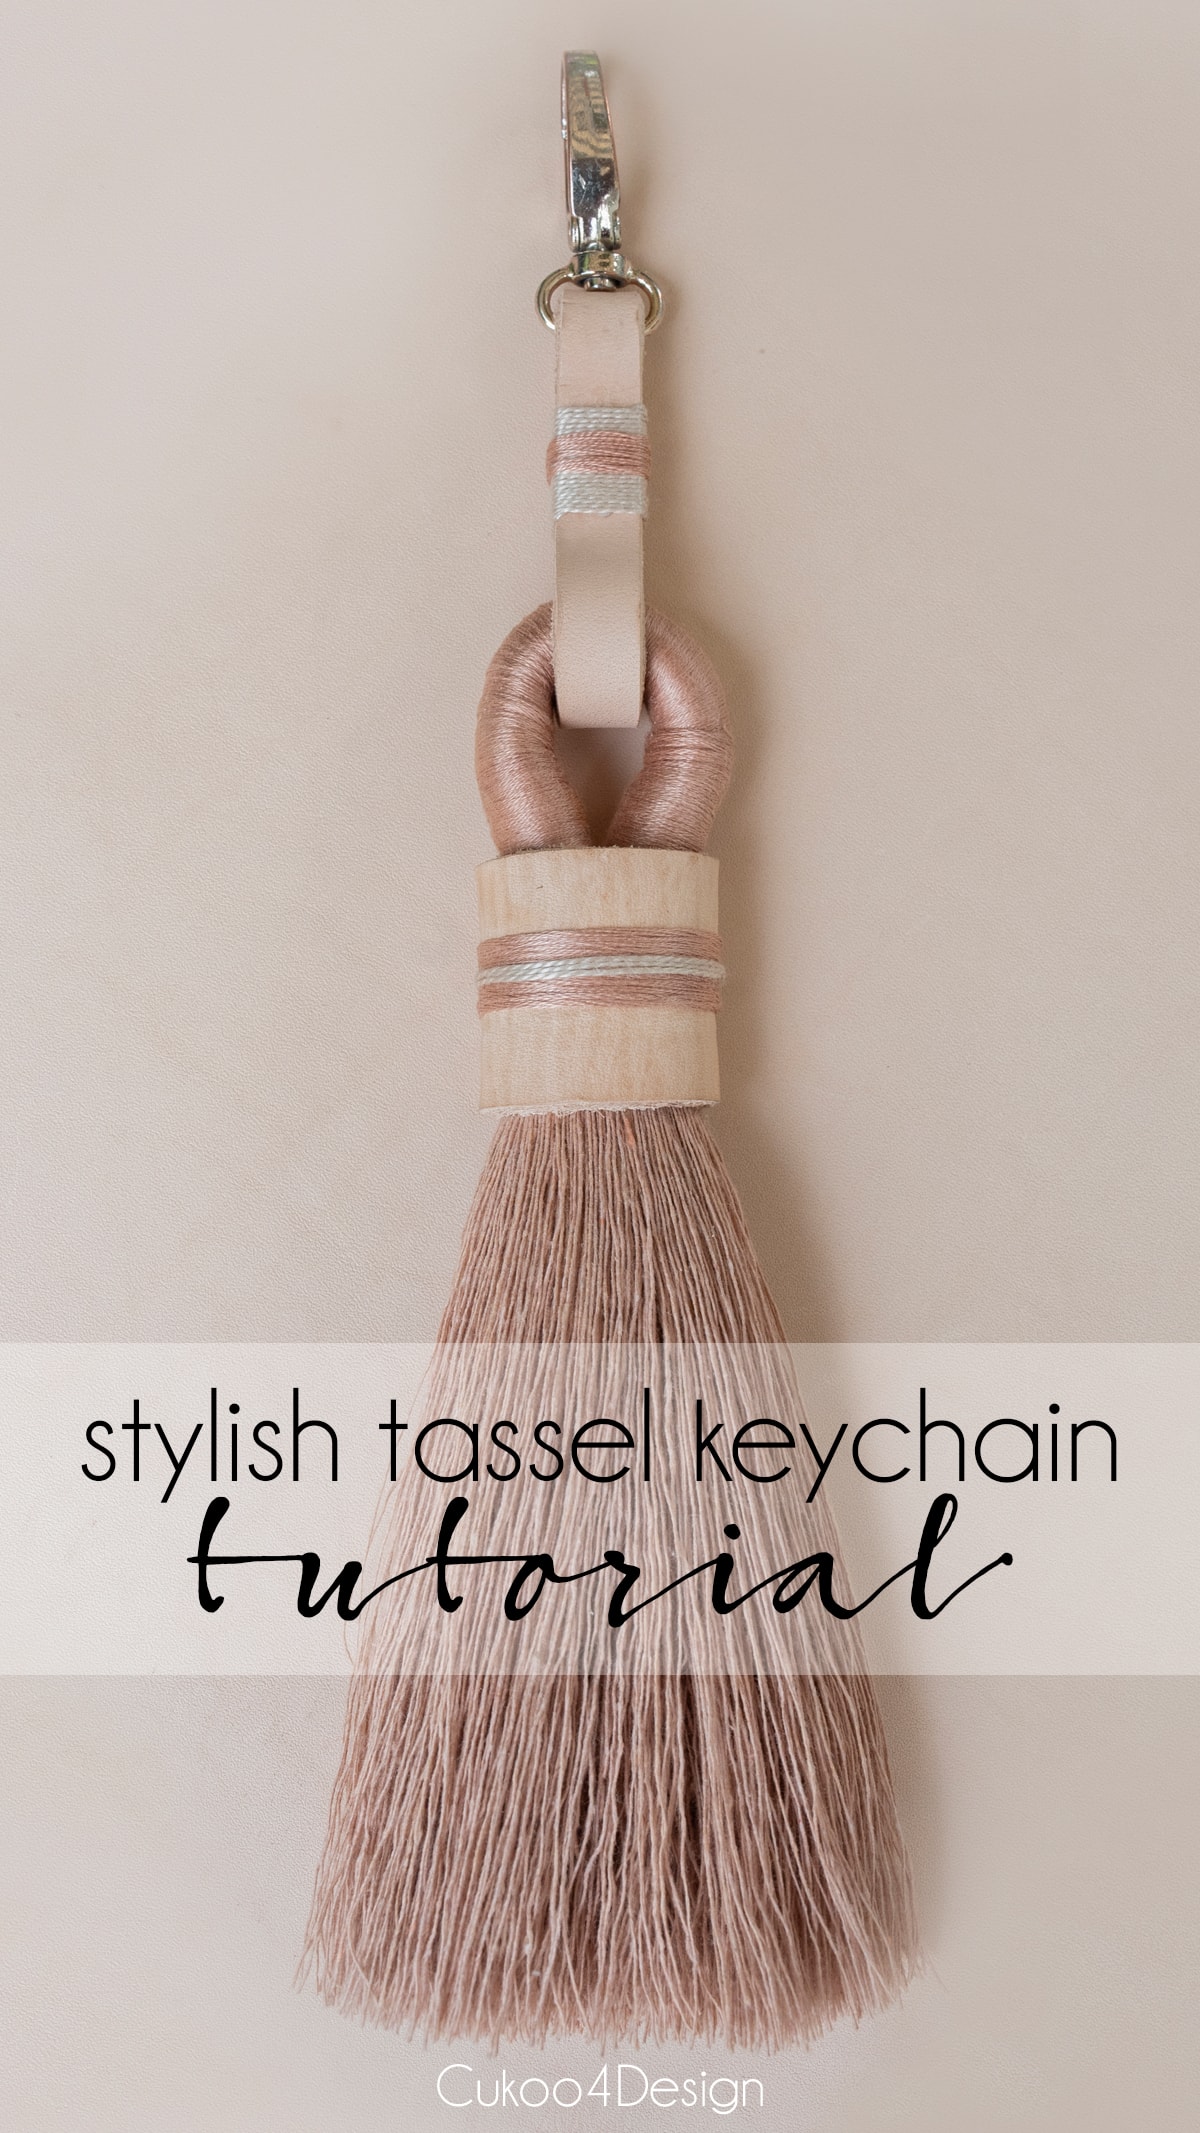
Stylish Tassel Keychain DIY
This post may contain affiliate links from which I will earn a commission at no extra cost to you. View my full disclosure policy.
I love creating crafts with things I already have on hand and today’s tassel keychain was made from scraps that I had left from my drawer pulls used on my wood bleach dresser makeover and the embroidery floss leftover from my long narrow wall art.
The embroidery floss and macrame yarn happen to be a perfect match and it wasn’t even planned that way. I love the contrast of the shiny/silky embroidery floss versus the same colored macrame yarn that is dull and stiff thanks to the liquid starch.
Of course, you could make it a more colorful tassel keychain with contrasting colors. I happen to love the monochromatic look for this tassel and letting the different materials highlight the different textures.
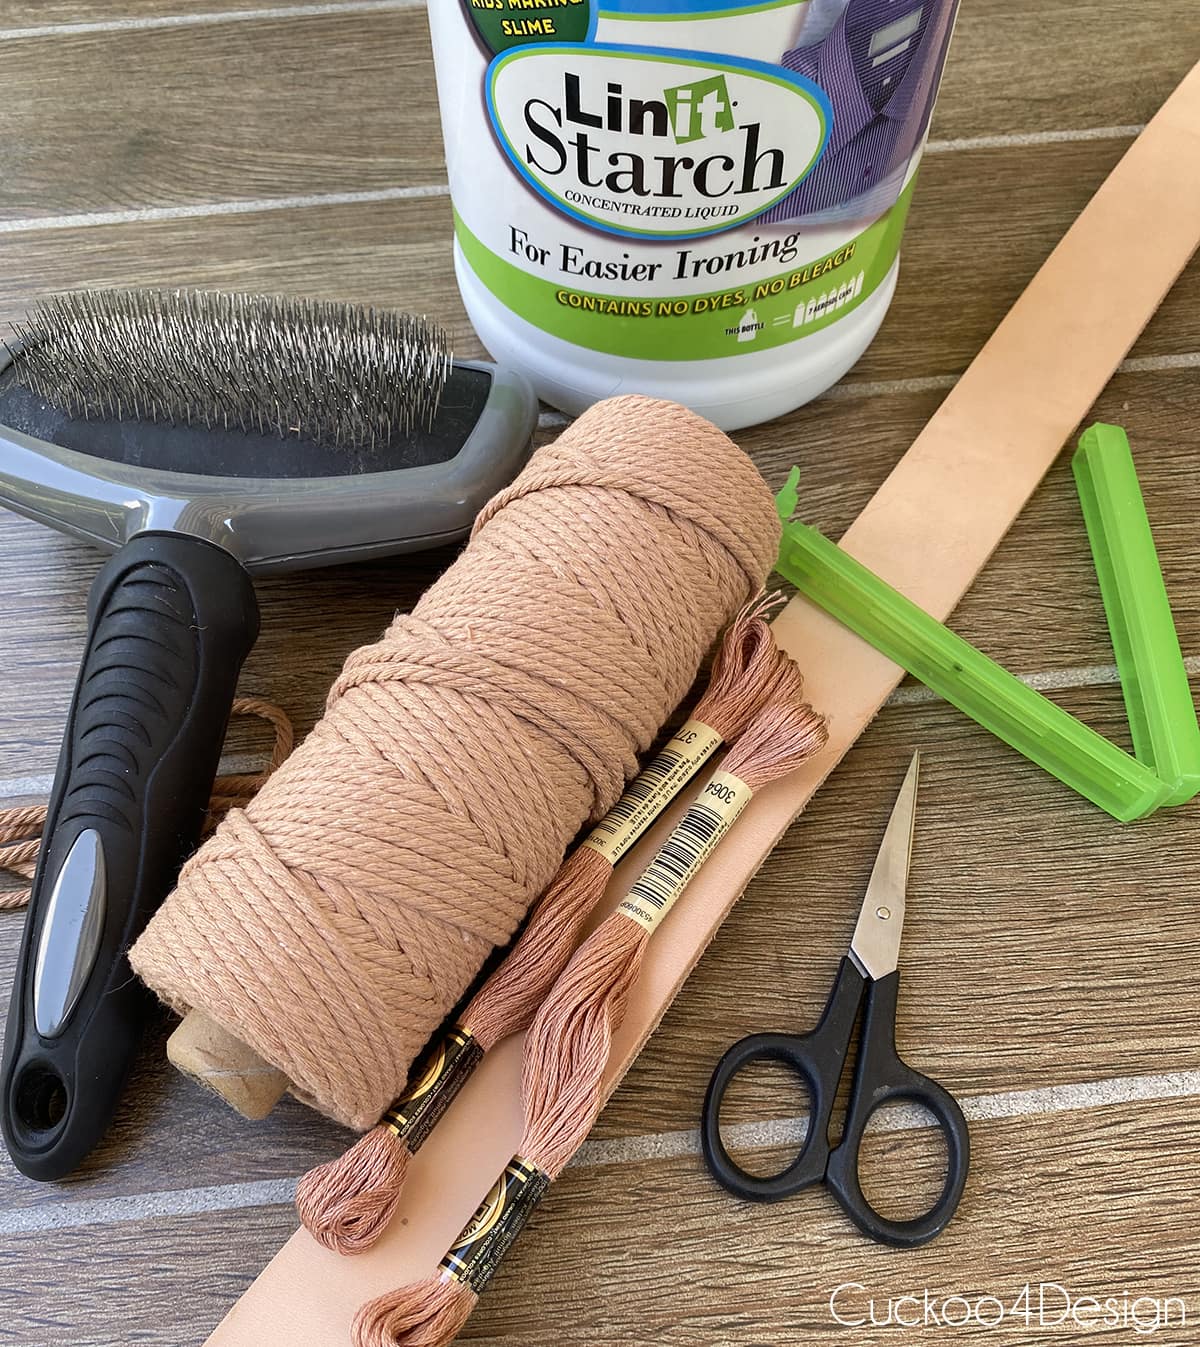
Materials used to make tassel keychain
- macrame yarn (or any other yarn, that’s just what I had and I love the color), I used about 24 strands at 17 inches long
- liquid starch
- bowl
- scissors
- embroidery floss (DMC Stranded Cotton Embroidery Thread colors I used: 3064 or 3773 both work and 712)
- leather scraps
- leather glue
- keychain clip
- comb
- brush ( love THIS ONE for projects like this)
- craft knife
- ruler
- cutting mat
- small spring clamps
- large spring clamp
- clips (optional)
Video tutorial
Use the triangle in the center of the image to watch the tutorial. If you are on a cellphone, hold the phone sideways to view it on full screen. If you have issues viewing it on my blog then you can also check it out on my YouTube channel.
Step-by-step tassel keychain instructions
Next is a description of what you need to do to make the tassel keychain and it certainly helps to watch the video with the tutorial to see exactly what my hands are doing and to understand the entire process.
I love unraveling, starching, and straightening the macrame yarn but you can definitely skip this step and leave it as is. It looks pretty too but I just prefer it the other way. You can also use wool or other yarn, whatever you have at hand.
So if you chose to skip the unraveling and straightening part of the macrame yarn then you skip to step 6.
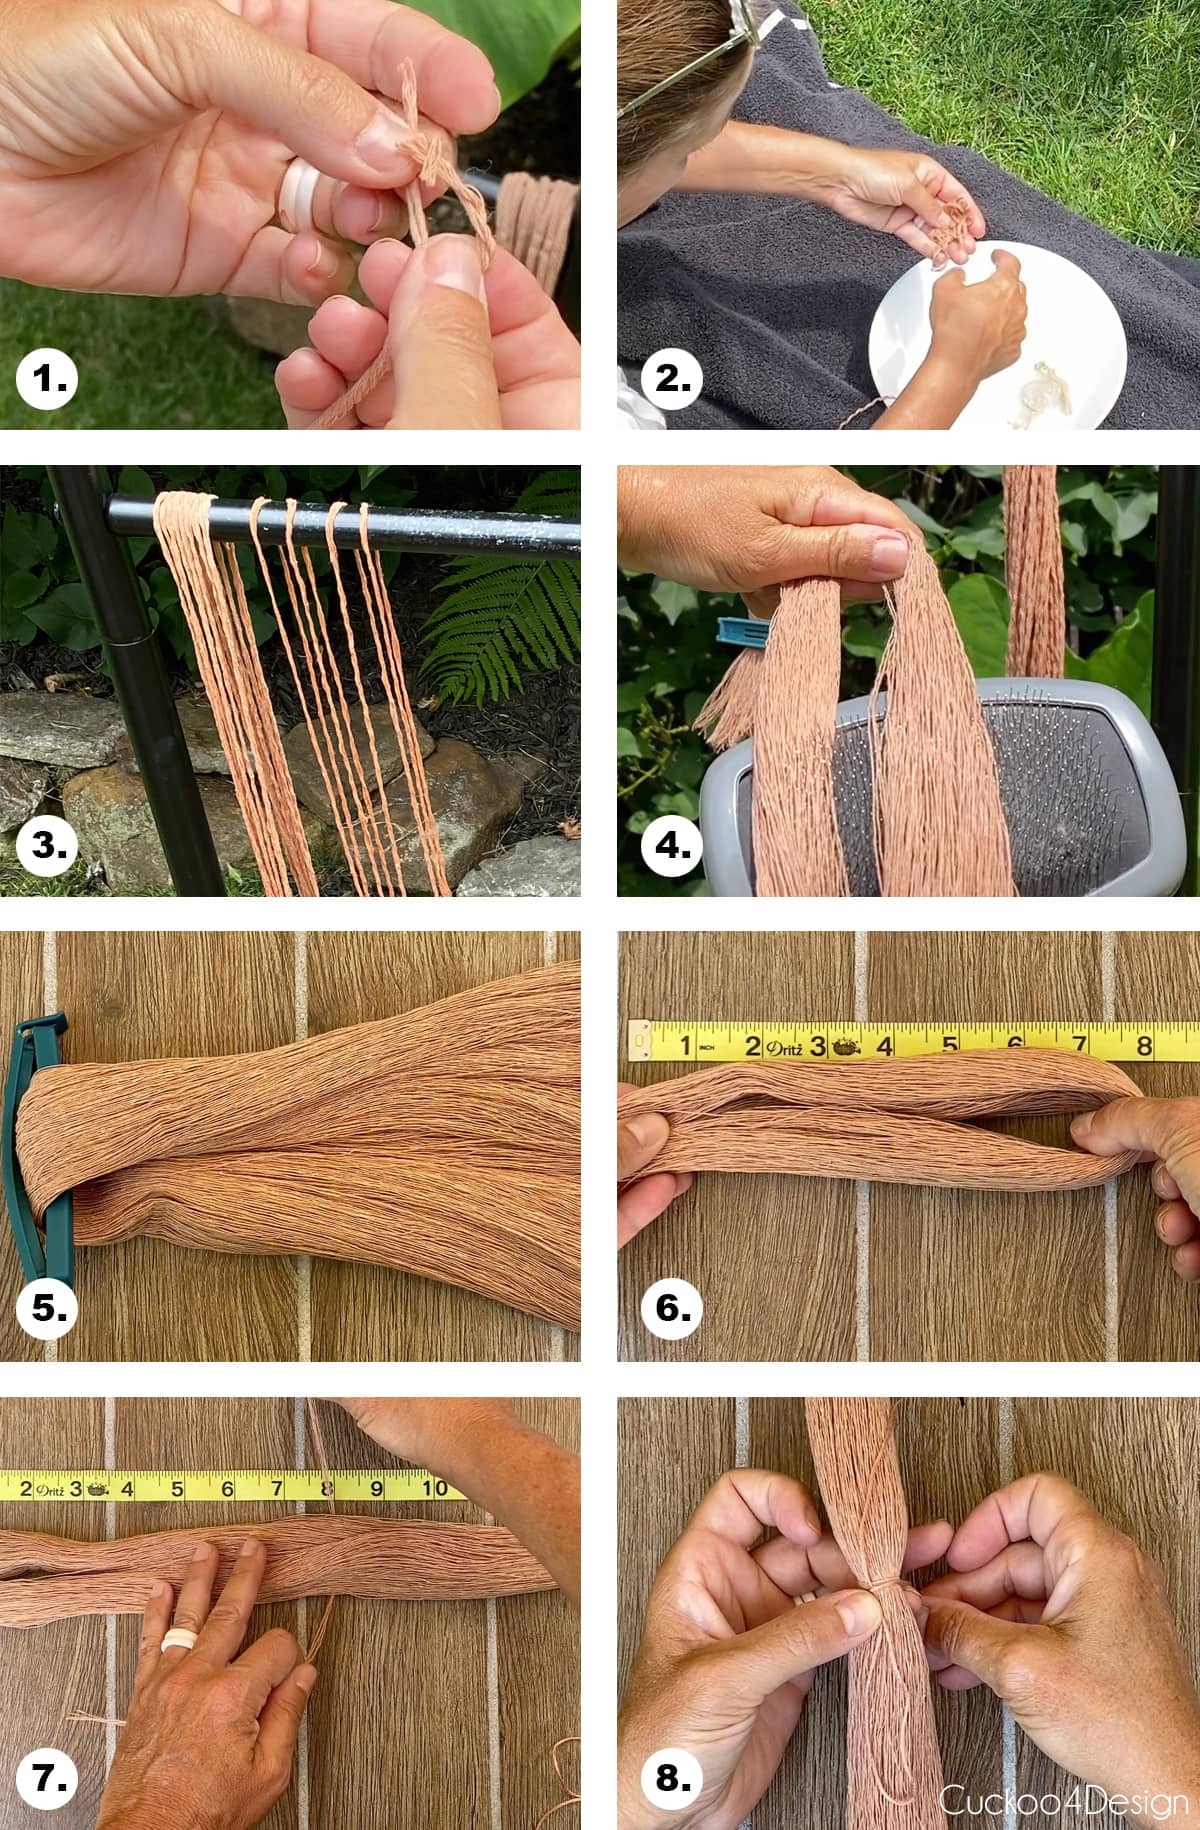
Step 1 through 8
1. Separate the yarn into different strands
2. Dip the different strands into a bowl filled with the starch.
3. Wring out access and hang yarn to dry. I use a garment rack which is also great for my other macrame projects but you can hang the yarn to dry on anything else that works for you.
4. When the yarn is completely dry, use a brush to comb it straight. I love using a sheepskin brush but others might work too.
5. I made way more than needed and keep it all bunched together with a snack bag clip.
6. I separated a bunch of yarn (about 24 strands at 17 inches long) and folded it in half. As you can see it is about 8 inches long folded in half but there is a bit of extra yarn to the left in the image which is needed for trimming the tassel nicely later.
7. Use some leftover yarn to tie off the center of the tassel.
8. Then use the embroidery floss color 3064 (or 3773) and the Gathering Knot Method to wrap the top center of the tassel keychain tightly (as shown in my video). I started from the center and wrapped to the right and then used another Gathering Knot going from the center to the left. That way I made sure it is exactly in the center of the tassel. I needed two Wrap Knots for this which ended up being about 4.5 inches of wrapped yarn altogether (in photo 8 you can see how I started out the Gathering Knot/Wrap Knot)
How to make a Gathering Knot or Wrap Knot
- Take your yarn and form a u-shape over the yarn strands that you want to wrap.
- Then take the long end and wrap it around all of your strands while making sure to leave a short end of yarn hanging at the beginning of the wrap. Wrap tightly towards the u-shaped loop. You can make the Wrap Knot as long as you want.
- When you reached the desired wrapped length, take the long strand and pass it through the u-shaped loop and pull on the shorter strand on the other side of the wrap. This will pull the loop under the wrapped yarn and secure it from unraveling again.
- Trim the two yarn ends and done!
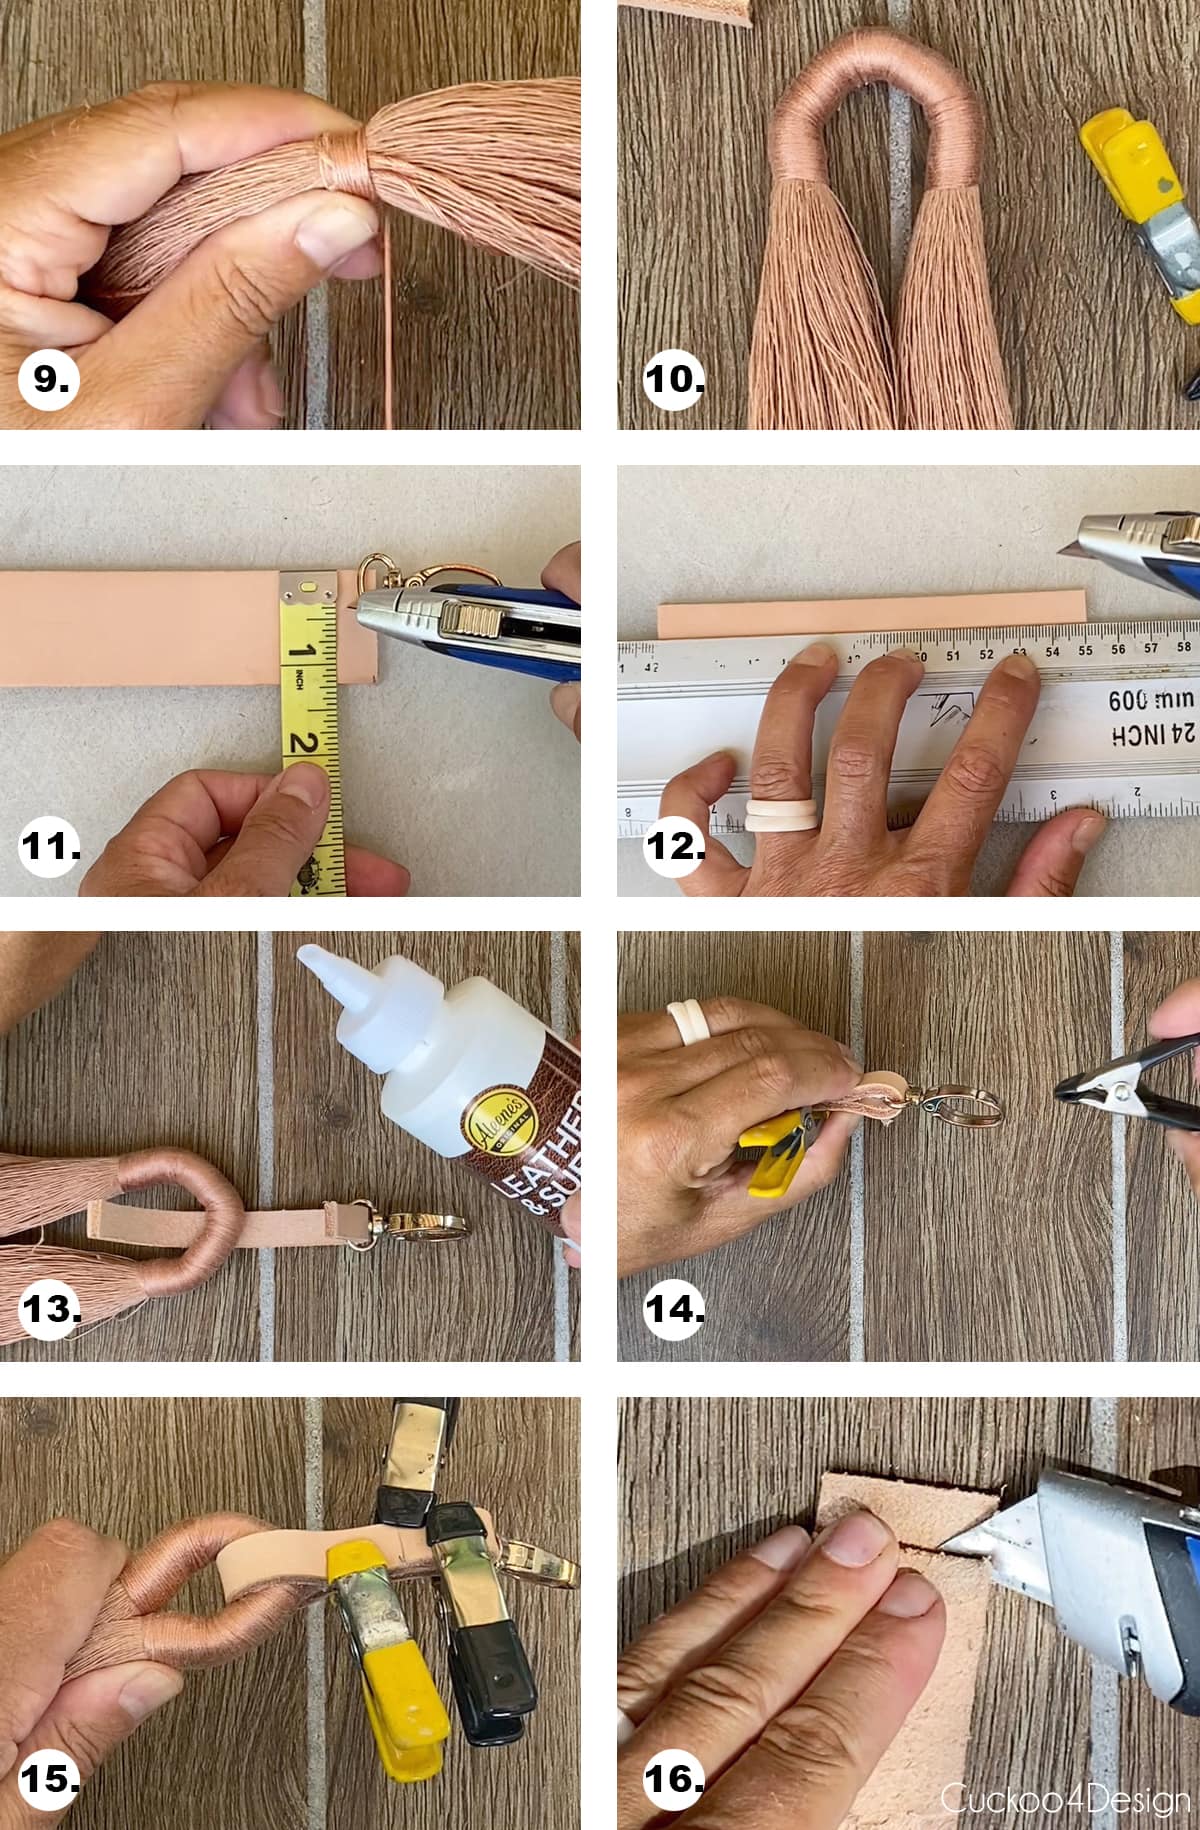
Step 9 through 16
9. You can see how tightly I wrapped the macrame yarn.
10. I used my hands and the help of a large spring clamp to form the 4.5-inch Wrap Knots into a u-shape to form the top of the tassel.
11. I measured the width I needed to cut the leather strap, so it would fit through the keychain clip.
12. Then I used a cutting mat, metal ruler, and craft knife to cut a thin strip of leather. Mine is about 5 inches long.
13. Loop one end through the u-shaped Wrap Knot and the other through the keychain clip.
14. Use leather glue on both ends and make sure to wipe access glue on the sides.
15. I secured everything tightly with 3 small spring clamps, which I love using for small craft projects.
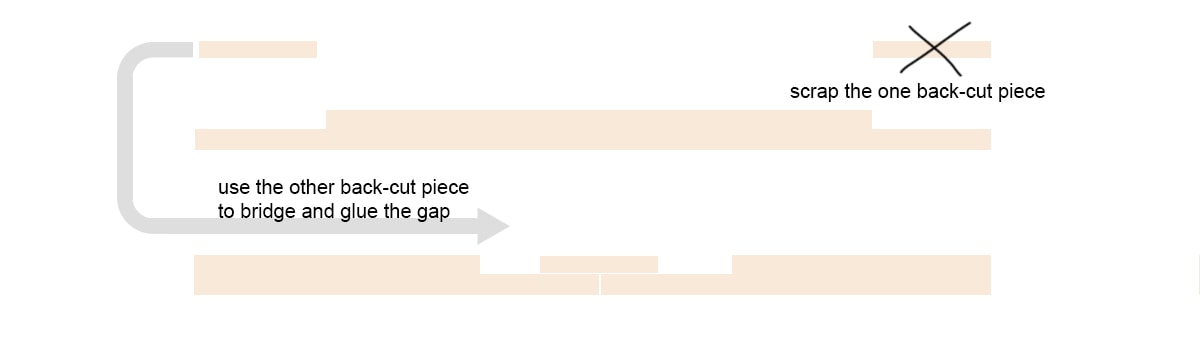
16. Next cut another strip of leather for the center of the tassel. (mine is 1.25 inches by 3.5 inches) I also used the craft knife to back cut this strip on both sides while keeping one of the back-cut pieces to glue and connect the two ends together. (you can see me gluing it in step 17)
Step 17 through 24
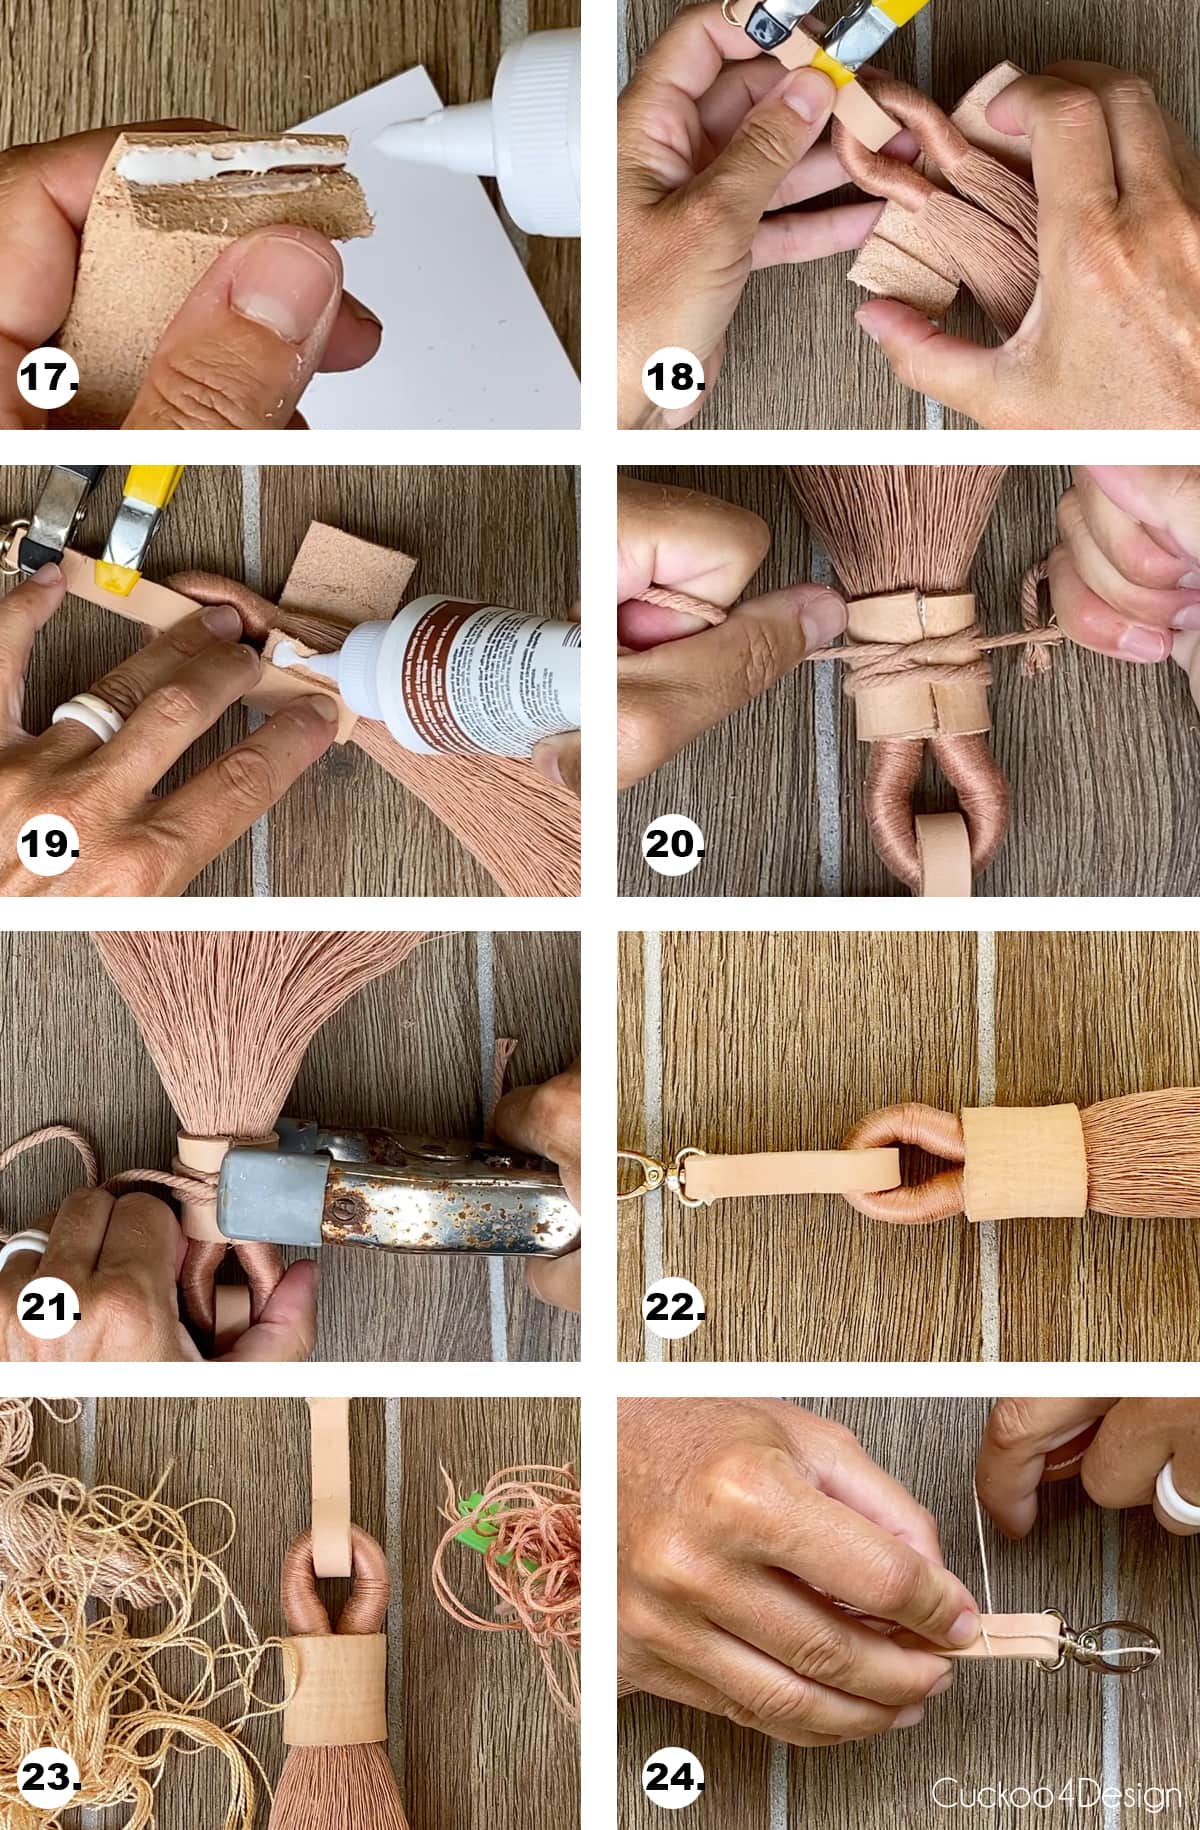
17. Here you can see how I glued the leftover back-cut piece with some overhang.
18. Line up the piece around the tassel while slightly overlapping the wrapped knot.
19. You can see the small back-cut leather piece that is sticking out, this is where I applied more leather glue. When you now lay the other back-cut end of the leather piece on top of that piece it fits snug and level. Again make sure to wipe access glue on the sides.
20. I used a small scrap piece of macrame yarn to tie the leather piece tightly together while the glue is drying.
21. A spring clamp helped keep everything even tighter. I let the tassel keychain dry overnight.
22. Remove all the clamps after drying time is over.
23. Pick your embroidery floss colors.
24. I used a plain ivory color 712 to wrap the top leather part with the “Gathering Knot Method” again.
Step 25 through 32
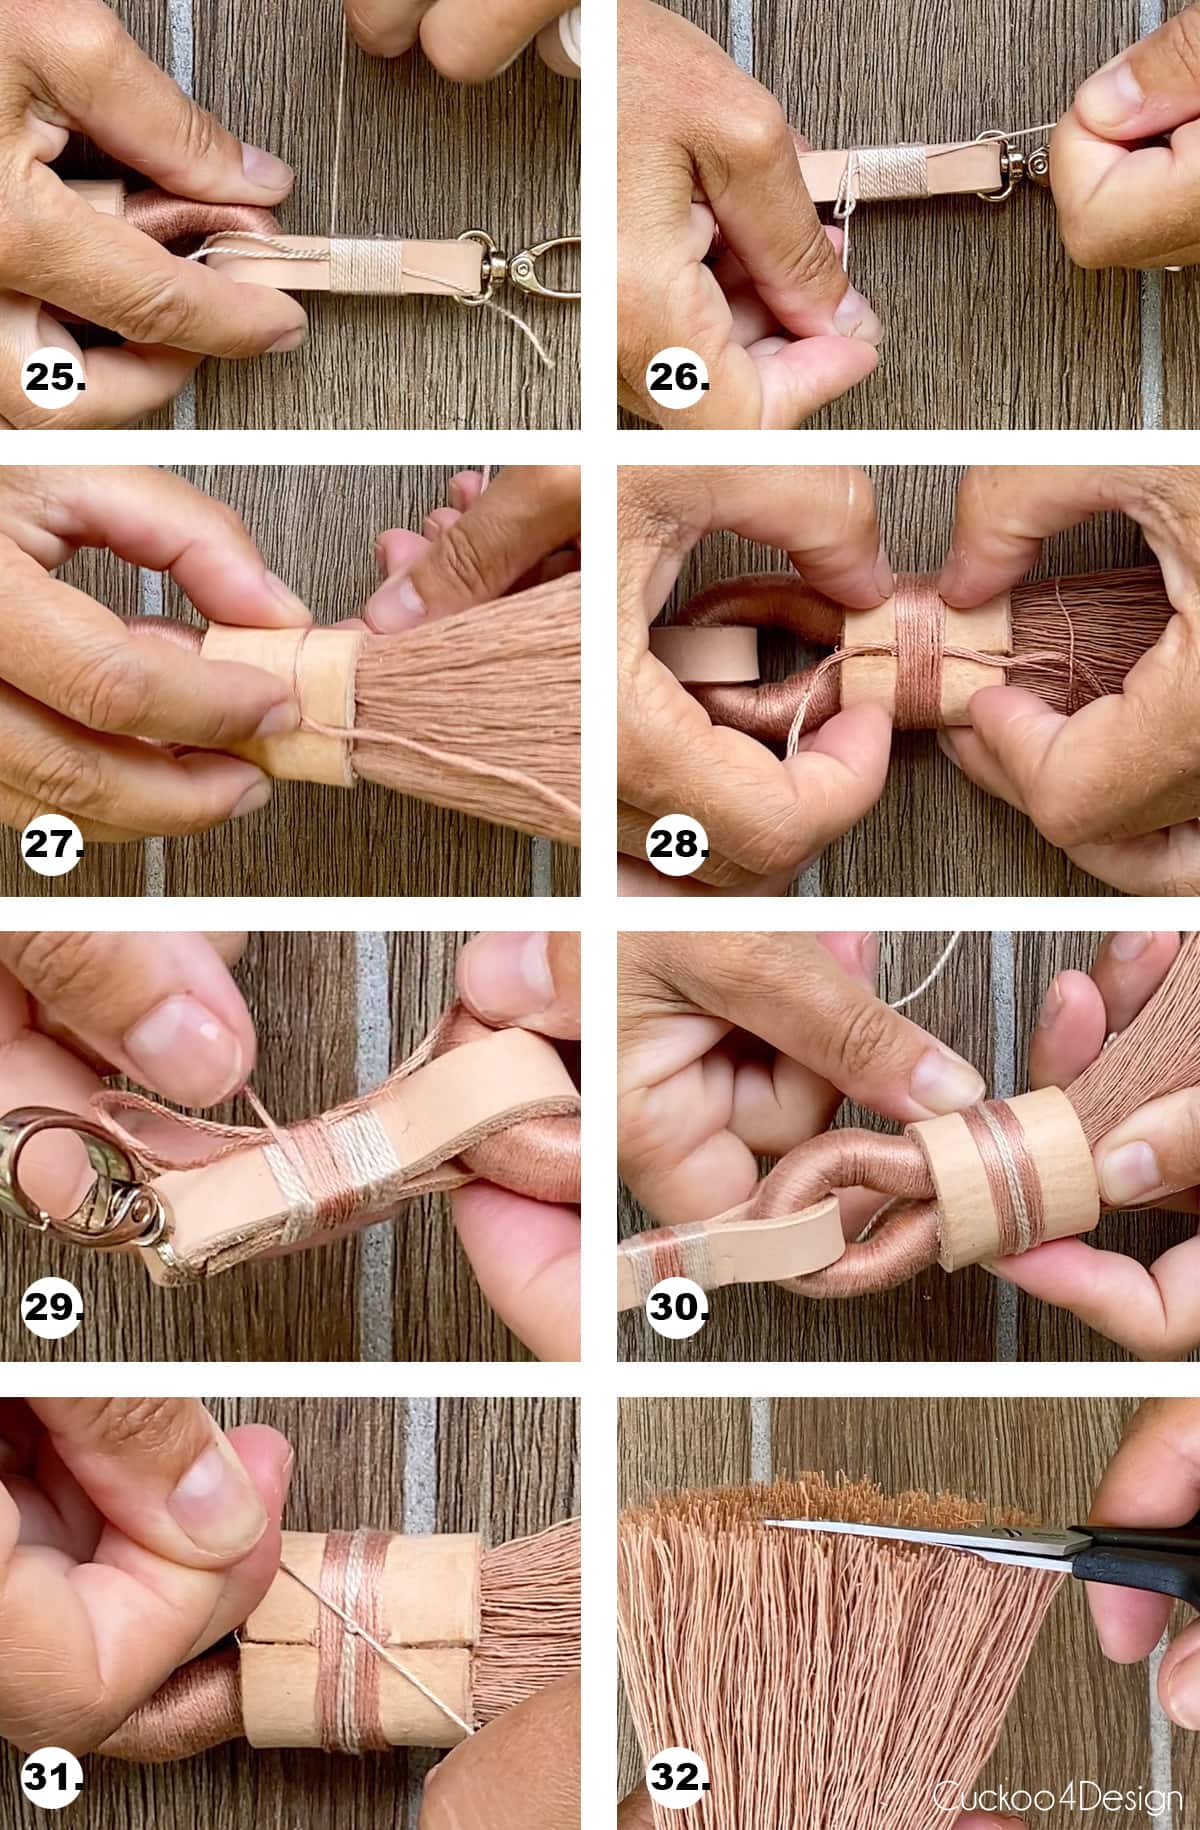
25. You can see how neatly I wrapped the center part of the thin strip of leather.
26. Again, to finish the “Gathering Knot Method” slip the end string through the u-shaped loop and pull the other side of the string until the string disappears under all the wrapped embroidery floss.
27. Next I used color 3064 again to wrap the larger piece of leather with the Gathering Knot Method.
28. I made sure that the two ends of the Wrapped Knot lined up nicely with the back glued side of the leather piece before hiding the loop and string under the knot.
29. I added another detail of darker embroidery floss over the small ivory cord detail with the Gathering Knot Method.
30. And added another small ivory embroidery floss detail to the larger leather piece.
31. Using the “Gathering Knot Method” didn’t work for this small amount of thread and I just ended up making a regular knot on the backside.
32. Don’t forget to trim the bottom of the tassel and you are done.
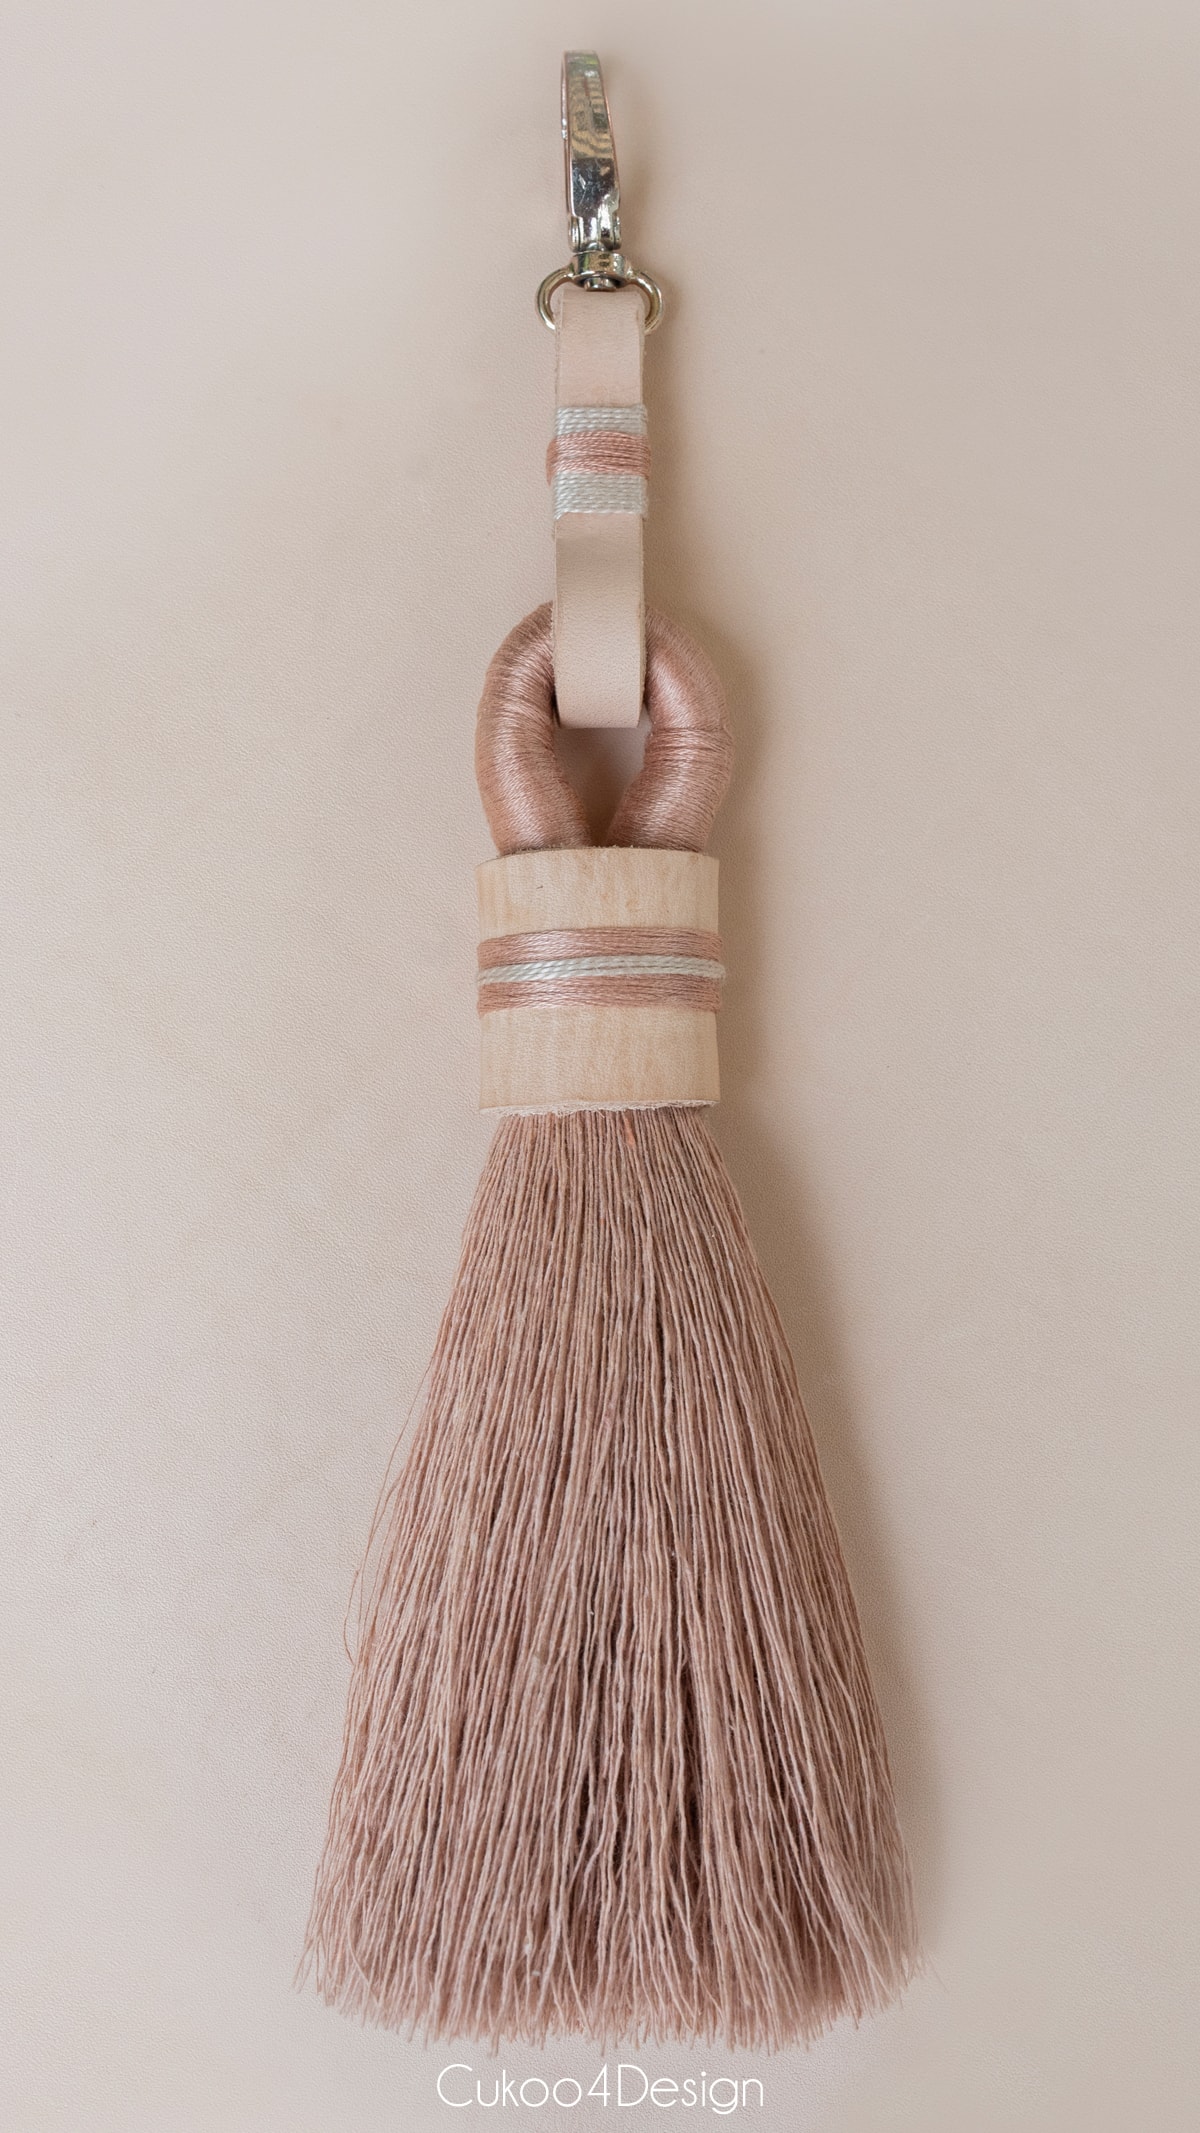
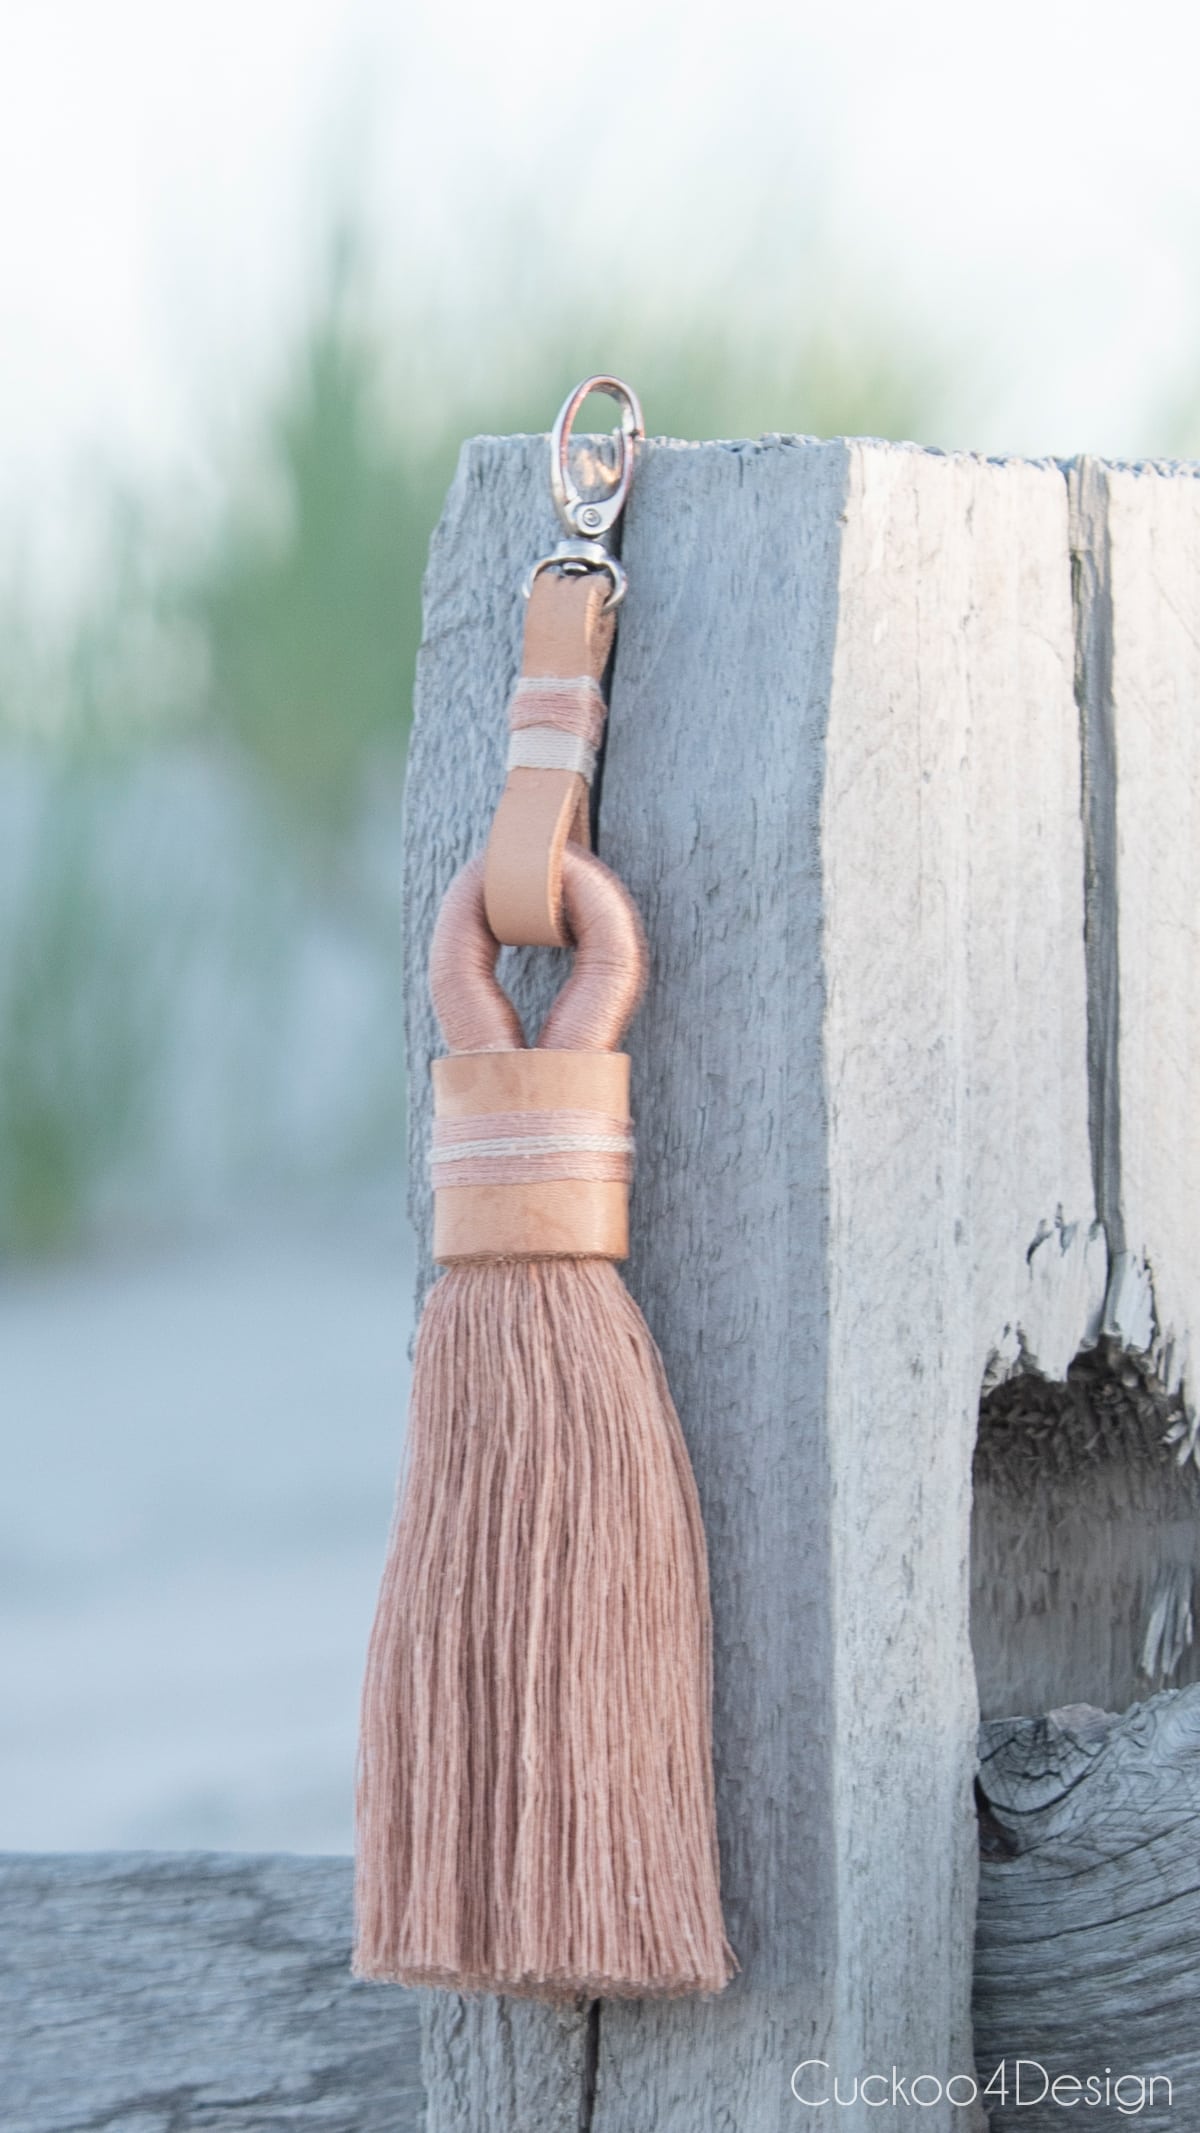
Photos of finished tassel keychain
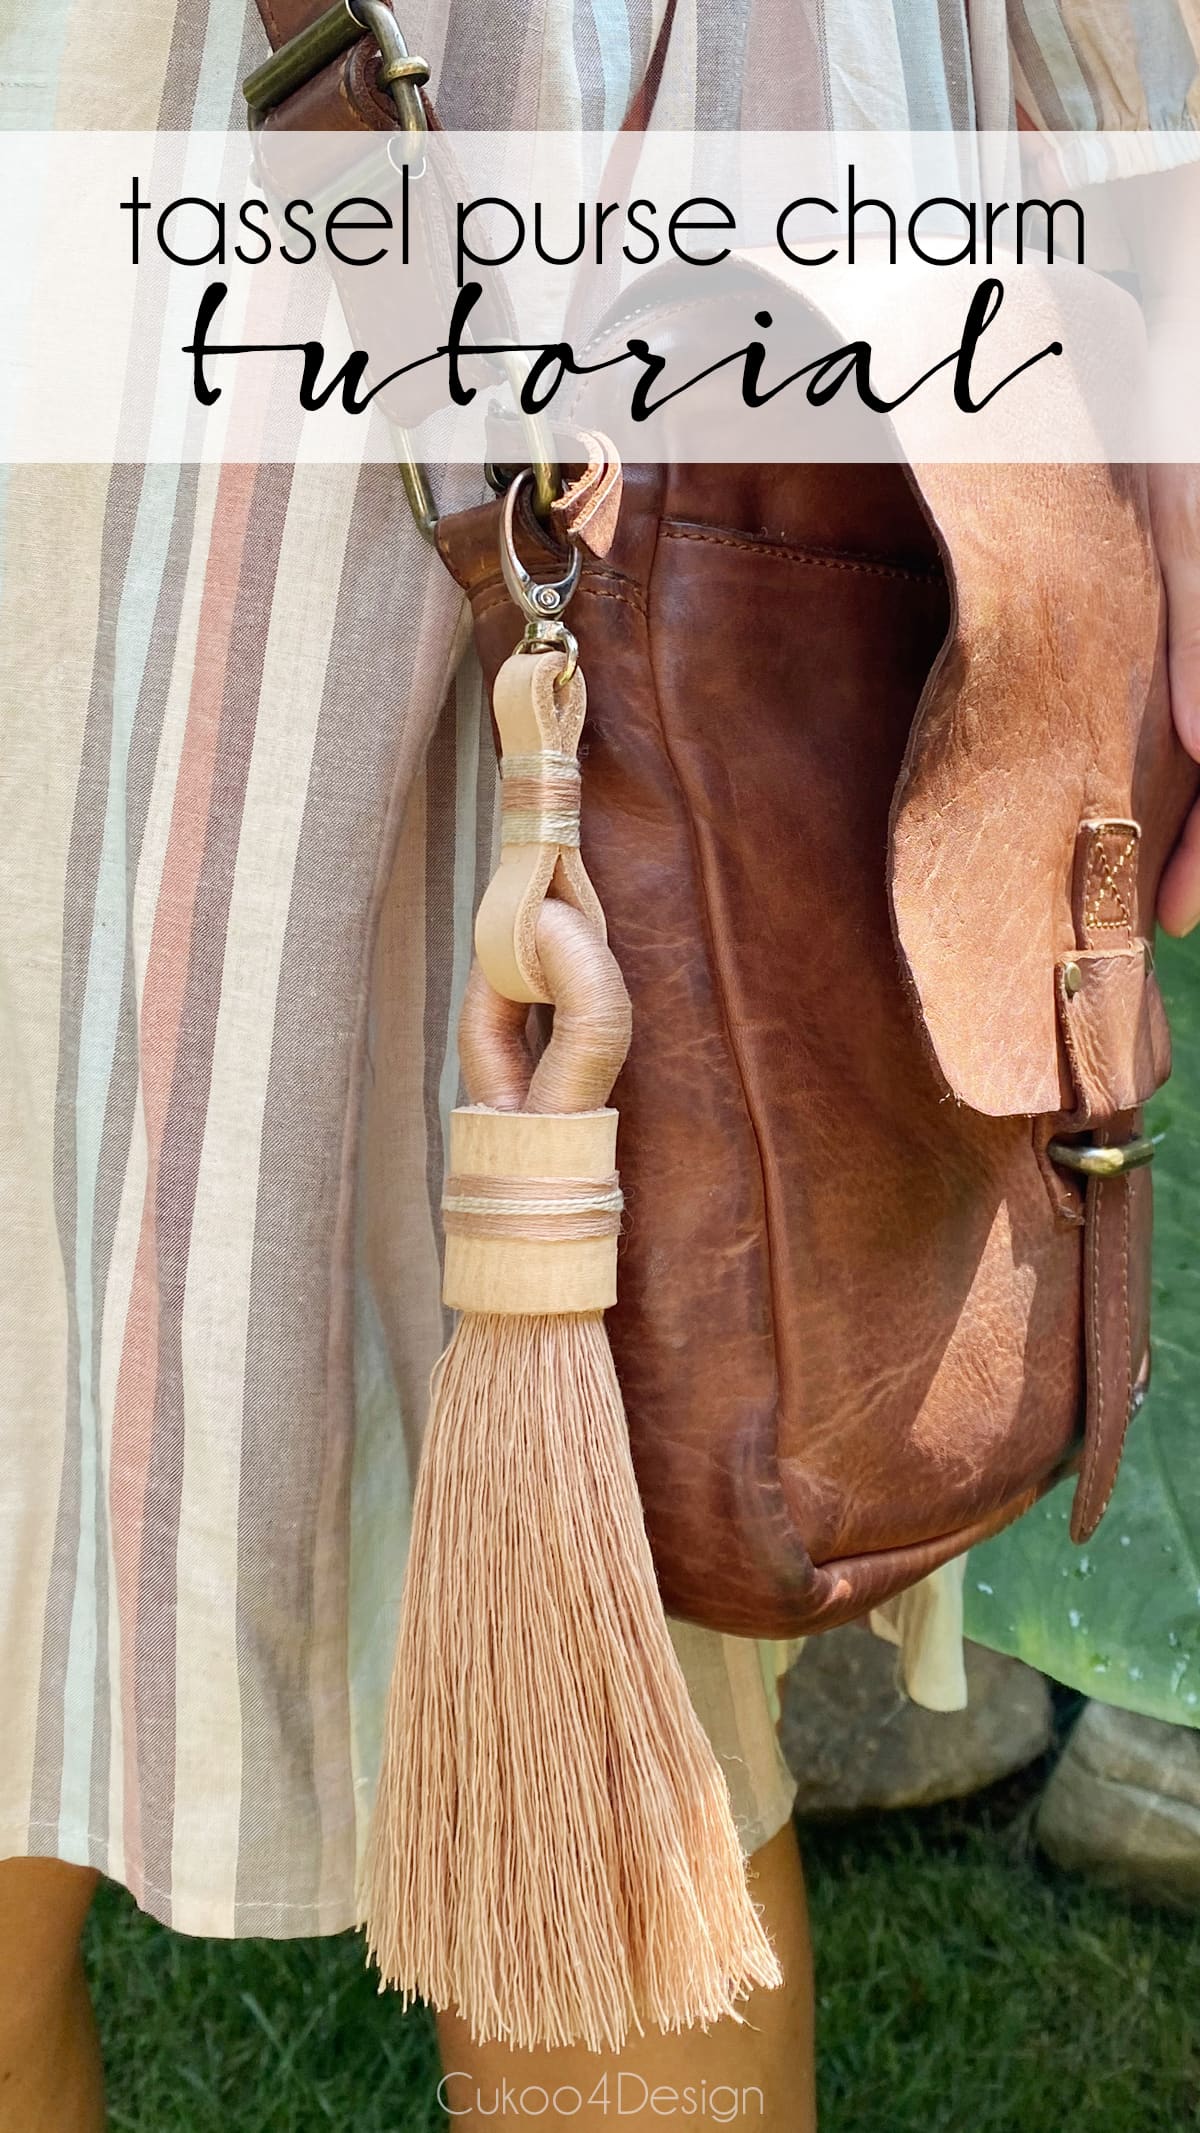
I made my tassel keychain rather big because I like it like that but you can obviously make your tassel much smaller should you not like big tassels.
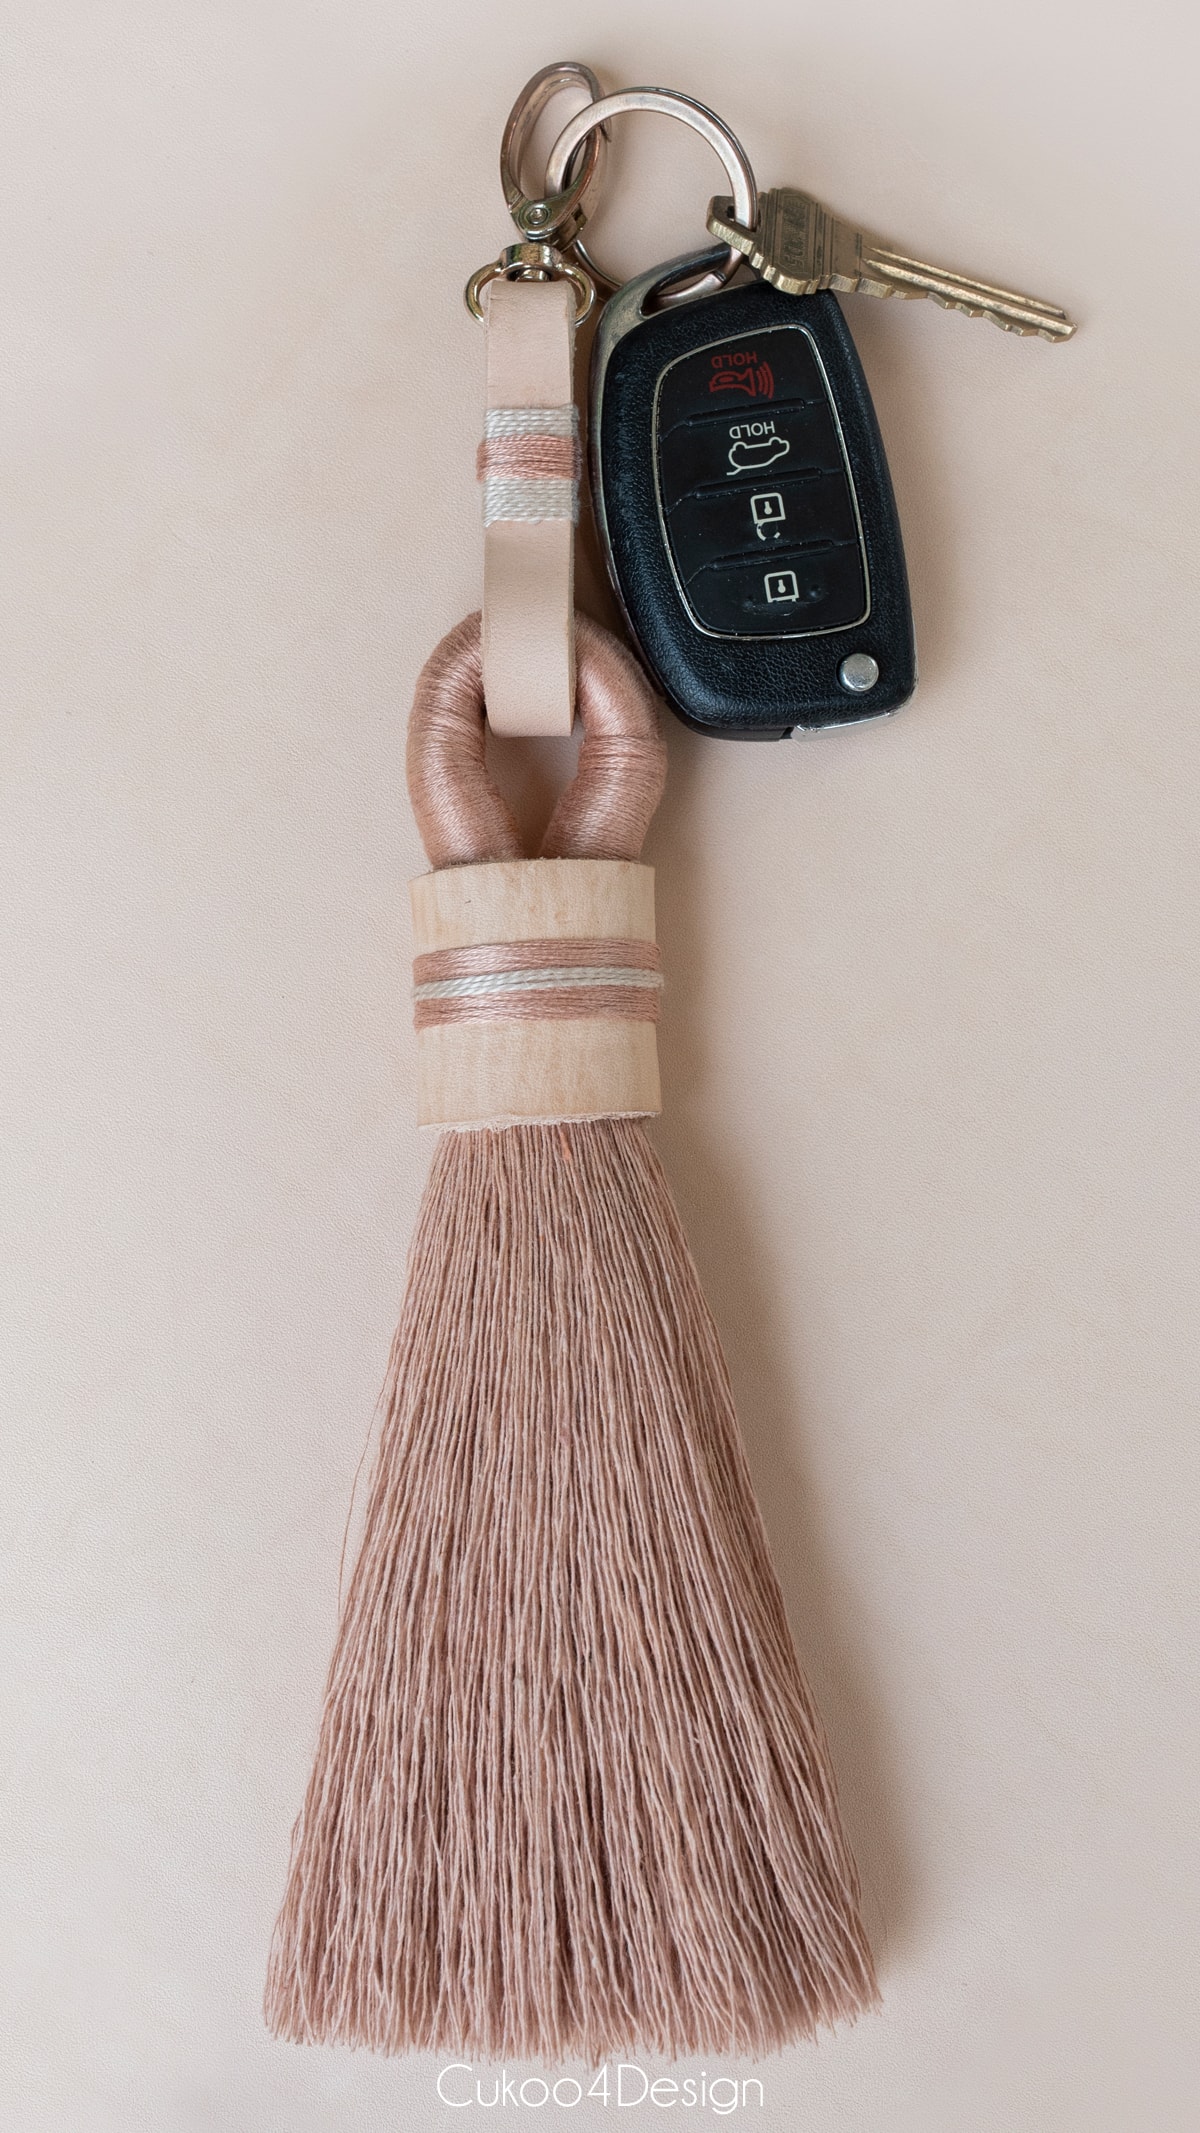
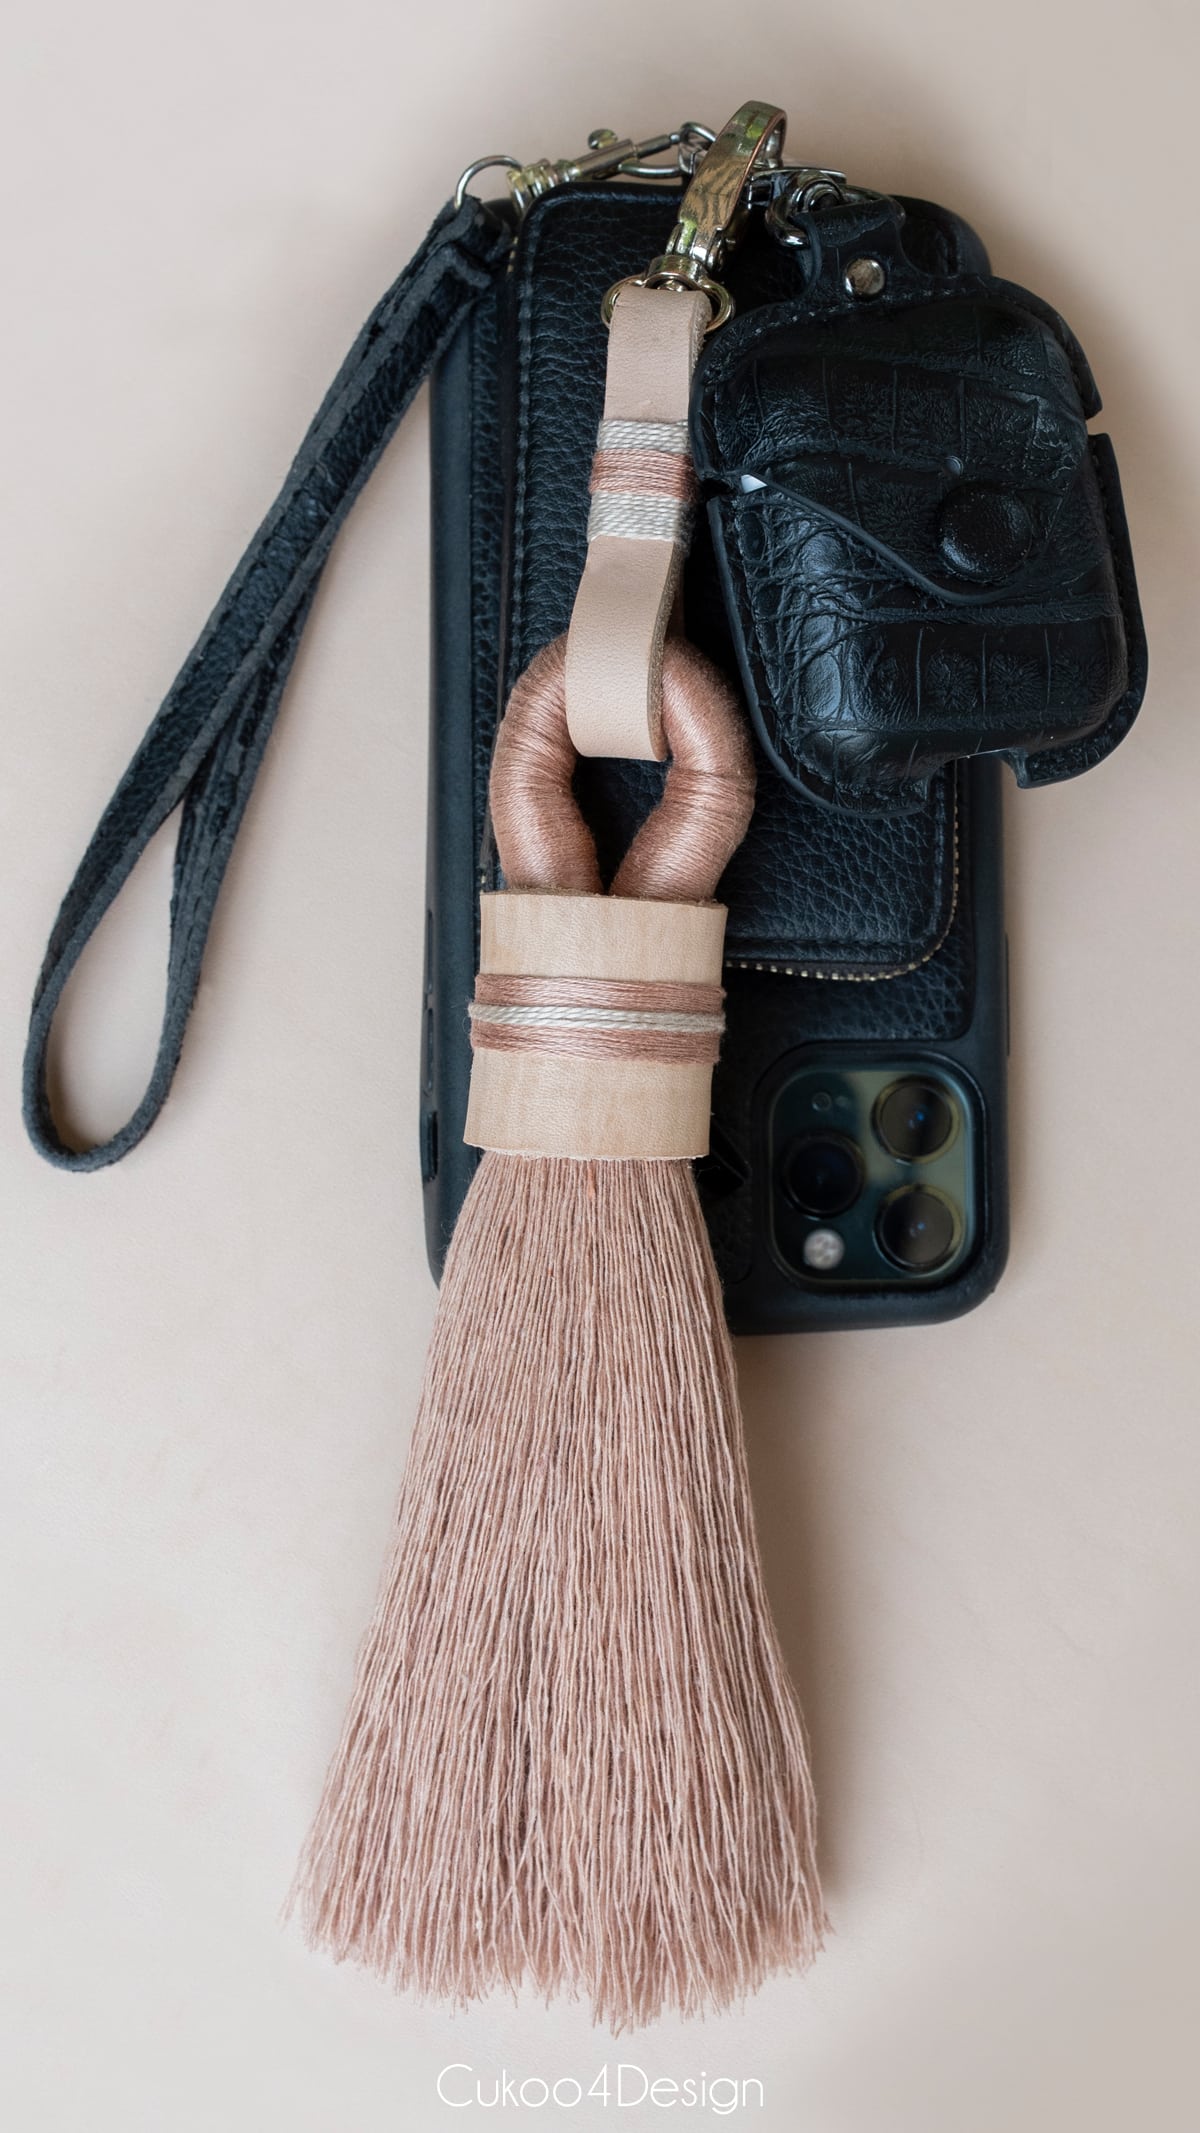
Most of the time I don’t carry a purse and only carry my cellphone that is in a wristlet wallet case. I’ve had several of them and love having my wallet attached to the phone. I also added my AirPods to that wristlet in an AirPod case. Love how the tassel looks attached to that.
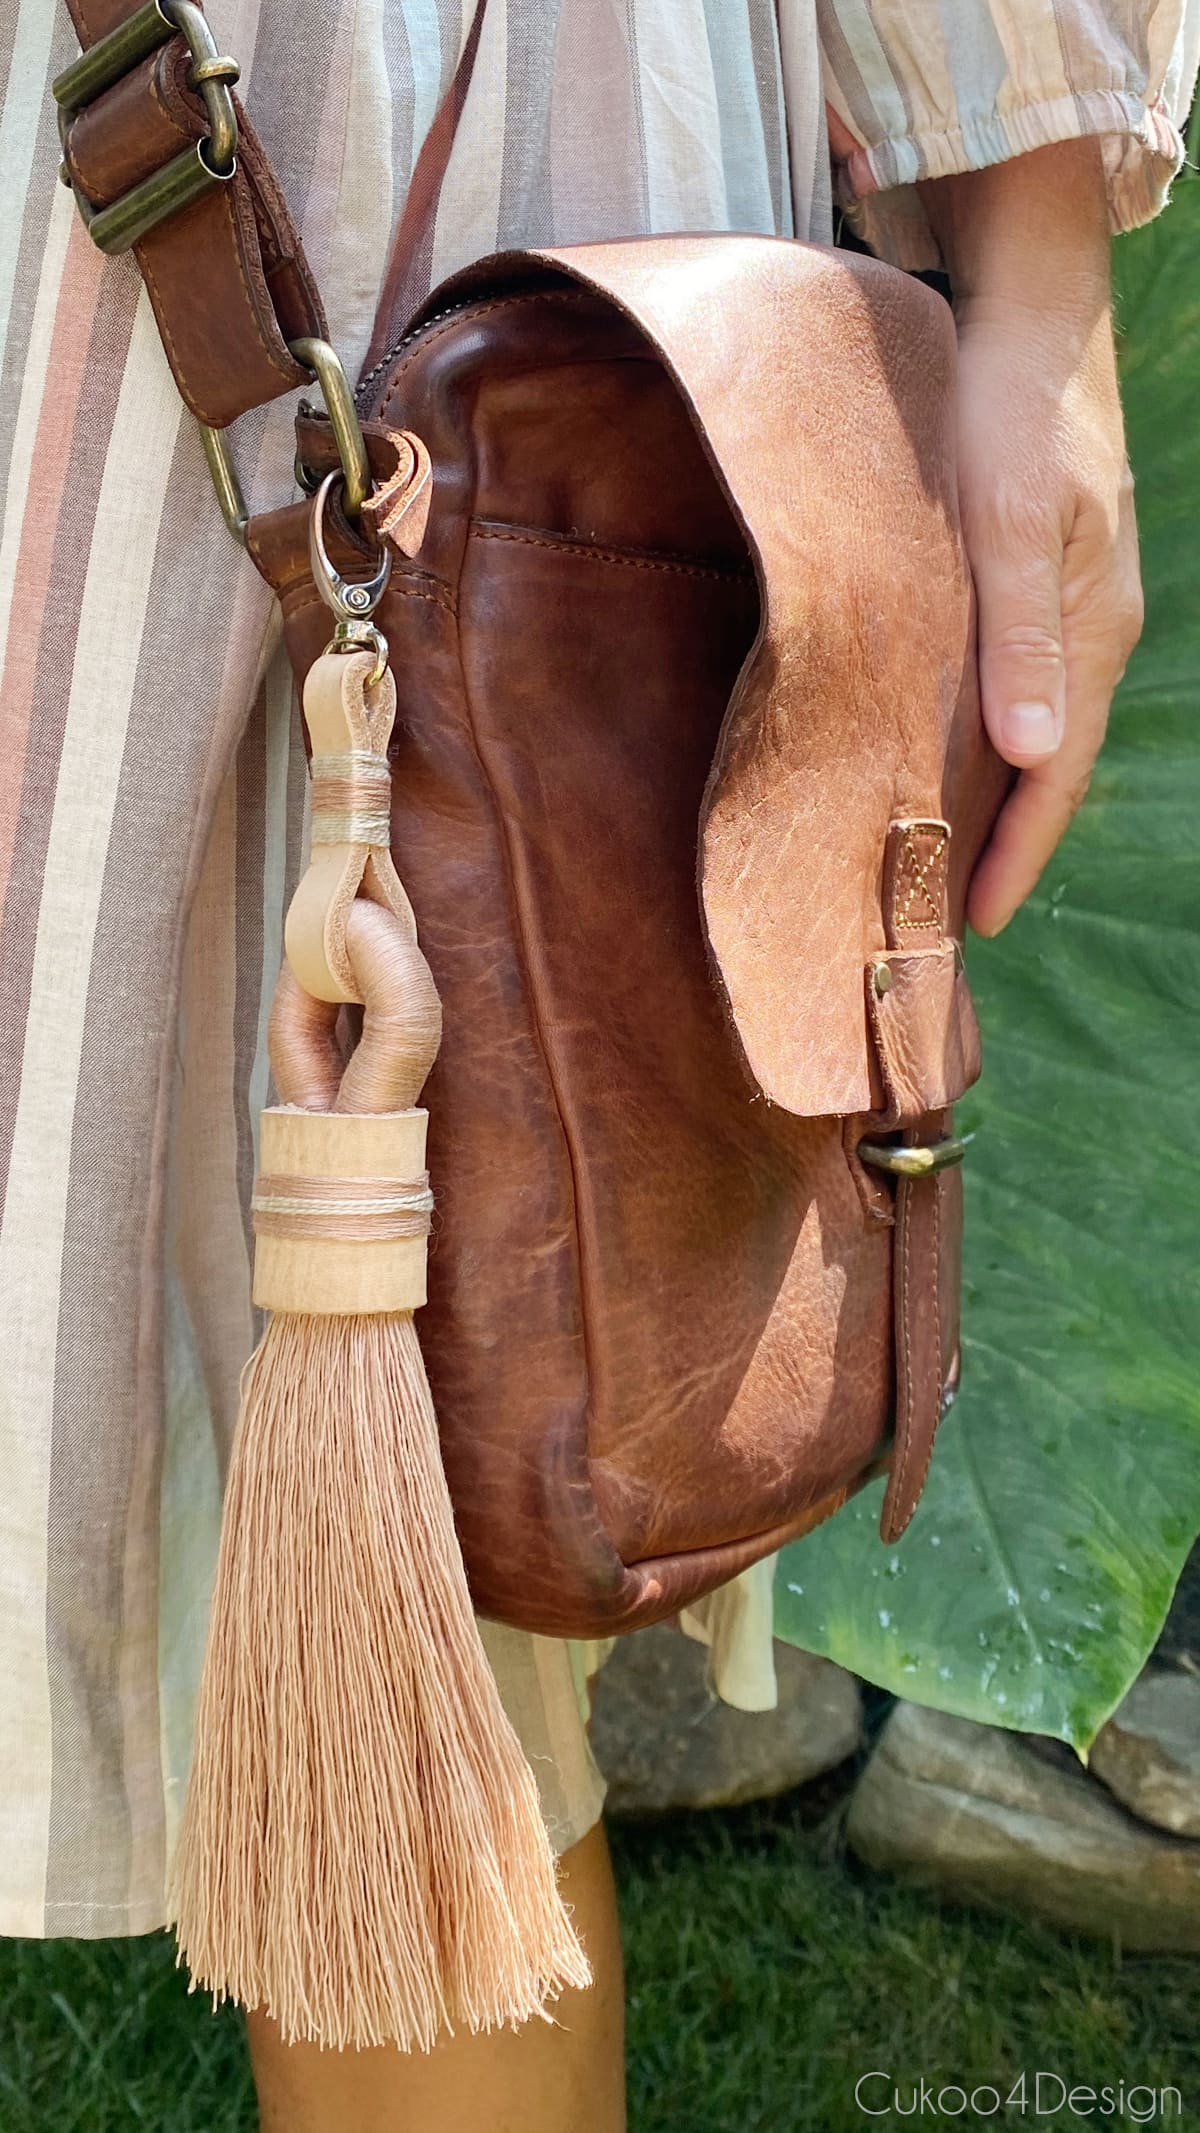
If I do carry a purse, then I use the below shoulder strap bag and the tassel keychain looks super cute clipped onto the strap as a purse charm as well. Don’t you think so? This tassel makes a great gift too. Thinking of Christmas here already!
More of my unique tassel tutorials
As I said at the beginning of this post, I love making tassels, and here are a few more for you to check out.
- how to make large tassels
- how to make a leather tassel
- how to make yarn tassels
- rope macrame tassel
- DIY stacked tassel
- DIY tassel umbrella
- DIY tassel ottoman
- DIY tassel embellishments for a tassel sconce, lampshade, or basket
This is it for today. It was a pretty lengthy tutorial which makes it appear more difficult than it actually was. Having to glue some parts that need to dry overnight makes it a little bit more time-consuming, but it didn’t bother me.
You should try to make your own DIY tassel keychains and hand them out as gifts!
Tschüß,

Love how that looks on your purse- the color is gorgeous!!!