

DIY embossed tin ornaments (free templates)
I haven’t been this excited about a DIY ornament in a long time. I was scrolling through Free People’s website (like I do way too often) and their gilded tin ornaments totally stopped me in my tracks. They are so pretty, but of course, my first thought was, I can make those myself! So I gathered some supplies and tools, started experimenting, and before I knew it, I had my own version…and a whole set of templates to share with you.
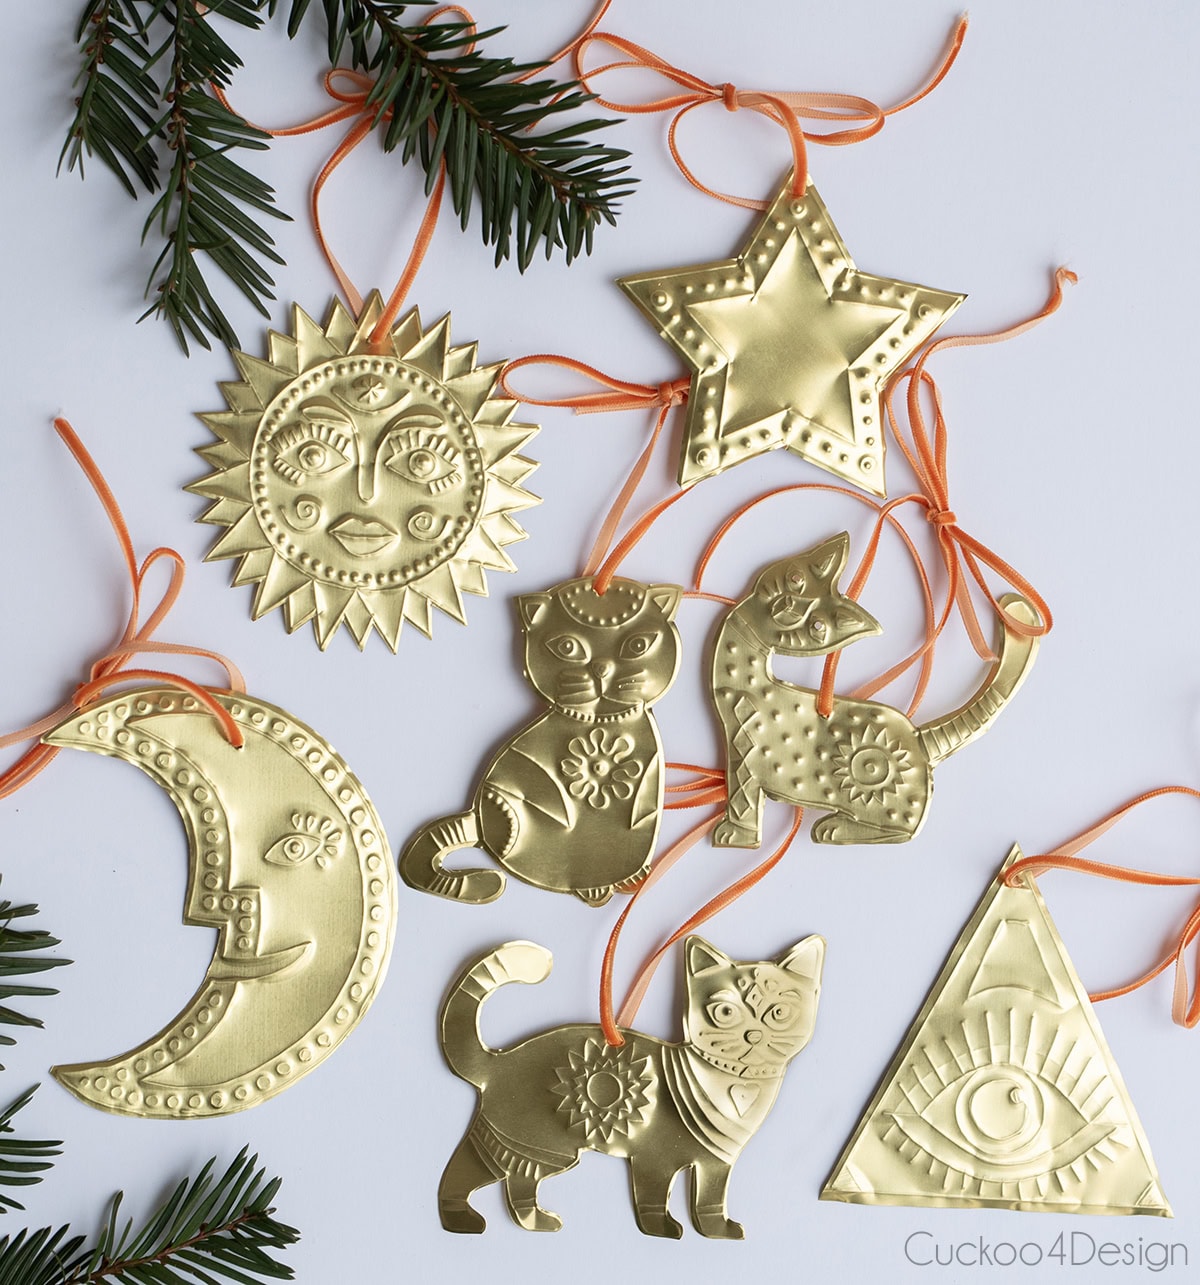
If you’ve ever wanted to make your own tin ornaments, this is such a fun and surprisingly easy project. These embossed tin ornaments look high-end, but you only need a few tools to create all the raised details. I’m sharing a full step-by-step tutorial along with free templates such as cats, a moon, a sun, a star, and even an evil eye, so you can make your own DIY tin ornaments in any metal finish. Whether you’re into classic holiday shapes or want embossed metal ornaments with a more whimsical, folk-art look, you’ll be able to customize these however you want.

Materials for DIY tin ornaments
- metal embossing sheets or craft stamping foil (tin, copper, brass, aluminum, or a set of 3 metal sheets)
- embossing tools/dotting tools, or similar objects, like an old inkless pen
- scissors for cutting tin
- embossing mats (substitute can be a silicone baking mat, craft foam, I bought a squishy shelf liner from the dollar store)
- nail (or bradawl) and hammer
- ribbon or string
I bought these K&S 0.005 inch brass sheets locally at ACE Hardware which were on sale for $2, and you are able to get two to three ornaments out of one sheet)
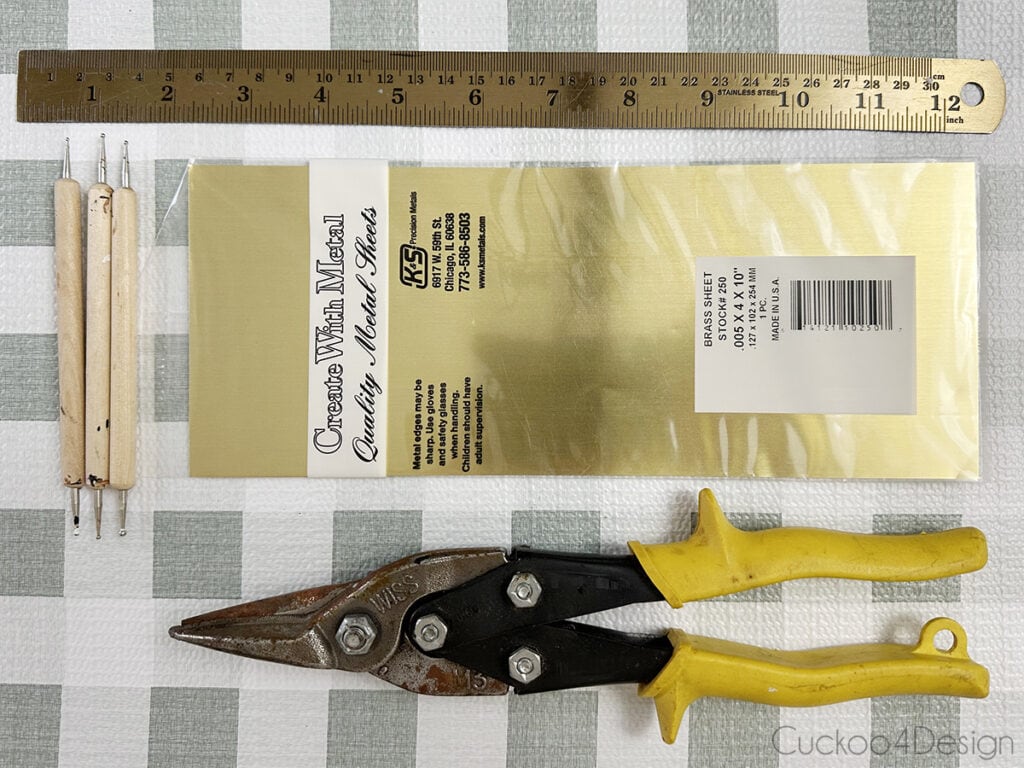
For most embossed ornaments, 36–38 gauge metal sheets are ideal because they’re strong yet easy to press.
Free printable tin ornament templates you can download
This post may contain affiliate links from which I will earn a commission at no extra cost to you. View my full disclosure policy.
To make this project even easier, I created a set of printable and resizeable tin ornament templates you can download. These are the exact shapes I used for my embossed ornaments, and they work beautifully for tracing and embossing on metal sheets or aluminum trays.
You can print them on regular paper and adjust the size percentage in the printer window depending on how big you want your ornaments to be.
Also, let me know in the comments if you’d like me to add some dog shapes to this post.
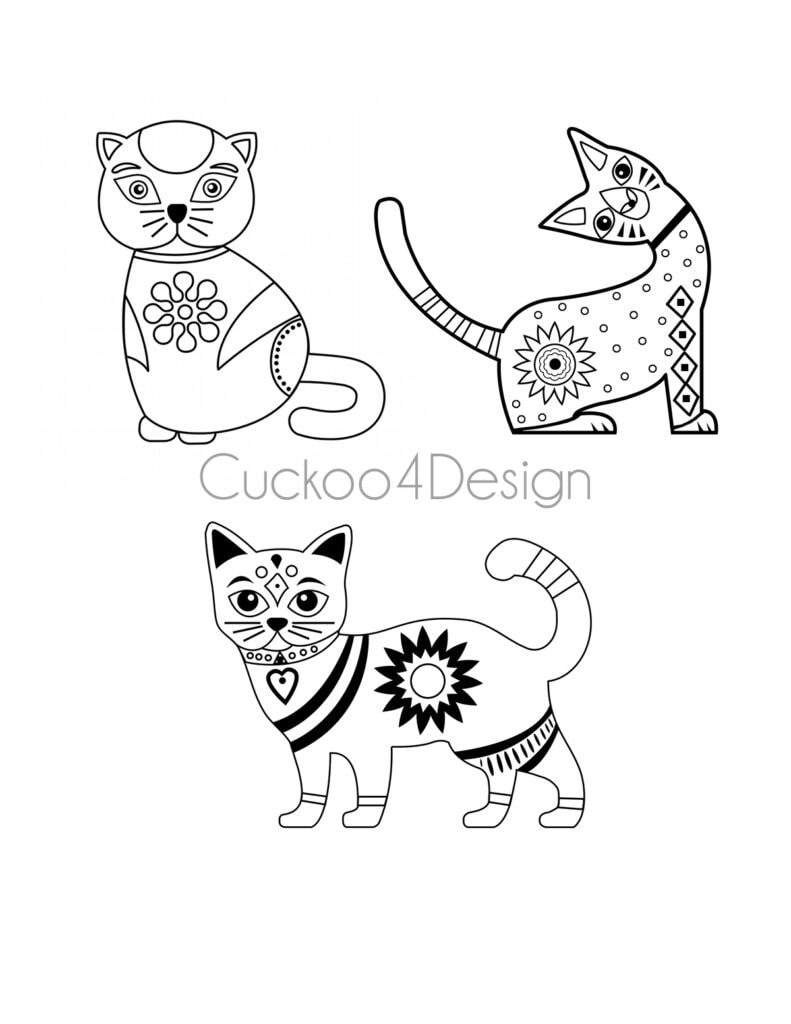
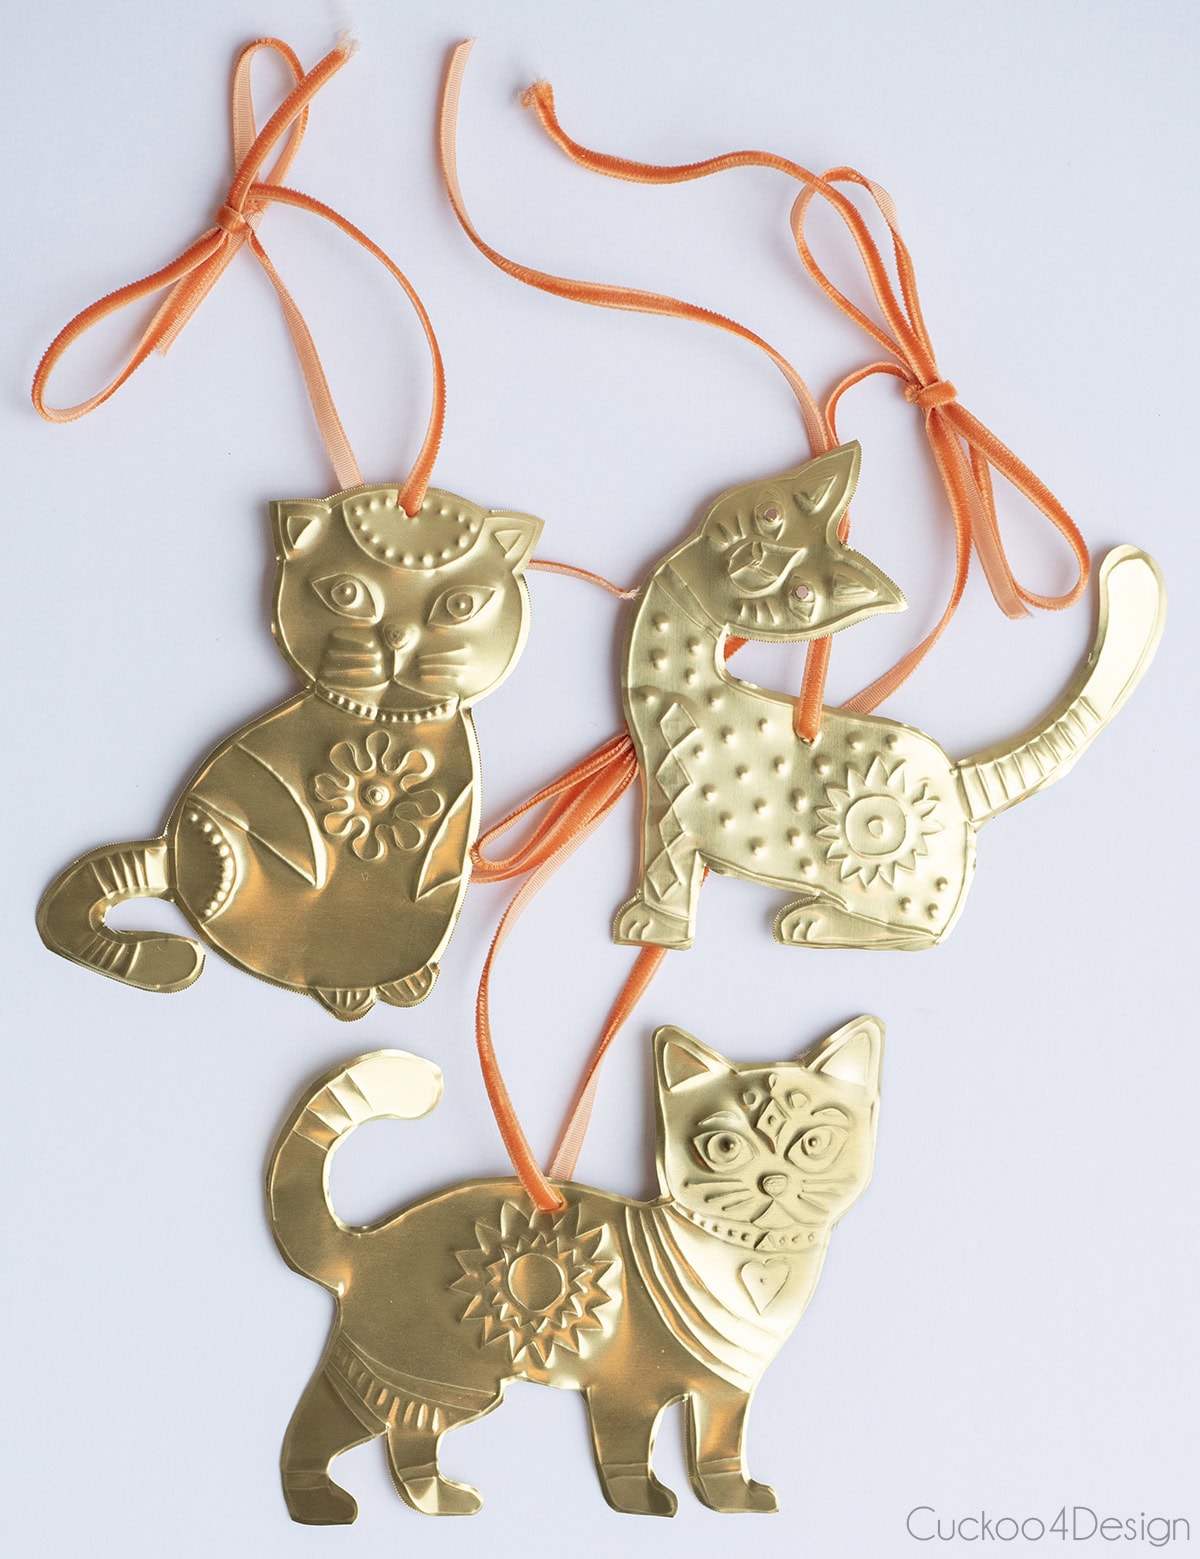
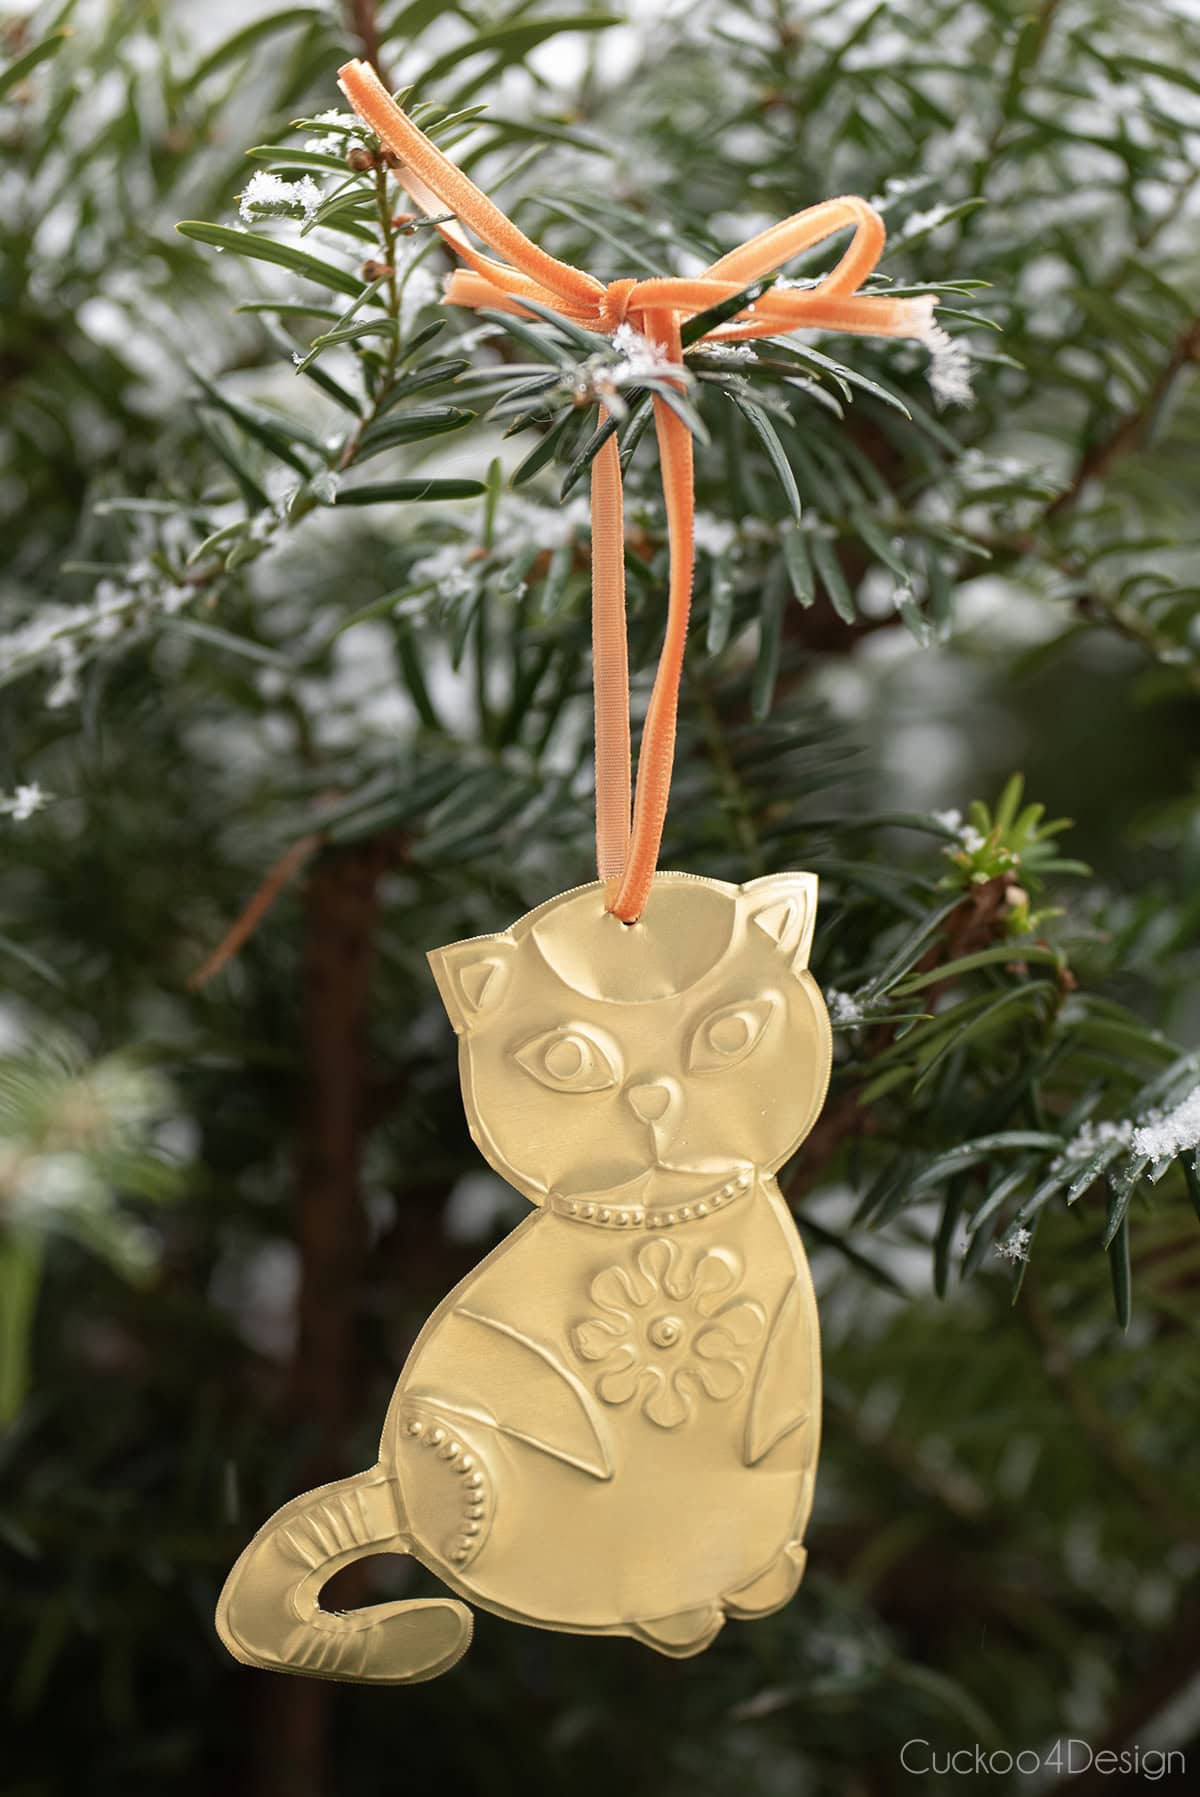
DIY cat ornaments
These three cat silhouettes emboss beautifully, and each one gives the cat, a slightly different personality.
Here are my cat templates.
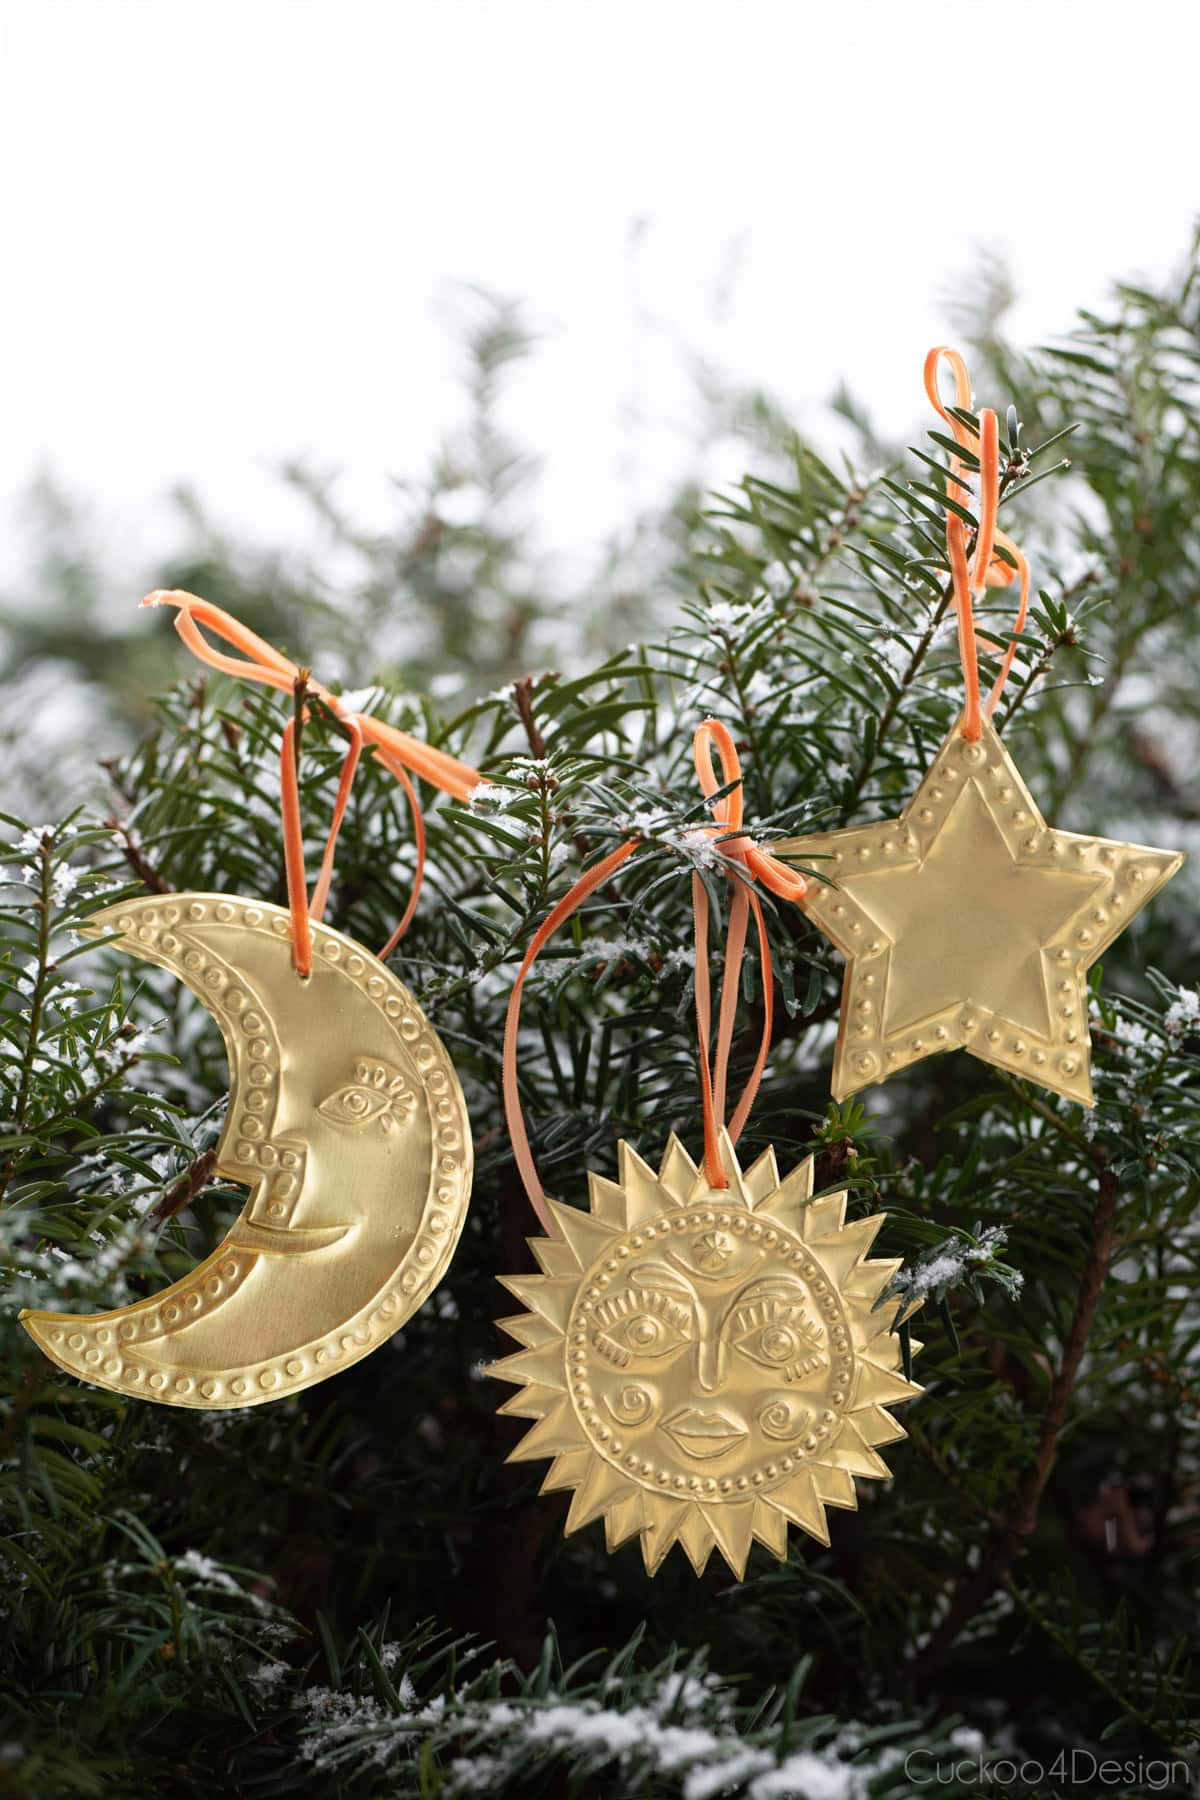
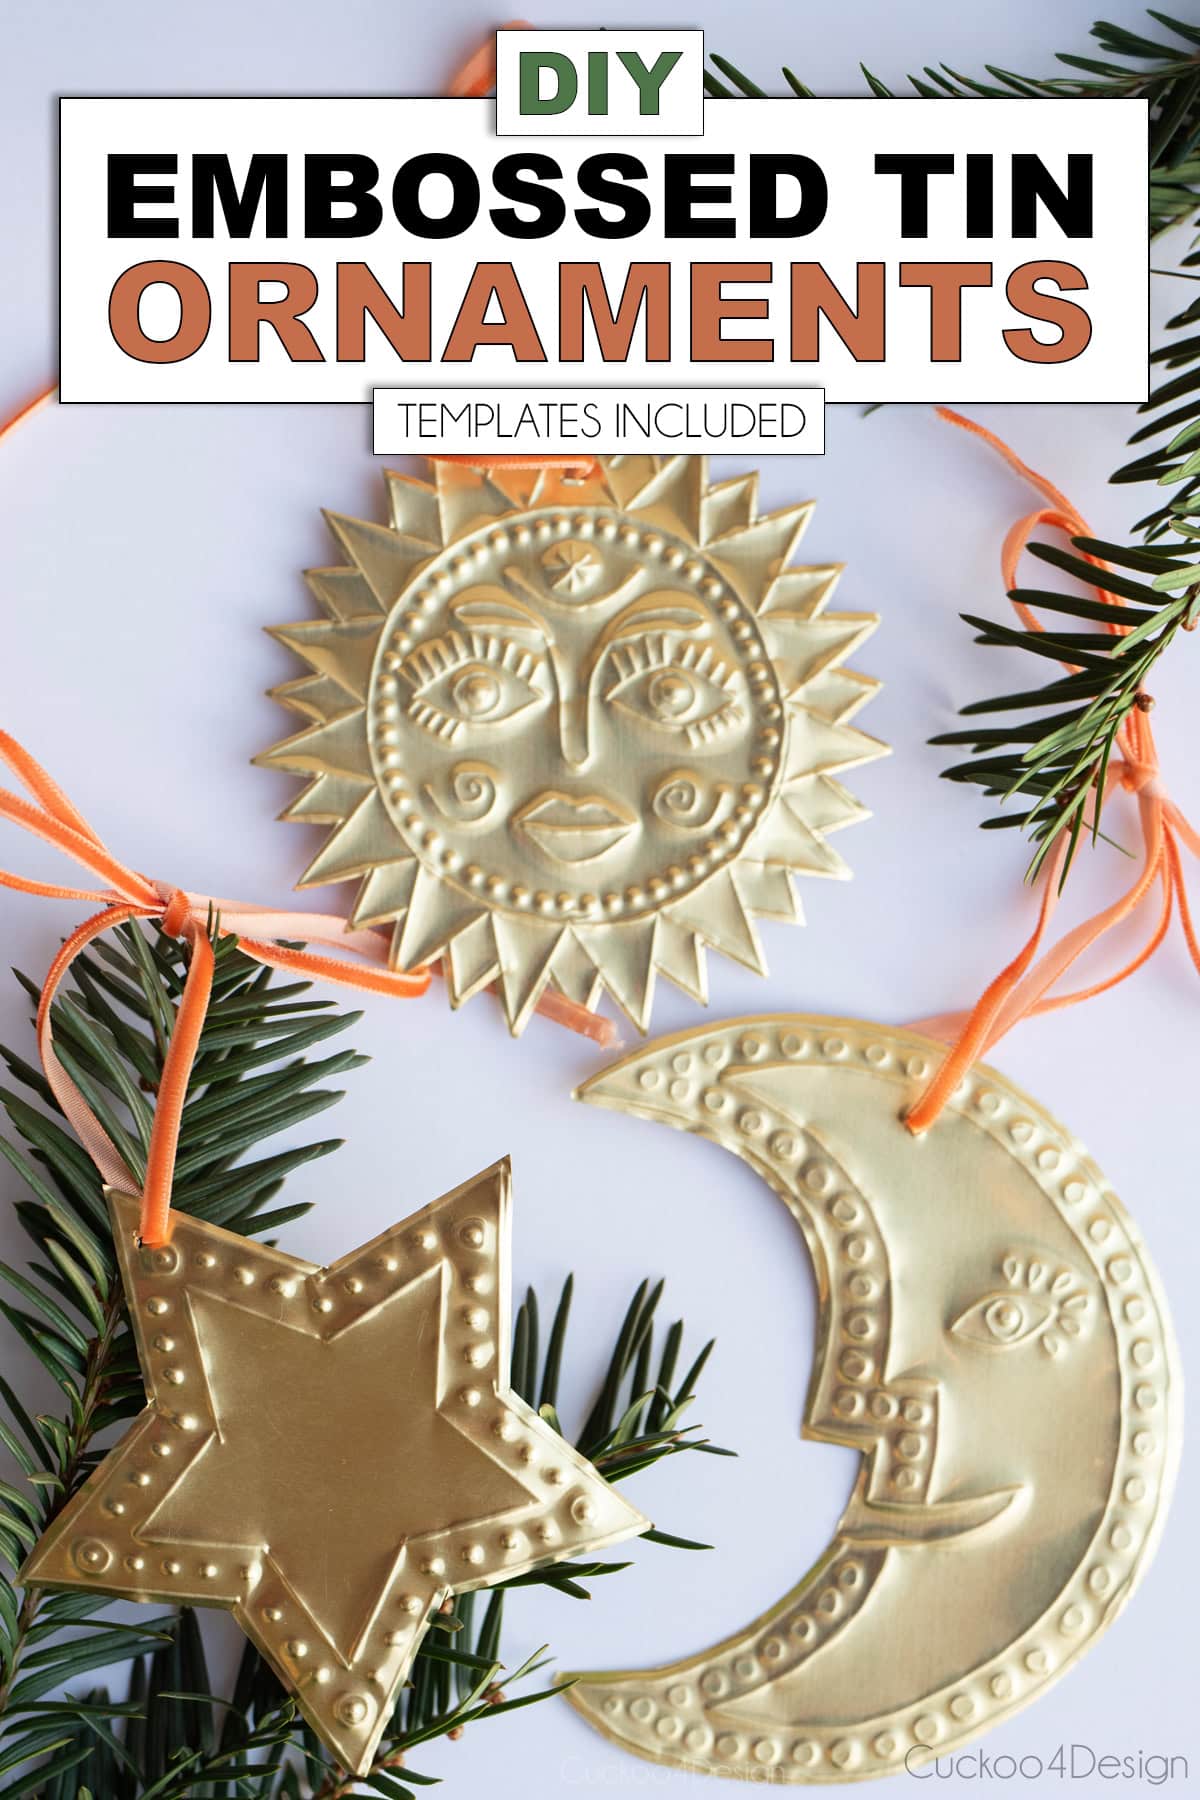
DIY sun, moon, and star tin ornament
This celestial set has a soft folk-art vibe and are super satisfying to emboss. The sun is actually my favorite.
Here are my sun, moon, and star templates

DIY evil eye ornament
This shape embosses beautifully and is perfect for beginners, but detailed enough to feel special. I love the meaning behind and we can all use that certain spiritual protection this year.
Here is my evil eye template.
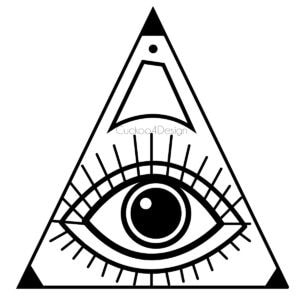
Meaning and purpose of the evil eye
The evil eye symbol has been used for centuries as a little protective charm to ward off bad vibes. Things like jealousy, envy, or any negative energy someone might send your way. Even though it’s called the ‘evil’ eye, the symbol itself isn’t evil at all. It’s actually meant to shield and protect you by reflecting that negativity back. You’ll see it in all kinds of cultures, often as jewelry, home decor, or small amulets meant to bring a bit of extra luck and protection.
Traditional Christmas ornament shapes
You can use my templates for a star, snowflake, angel, and heart from my cardboard Christmas ornaments tutorial if you want to turn traditional Christmas shapes into metal embossed ornaments.
Related: I also ended up making DIY Easter bunny ornaments with three free templates using this exact same method.
Embossed tin ornaments video tutorial
As always, I made a video tutorial, which I recommend you watch, so you can understand the entire process versus just seeing images with a description. Should the video not load for you on my blog, you can also watch it on my YouTube channel.
How to make embossed metal ornaments (Step-by-Step)
This part is where all the magic happens. Embossing metal looks fancy, but it’s surprisingly easy once you start tracing your shape and pressing the raised details. Watch exactly step-by-step how I made each metal ornament!
Step 1: Download and print your templates
Download the templates from my Google Drive and then roughly cut them out. You don’t need to cut out the shapes in detail.
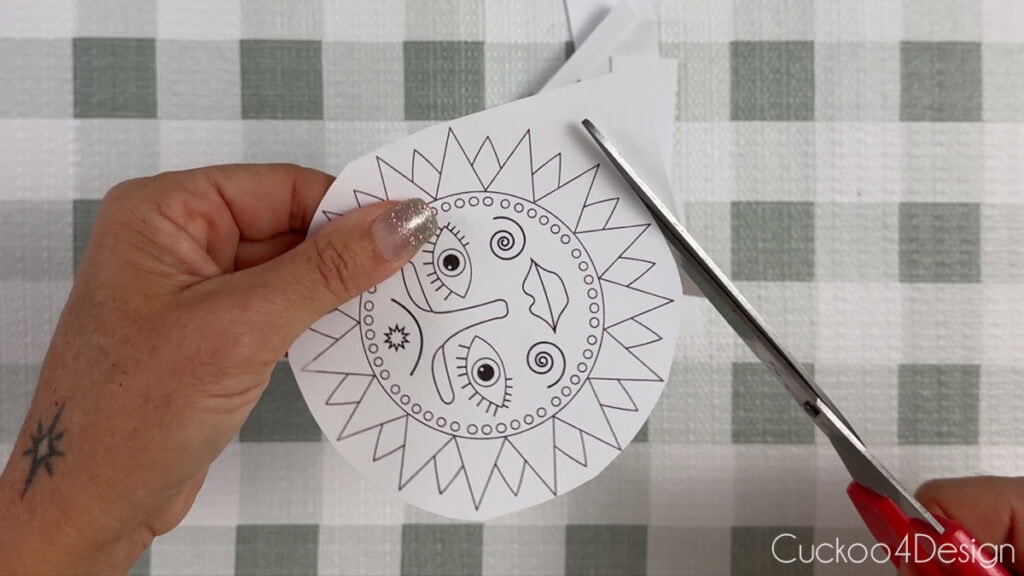
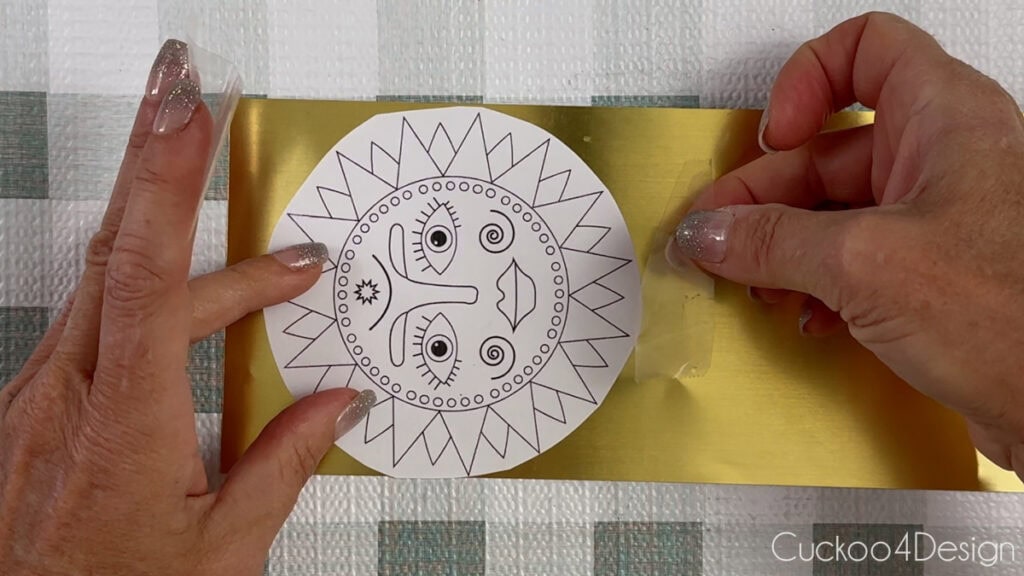
Step 2: Tape a template to metal sheet
Use clear tape to attach the template to the metal sheet.
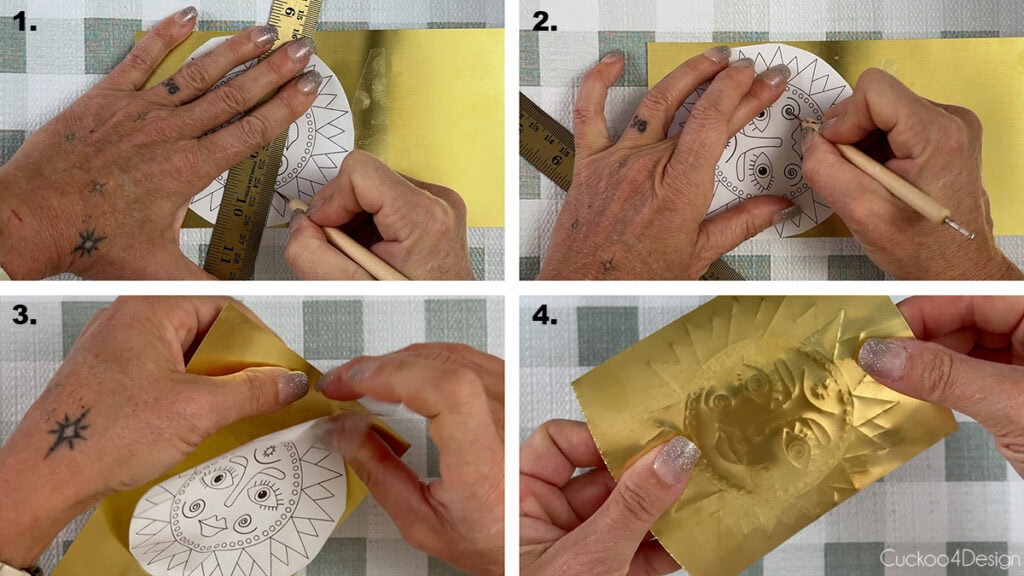
Step 3: Lightly trace template onto metal and Remove the template
Use an embossing tool to lightly trace the template onto the metal. If you are having trouble with the paper tearing, you can cover the entire paper with clear packaging tape, which has helped me with some of the shapes.
Remove the template when you are done tracing the pattern.
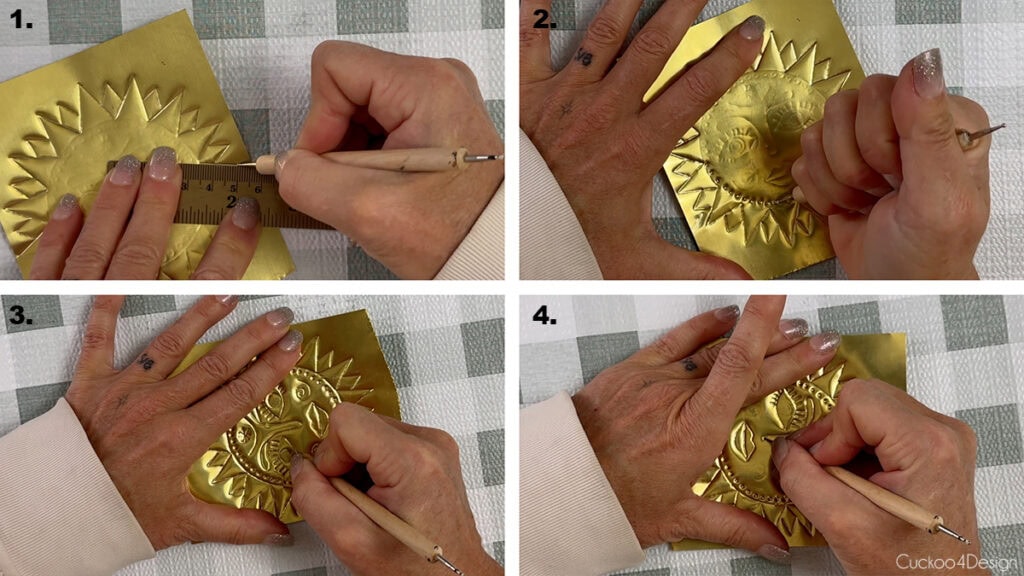
Step 4: trace it again with full pressure
Now use the same tool to trace the same pattern again with full force.
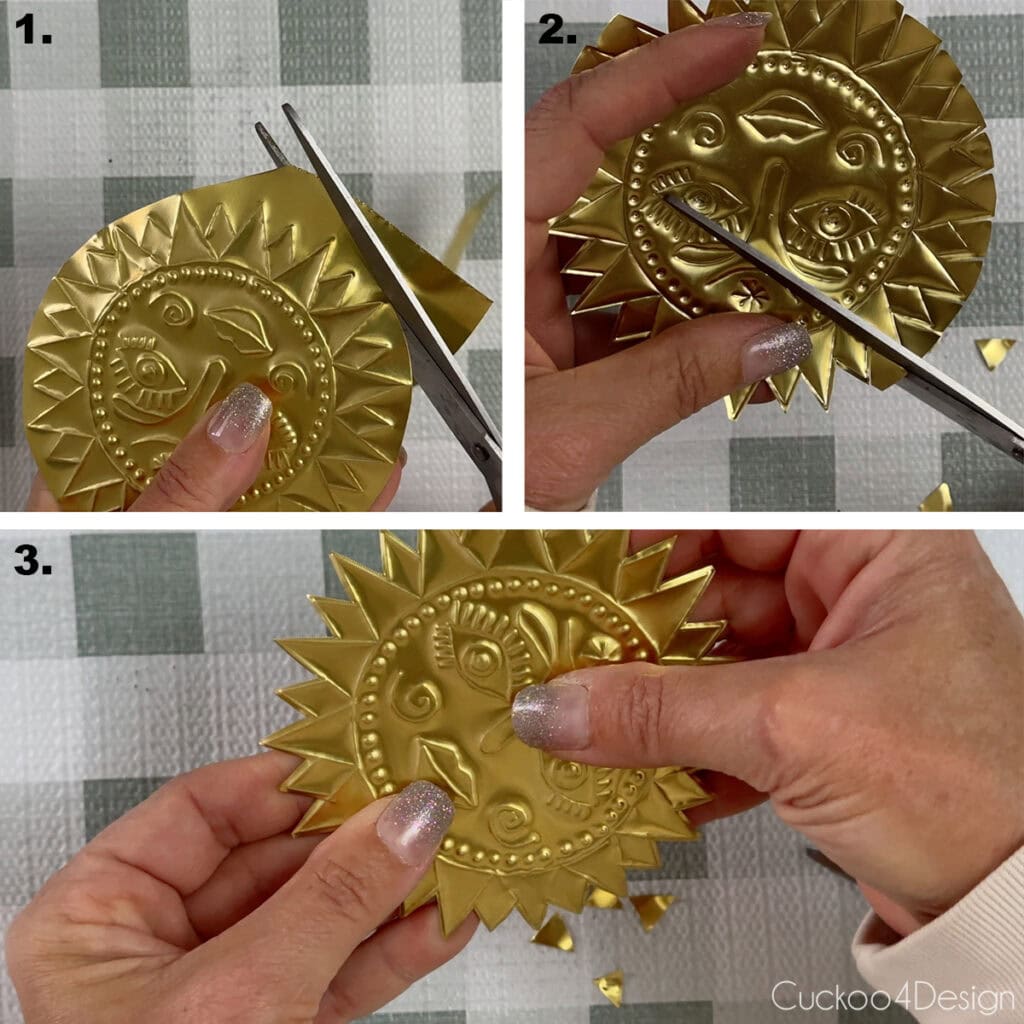
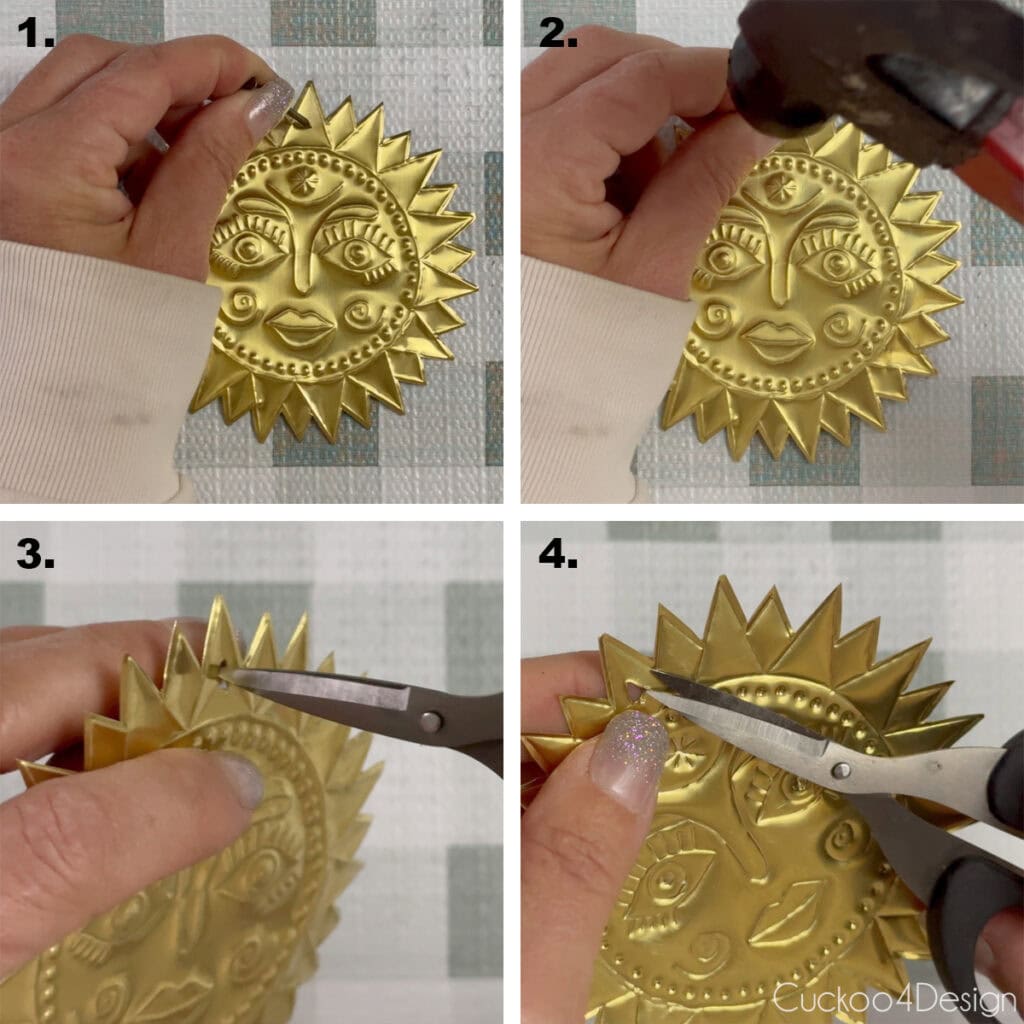
Step 5: Cut out ornament shape
I tried tin snips to cut out the ornament shape, but quickly realized that my standard scissors worked even better. My hands are very small, and holding bulky tools for precision work is difficult at times, so I was very glad to be able to use standard scissors instead.
Don’t cut exactly on the embossed line, and leave a little edge instead.
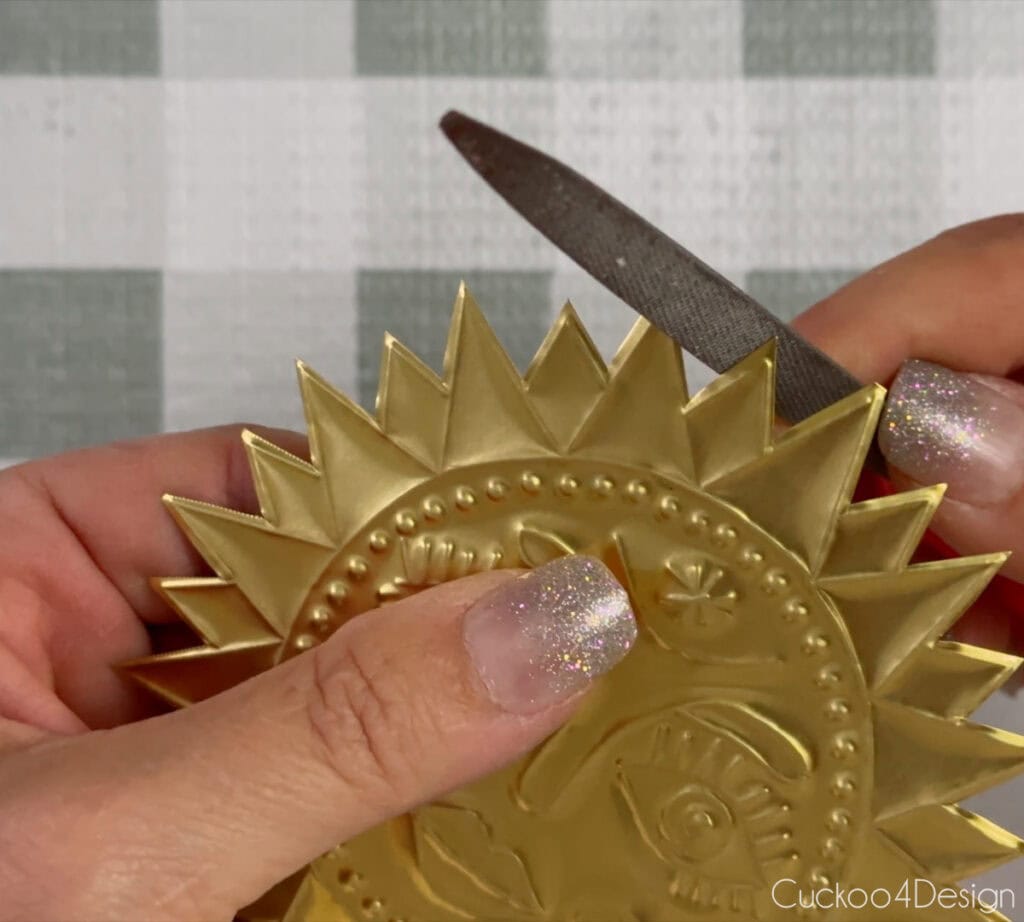
Step 6: File metal edges
Some of the metal edges are very sharp, especially on this sun ornament! I used a metal file to dull the sharp edges.
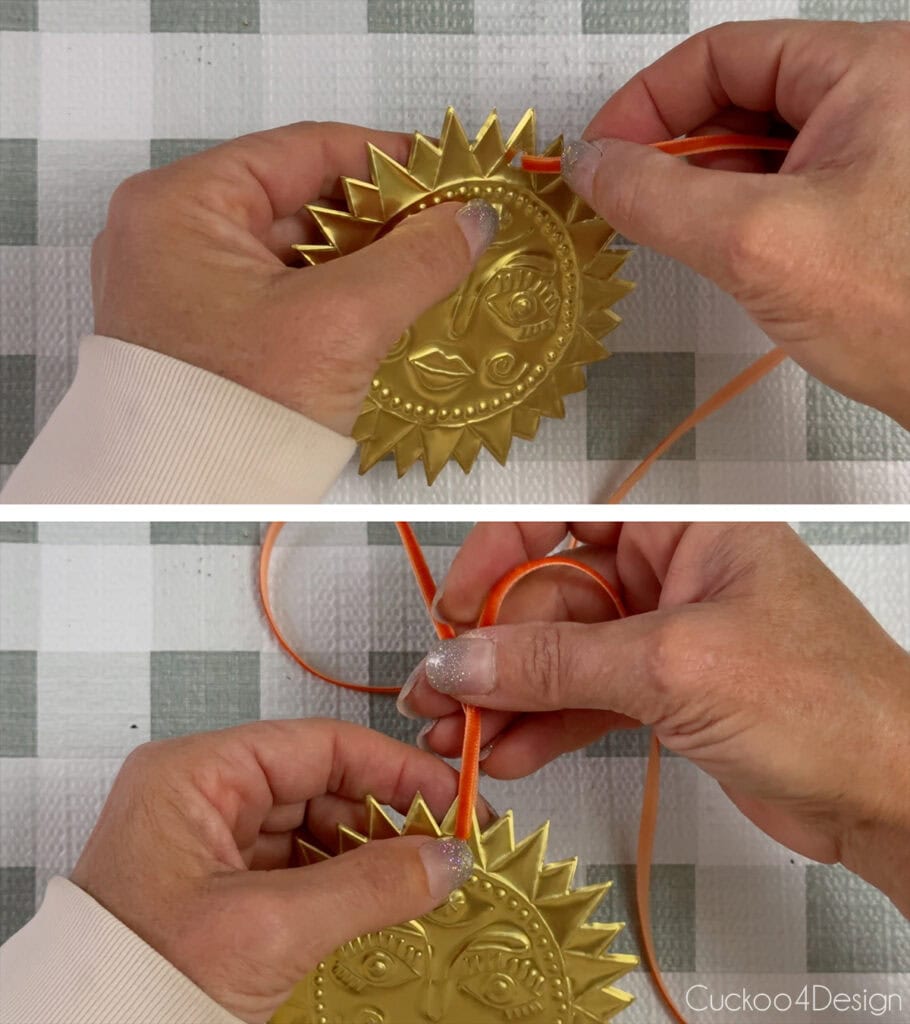
Step 7: Punch hole for hanging
Next, I used a nail and a hammer to punch a hole into the top of the ornament.
Step 8: Attach ribbon for hanging
I used thin ribbon to thread through the hole for hanging the ornament.
(This is the ribbon I used, which was still left from my DIY mushroom ornaments.)
Kid-friendly tin ornament version (using aluminum trays)
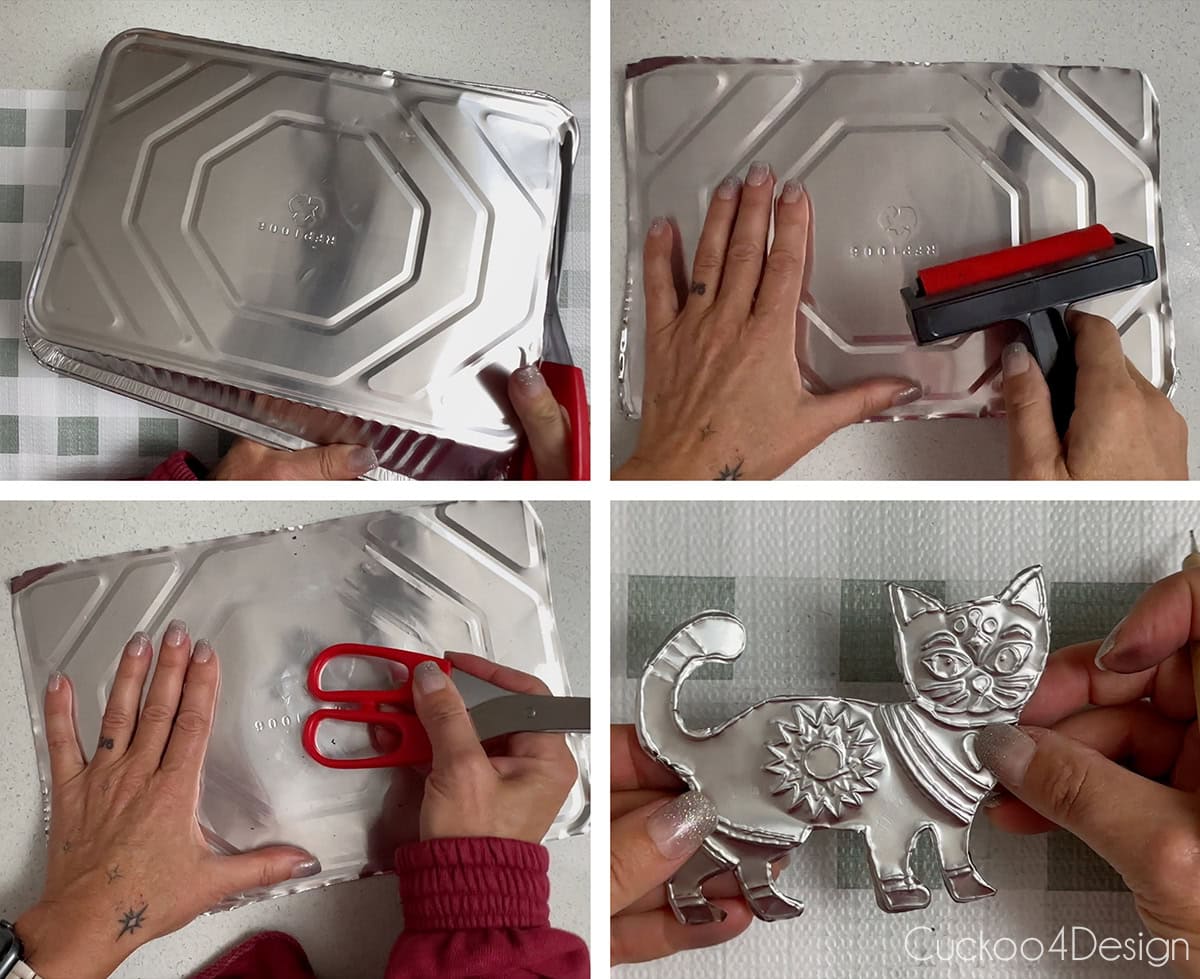
If you want to make these ornaments with kids, I recommend using disposable aluminum cooking trays instead of traditional metal sheets. They’re super easy to cut, don’t leave sharp edges, and they’re soft enough that kids can emboss designs without needing much pressure. It’s a fun way to let kids join in without worrying about safety.
Before the kids start embossing, make sure to smooth out the bottom of the aluminum tray so they have a flat surface to work on. I used a decoupage roller and the flat edge of my scissors to flatten everything. Then I simply followed the same steps of this tutorial.
Disposable aluminum trays are not only safer and easier for kids to work with, but they’re also a super inexpensive way to make a whole bunch of ornaments.
How the finished embossed tin ornaments look
I love how they turned out so much! They are so me!
I know that a lot of you are cat lovers just like me, and I’m so happy to finally have unique DIY cat ornaments to add to my collection. If I ever come up with more shapes, especially cats, I will add them here and let you know.
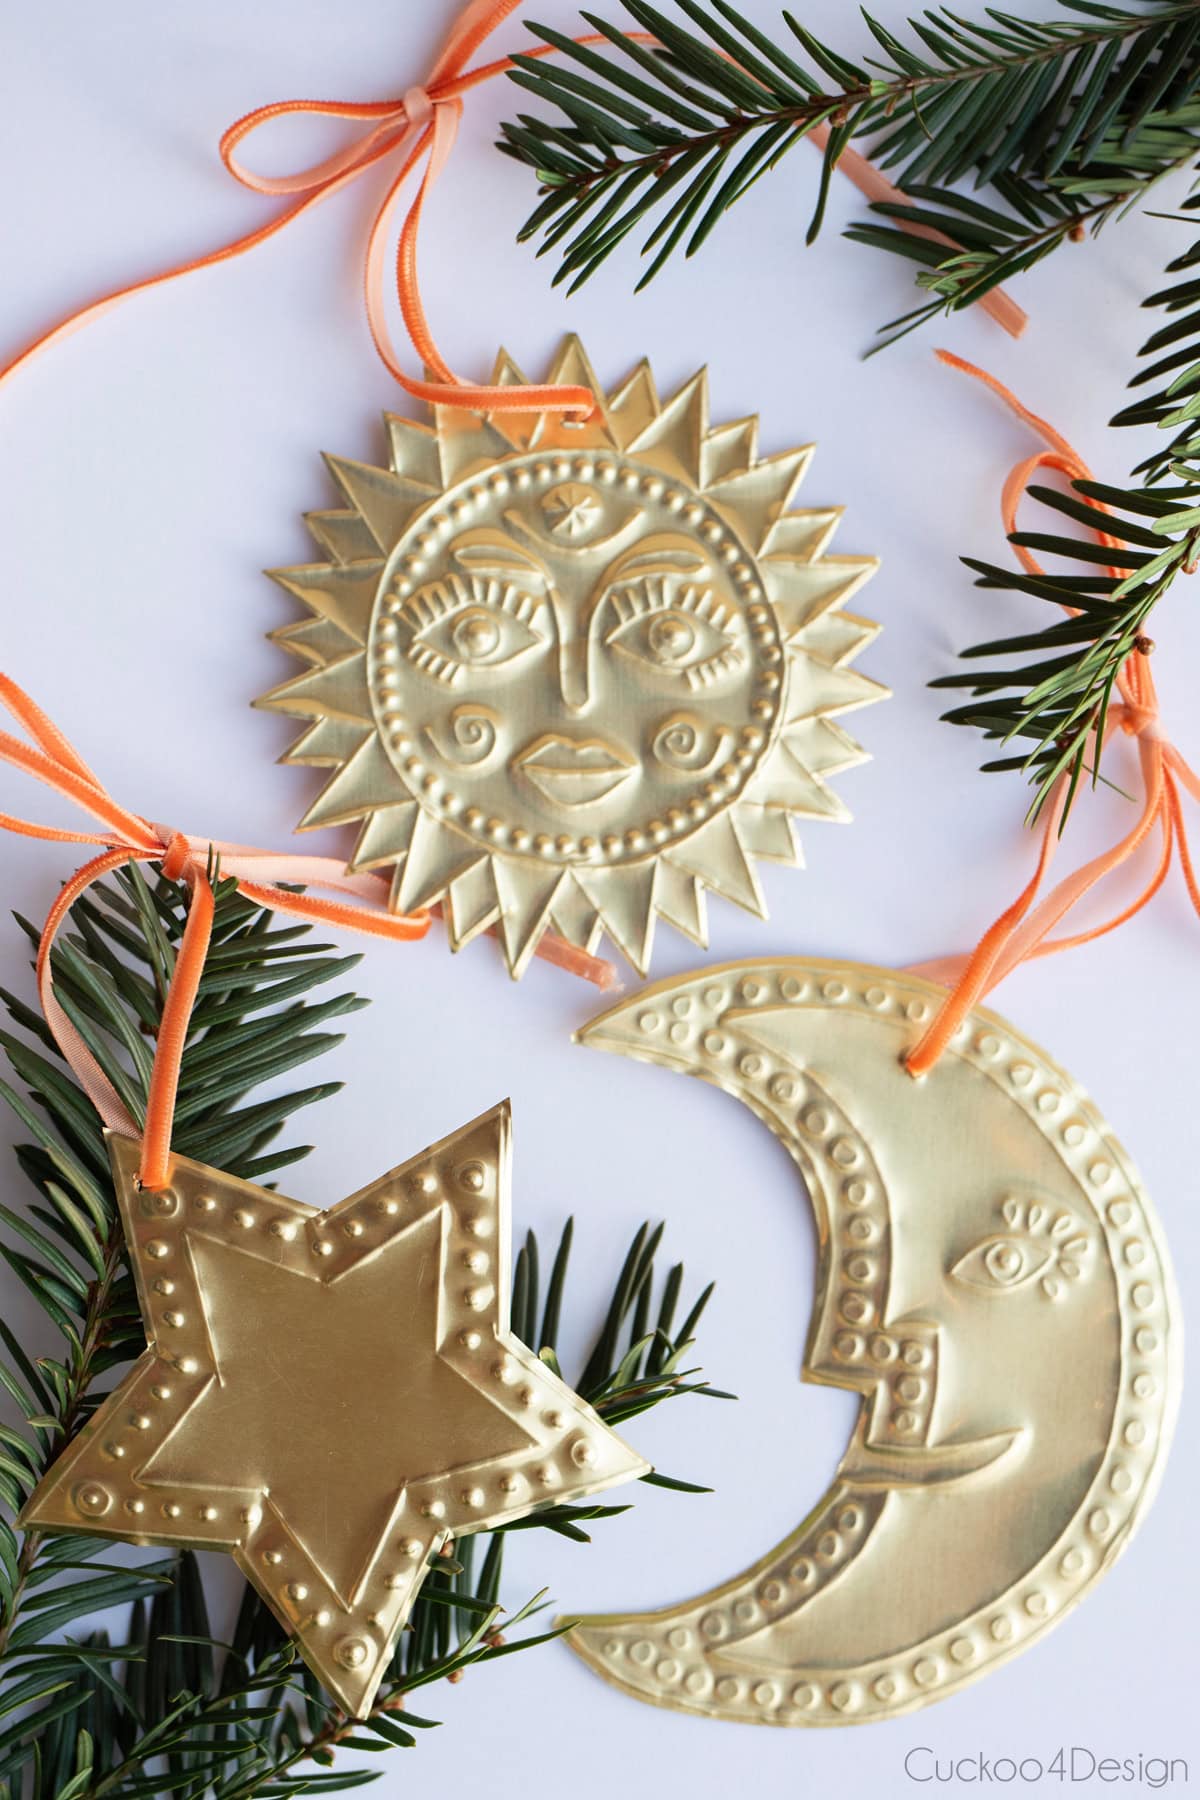
Tip: The sun, moon, and star could be used all year long and not just for Christmas. You could make a garland out of it and hang it on the wall or your fireplace mantel. I think I will make one this summer for my porch or patio!

I am hanging these beautiful new ornaments on my dining room Christmas tree. Here is a glimpse at the tree so far, but I’m not done yet, and not sure what other ornaments I will add.


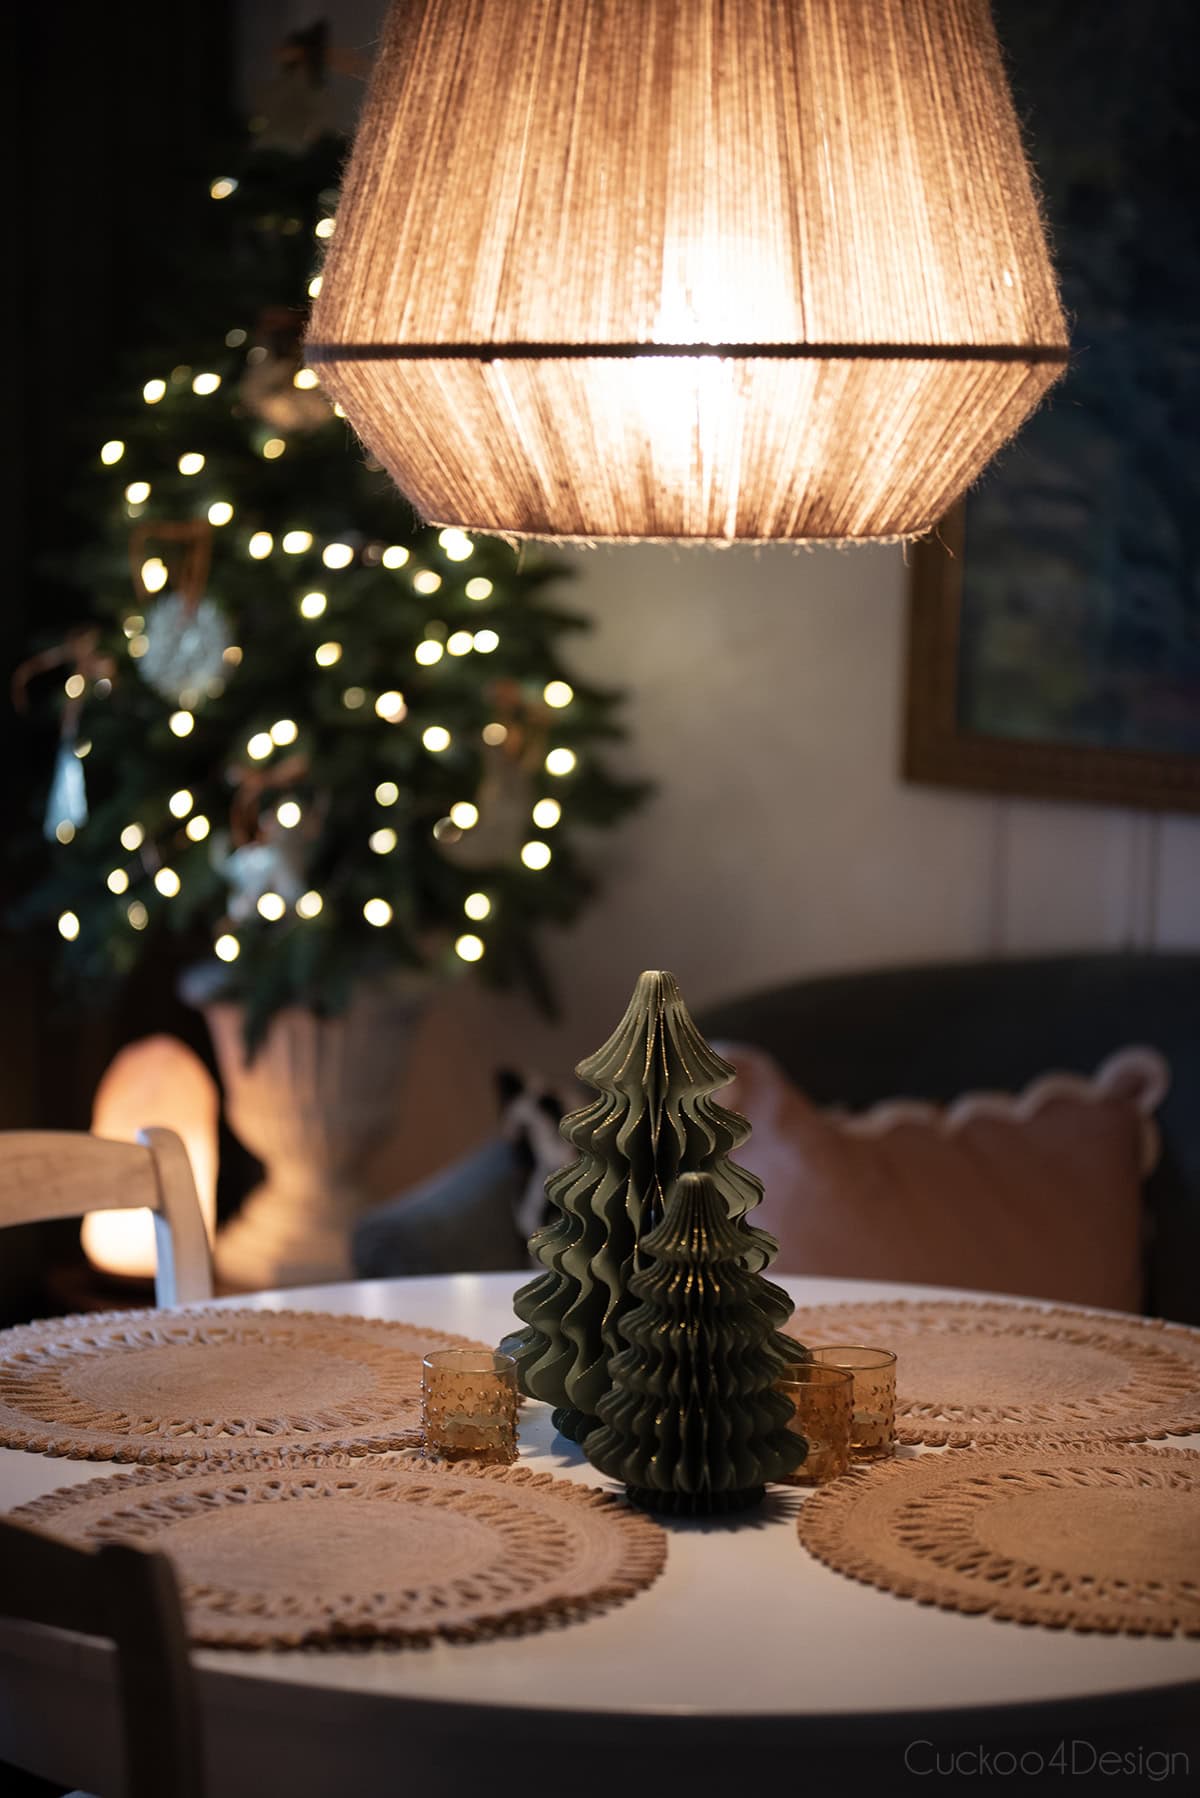
UPDATE: I finished the tree, which is part of my blog post about textured Christmas decor, where you can see the rest of my home and this year’s Christmas decor.

I also added my mushroom ornaments, where I used the same ribbon as I mentioned earlier.
FAQs about DIY Tin Ornament
For most hand-embossed metal art and ornament projects, 36–38 gauge aluminum or tin sheets work beautifully. This range is sturdy enough to hold its shape once embossed, but still thin and flexible enough to trace, press, and add detailed designs without too much pressure.
A quick tip to remember:
Higher gauge = thinner metal
Lower gauge = thicker metal
You may already have embossing-friendly materials in your recycling bin. Great options include: disposable aluminum baking pans, soda or beer cans (most food cans are too thick), tin lids from jars or candle containers. All of these cut easily with metal snips and are soft enough for embossing tools.
Not necessarily! While you can buy metal embossing styluses, many items you already own work perfectly well, such as ballpoint pens (out of ink), knitting needles, bamboo skewers, or even wood craft sticks.
Tin can have sharp edges once cut, so always sand them gently with a metal file or fine-grit sandpaper. You can also fold or burnish the edges using the handle of a tool to keep everything safe, especially if kids will be handling the ornaments.
Yes! Tin takes paint beautifully. Acrylic craft paint, spray paint, or alcohol inks all work well. Just make sure the metal is clean and dry, and seal your design if you want extra durability or a matte/metallic finish.
Painted tin ornaments are actually a big part of traditional Mexican folk art, especially in regions known for ‘hojalata’ (tinwork). If you love that colorful, hand-painted look, you might also enjoy my tutorial on painted Mexican-style ornaments.
Where to buy tin ornaments online
Prefer to buy instead of DIY? Here are some beautiful tin ornaments I’ve found in all kinds of metal finishes. These are perfect to mix in with your handmade ones.
More of my DIY ornaments
If you’re looking for more DIY Christmas ornament ideas, here are some of my other popular tutorials that pair beautifully with today’s embossed tin ornaments.
- DIY honeycomb ornament – A lightweight, dimensional paper ornament that looks delicate but is surprisingly easy to make. Perfect for a Scandinavian or modern Christmas tree.
- DIY baking soda paint ornaments – A great budget-friendly way to upcycle old glossy or glittery ornaments with a matte, textured, pottery-inspired finish using simple baking soda paint.

- How to make beeswax ornaments – These smell amazing and have a beautiful, old-world feel. You can pour melted beeswax into simple silicone molds to create natural, golden ornaments.
- DIY toilet paper roll stars – One of my favorite upcycled projects! These stars are made from painted toilet paper rolls, but you’d never know it. They turn out sculptural, lightweight, and surprisingly elegant. (And I also have DIY toilet paper roll snowflakes if you’re in a crafty mood!)
- DIY macrame ornaments – I included 6 free patterns in this tutorial, and they all look lovely together on a tree. These macrame ornaments are beginner-friendly, relaxing to make, and a great way to use up leftover yarn.
I hope this post inspired you to make your own ornaments, and if you do, don’t be shy and share the results with me!
Tschüß,

Like everything you put your hand to they turned out beautifully. As I have both cats and dogs some canine templates would be wonderful. Thank you for sharing your talent. Merry Christmas
Thanks so much Barb. I’ll work on some this week. I started with a Wiener, a husky, and a Golden. I was thinking of a Frenchie or Boston yet too. Not sure, any preferences?