

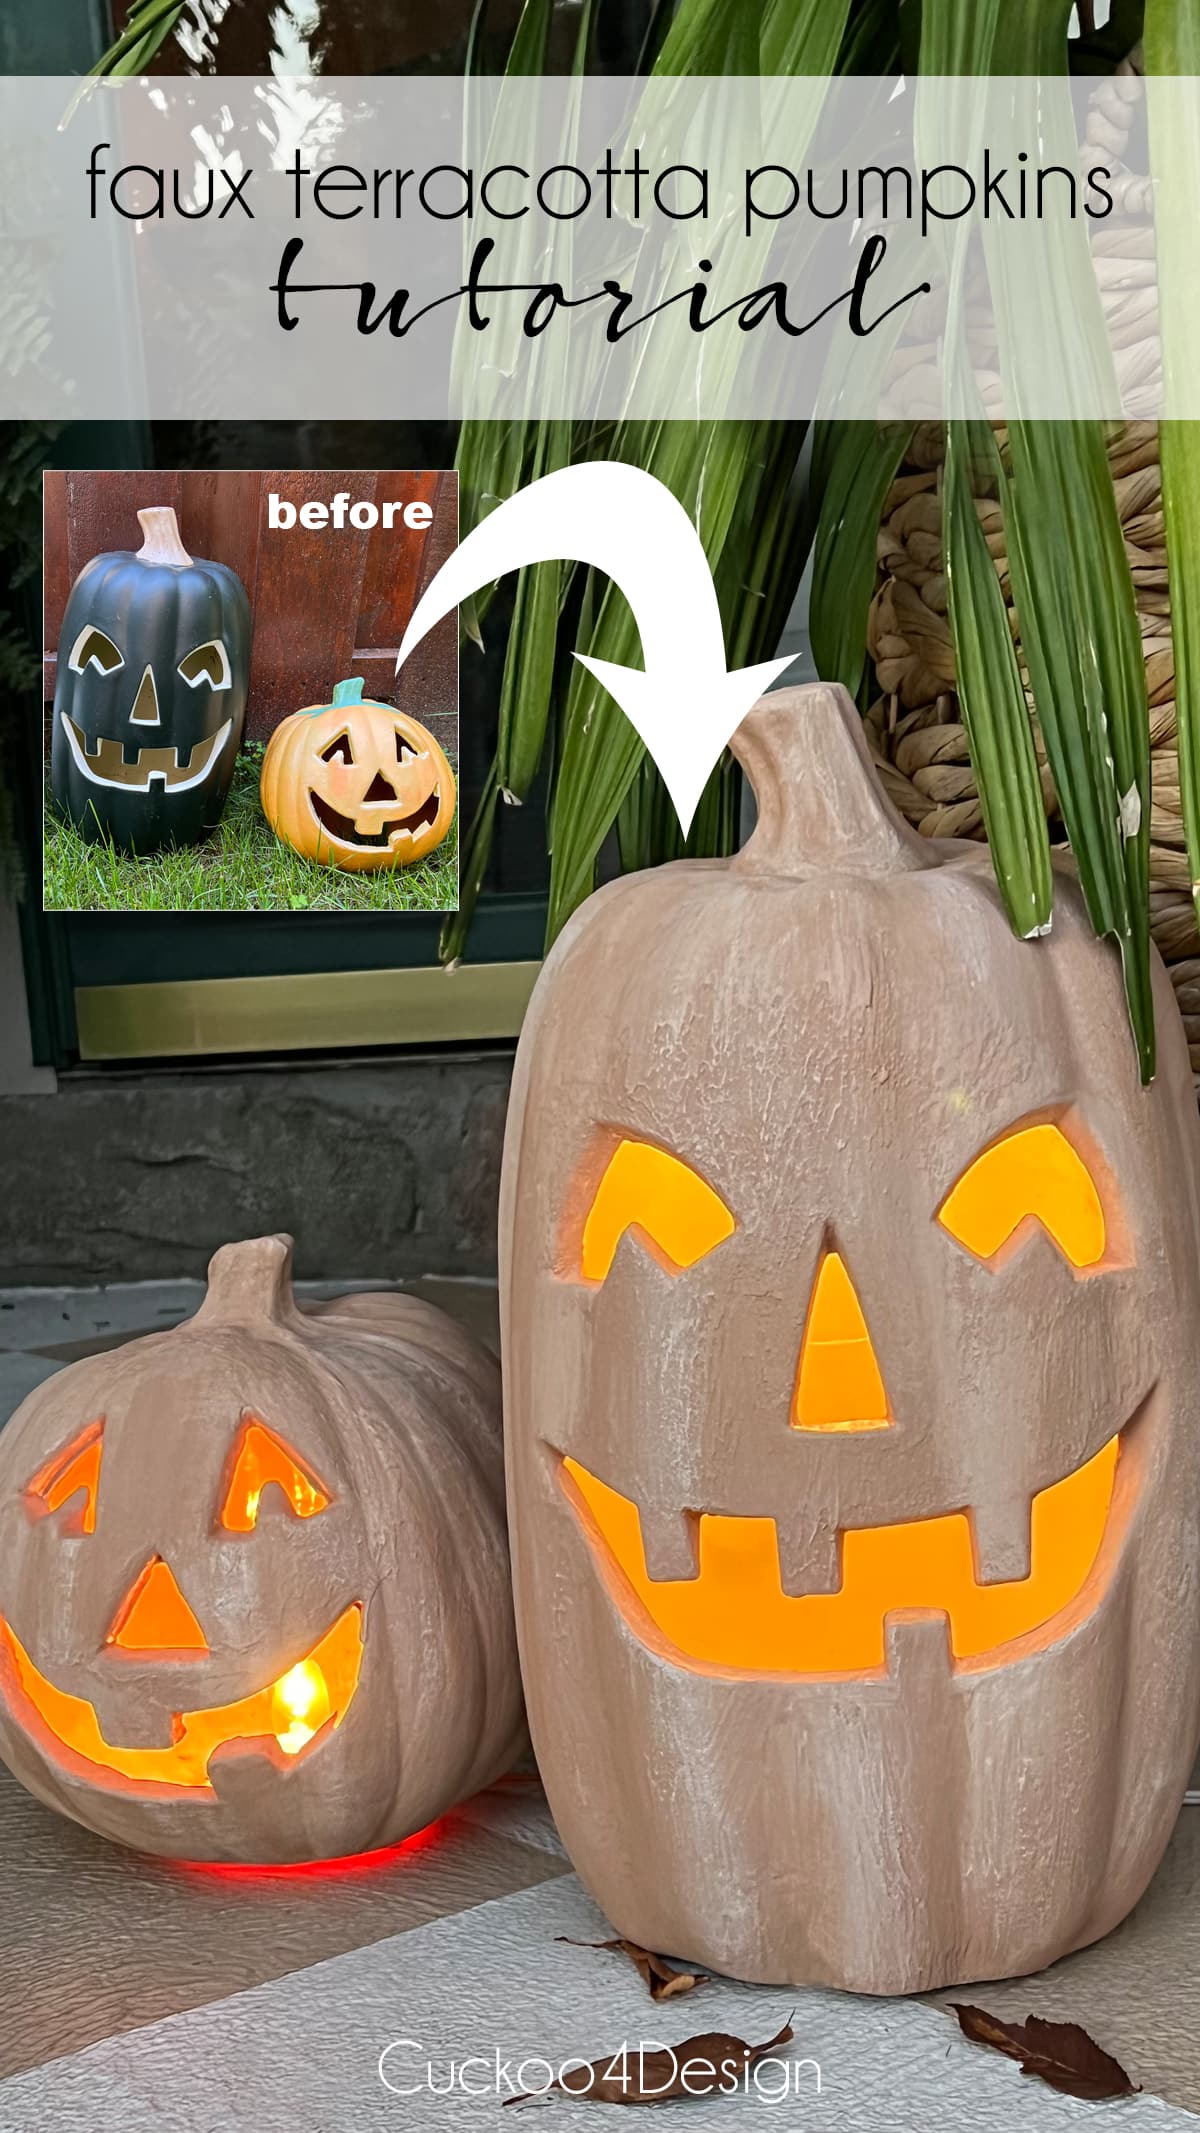
How To Paint Faux Terracotta Pumpkins
One of my favorite materials and colors right now is terracotta. I just wrote a blog post about painting over painted concrete floors where I showed my new ivory and terracotta checkerboard patterned floor. So painting some random plastic mismatched plastic pumpkin Jack-o’-lanterns into faux terracotta pumpkins to match my front porch fall decor just felt right.
How to paint plastic pumpkins to look like terracotta pumpkins
This post may contain affiliate links from which I will earn a commission at no extra cost to you. View my full disclosure policy.
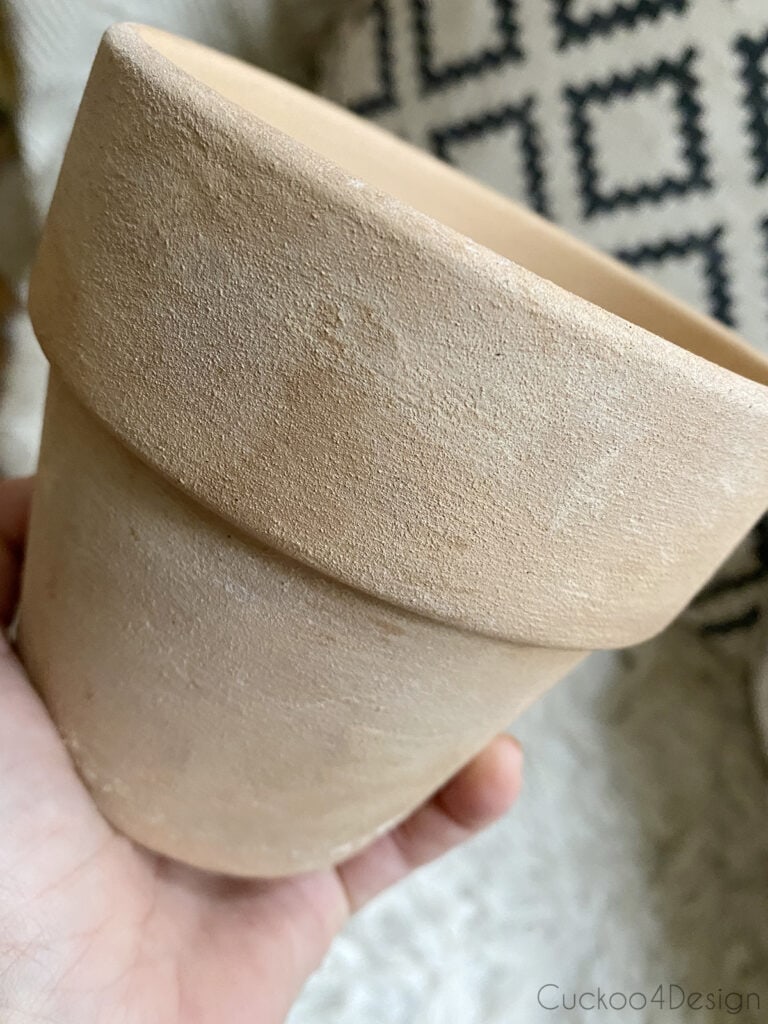
Pottery Barn recently sold authentic terracotta Jack-o’-lantern pumpkins. They were pricey but sold out really fast regardless. So even if you are willing to spend a nice chunk of change on them, they aren’t available anymore. I still really wanted a group of them for my front porch so I decided to make my own.
Inspiration: The original terracotta Pottery Barn Jack-o’-lanterns
Different faux versions of the Pottery Barn pumpkins quickly went viral on social media, especially on TikTok.

The below different versions of terracotta Jack-O’-Lantern images will take you to the sources:

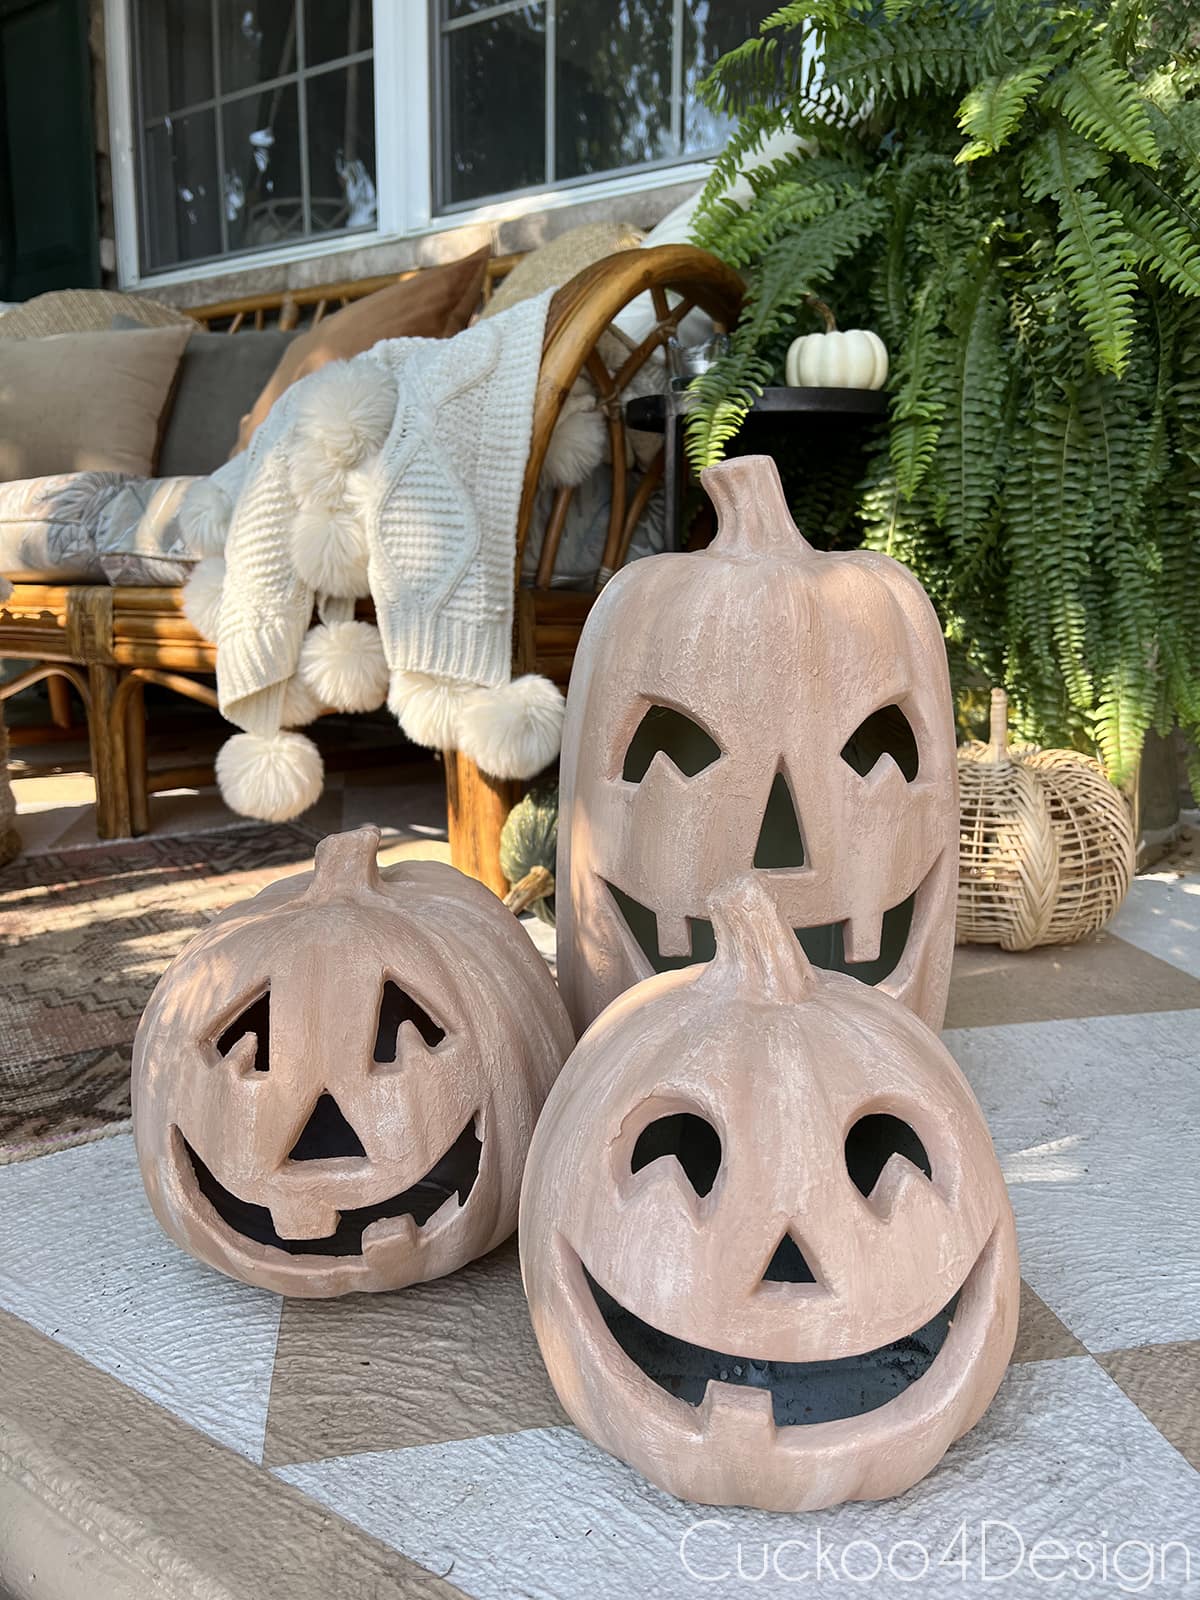
I had these three mismatched plastic pumpkins/Jack-o’-lanterns in our attic and wanted to use them again in this year’s fall decor. I knew that I could turn them into Pottery Barn dupes with the same paint recipe I used before.

The entire process is the same painting technique that I used a couple of years ago for painting ornaments with baking soda paint. I also painted chalk-paint pumpkins in 2013 (shared them again in last week’s post too) in a similar color and finish. Recently I received a comment on Instagram after sharing today’s pumpkins in my porch reveal and it really struck a nerve. I have to share it:

So let me say… just because you saw this painting idea two years ago doesn’t mean it was that influencer’s original idea either. That’s just when you saw it first. Like I said up there I’ve been doing similar things for years. Nothing is new anymore. Some people straight out copy from others which to me is mostly what the TikTok influencers do. I mean Gigi Hadid certainly didn’t invent the spicey vodka sauce for pasta even though my daughter might insist she did. (insert eye roll).
And most ideas are simply reinvented to fit your style and taste.
I wrote a blog post about different chalk paint recipes in 2017 and many other bloggers did as well. Whether you mix calcium carbonate, non-sanded grout, or in this case baking soda into flat latex paint. They all create a dull textured finish and could be used for this type of painting project and if mixed as thinner paint used on furniture.
And yes, this easy DIY project is definitely not new. I can say for sure that whoever this person saw painting the pumpkins 2 years ago, it was not that person’s original idea. Sigh!!! I painted chalky pumpkins 9 years ago already and I still don’t claim it as my original idea. Well, the studs were definitely my idea though! Hey, I put my own spin on it!

Enough venting let’s get back to the project, shall we?
Materials needed to paint the faux terra cotta pumpkins
- plastic pumpkins or Jack-o’-lanterns or you can use ceramic or real pumpkins as well (check out the affordable options I linked below)
- baking soda
- terracotta colored latex paint (or craft paint, more info below)
- Kilz spray primer
- Krud Kutter and paper towels or clean cloth
- small bowl for mixing
- craft paint brush
- painter’s tarp and cardboard
- mixing spoon and container (plastic or glass will work great)
What kind of paint do you use on plastic pumpkins?
When you use a quality primer like the oil-based Kilz spray primer on a plastic pumpkin, you can basically use any paint you’d like. I however prefer acrylic craft paint since it is easy to use and clean.
For today’s project, I used the same leftover paint colors from my Christmas ornament project which is latex based and works well for the baking soda paint recipe.
This project didn’t cost me anything since I had everything on hand. You can buy color samples for cheap in small containers at most home improvement stores. Or simply use latex craft paint.

Colors used to paint the terracotta pumpkins
These are the same colors that I used on my Christmas ornaments. Or you could use this collection of craft paint in a variety of terracotta shades. Why mix you are colors if you don’t have to?
- Strawberry Malt by Valspar – 2008-8C (leftover paint from our bathroom makeover)
- Rustic Oak by Valspar – 2007-7B (paint sample)
- Ultra White by Valspar – 7006-24 (leftover paint from our house)
(Find out more about my favorite terracotta paint colors in a recent blog post that I wrote)
You certainly can mix your terracotta colors though too instead of buying them. Just use an orange color and tone that down with white, tan, and brown craft paint.
Some cheap plastic pumpkins and Jack-o’-lantern options for sale
You can easily find these types of plastic pumpkins at yard sales, the dollar store, Facebook Marketplace, thrift store, or for cheap at places like Walmart and Target.

Step-by-step faux terracotta pumpkin painting instructions
Video tutorial
If you are on a smartphone or tablet, hold your device horizontally for better viewing. If the video doesn’t load for some reason then you can also view it on my YouTube Channel instead.
The following music was used for this media project: Music: Mystical Autumn by MusicLFiles Free download: https://filmmusic.io/song/9755-mystical-autumn License (CC BY 4.0): https://filmmusic.io/standard-license Artist website: https://cemmusicproject.wixsite.com/musiclibraryfiles
Step 1: Remove any electrical cords and light bulbs (if applicable)
First, start out by removing the electrical cords from your plastic pumpkins if you have any (If you don’t have a lantern pumpkin move on to step 2). This is very easily done and doesn’t require any special electrical skills. I simply snapped the lightbulb socket out of the bottom of the pumpkin which removed everything including the cord. That’s it!
Step 2: Clean the plastic pumpkins
I like using a degreaser to clean my surfaces for any paint project. They work really well for paint prep. In this case, I used Krud Kutter and a clean cloth by simply spraying it on and wiping the plastic pumpkin with the clean cloth. (doesn’t matter if they are plastic or ceramic pumpkins)
Step 3: Place the plastic pumpkins on a protected flat surface
While you are waiting for the clean pumpkins to dry you can set up an area for painting with a plastic tarp or a drop cloth. The spray primer can make a real mess and is very sticky, so I make sure that I have a rather large protected painting area. Also, set them up for their spray primer coat. I prefer to prop them up on cardboard boxes.
Step 4: Prime the pumpkins
I never skip the step of priming. I’m a huge fan of Kilz spray primer. The texture it gives the surface is perfect for this project and the paint adheres so much better this way. Make sure they are completely dry before priming.
Make sure to shake the can really well before spraying.

Evenly spray all the pumpkins with the spray primer and let the paint dry.

Step 5: Mix your baking soda paint colors
When the spray primer has completely dried it’s time for the baking soda paint. (If you are looking to simply paint plastic pumpkins then you can now add two layers of spray paint or acrylic paint instead of doing what I did).
The good thing is that there really are no rules for mixing this type of baking soda paint.

For my painted terracotta ornaments and vessels from a couple of years ago, I mixed the baking soda and paint evenly because I didn’t want a sloppy uneven texture. For these pumpkins though, I opted for sloppy. I didn’t mix the paint and baking soda well and it helped create the perfect uneven texture and color I was going for.
I even mixed the two different paint colors (the lighter and the darker color) unevenly with the baking soda and just brushed it on. (see the small mixing bowl in the photo below?)
Step 6: Apply two coats of the darkest color
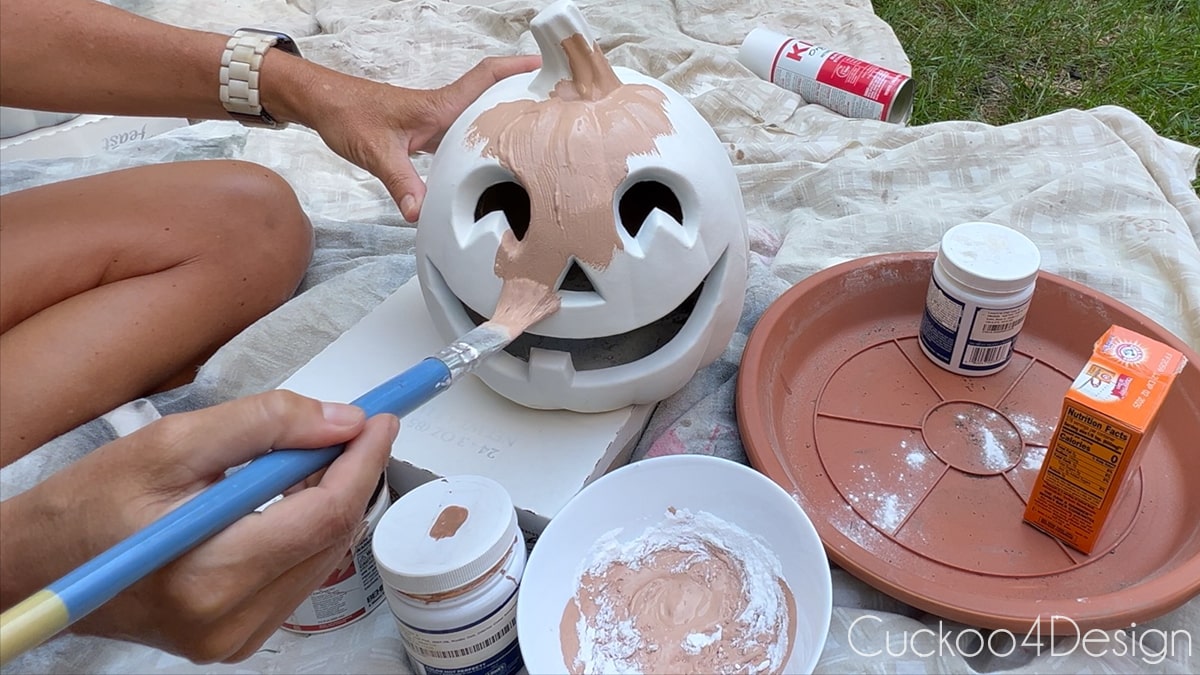
I did apply two coats of the darker uneven baking soda paint color on the entire pumpkin (pumpkin stem included) which you can see in my video.
Step 7: Add a thin layer of a lighter mixed color
When the second coat of paint has dried follow that up with the lighter color unevenly and only one coat. You don’t want to cover all of the earlier darker color. Different color variations and shading is key for this project.
In the next photo, the faux pumpkins are still wet. When they are dry, they have a dull chalky, and stone-like finish. I love the uneven, chunky, and textured finish.
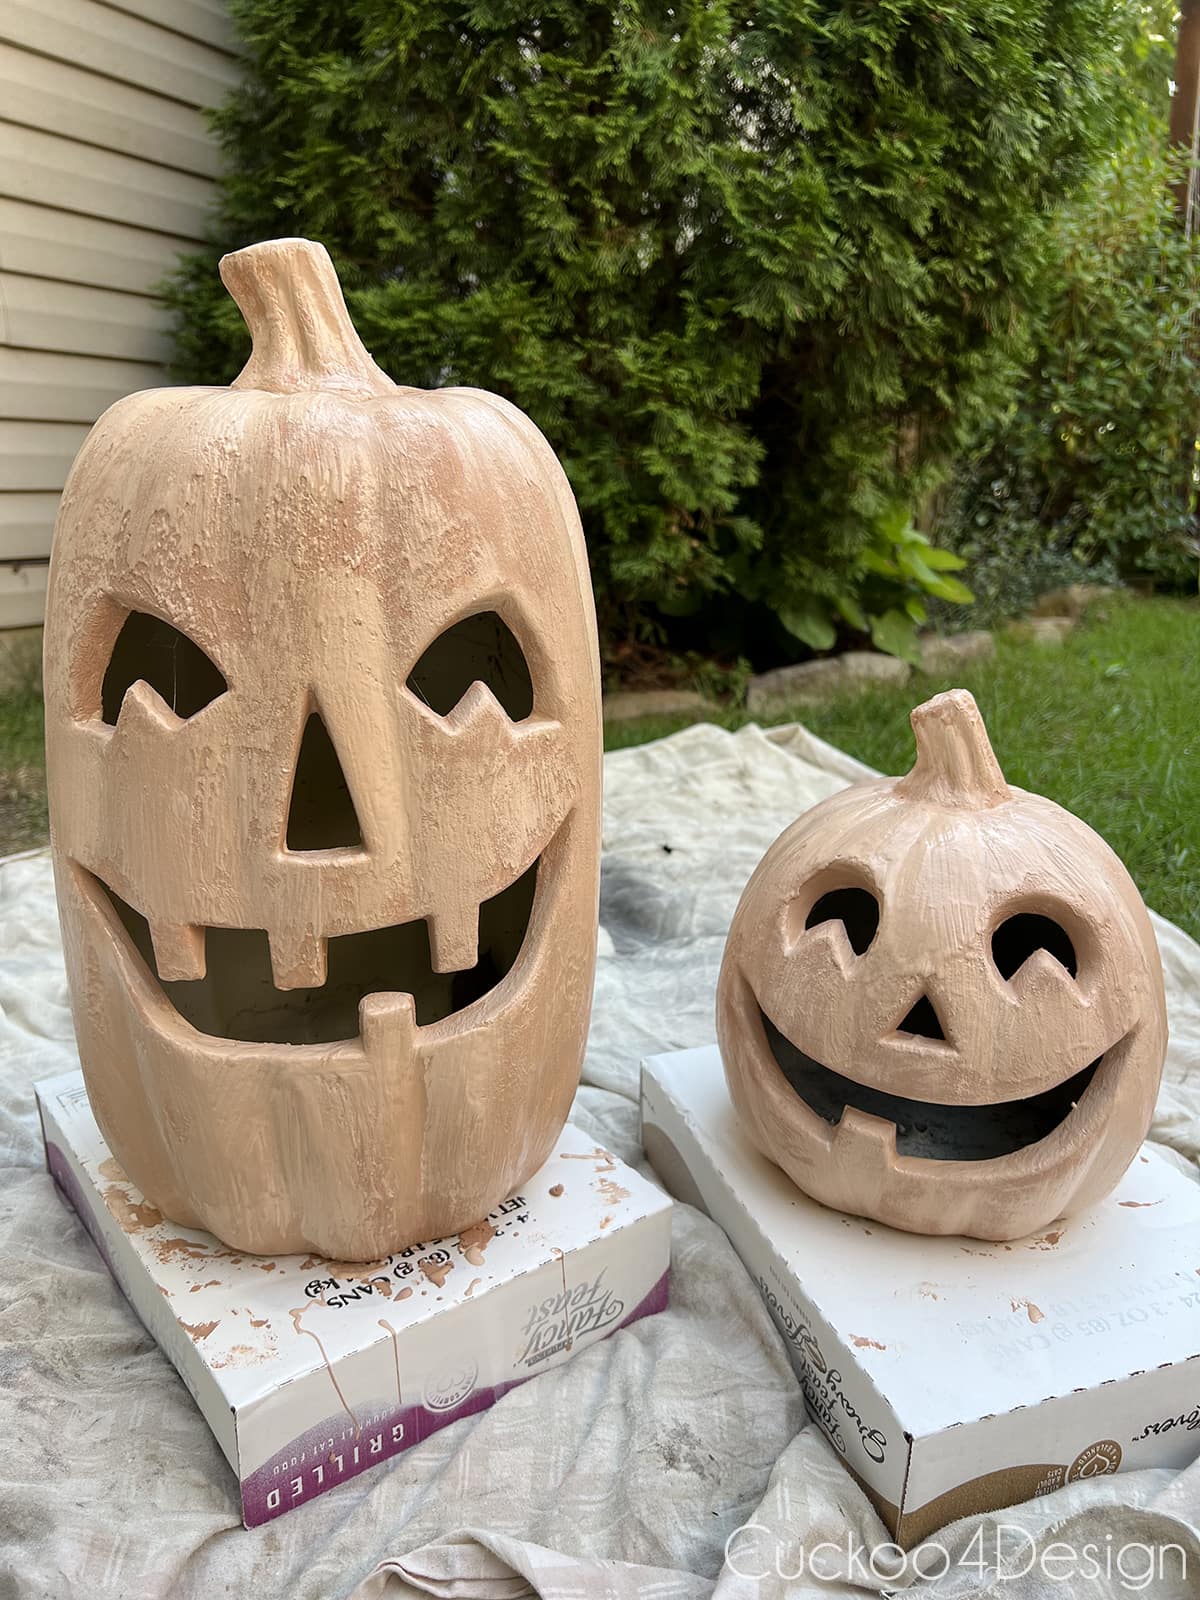
The finished pumpkin doesn’t look nearly as textured as the wet one which you can see in the finished photos.
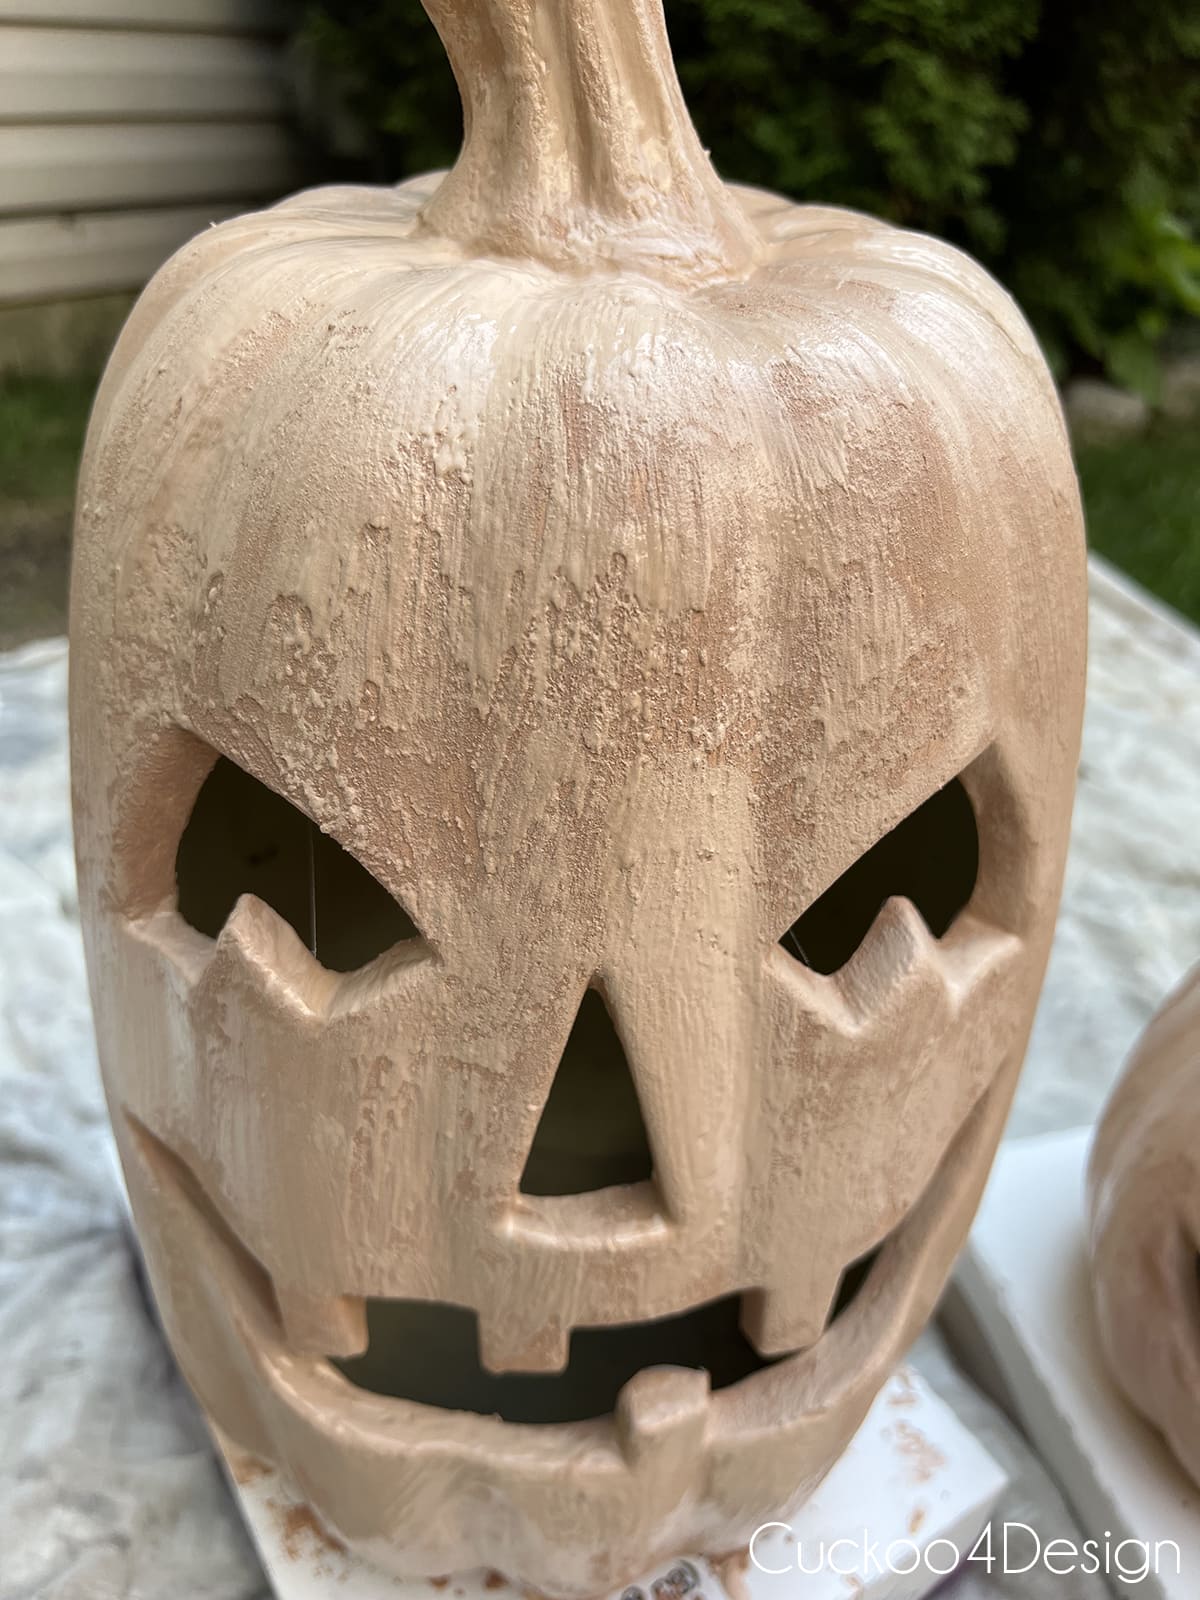
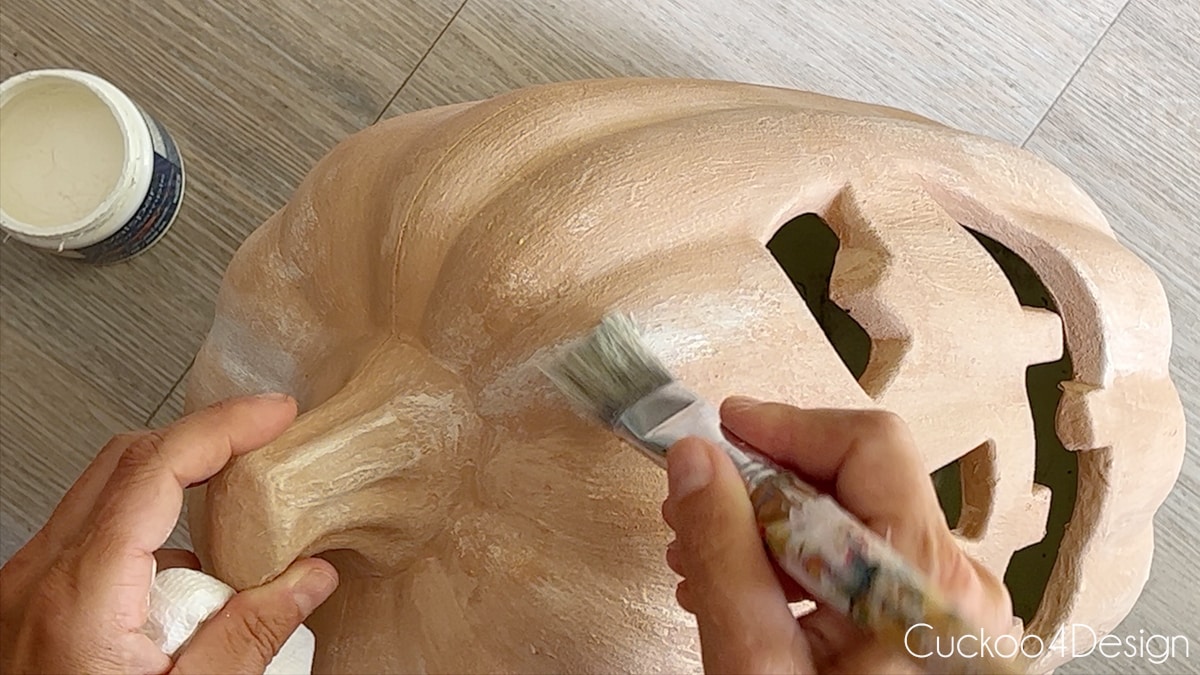
Step 8: Thinly dry-brush white paint over pumpkin
Lastly, I dry-brushed some of the white paint over the dry pumpkins. This is basically a simple whitewash. Make sure to wipe off most of the white onto a paper towel before brushing it on. You definitely don’t need a lot of white paint for this step.

Step 9: Reinstall electrical components (if applicable)
If you have electrical Jack-o’-lanterns. Add the electrical cords again. And your DIY terracotta pumpkins are done.
I’ve seen others just dusting the baking soda powder onto the paint and then slightly brushing it off but the number one reason I didn’t want to just dust it is that the pumpkins get a bit wet out on our covered porch and it would wash off. To be sure nothing happens to your terracotta pumpkins. You can finish them off with a clear matte finish by applying ultra-flat sealant. I love MINWAX Polycrylic and use it for a lot of my paint projects. I did not apply a sealant because I want to test out how they last over time without it.
If you like Pottery Barn dupe tutorials, then check out my tutorial on how to make the viral Pottery Barn lit ghost wreath.

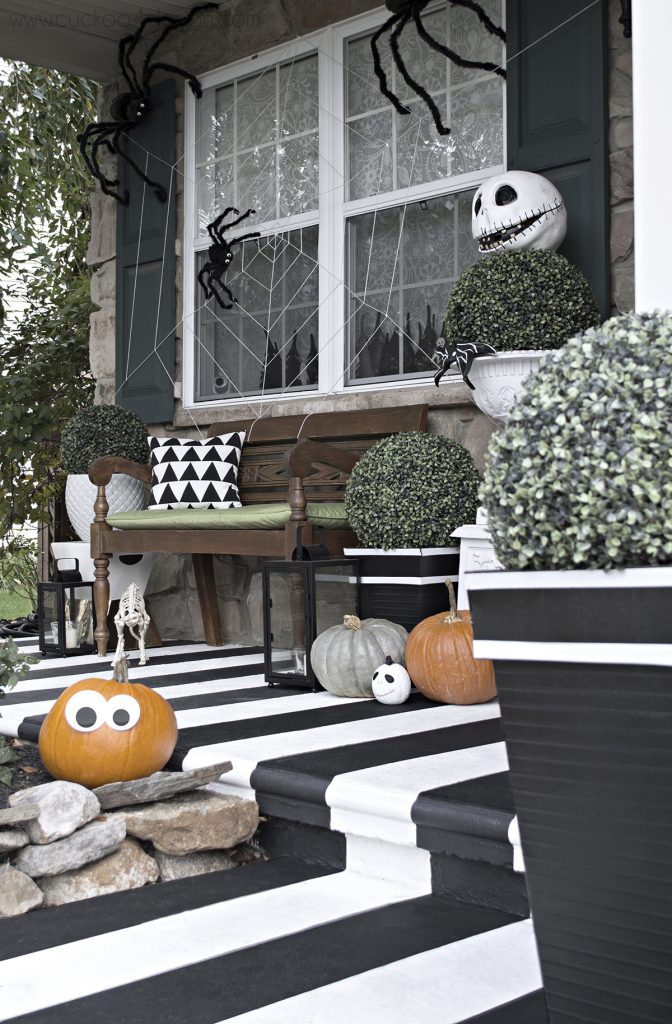
Photos of finished DIY terracotta pumpkin Jack-O’-Lantern
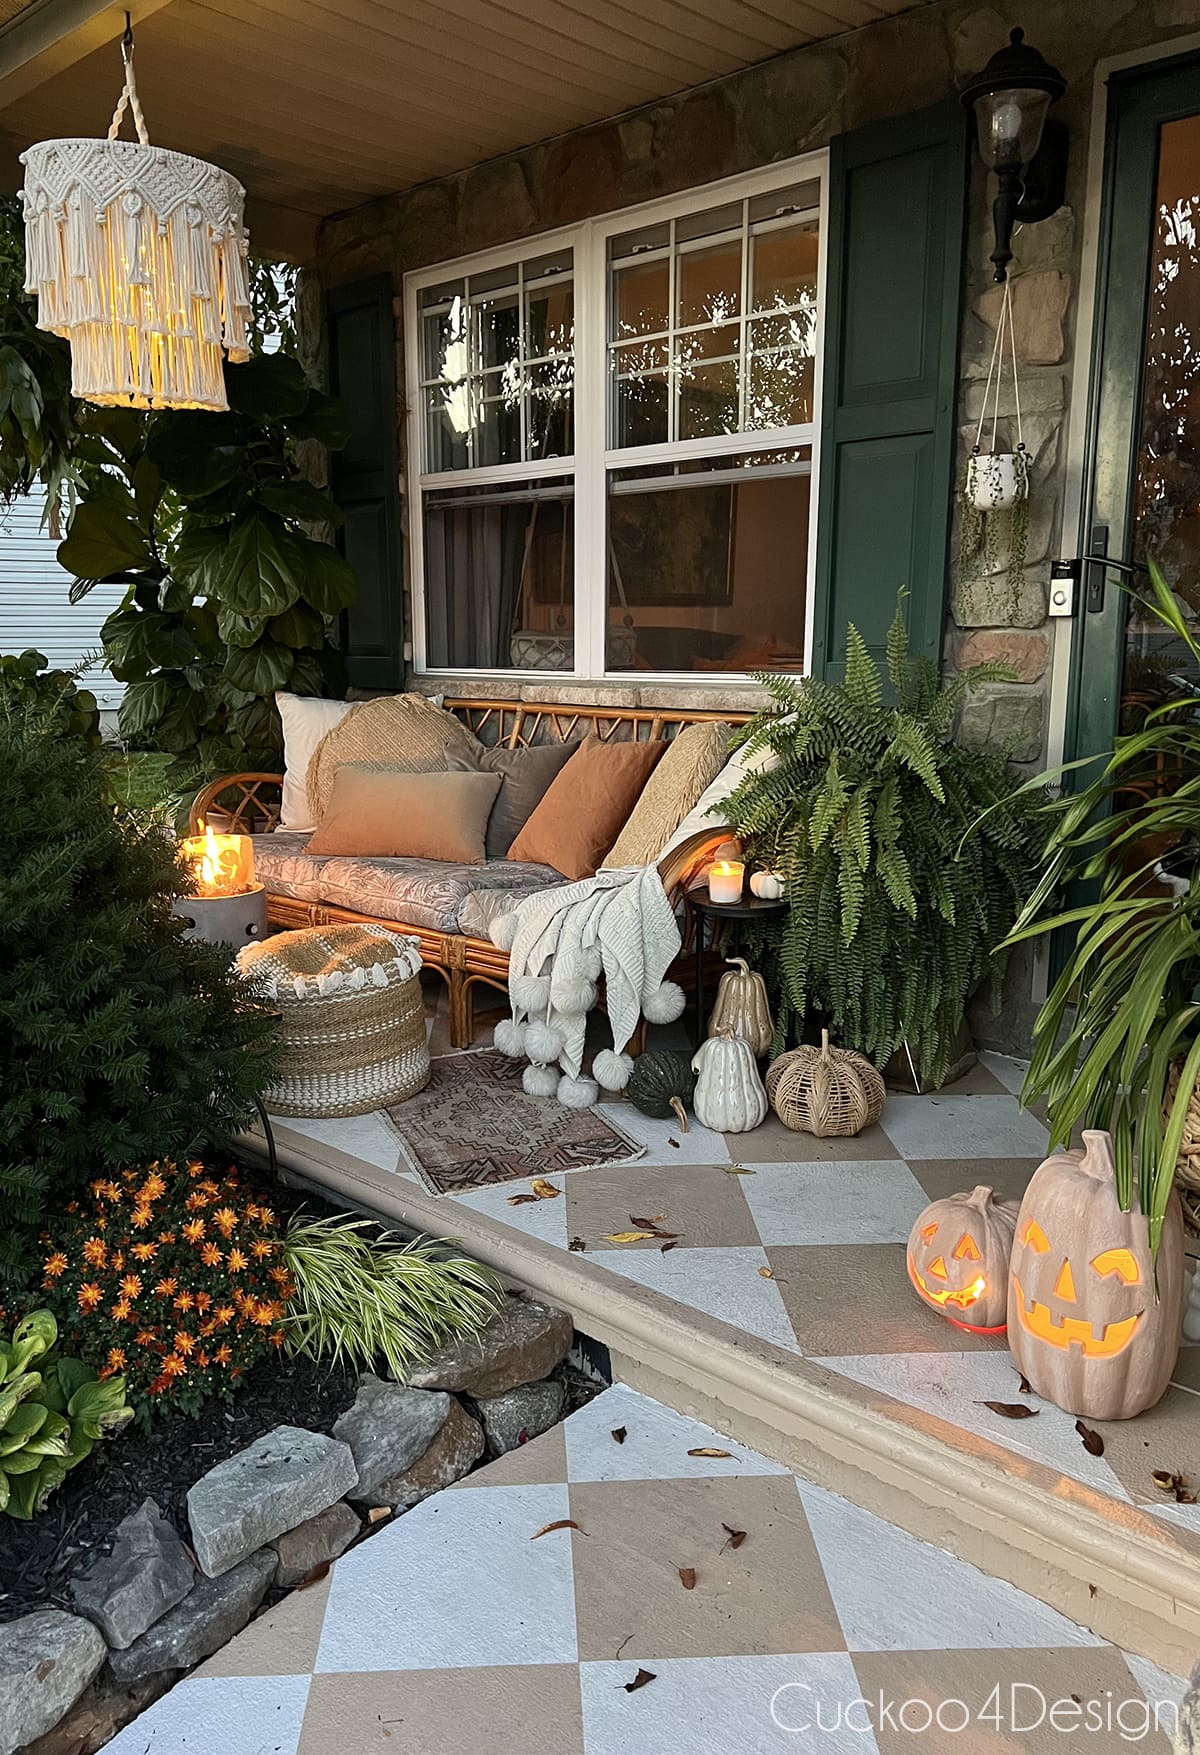
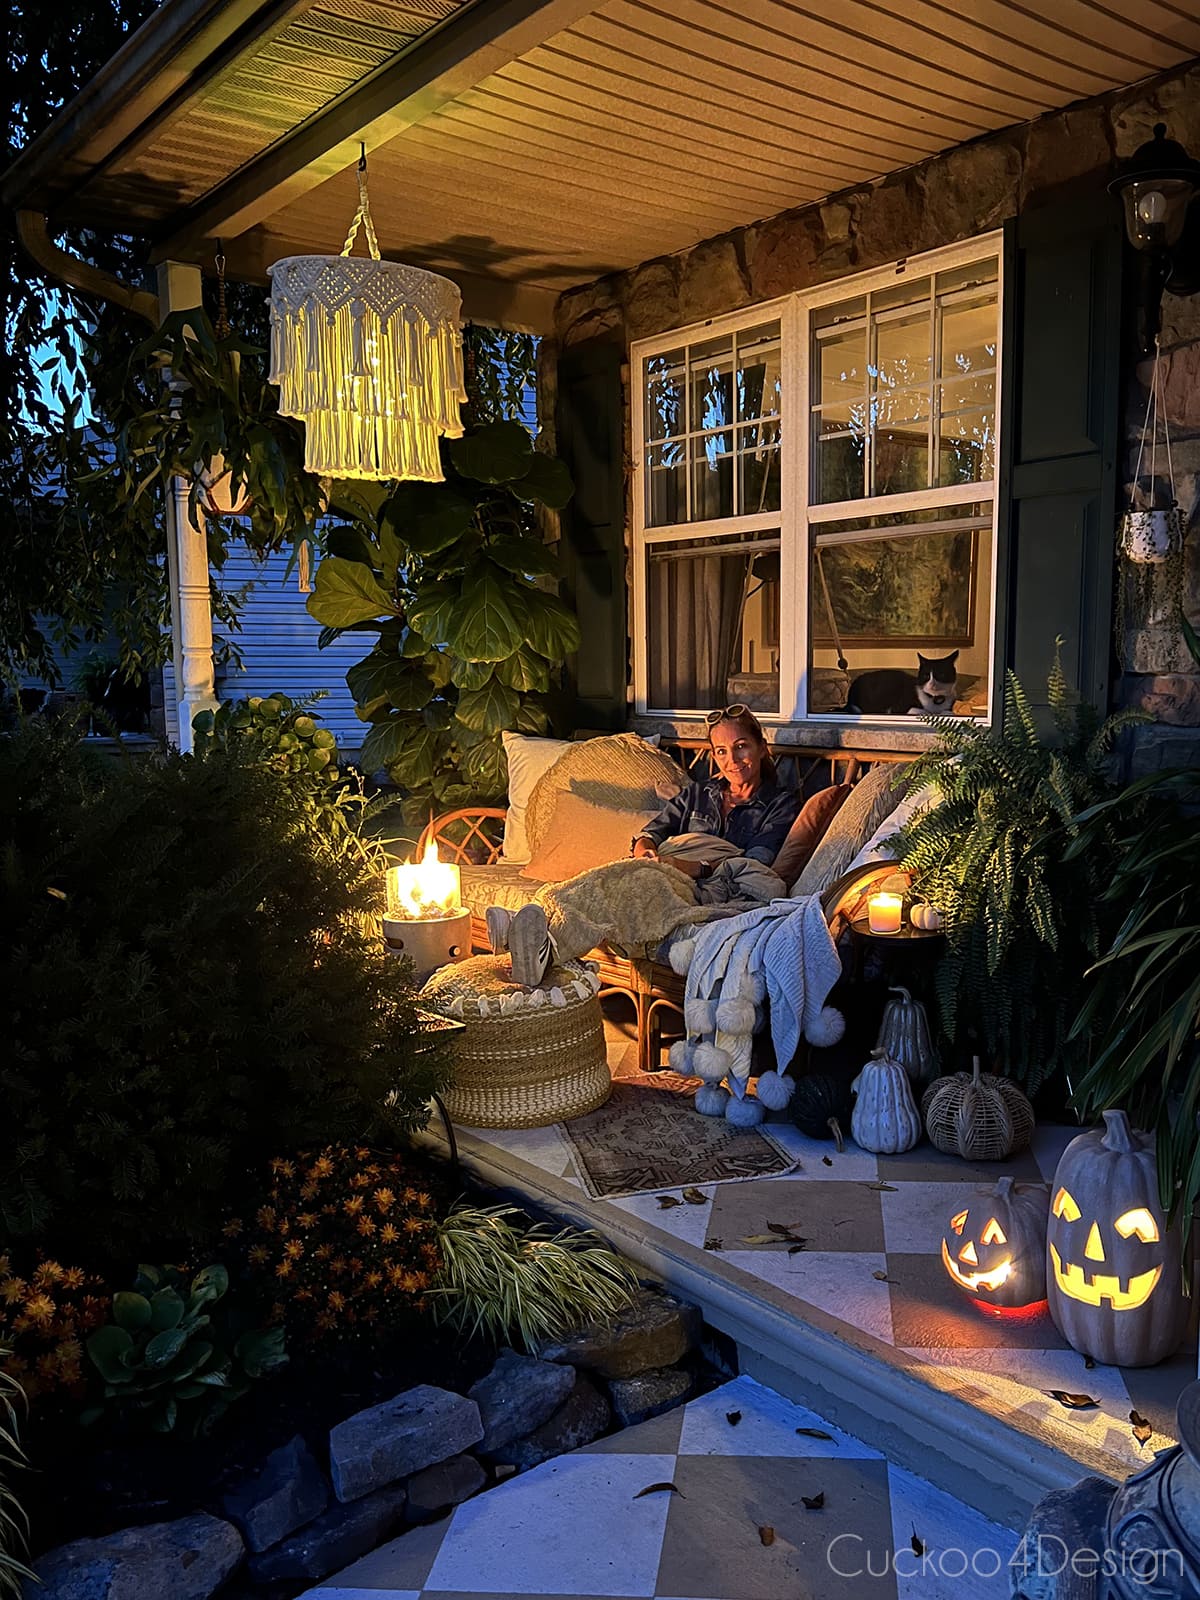
I really haven’t been into fall decorating in the past couple of years but my simple cozy porch has gotten me motivated again this year to try to move on from summer to fall. It is always a sad time for me when summer comes to an end. I honestly hate bringing my plants inside the home when it gets too cold outside.

The porch is just so much better with all the greenery. If you are new around here, make sure you also check out my latest blog post about how I repainted our porch in this checkerboard pattern floor and my recent fall home tour for more porch and home photos.


I recently made corn husk bats, and they would look really cute hanging on the porch, too. I will probably make more to put them out here.

When you enter our front door, you step right into the dining room. I recently made a wall full of creepy Halloween art for above our sideboard right next to the door.

I recently made a simple DIY paper leaf fall foliage arrangement for the corner of our living room. It’s perfect for fall and such an easy tutorial. I also made some paper moths to add to the branches for Halloween decor.

Check out the rest of my fall home tour.
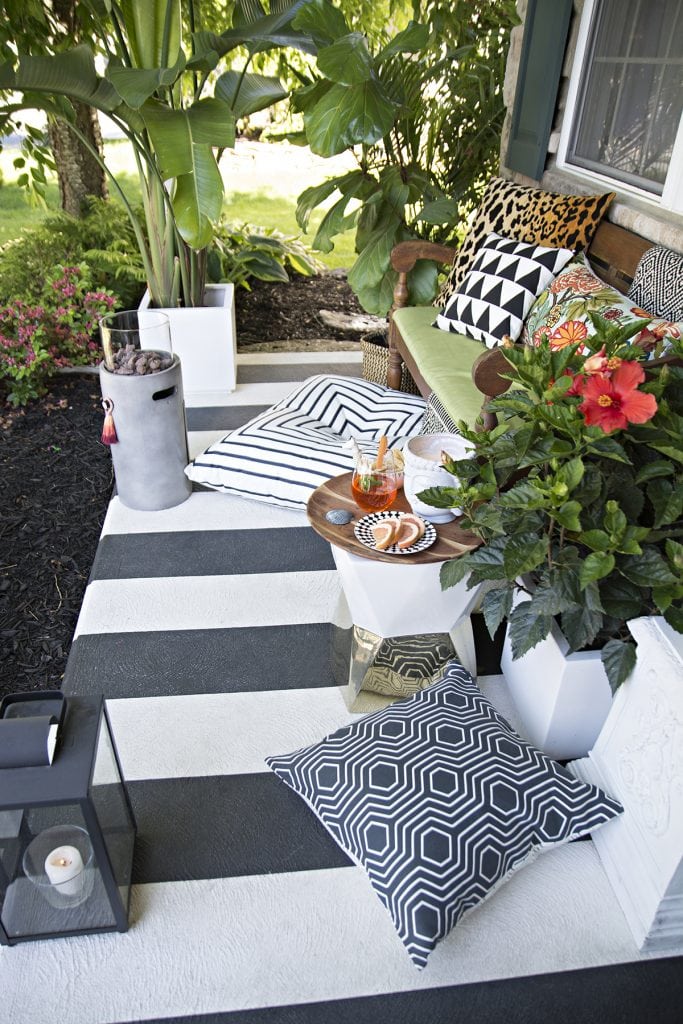
Look at my black and white Halloween porch from 2016. Can you even believe this is the same porch? Crazy what some paint and thrifted furniture can accomplish. Those were the times when my kids were little and loved this type of Halloween decor.
And the same black and white porch not decorated for Halloween. That bench isn’t even close to being as comfy as the $50 rattan sofa I found on Facebook Marketplace.
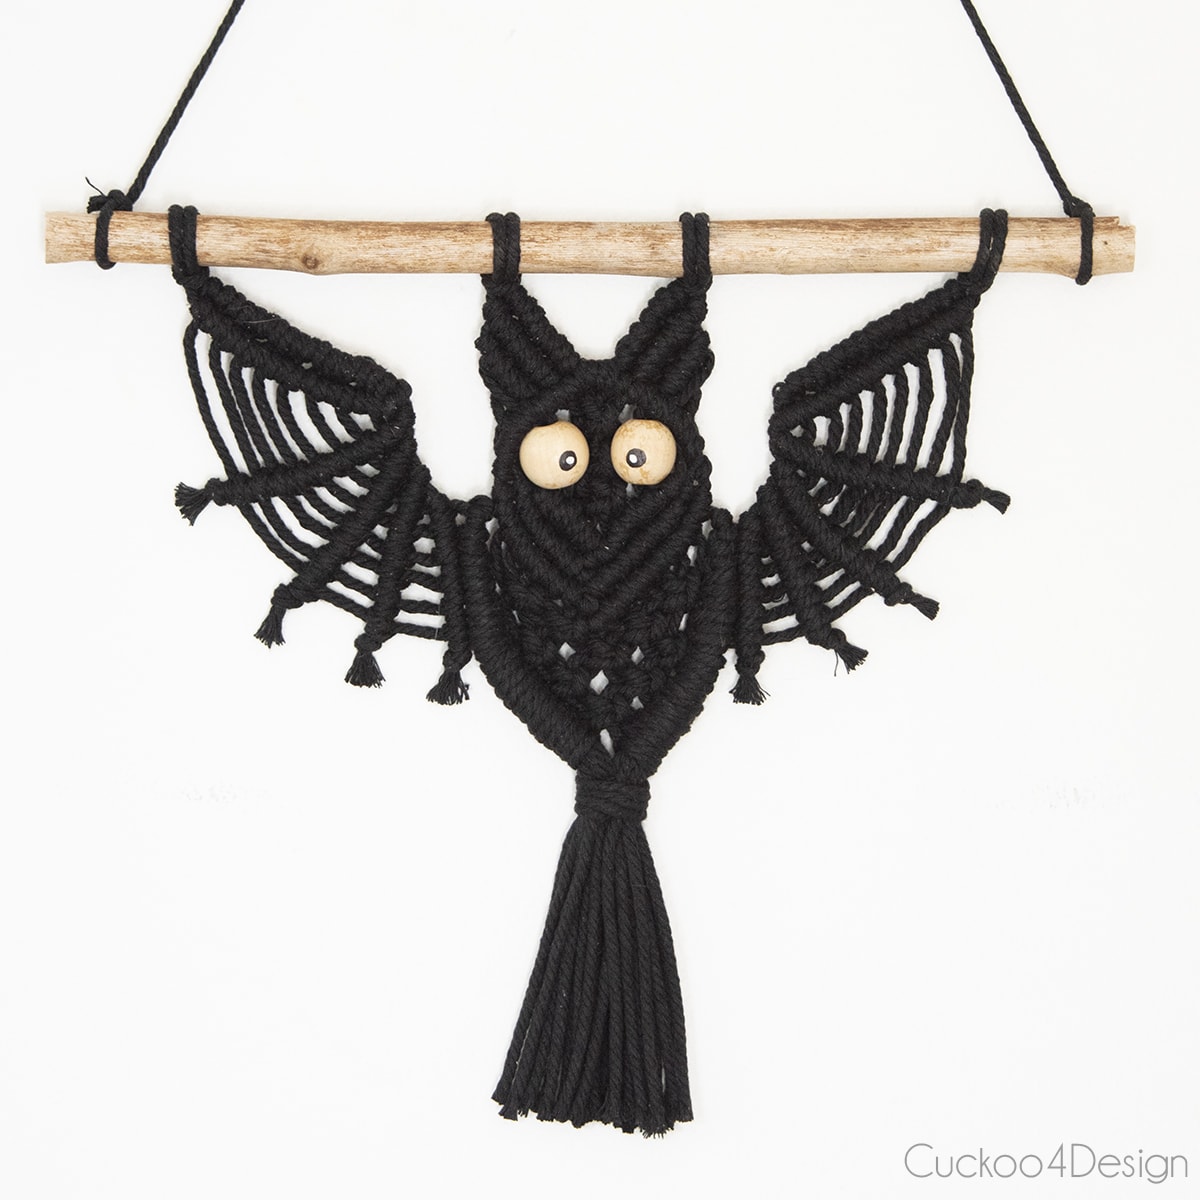
Also, check out my macrame bat tutorial and how to make a macrame ghost wall hanging.
And here is a photo of the faux terracotta ornaments on my tree that I mentioned earlier. Aren’t they pretty too?

You might also like my faux pumpkin painted in a traditional easy folk art called Bauernmalerei.

I’m so happy with how the pumpkins turned out. I was able to reuse some mismatched decor that I was hoarding in our attic without spending any money. Even though it’s not a mindblowing new DIY and has been done before, I still love it and it makes me happy seeing them on our porch and I believe that’s what’s most important.
Tschüß,


How To Paint Faux Terracotta Pumpkins
This is a tutorial about how to paint any type of pumpkin to look like a real terracotta pumpkin.
Materials
- plastic pumpkins or Jack-o’-lanterns (you can also use ceramic or real pumpkins)
- baking soda
- Krud Kutter and paper towels or clean cloth
- terracotta colored latex paint or craft paint (colors used for this project are all Valspar paint samples: Strawberry Malt by Valspar – 2008-8C, Rustic Oak by Valspar – 2007-7B, Ultra White by Valspar – 7006-24)
- Kilz spray primer
- small bowl for mixing
- painter's tarp and cardboard boxes
Tools
- craft paint brush
- mixing spoon
- plastic or glass container for mixing
Instructions
- First, start out by removing the electrical cords from your plastic pumpkins if you have any. This is very easily done and doesn't require any special electrical skills. Simply snap the lightbulb socket out of the bottom of the pumpkin which removes everything including the cord. That's it!
- Thoroughly clean the plastic pumpkins by spraying on a de-greaser spray and wiping the cleaner off with a clean cloth(doesn't matter what material they are) and let them dry.

- Prop the pumpkins up on cardboard boxes on a painting tarp or sheet to get them ready for painting.
- Shake the spray primer can really well and give the pumpkins a good, even coat of spray primer. Let them dry.

- Mix the darker baking soda paint by putting some of the paint into a plastic or glass container and then adding the baking soda to the paint. Just mix in enough to get a thick almost pasty consistency. No ratio is needed! Also, mix the paint and baking soda unevenly for the perfect texture.

- Apply two coats of this first paint color and let it dry.
- Mix the lighter paint with baking soda the same way and unevenly brush a light coat of that color over the darker color. Let it dry.
- Lightly dry-brushed some of the white paint over the dried pumpkins in some spots. Make sure to wipe off most of the white onto a paper towel before brushing it on.
- And your pumpkins are done. If you have electrical Jack-o'-lanterns. Add the electrical cords again.
Notes
- You can also seal your pumpkins with a sealant like clear matte or ultra-flat sealant. This pumpkin project was not sealed.
I love your pumpkins and the picture of you on the porch is darling! It looks so cozy! It got down in the 40’s the past two nights in MN where I am and I’m hoping it at least killed some of the mosquitos so I can go back to being outside in the evening. Ignore the haters Julia! Your ideas are always good to me!
Thank you Mary. And yes it would be so nice if a lot of mosquitos would die in cooler weather because I get eaten alive the minute I step outside. The porch is my favorite spot to hang out.
Thanks for sharing the pumpkin post, and for saying what you did. lol I don’t do TikTok, but I have stuff pop up on my FB feed every now and again. This or that influencer has gotten a gazillion views of their super inventive idea….Part of me thinks, where have these people been? The other part, I was doing this 20 some years ago. ?
Haha, yes so true.
They look amazing!
Thank you so much Amber!
I love these pumpkins! So much beautiful texture!
Oh, Thanks so much, Bettsi!