

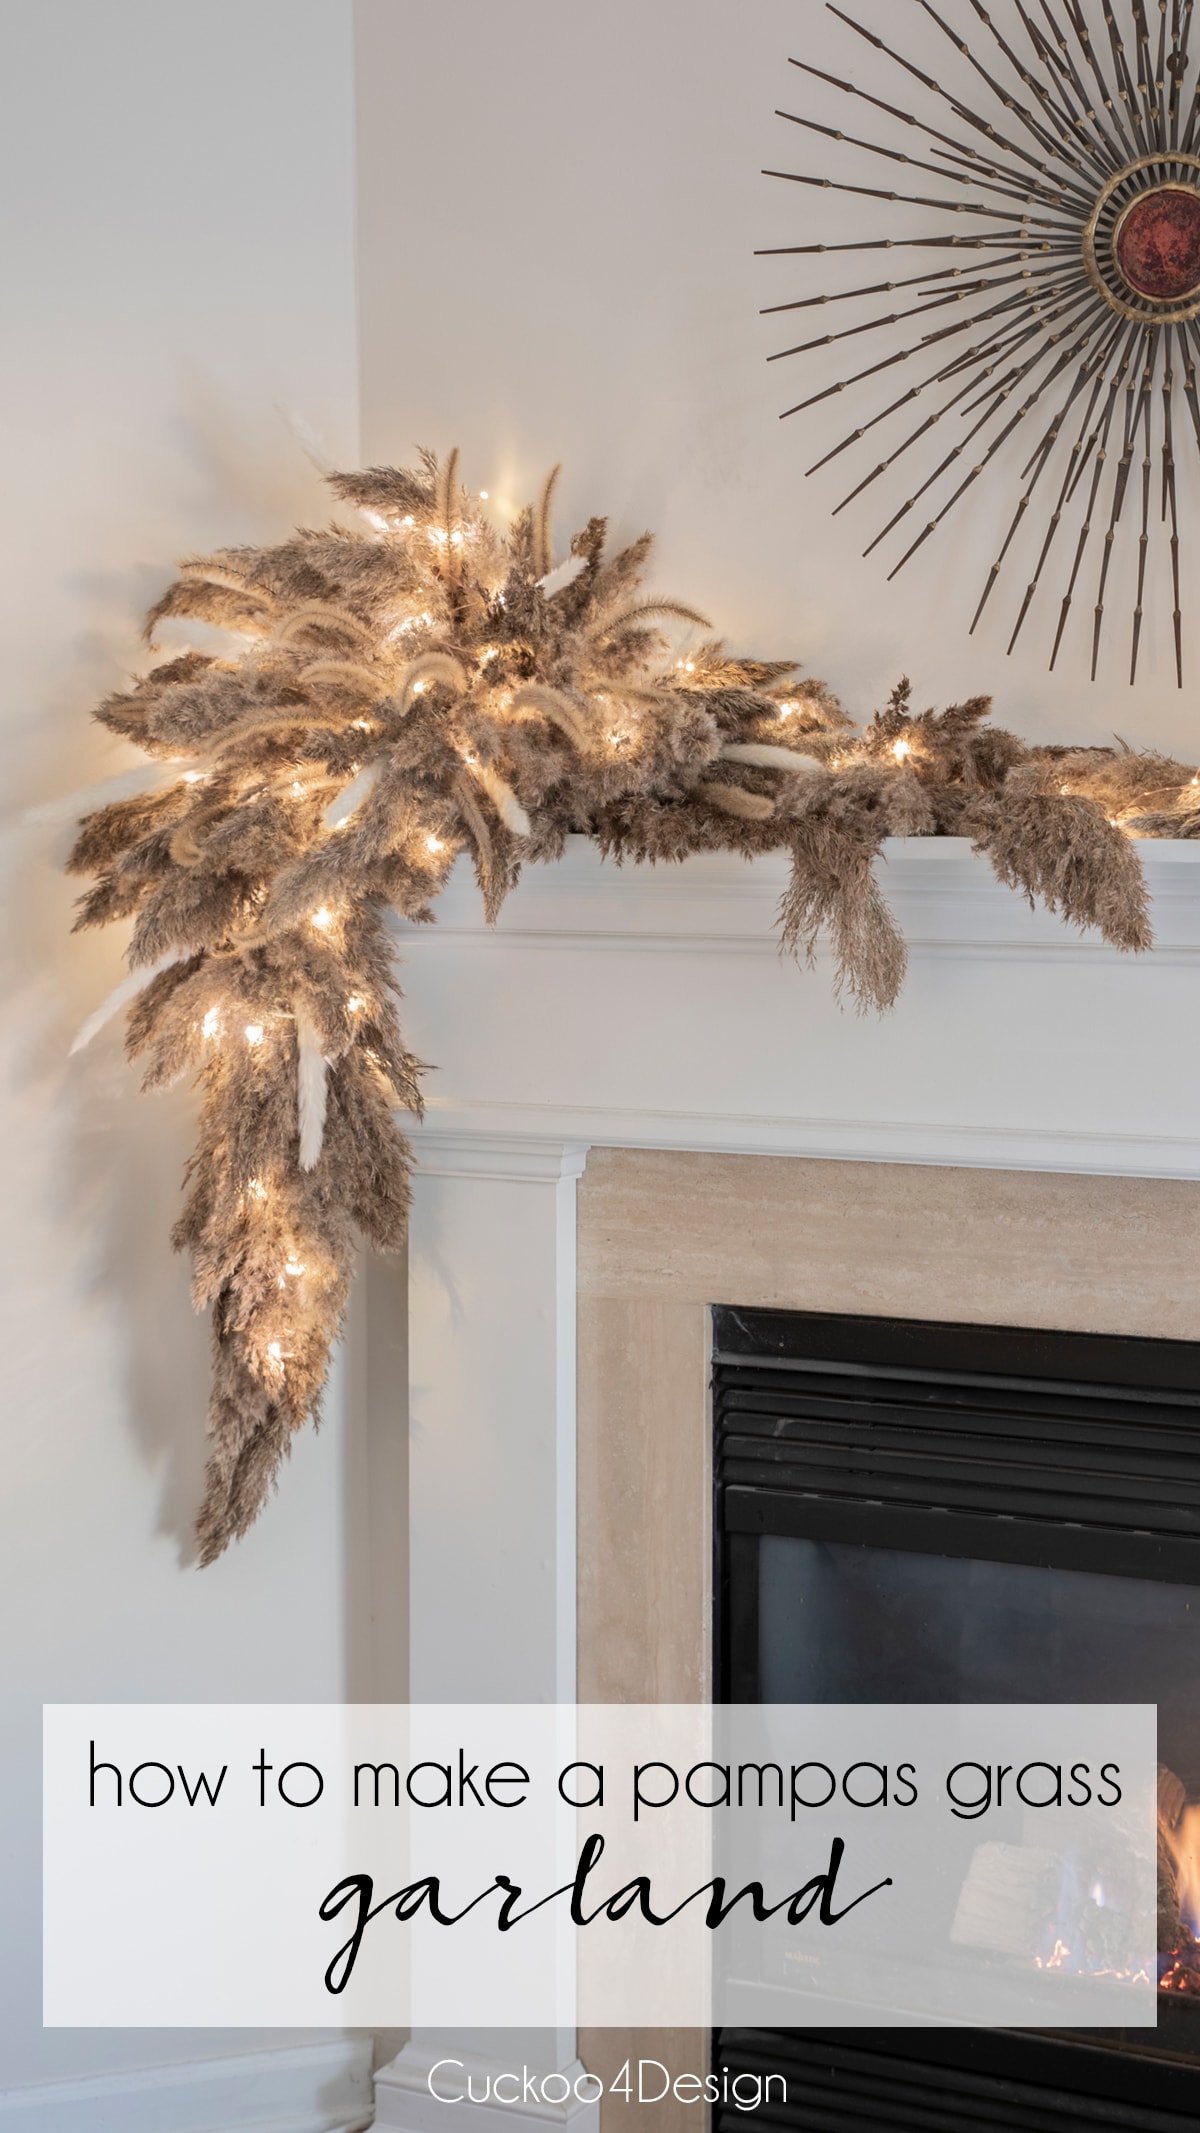
How to make a pampas grass garland
Pampas grass has become a favorite for boho-inspired home décor, and this DIY pampas grass garland is one of the easiest ways to bring that soft, natural texture into your space. Whether you drape it across your fireplace mantel for the holidays, use it as a wedding garland, or style it on a shelf, this project adds instant cozy elegance.
DIY pampas grass garland – boho Christmas and wedding decor idea
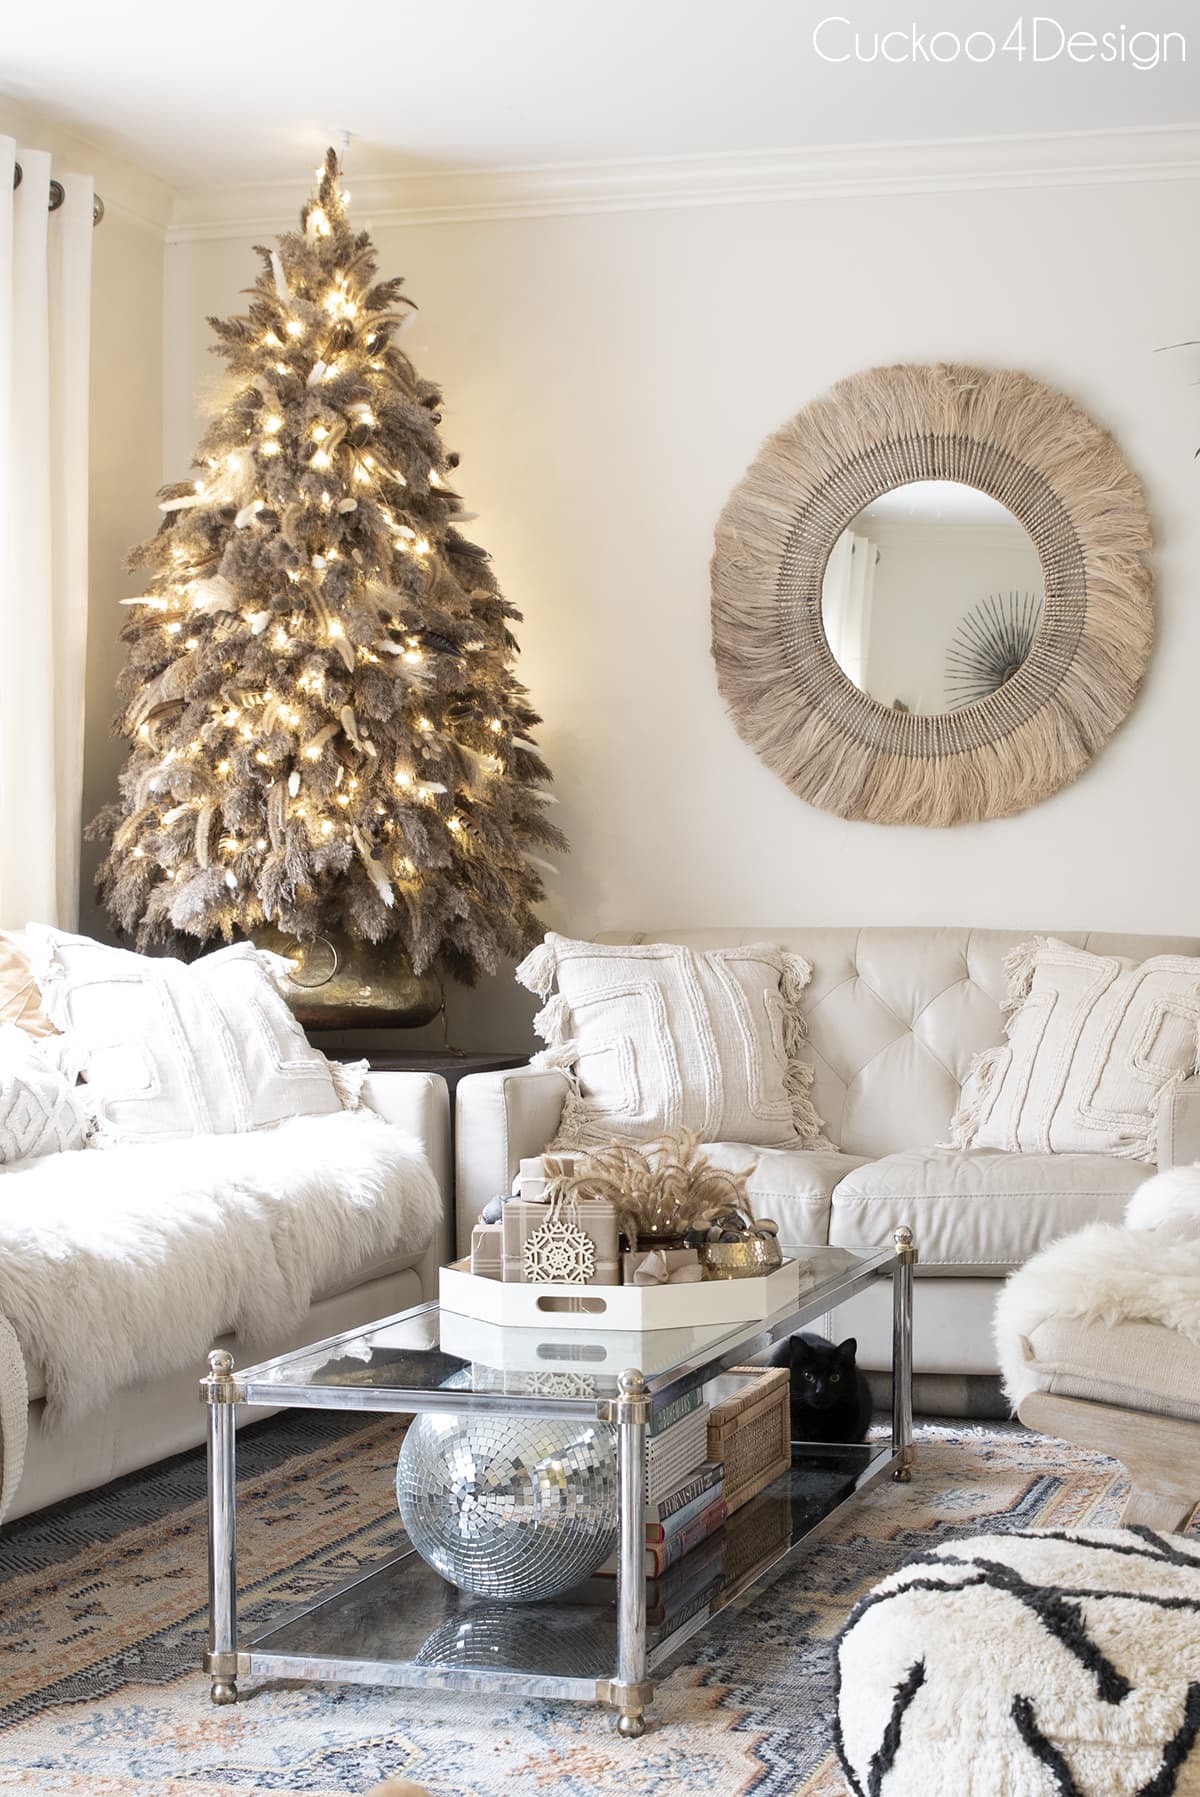
There is definitely a theme this year, and I can’t seem to stop. It all started with my pampas grass Christmas tree that I keep talking about. Then I followed it up with my dried floral Christmas tree that I showed a couple of weeks ago in my boho Christmas decor housewalk home tour. So today I want to share the tutorial with you!
I recently told my husband that I need a bumper sticker that says ” I brake for grasses”! LOL because everywhere I drive, I see beautiful pampas grass and other dried grasses and dried flowers and I contemplate stopping even if it is a highway. I promise I won’t though but I think of all the pretty things I can make with them. It doesn’t get more affordable than that.
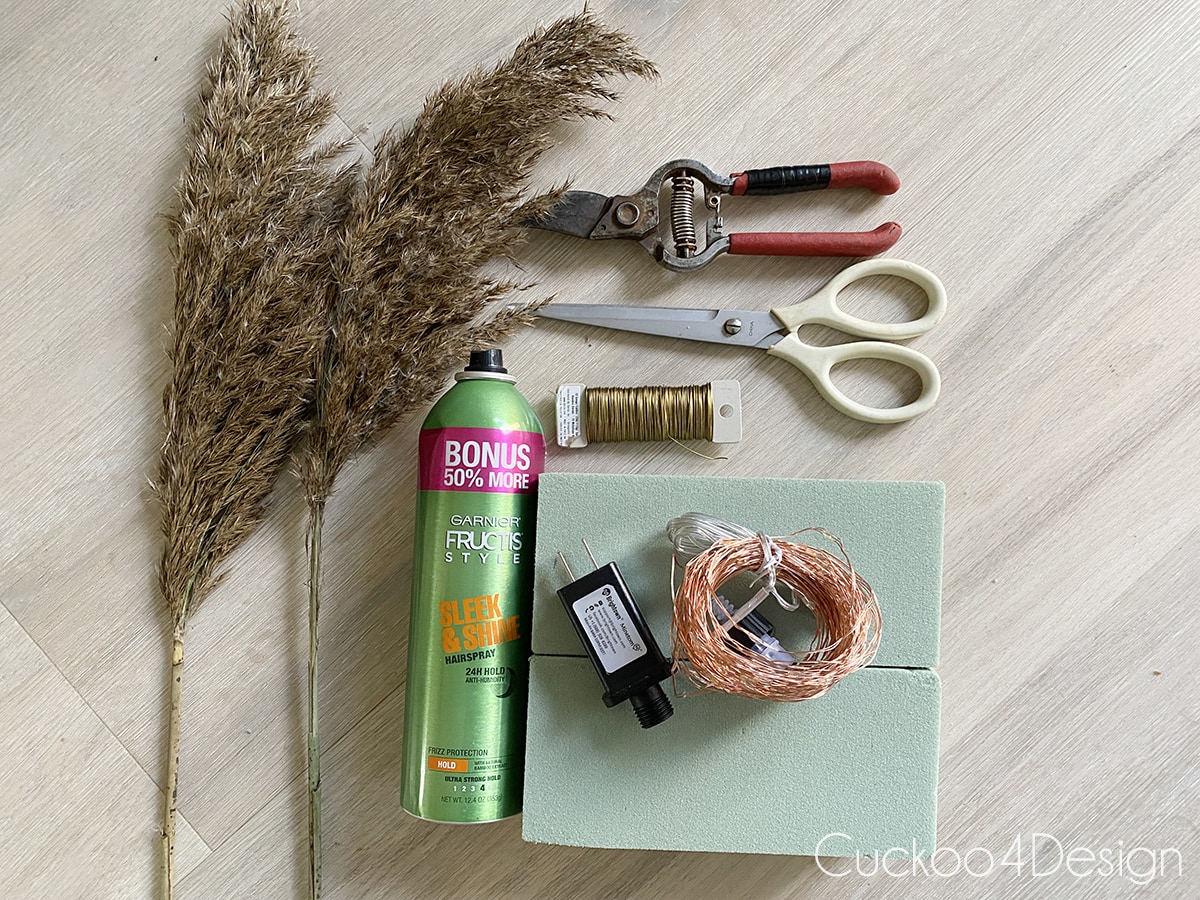
Supplies needed to a pampas grass garland
- pampas grass or any other fluffy grass (example HERE)
- a variety of different dried grasses (optional)
- floral wire
- scissors
- floral foam blocks (styrofoam blocks)
- fairy lights (I love plug-in fairy lights since I can connect them to my Alexa or other timers)
- command hooks
- two rocks
- hairspray
- lighter grasses are optional (I bought this one HERE)
Tip: If you don’t have access to free grasses growing close to you, check out Facebook Marketplace. I have noticed several people selling bunches of the same grass I used for affordable prices.
Pampas grass garland video tutorial
If you want to make your own pampas grass garland, it will definitely help you if you watch my video to see how I constructed the entire garland. To watch the video, use the triangle on the image, and if it doesn’t load for you, then you can also watch it on my YouTube channel.
Step-by-step pampas grass garland instructions
I didn’t just want to make a thin strand of garland. I wanted mine to be thicker with more substance in certain areas. So it’s a combo of garland and dried floral arrangement.
If you want a thin garland then you can just use the one part of my tutorial to make a thin strand of pampas grass garland.
I don’t recommend this tutorial for an open fireplace to avoid a house fire. Also keep candles away from the pampas grass garland.
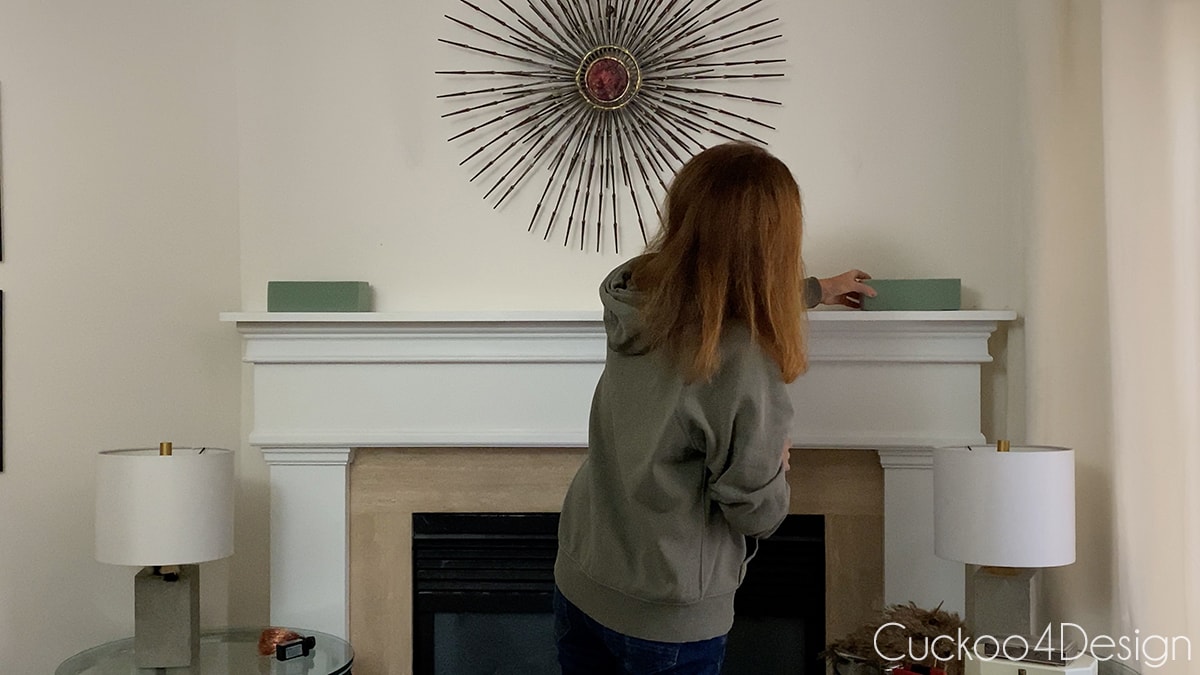
Step 1: Place your two foam blocks
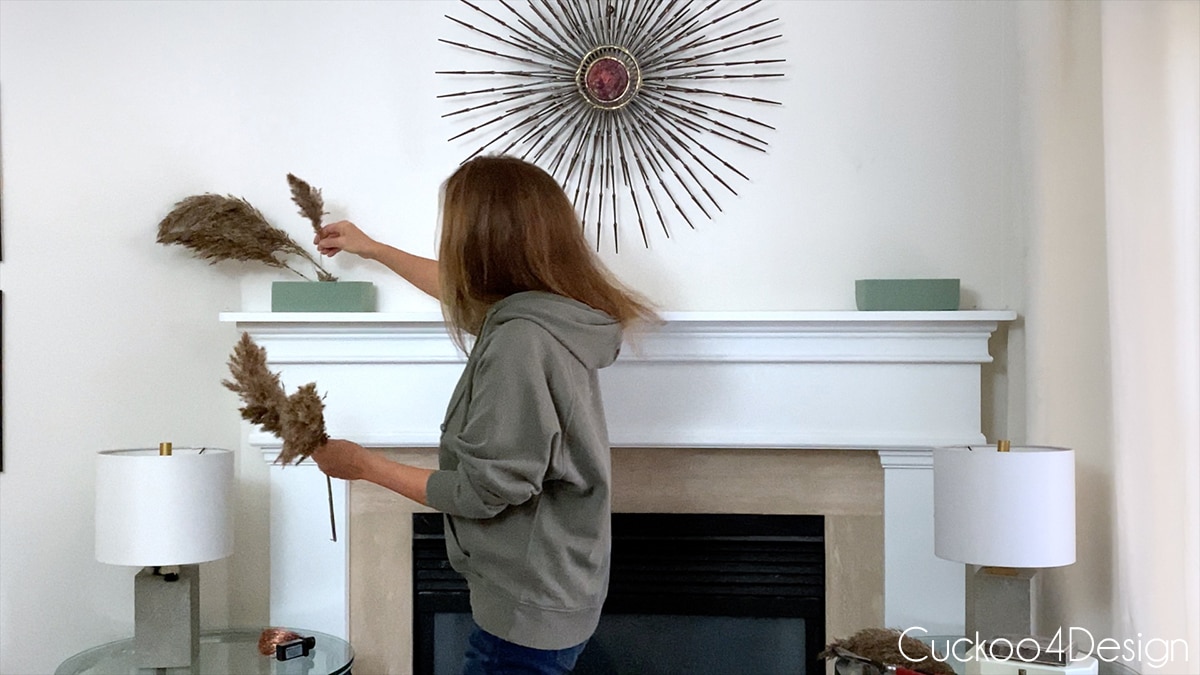
I started by placing two floral foam blocks on each side of the fireplace mantel. Make sure you still have some space on each side of the blocks, so you can stick grasses in that area.
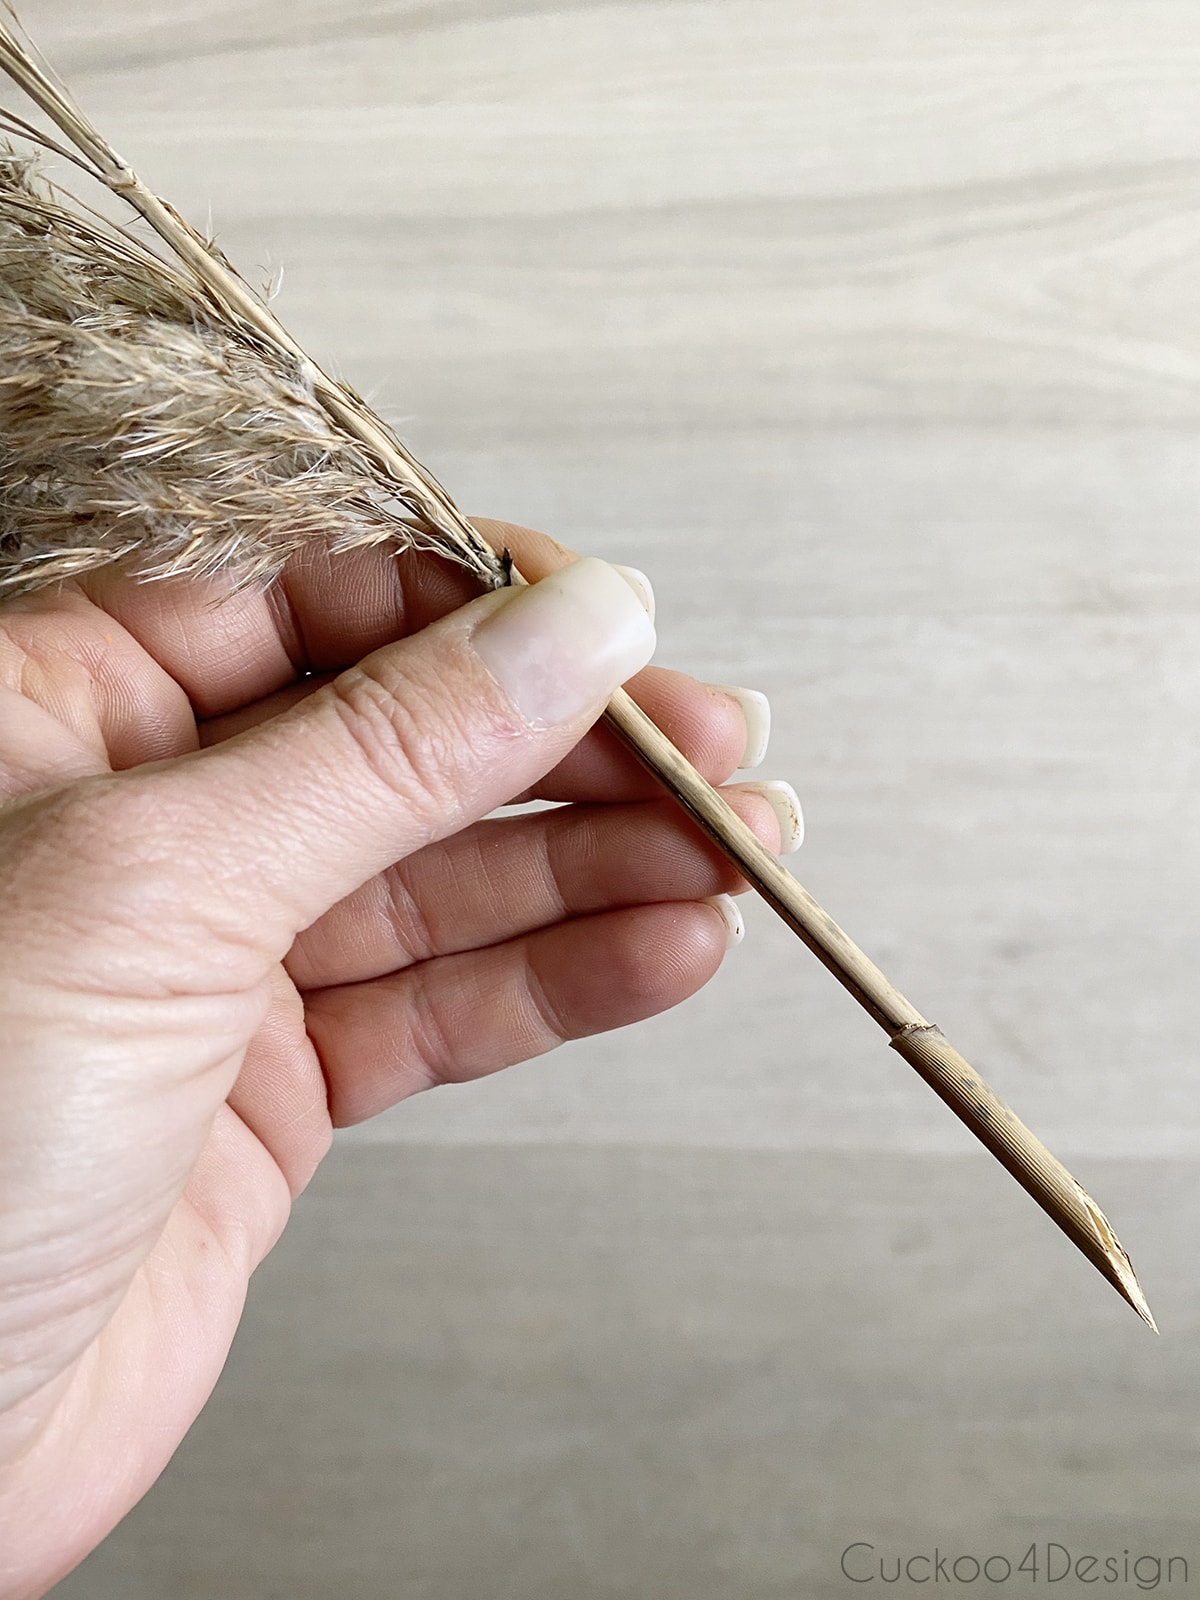
Step 2: Cut your grass stems at an angle
I cut the pampas grass stems at an angle so they are easier to insert into the floral foam blocks.
Step 3: Insert grasses into the foam blocks
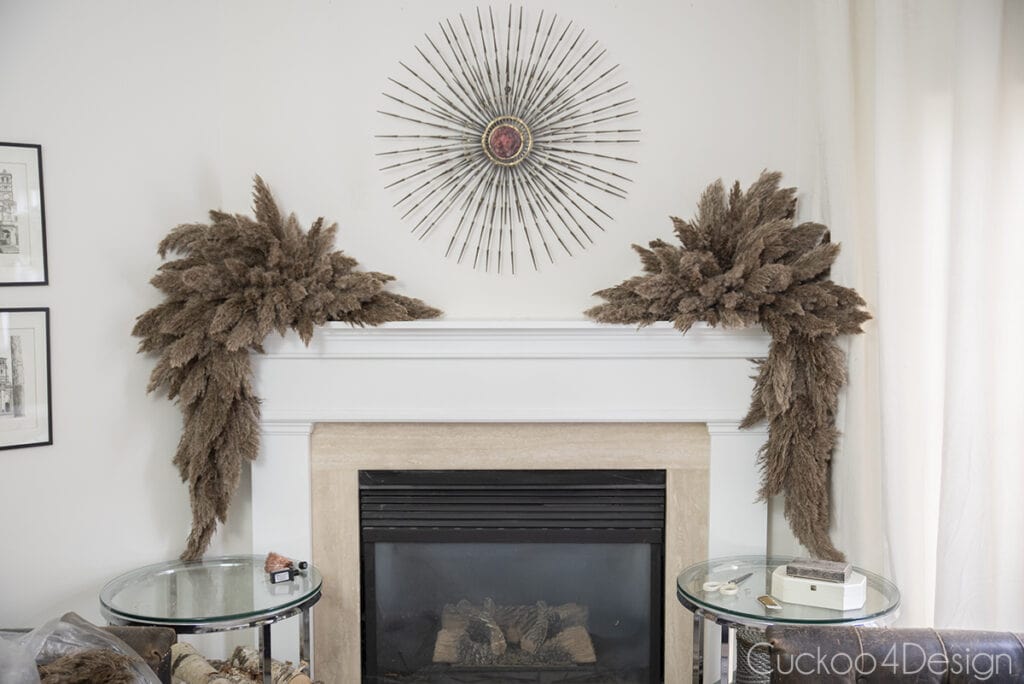
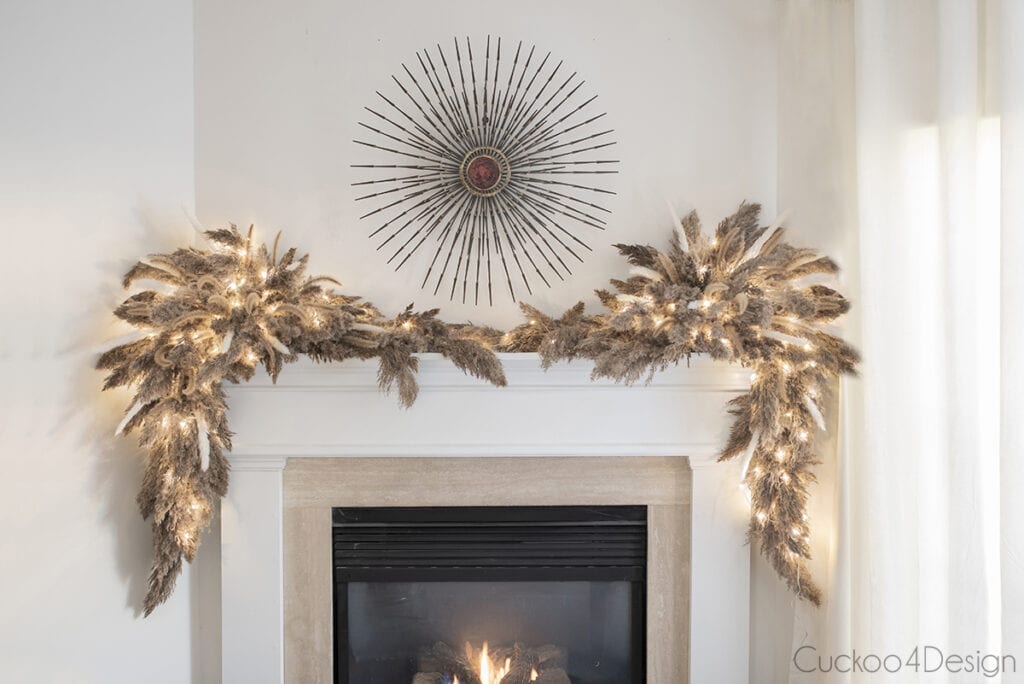
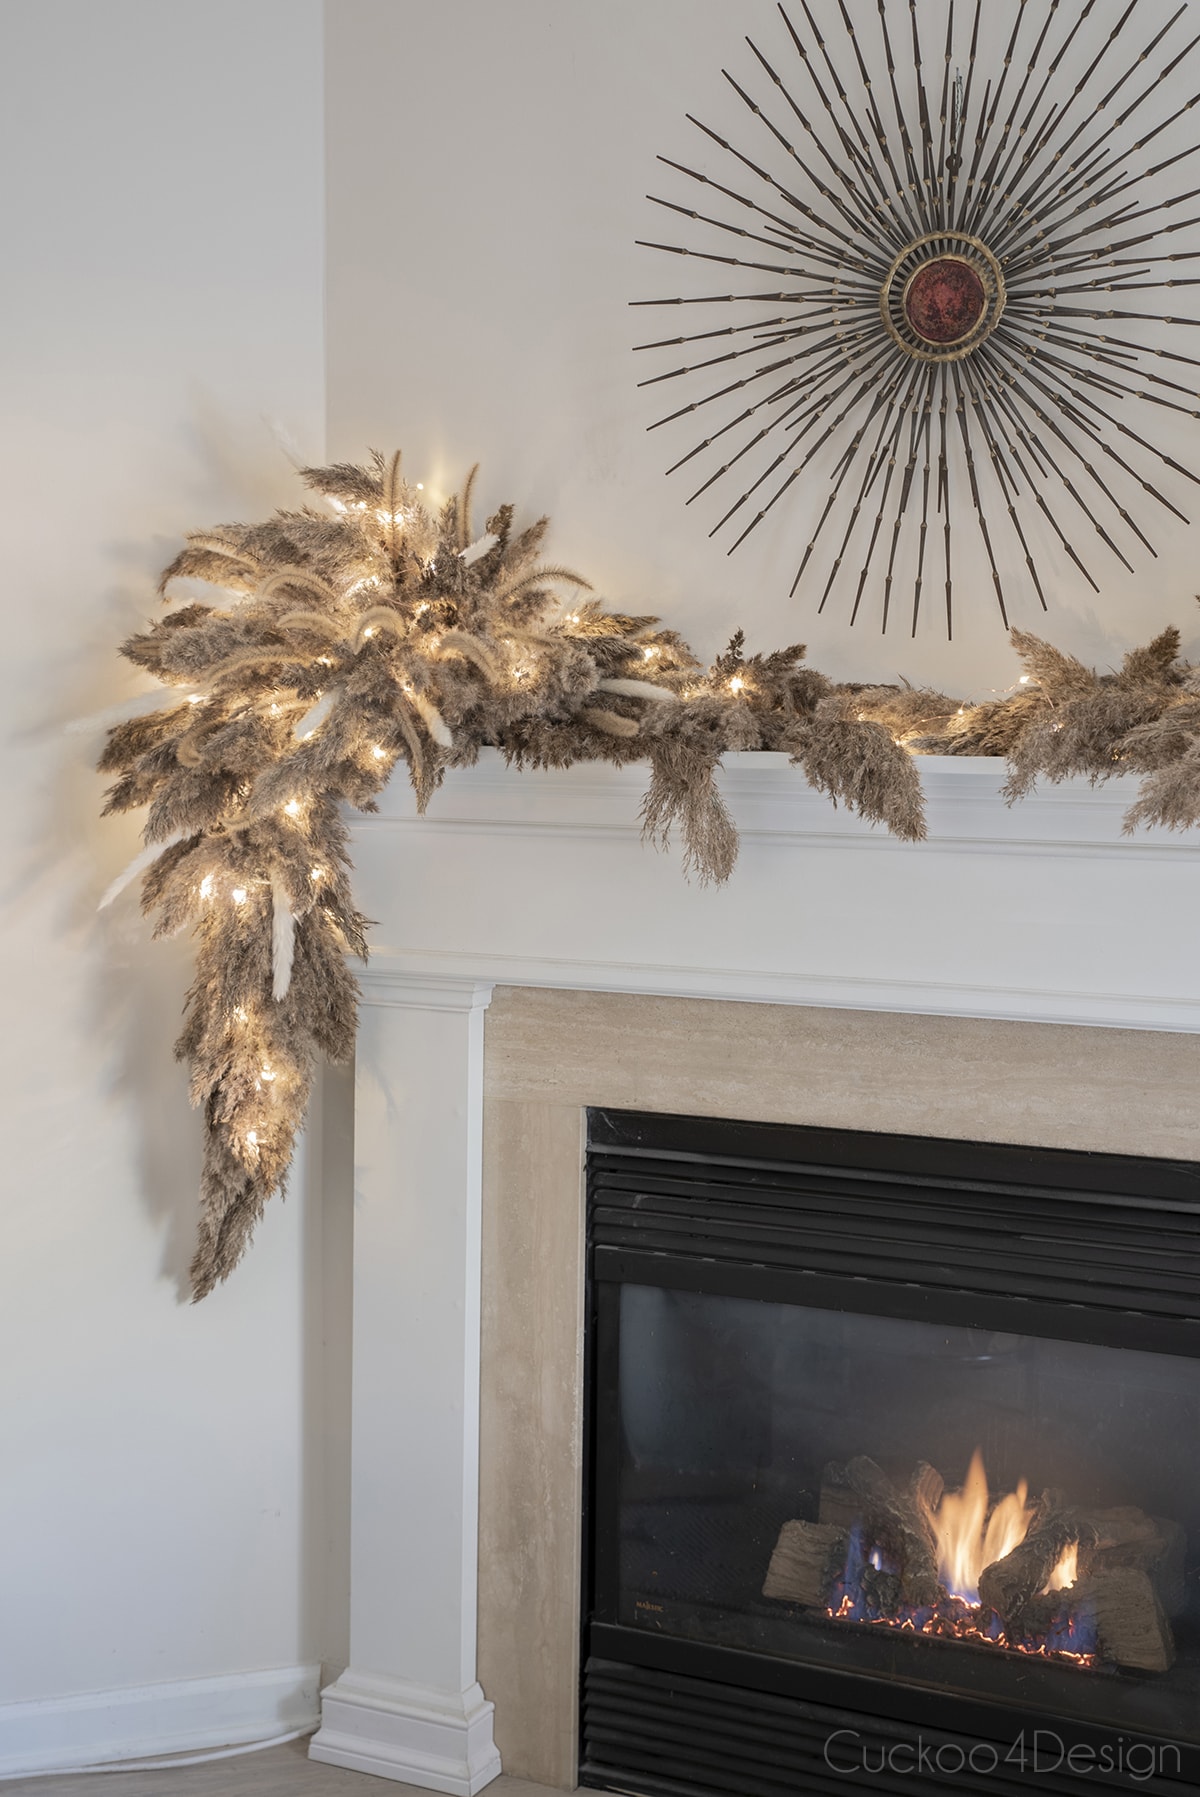
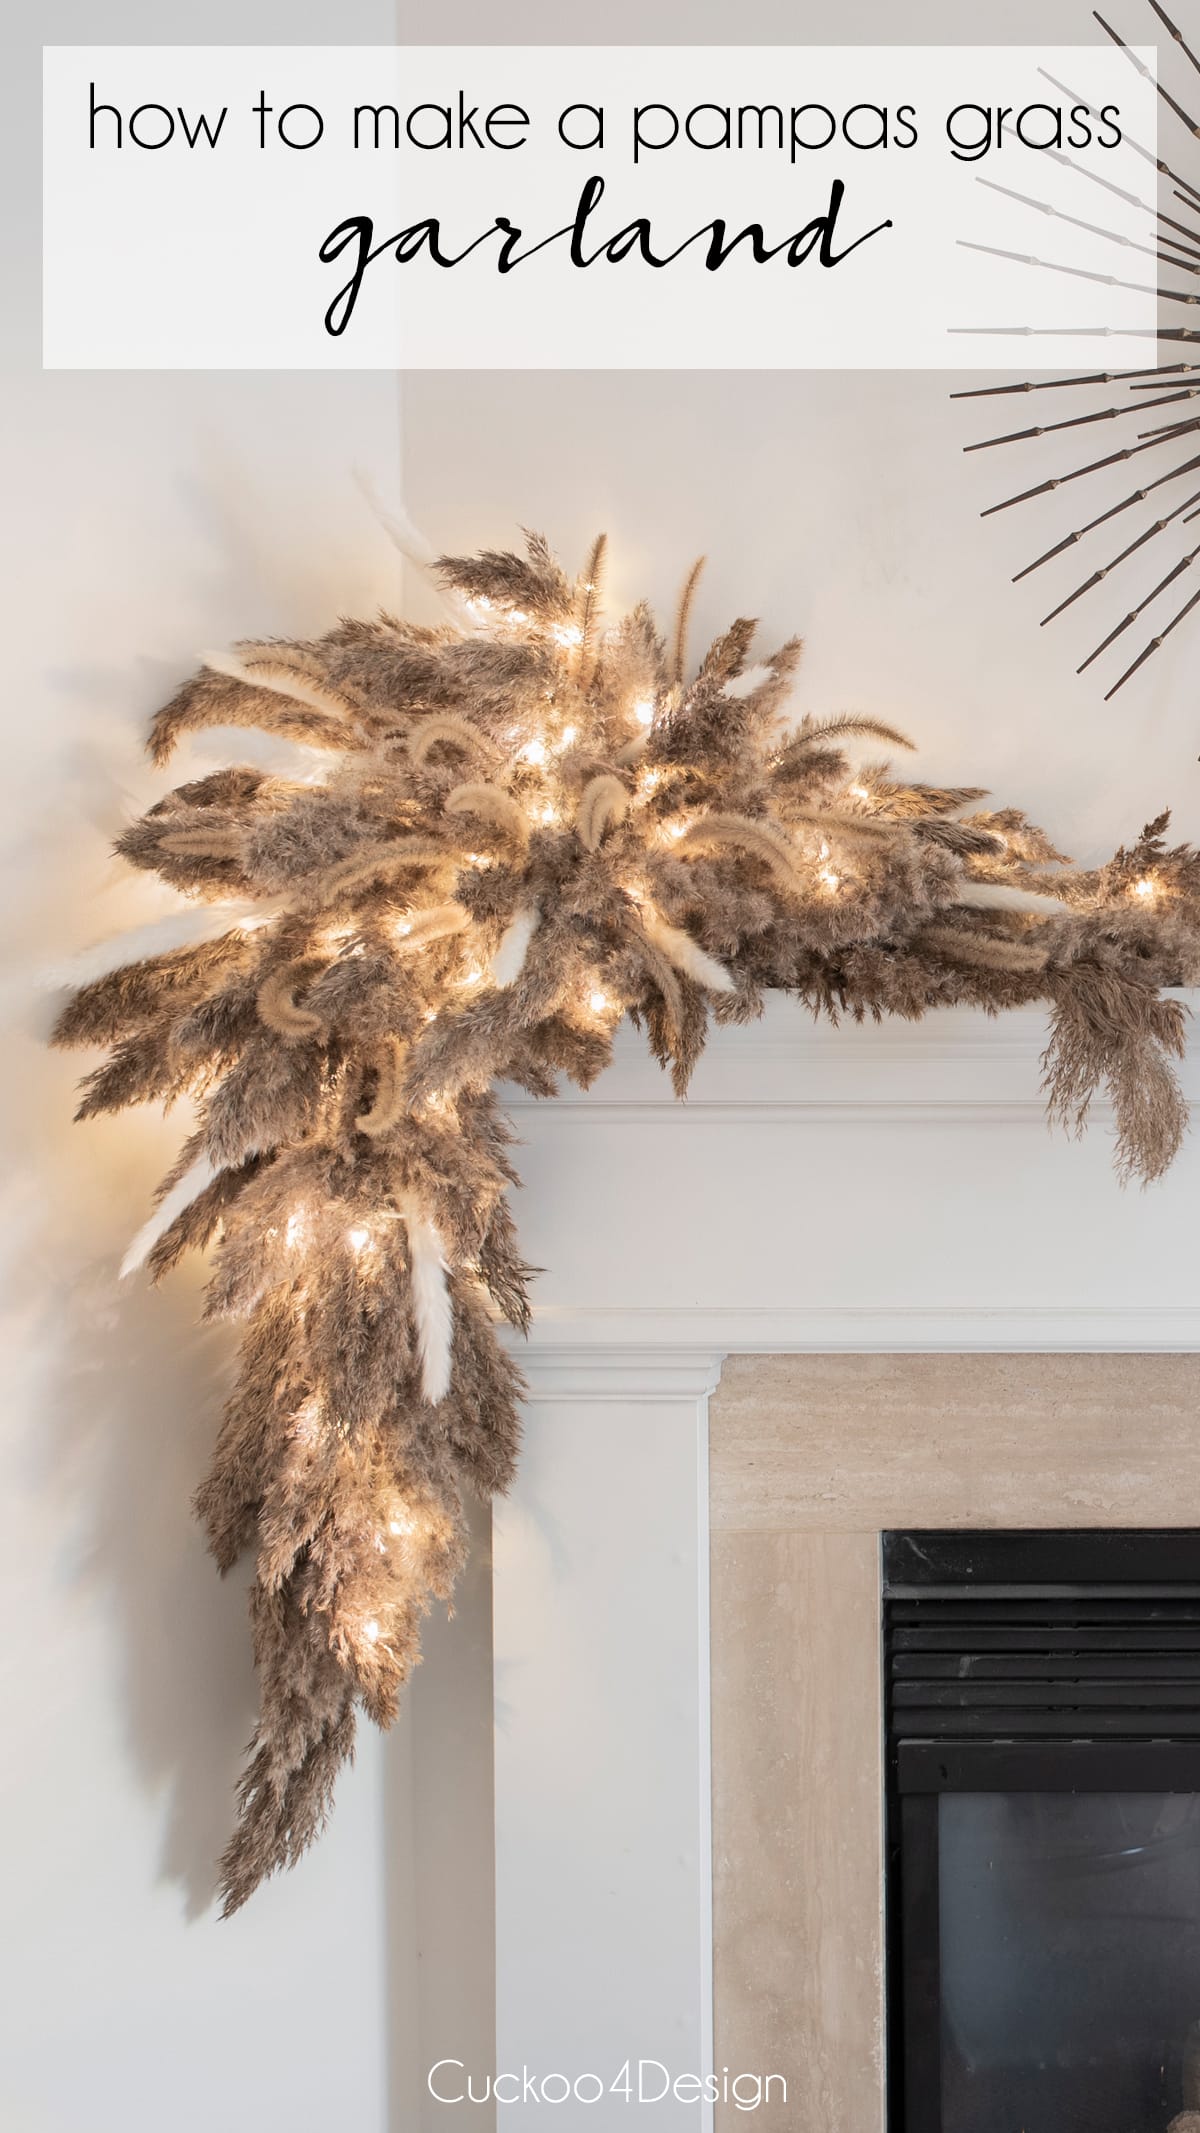
Then I started to insert them into the foam blocks. This is where I tried to figure out exactly what shape I wanted. I decided to work around the starburst shape that is currently hanging above the mantle but you can shape your garland any way you’d like.
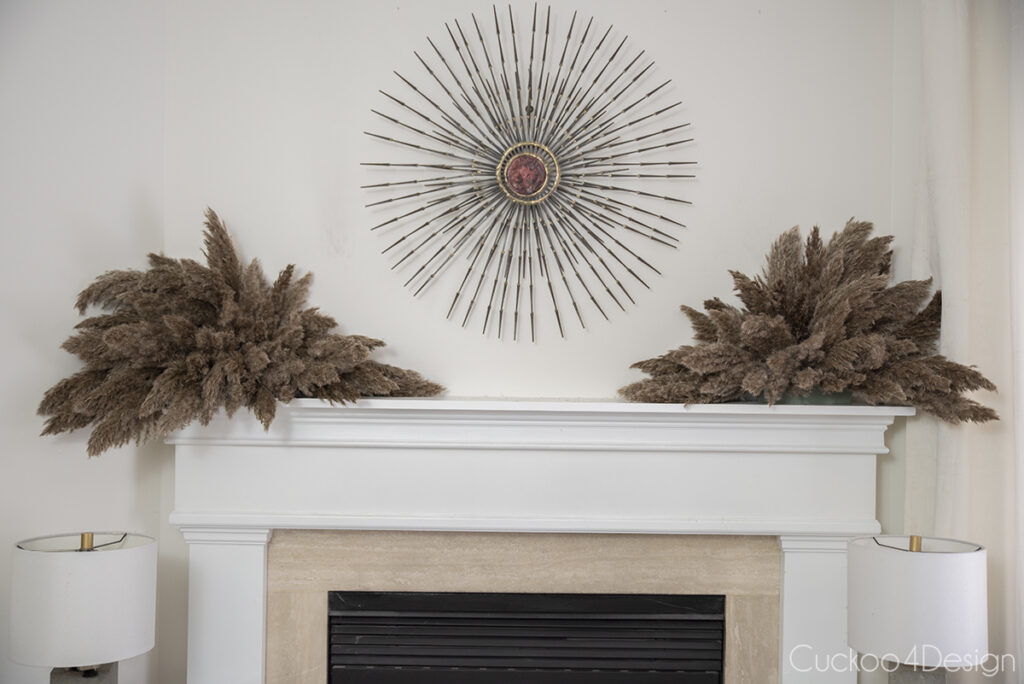
Below you can see what shape I settled on. These pampas grass swags would look great alone on the mantle, above a door frame, or as boho wedding decor.
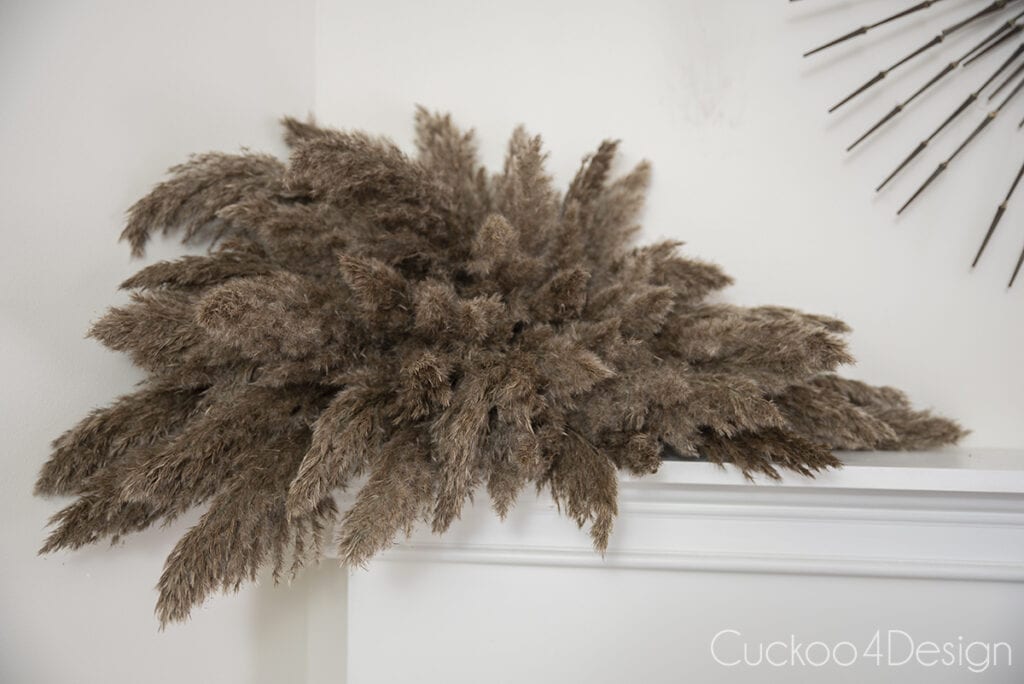
This is when I decided that it would be a good idea to place a rock on each foam block so they wouldn’t fall forward.
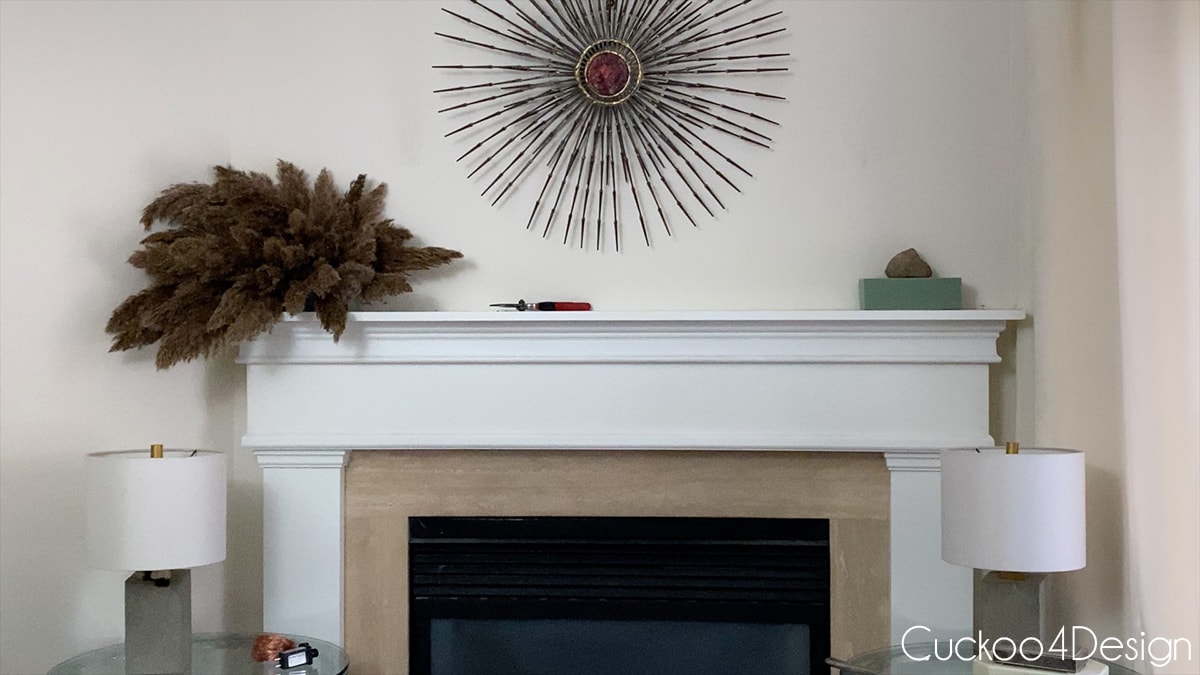
I replicated a similar shape for the right side of the garland.
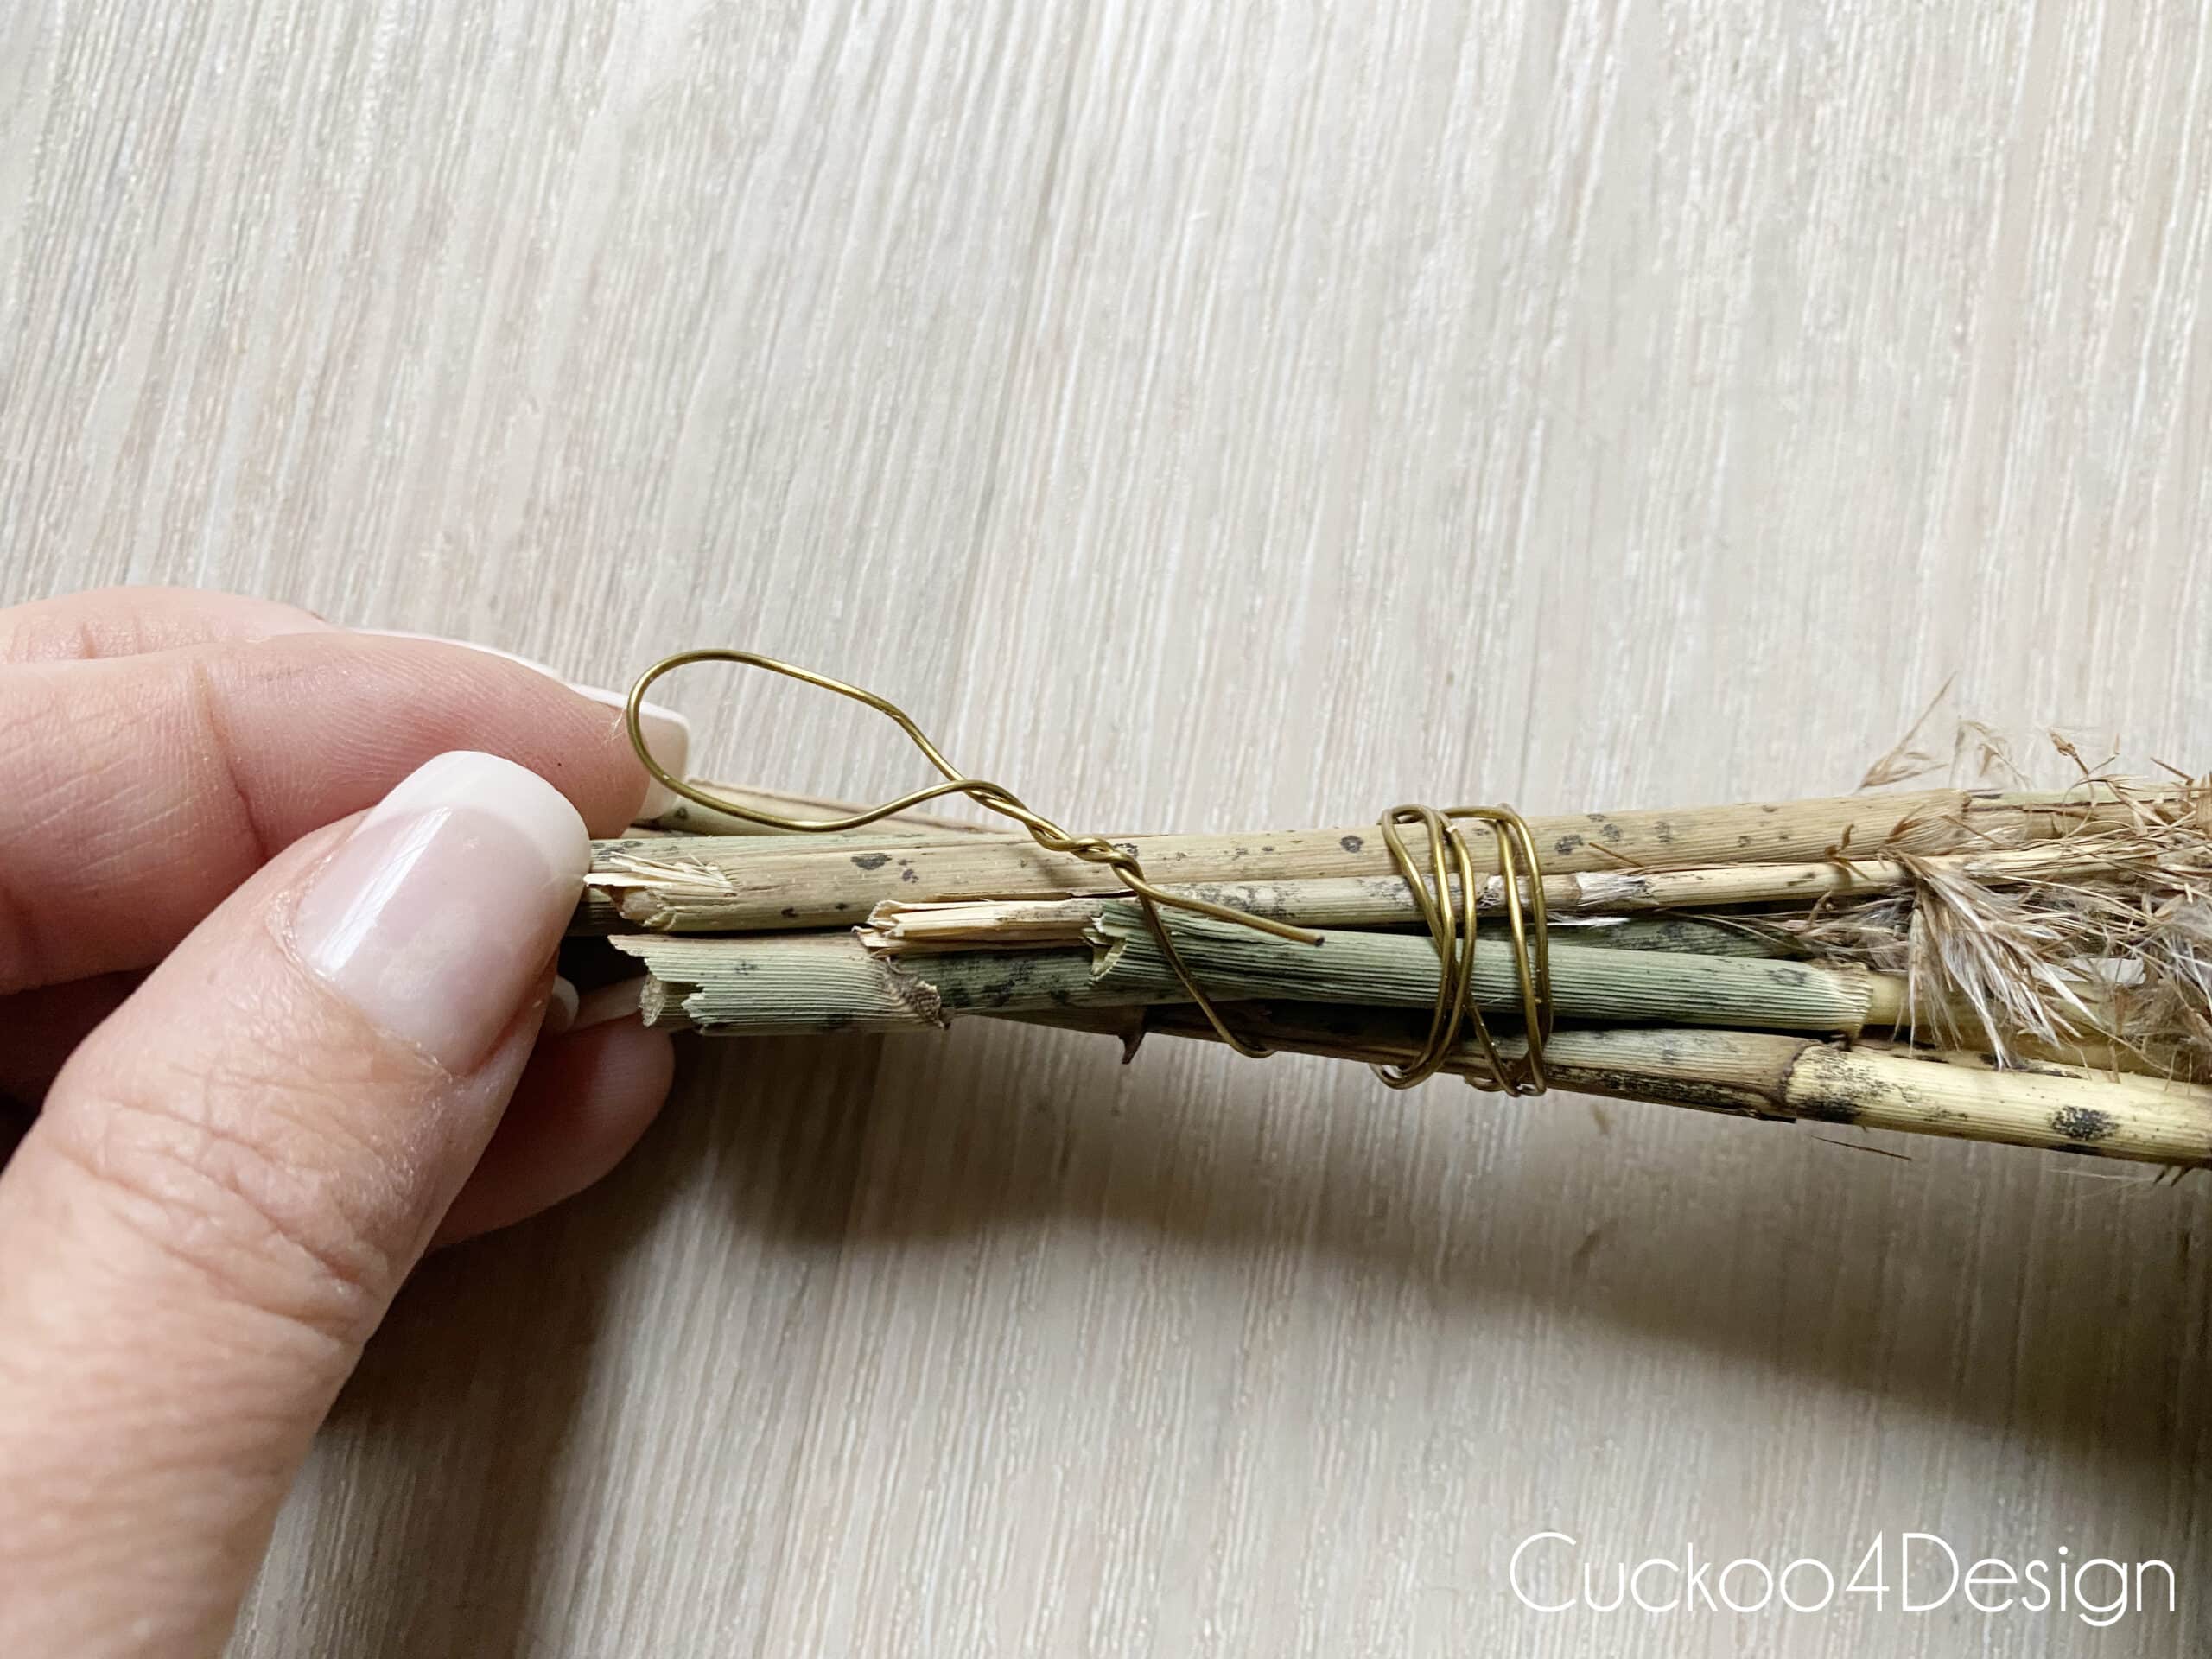
Step 4: Wrap the grasses to form a Garland
This is the step where the actual garland wrapping part with floral wire comes in place now. Like I said at the beginning of this tutorial. You could skip the swag part and just make a really long garland the way I wrapped the stems below and in the video.
Or you could make the garland part hit the floor. For me, that was a bit too much since I have side tables that would be in the way of the garland hitting the floor.
Simply keep adding more pampas grass stems and move upwards by wrapping floral wire around the stems.
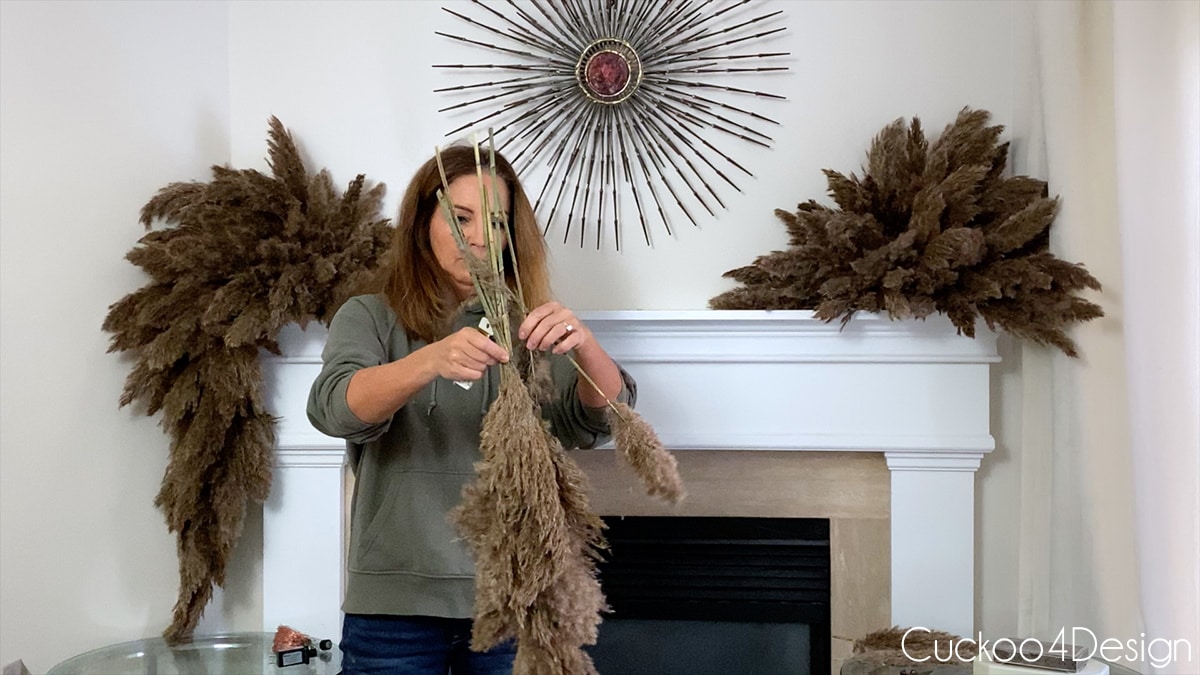
When I had the desired length of the garland, I formed a loop with the floral wire.
Step 5: Hang the garland
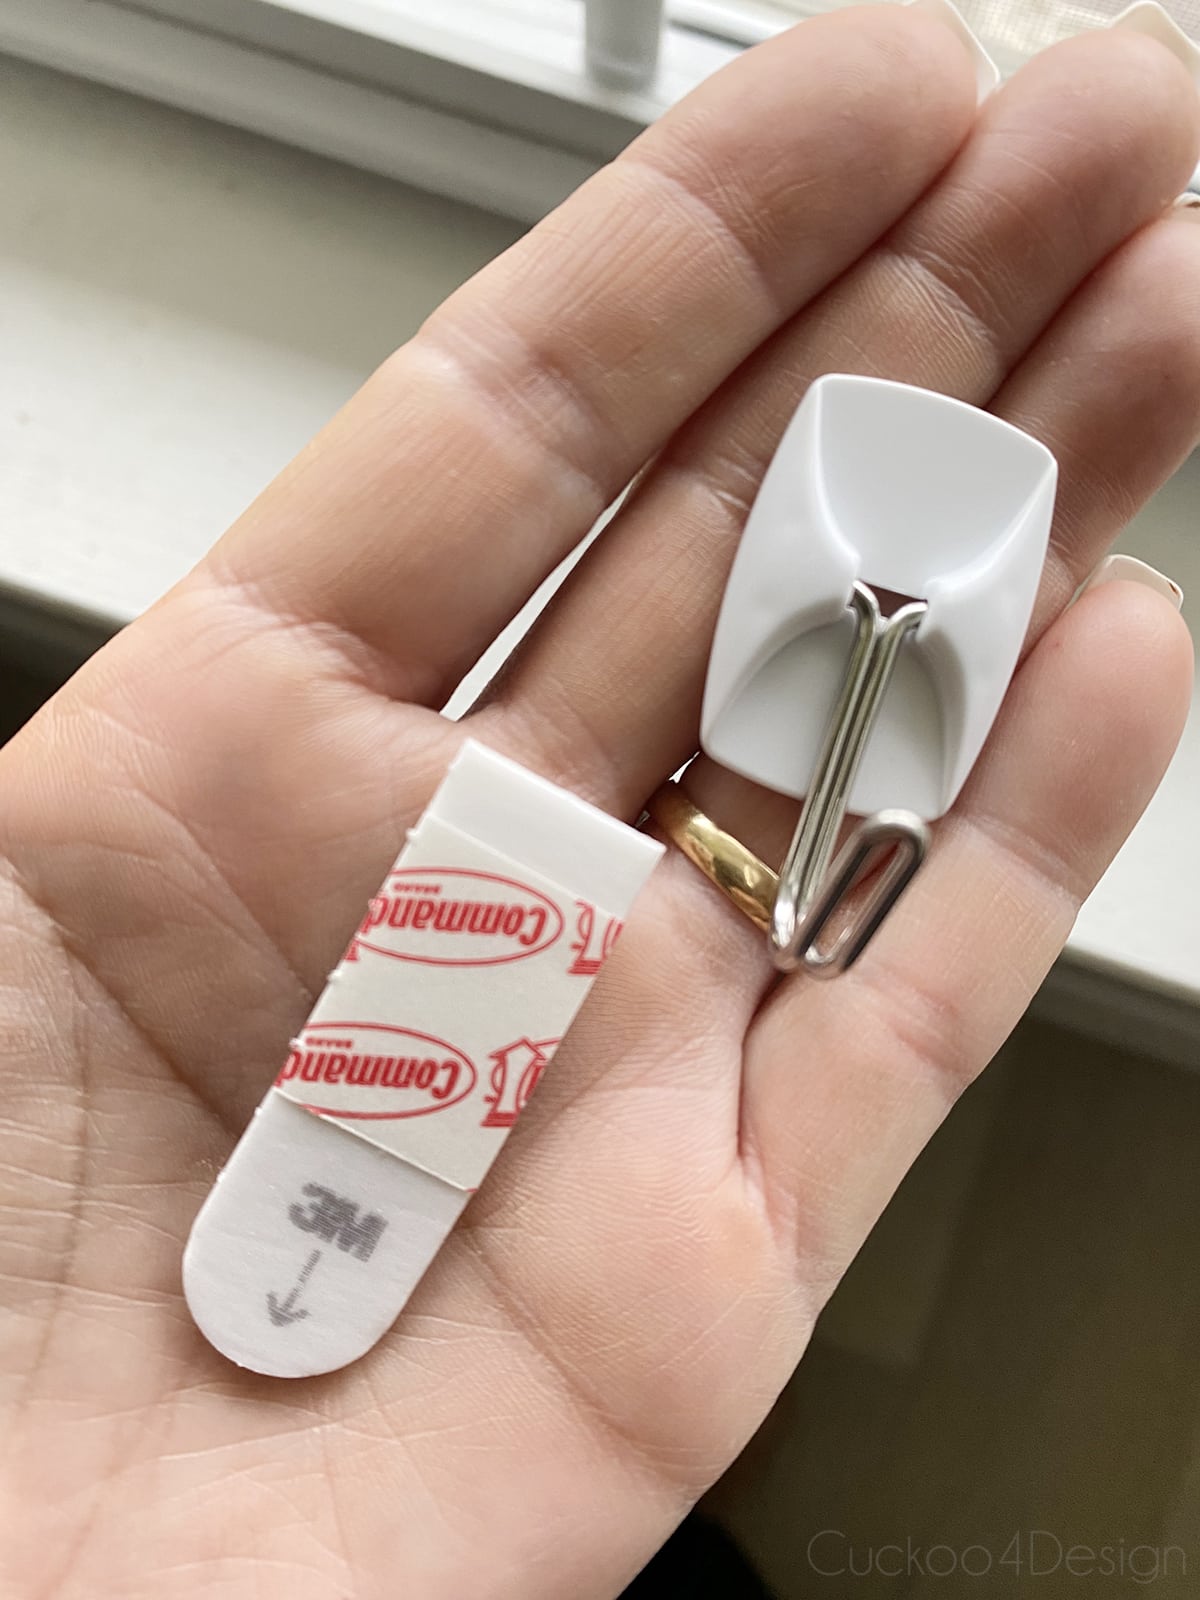
I used the metal and plastic command hooks below to hang the garland. I’m sure others will work as well.
In front of the foam blocks, I stuck a command hook on each side as well. Sorry, I don’t have a photo of where exactly, because I forgot, and mine were already there because I had a wood bead garland hanging on the mantle before.
Use the wire loop to hang the garland pieces onto both corners of the mantle from the command hooks.
Below you can see both sides of the pampas grass garland hanging down.
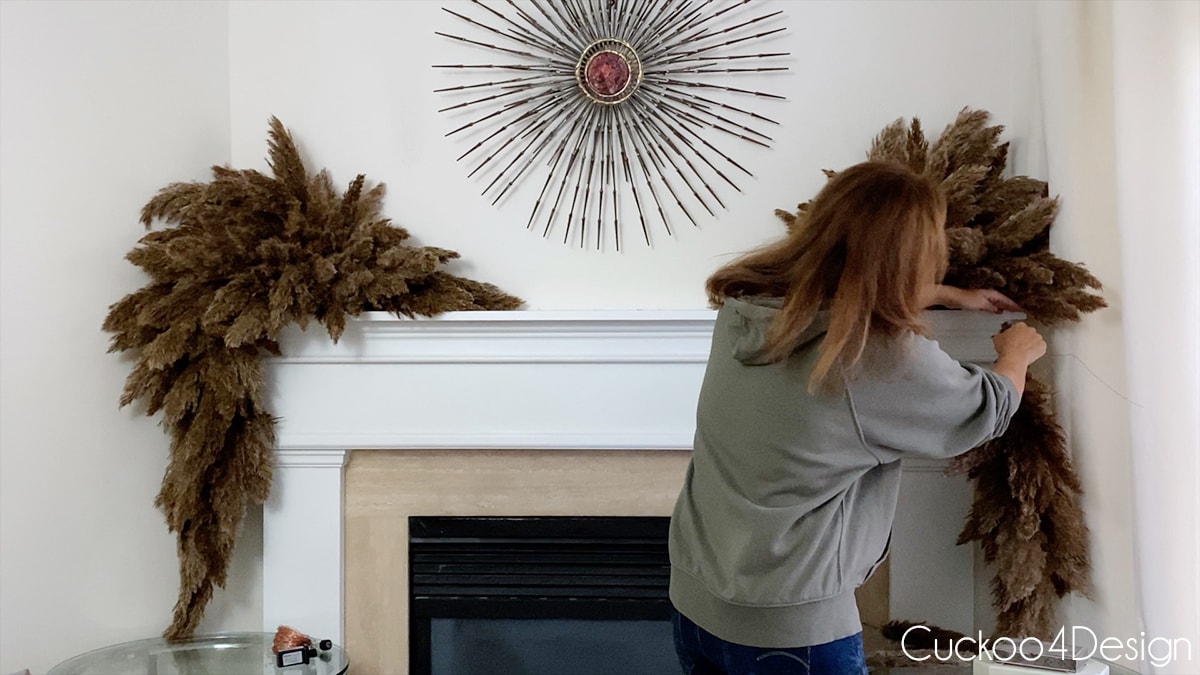
Step 6: Connect the two pampas grass swags in the center
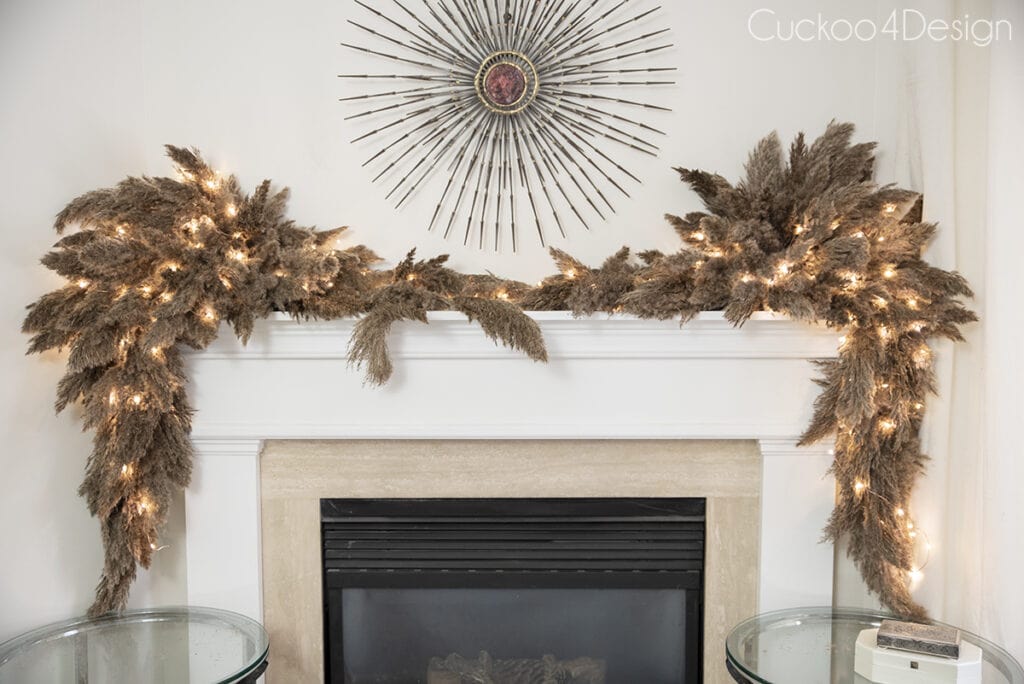
All I had left to do was connect the middle. It looks pretty as well if you leave the two swags the way they are in the above photo, but I wanted to connect them as an entire garland so I could place fairy lights on the entire fireplace mantle.
The fair lights are a much better option than standard traditional Christmas lights because they are light and don’t get hot.
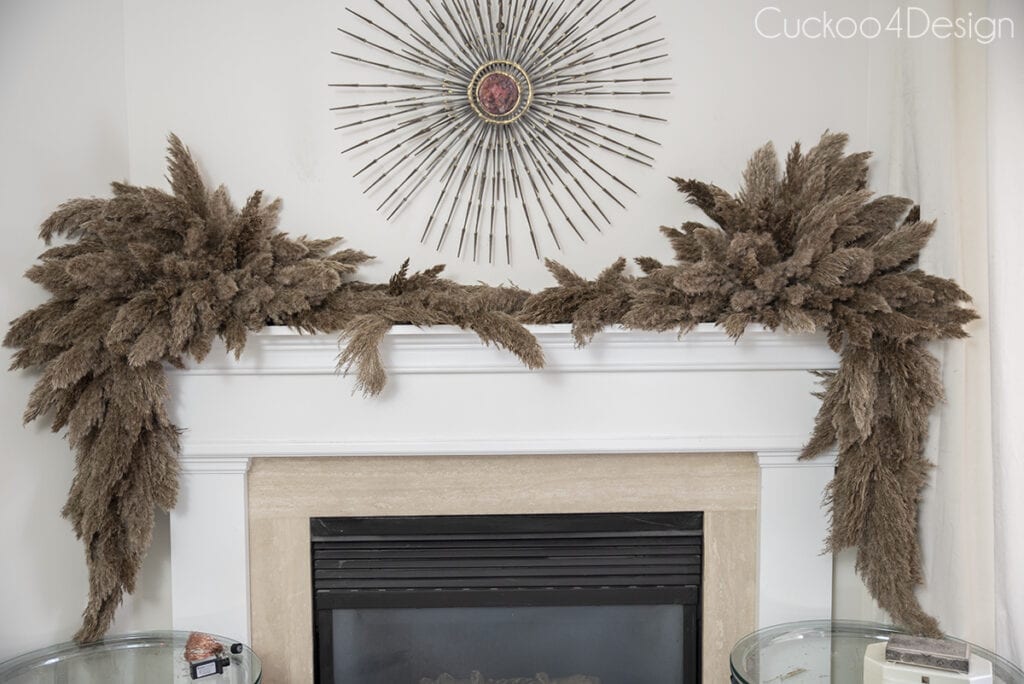
This garland and the shape remind me a bit of angel wings, which is another reason I love it so much. I’m a sucker for symmetry, but you can definitely make it look more asymmetrical.
Steps 7: Add fairy lights (optional)
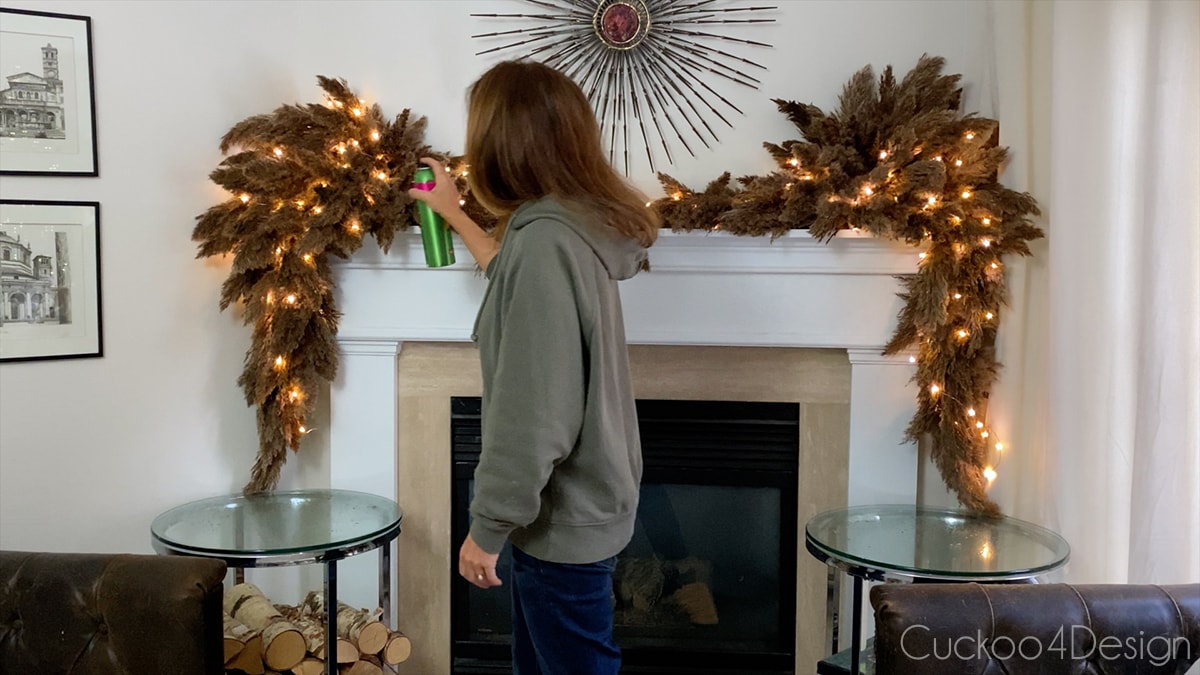
I added the fairy lights to the pampas grass garland before setting it all with a good coating of hairspray.
Step 8: Coat the pampas grass garland in strong hairspray
Adding strong hairspray helps prevent the garland from shedding. I was careful not to get it all over my walls and furniture.
Step 9: Add some other decorative grasses for added texture (optional)
Lastly, I added some different, lighter dried grasses to the garland, and you can see that, combined with the fairy lights, it makes a drastic change in texture and lighting. I love it!
I can picture this pampas grass garland over a door frame, at a wedding altar, or as a table centerpiece.
RELATED: Are you looking for more floral inspiration? Check out my beautiful DIY fall flower arrangement ideas to make at home, or my affordable flower arrangement ideas.
Photos of finished pampas grass garland for our fireplace mantle
This post may contain affiliate links from which I will earn a commission at no extra cost to you. View my full disclosure policy.
As I mentioned earlier, the fairy lights definitely help with making the grass look lighter. It is best to cut the grass late in the season when the seeds are gone.
Below is a photo of our decorated fireplace area in our living room. I love the cozy feel.
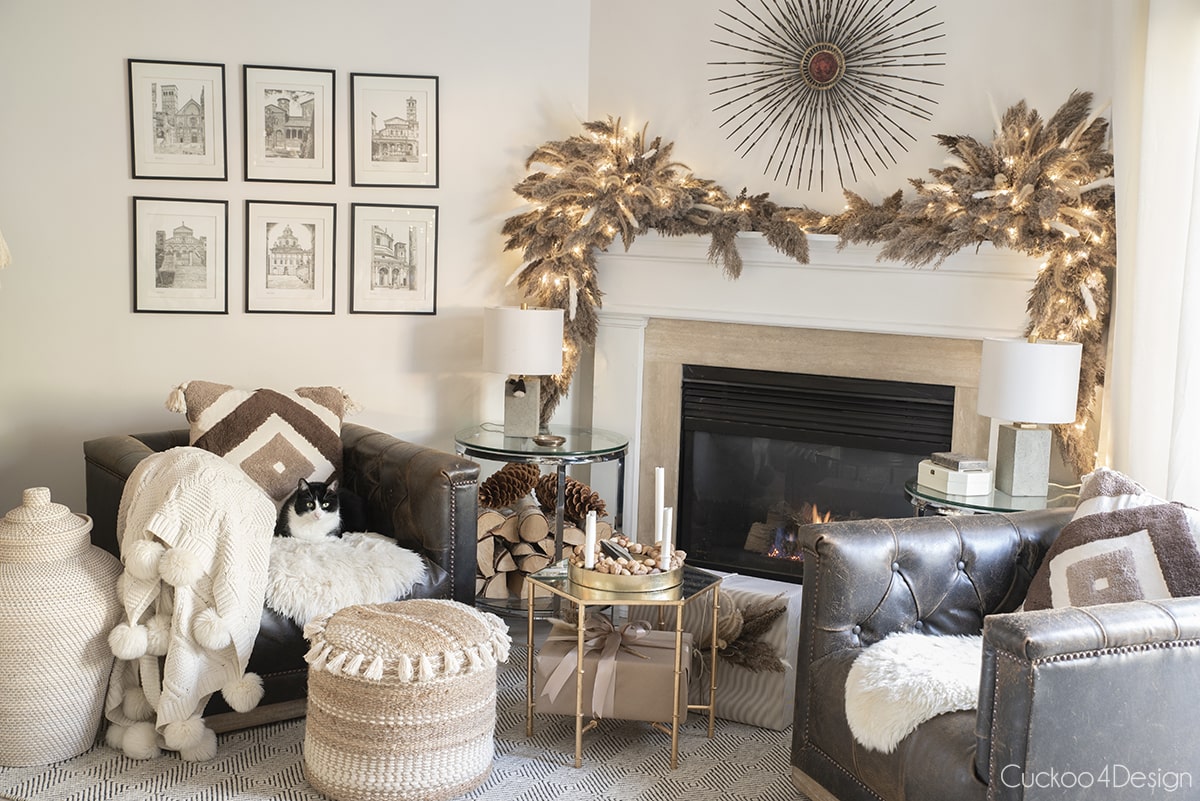
Another idea is to place feathers, like I did in my dried floral Christmas tree, or different shiny ball ornaments.
RELATED: If you like decorating with natural materials as much as I do, then you might also like my DIY corn husk bats (for Halloween) or my DIY seashell flowers and DIY seashell tassels, which I have used for summer and Christmas decor.
I have to mention my dried floral Christmas tree again (pictured above, so you can see the look of added feathers) and my DIY pampas grass Christmas tree (pictured below)
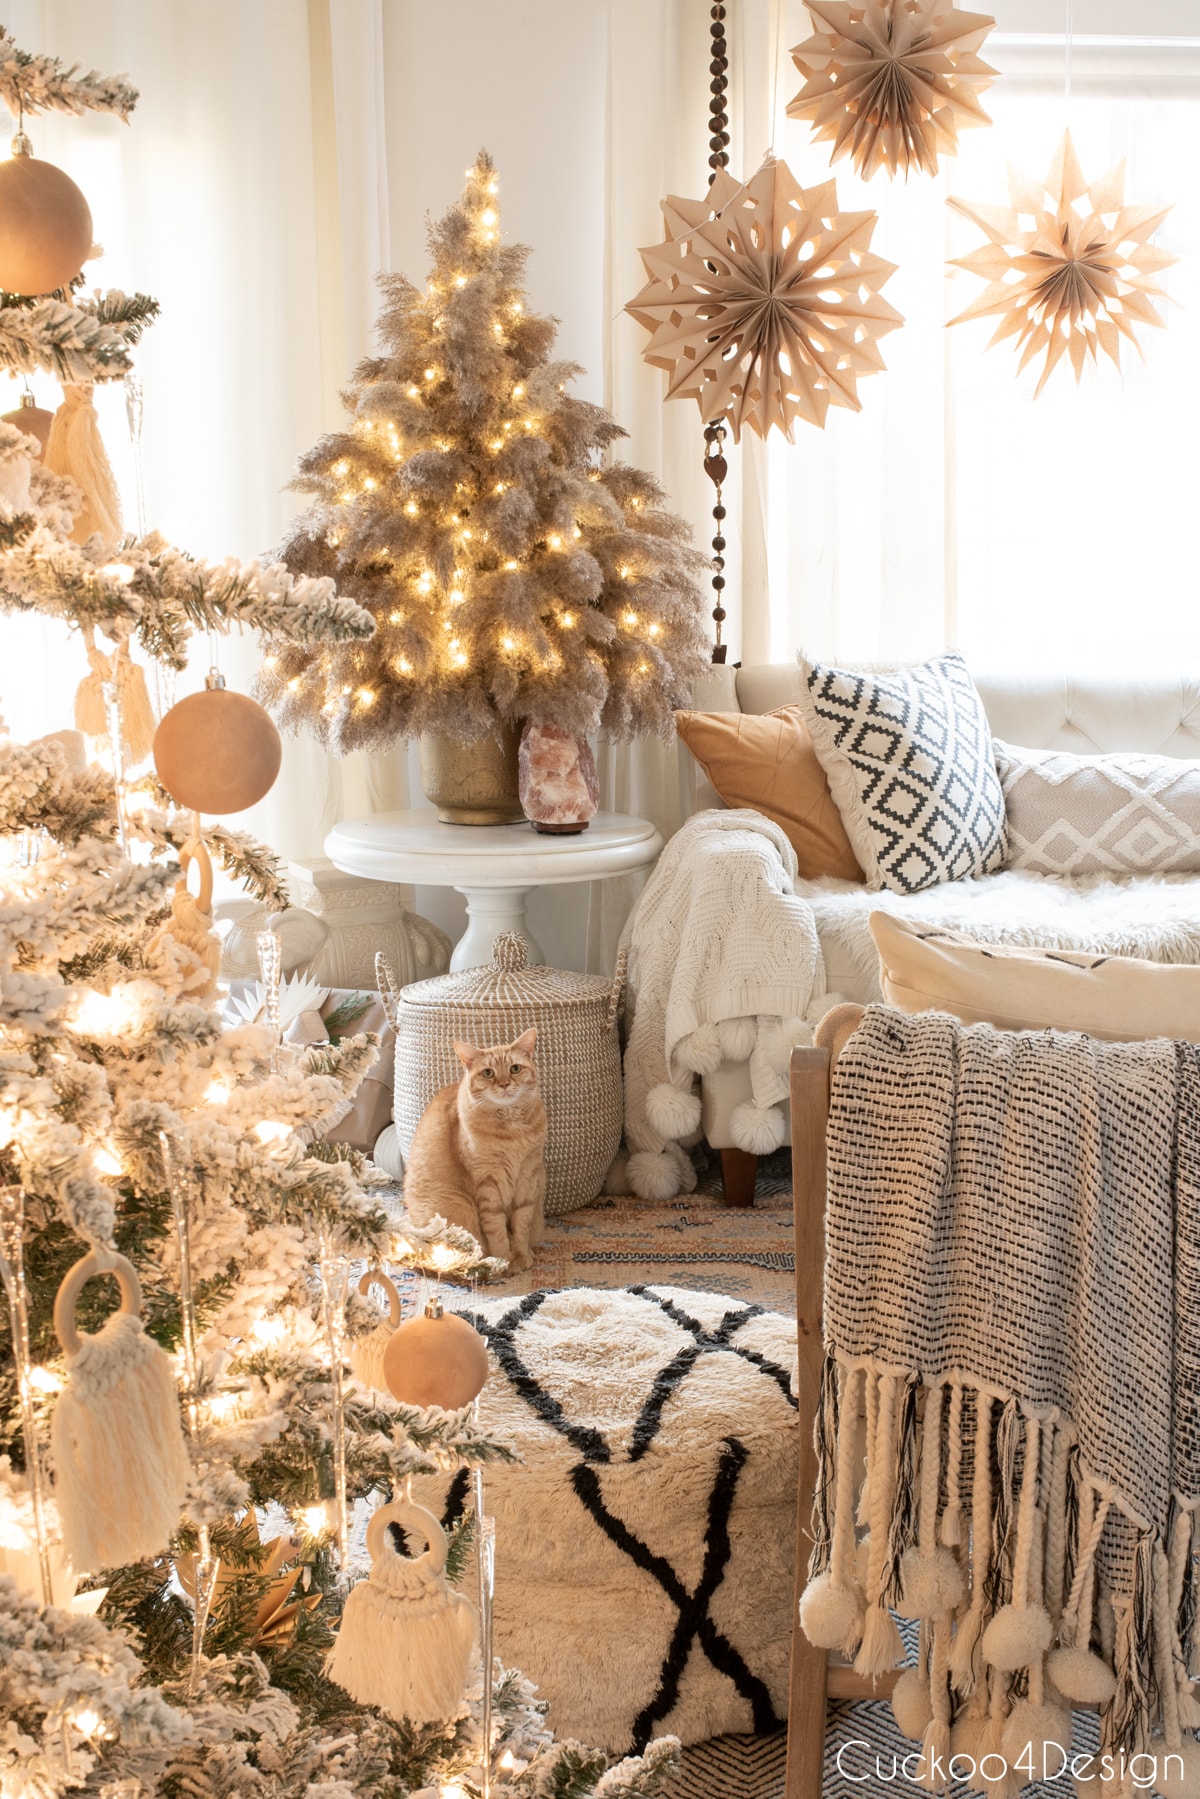
You might also like my paper bag snowflakes (pictured above) or my DIY dried flower Christmas ornaments, also using pampas grass (pictured below).

If you love garlands as much as I do, then also check out my easy macrame garland tutorial and rope tassel garland.
I hope you enjoyed this easy tutorial. You could also use this pampas grass tutorial as wedding decor. I’ve seen it done before and love the look so much.
Tschüß,


How to make a pampas grass garland
In this tutorial, I am showing how I made a pampas grass garland for our fireplace with fluffy grasses found outside for a festive boho look.
Materials
- pampas grass or any other fluffy grass
- a variety of different dried grasses (optional)
- floral wire
- floral foam blocks
- fairy lights
- command hooks
- two rocks
- hairspray
- lighter grasses are optional
Tools
- scissors
Instructions
- Place your two foam blocks
I started by placing two floral foam blocks on each side of the fireplace mantel. Make sure you still have some space on each side of the blocks, so you can stick grasses in that area.
- Cut your grass stems at an angle
I cut the pampas grass stems at an angle so they are easier to insert into the floral foam blocks.
- Insert grasses into the foam blocks
Then I started to insert them into the foam blocks. This is where I tried to figure out exactly what shape I wanted. I decided to work around the starburst shape that is currently hanging above the mantle, but you can shape your garland any way you'd like.
Below you can see what shape I settled on.
This is when I decided that it would be a good idea to place a rock on each foam block so they wouldn't fall forward.
I replicated a similar shape for the right side of the garland. - Wrap the grasses to form a Garland
This is the step where the actual garland wrapping part with floral wire comes in place. Like I said at the beginning of this tutorial. You could skip the swag part and just make a really long garland the way I wrapped the stems below and in the video.
Or you could make the garland part hit the floor. For me, that was a bit too much since I have side tables that would be in the way of the garland hitting the floor.
Simply keep adding more pampas grass stems and move upwards by wrapping floral wire around the stems.
When I had the desired length of the garland, I formed a loop with the floral wire.
- Hang the garland
I used the metal and plastic command hooks below to hang the garland. I'm sure others will work as well.
In front of the foam blocks, I stuck a command hook on each side as well. Sorry, I don't have a photo of where exactly, because I forgot, and mine were already there because I had a wood bead garland hanging on the mantle before.
Use the wire loop to hang the garland pieces onto both corners of the mantle from the command hooks.
Below you can see both sides of the pampas grass garland hanging down. - Connect the two pampas grass swags in the center
All I had left to do was connect the middle. It looks pretty as well if you leave the two swags the way they are in the above photo, but I wanted to connect them as an entire garland so I could place fairy lights on the entire fireplace mantle.
The fair lights are a much better option than standard traditional Christmas lights because they are light and don't get hot.
This garland and the shape remind me a bit of angel wings, which is another reason I love it so much. I'm a sucker for symmetry, but you can definitely make it look more asymmetrical. - Add fairy lights (optional)
I added the fairy lights to the pampas grass garland before setting it all with a good coating of hairspray. - Coat the pampas grass garland in strong hairspray
Adding strong hairspray helps prevent the garland from shedding. I was careful not to get it all over my walls and furniture. - Add some other decorative grasses for added texture (optional)
Lastly, I added some different, lighter dried grasses to the garland, and you can see that, combined with the fairy lights, it makes a drastic change in texture and lighting. I love it!


Notes
- I don't recommend this tutorial for an open fireplace to avoid a house fire. Also, keep candles away from the pampas grass garland.
- These pampas grass swags and the entire pampas grass garland would look great alone on the mantle, above a door frame, or as boho wedding decor.
it looks so beautiful and so full!
🙂 thanks
Approximately how many stems did you need for each side of the mantle?
Hi Meg, that is very hard to say because I just kept going back and cutting more as needed. I’d have to say at least 40-50 for each side. It also depends on the size of you mantle.