

How to build a DIY stock tank pool with liner (original pioneer tutorial)
Building a DIY stock tank pool is easier than you think if you know the right way to do it. I learned through trial and error when we built ours with a pool liner in May 2019. After six years of daily summer use and harsh winters, here’s the complete tutorial: ground prep, liner installation, pump setup, bamboo wrap, and all-year-round seasonal maintenance. Everything we know and what I wish I’d known from the beginning.
This DIY stock tank pool with a pool liner was built before stock tank pools went viral during COVID, and we have 6+ years of experience caring for it. This blog post covers everything I learned over the years
(Disclosure: The Tractor Supply Company provided us with the stock tank and all opinions are as always 100% my own!)
Why we chose a stock tank pool for our sloped backyard
This post may contain affiliate links from which I will earn a commission at no extra cost to you. View my full disclosure policy.
For us, unfortunately, the bare steel didn’t work long-term so we had to alter the look, and here is why…
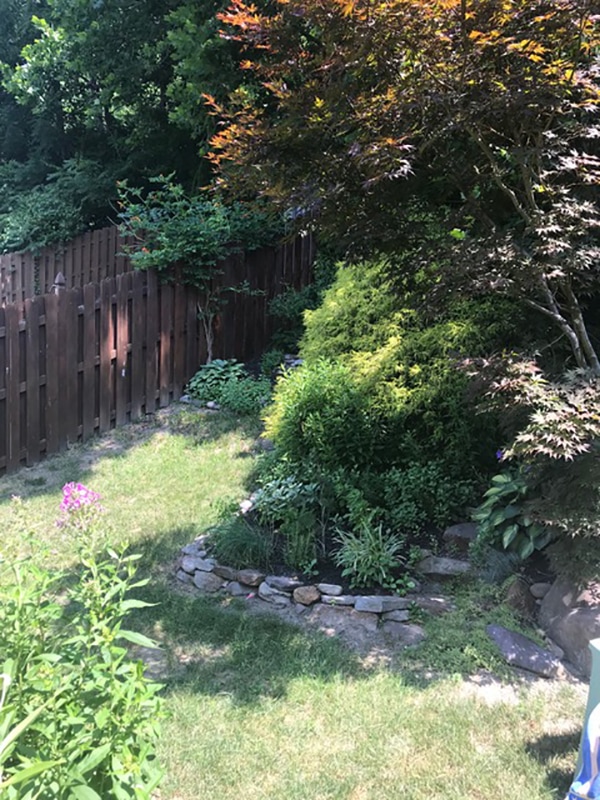
Our yard is all hill, sloping right after the patio. A landscaper once laughed at my pool request, saying no hand digging was possible and heavy equipment couldn’t fit. I was disappointed since I wanted a pool for my kids. A small inground pool wasn’t feasible, so I convinced my husband to dig. I even bought an 8-foot Intex pool, which we gave to neighbors. I kept seeing stock tank pools on social media and convinced my husband to dig. In early March, he finally started digging by himself as his evening workout for weeks. I knew the galvanized metal was strong enough to stand as a retaining wall.
Our kids aren’t little anymore, but that doesn’t change the fact that floating or sitting in water still sounds amazing, even if it is only the size of a kiddie pool.
Where do stock tank pools come from
They are repurposed livestock watering troughs, either made from galvanized metal or plastic.
Hey Wanderer pioneered stock tank pools, and I pioneered the pool liner stock tank method on the internet. When I published this in May 2019, there were no tutorials about using liners. I figured it out through trial and error. Then COVID hit, these pools went viral, and everyone started using liners.
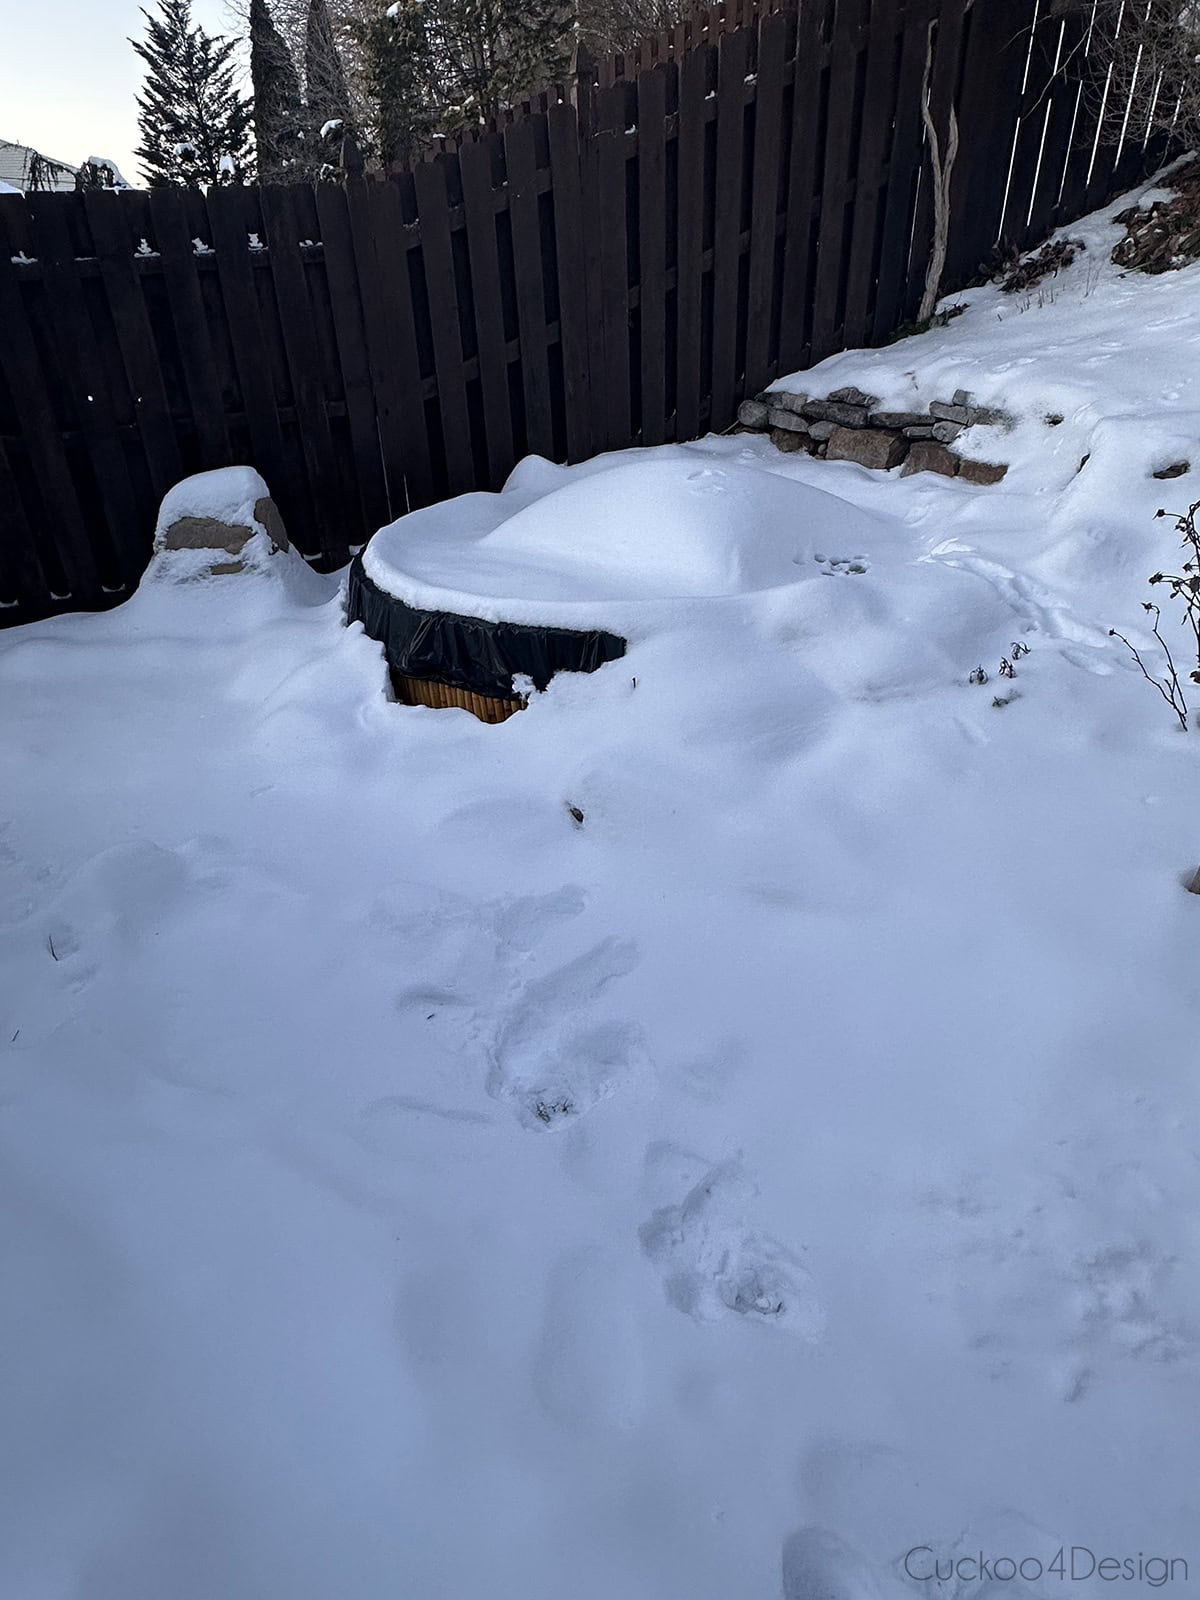
The difference? We’ve actually lived with ours since 2019 and can speak from years of experience now. This guide includes the real failures, the lessons learned, and what actually works long-term. Our stock tank pool with a pool liner gets used daily during summer and has to endure heavy winters, as you can see below.
Our sloped yard before we started
This is not a cheap project but for us, it was the only way of adding water to our sloped backyard. We had to go beyond the standard version of just plopping a stock tank on a leveled surface and adding a small pump.

What makes our stock tank pool different?
We had to find the best long-term solution. Unlike other free-standing stock tank pools that can be easily drained and refilled, ours is permanently placed in a hill, making future troubleshooting difficult. We opted for stone and rock for a natural retaining wall instead of a wooden deck. The rocks also function as a retaining wall.
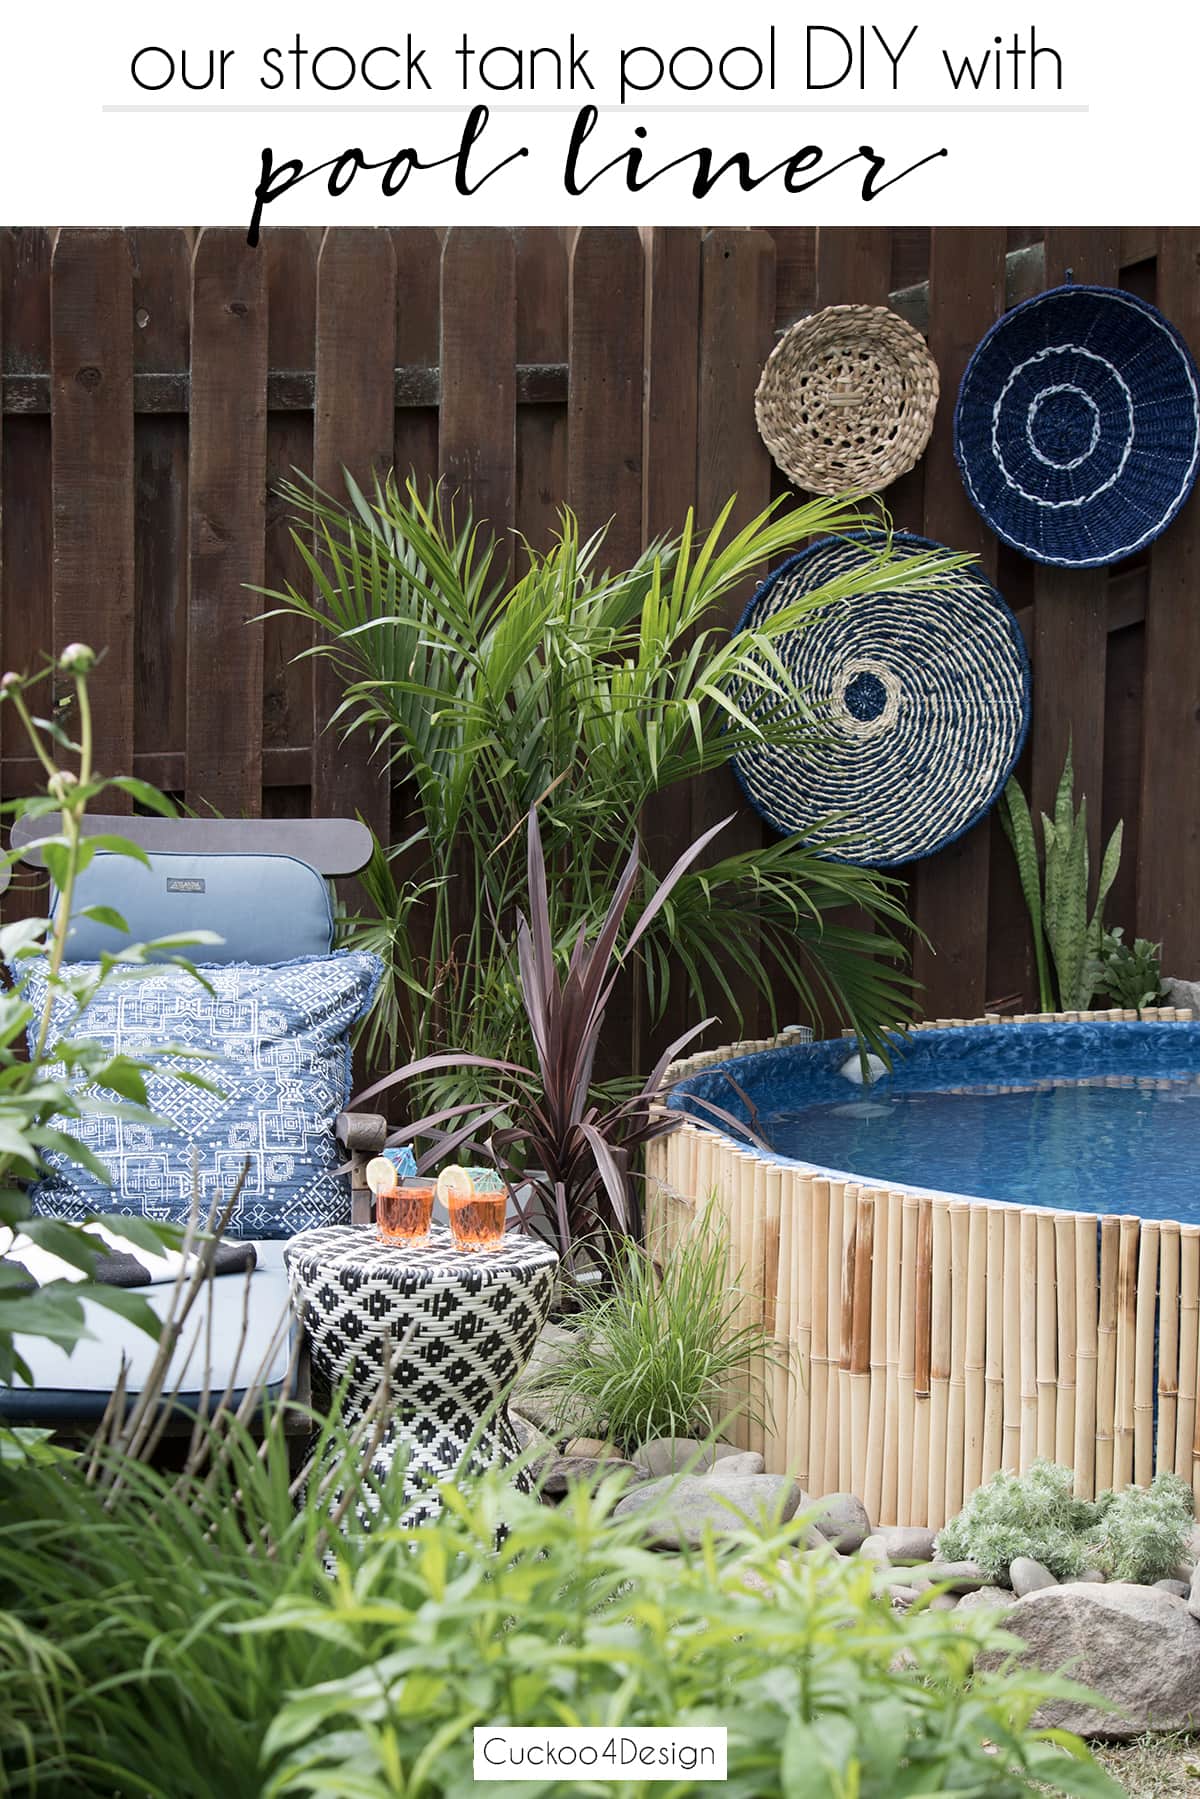
- We added a pool liner with a 20-year warranty and needed to hide the liner’s overlap. I initially wanted to make the stock tank look like a wooden barrel. But we chose bamboo instead for more visual interest. If you prefer the barrel look, I found wood and galvanized duct outlet hanger straps or HERE to attach slats, or you can use outdoor wood pathway rolls to cover the tank.
- Our stock tank pool is dug into a steep backyard hill.
- We used a lot of rock and stone around it.
- And we learned that coating/painting it with a rubber coating made for metal roofs does not work. This wasn’t an upsettingly expensive mistake. In my video, you can see how the rubber coating just peels off. This is why we ended up going with the liner. “Hey Wanderer” used a rubber coating on their tank once it started rusting, and it appears to be working for them. The reason for that is that it wasn’t a new tank, and the galvanization had worn off already. The new galvanized metal prevents the rubber coating and any type of paint from sticking. And, yes, I cleaned, scuffed, and washed the tank down with vinegar, and it still didn’t work.
Planning considerations
- Do you want chlorine or saltwater or simply just drain the water when dirty so you can refill it? The 8-foot stock tank pool holds 700 gallons of water by the way so I think most people don’t want to drain it all the time. In our yard that was also not an option. (watch a YouTube video on why you shouldn’t use saltwater in a metal pool)
- Chlorine and salt water will eat away the galvanization of the metal and it will eventually rust. Remember the tank is made for livestock to drink fresh water from not altered pool water. So if you are looking for a long-term solution, protecting the metal is definitely necessary.
- What pump should you buy? Do you want a cheaper one where you continuously have to buy and change the filters or do you want a more pricey sand filter pump where you don’t need to buy any filters? We ended up with the 10-inch Intex Krystal Clear Sand Filter Pump.
- Figuring out the right hose connections since some of the older tutorials have parts that aren’t available anymore. This was the biggest pain in the you-know-what for me but I think what I bought is working well so far.
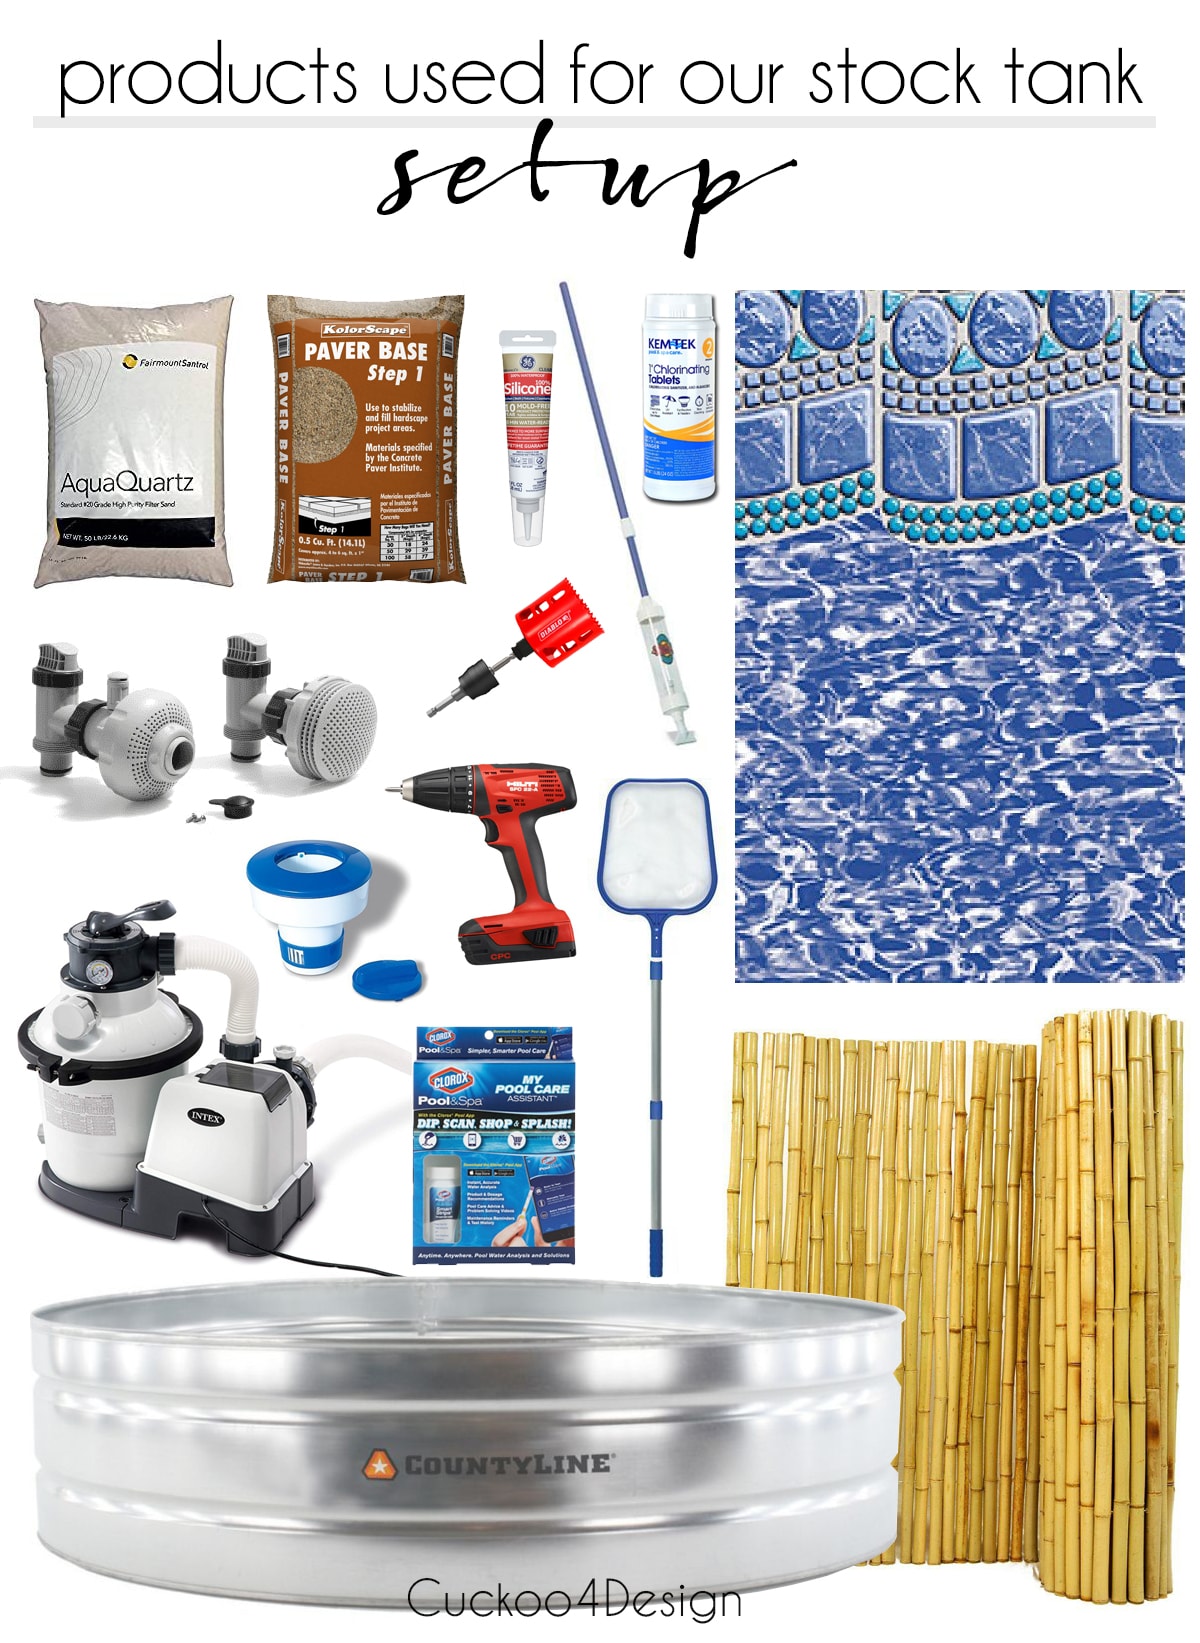
Complete supplies list
I separated the supplies into sections to make it easier.
Essential supplies
- 8-foot galvanized stock tank from Tractor Supply Company
- 8-foot round pool liner
- Liner pad (we didn’t add one in this first installation, but added it when we replaced the pool liner last year)
- Intex Krystal Clear Sand Filter Pump, 10-inch
- Filter sand
- Waterproof caulk for valve sealing
- Large spring clamps to hold liner in place
- 2×4 piece of wood and level – critical for ground prep
- Power drill and 2 3/4″ hole saw bit for metal
- Rake for leveling
- Paver base sand
- Hand tamper
Hiding the liner edge
- 2-foot height bamboo fence, or taller alternative that needs to be trimmed (See bamboo purchasing notes below for sizing details)
- Cedartone VOC stain
- Mold cleaner to clean any accumulating mold
Stain your bamboo before installation. We didn’t, and ended up with mold, so protect it from the start and save yourself time!
Bamboo purchasing notes:
We first bought a section of 2-foot height bamboo to check the quality. After that, we ended up buying taller 3-foot bamboo from Amazon because of the return policy. Unfortunately, it isn’t available anywhere else in a 2-foot height, so we had to cut the extra foot off. Make sure to cut on the side of the bamboo that is open, so you can have the closed stakes facing upwards.
In case you are wondering why I didn’t order the 4-foot bamboo and cut it in half so I would have two 2-foot sections right away… Well, bamboo has a tendency to splinter, and as I said, I wanted the top stakes to be closed. This way, I ensured it all looked clean and neat. Hope that makes sense.
Maintenance and chemicals
- Chlorine tablets and a floating chlorine dispenser
- Water test kit and app
- Small pool vacuum
- Skimmer
- Frog log (prevents animal drowning)
Supplies for our specific hillside build
- 2B stone for backfill (2 yards delivered for around $110)
- Various landscaping rocks and river rocks
- Plants of your choice
It really paid off that my husband is a rock hoarder LOL. Sounds kind of caveman-ish, doesn’t it? But it’s true. He and his best friend, who recently passed away, used to take his dump truck onto his grandfather’s property and collect huge boulders and rocks. We had planned to one day add a water feature, but weren’t sure what it would be. My husband scattered the rocks throughout our landscaping, and we couldn’t believe how many we actually had.
Water inlet/outlet parts
They used to sell a kit on Amazon for the water circulation inlet leading to and from the pump. Unfortunately, that kit isn’t available anymore, and I had to search for all the separate parts on my own, which was a tad bit frustrating. Here’s the exact setup we used:
Main kit: Intex Pool Inlet Air Water Jet Replacement Part Kit – includes plunger valve (#10747), air jet valve (#12363), air jet valve cap (#12373), inlet threaded air connector 1050-1900, part #12371 and adjustable pool inlet jet nozzle (#12369) but I didn’t use the 2 strainer connectors (#11070) and 2 strainer grids (#11072).
Additional parts needed:
- Threaded strainer connector #11235
- strainer washer (10255) and strainer nut (10256)
- Additional plunger valve
- Optional: Threaded cover (eBay)
For complete step-by-step instructions with photos, continue reading below.
Watch the full DIY stock tank pool build process
I have to mention again that we didn’t use the liner pad for this first stock tank pool set-up. We added that in 2025 when we had to replace the pool liner.
You can also watch this video on my YouTube Channel.
Step-by-step installation tutorial
If I could only give you one piece of advice, it’s that you need to really pay attention to getting the ground perfectly level. Everything else can be adjusted or fixed later, but an unlevel pool causes endless problems. That’s why we’re starting with the most important step first.
Step 1: Ground preparation
The area prep is one of the most important steps of this project. You will be sorry in the end if you didn’t level the ground properly.
My husband stuck a screwdriver with a string into the center of the ground. This way, you can map out a large enough circle. He then carved out enough soil for the 8-foot round tank to fit.

Then he added paver base sand, leveled and tamped it.

We hired an electrician to add an outlet for the pump and my husband had to dig a trench for that as well.


Step 2: Pool liner installation
Below you can see my first attempt at protecting the metal of the pool with Flex Seal. It is used for coating metal roofs and I was convinced that it would work. You can see in my video how much it was flaking almost immediately. So save yourself the money and don’t try to do what I did.

The only other option was to add a pool liner and I wasn’t sure if it was going to fit. It literally drapes over the tank like a trash bag over a trashcan and ended up fitting perfectly. I’m also glad that the ugly fake tile portion of the liner isn’t visible since the tank is only 2 feet tall.
And in case you are wondering, yes, we just placed the liner over the chipping flex seal. I didn’t feel like stripping that crap off, and don’t think there was a need to either.
As I mentioned several times earlier, we didn’t add a pool liner pad until we had to replace the pool liner. I highly recommend it.


Smoothing out the wrinkles wasn’t as easy as I thought, but it was doable. It would have been easier without a rainstorm and needing to empty the pool again. So, make sure when you work on this that your weather isn’t acting up.
Step 3: Pump and valve setup
In the video, you can see how I drilled the hole and I had to cut the liner for that.
Above-ground pool companies suggest keeping the water inlet and outlet 2-3 feet apart for circulation. This is not an issue here due to the pool’s small size and lack of alternative placement.

We filled the area under the plunger valves with 2B stone.
We caulked around the inlet and outlet inside the pool and on the outside of the pool. Make sure the caulk has dried and the plunger valves are set to close before filling the pool with water.

Set up your water filtration system according to the manufacturer’s instructions. We placed ours on a paver stone which we bought at Lowes. Make sure that the pump also sits on a leveled surface.

(I have since found a simple solution to cover the pool pump. Now it finally blends in with all the rocks and landscaping.)

Fill up your tank with water slowly to ensure that there are no leaks on the outside.
Here you can see the pump running and successfully circulating the water.

Step 4: Bamboo wrap installation
The above situation of the liner just hanging over the tank was not pretty. It is definitely a must to cover the ugly part of the liner overhang.
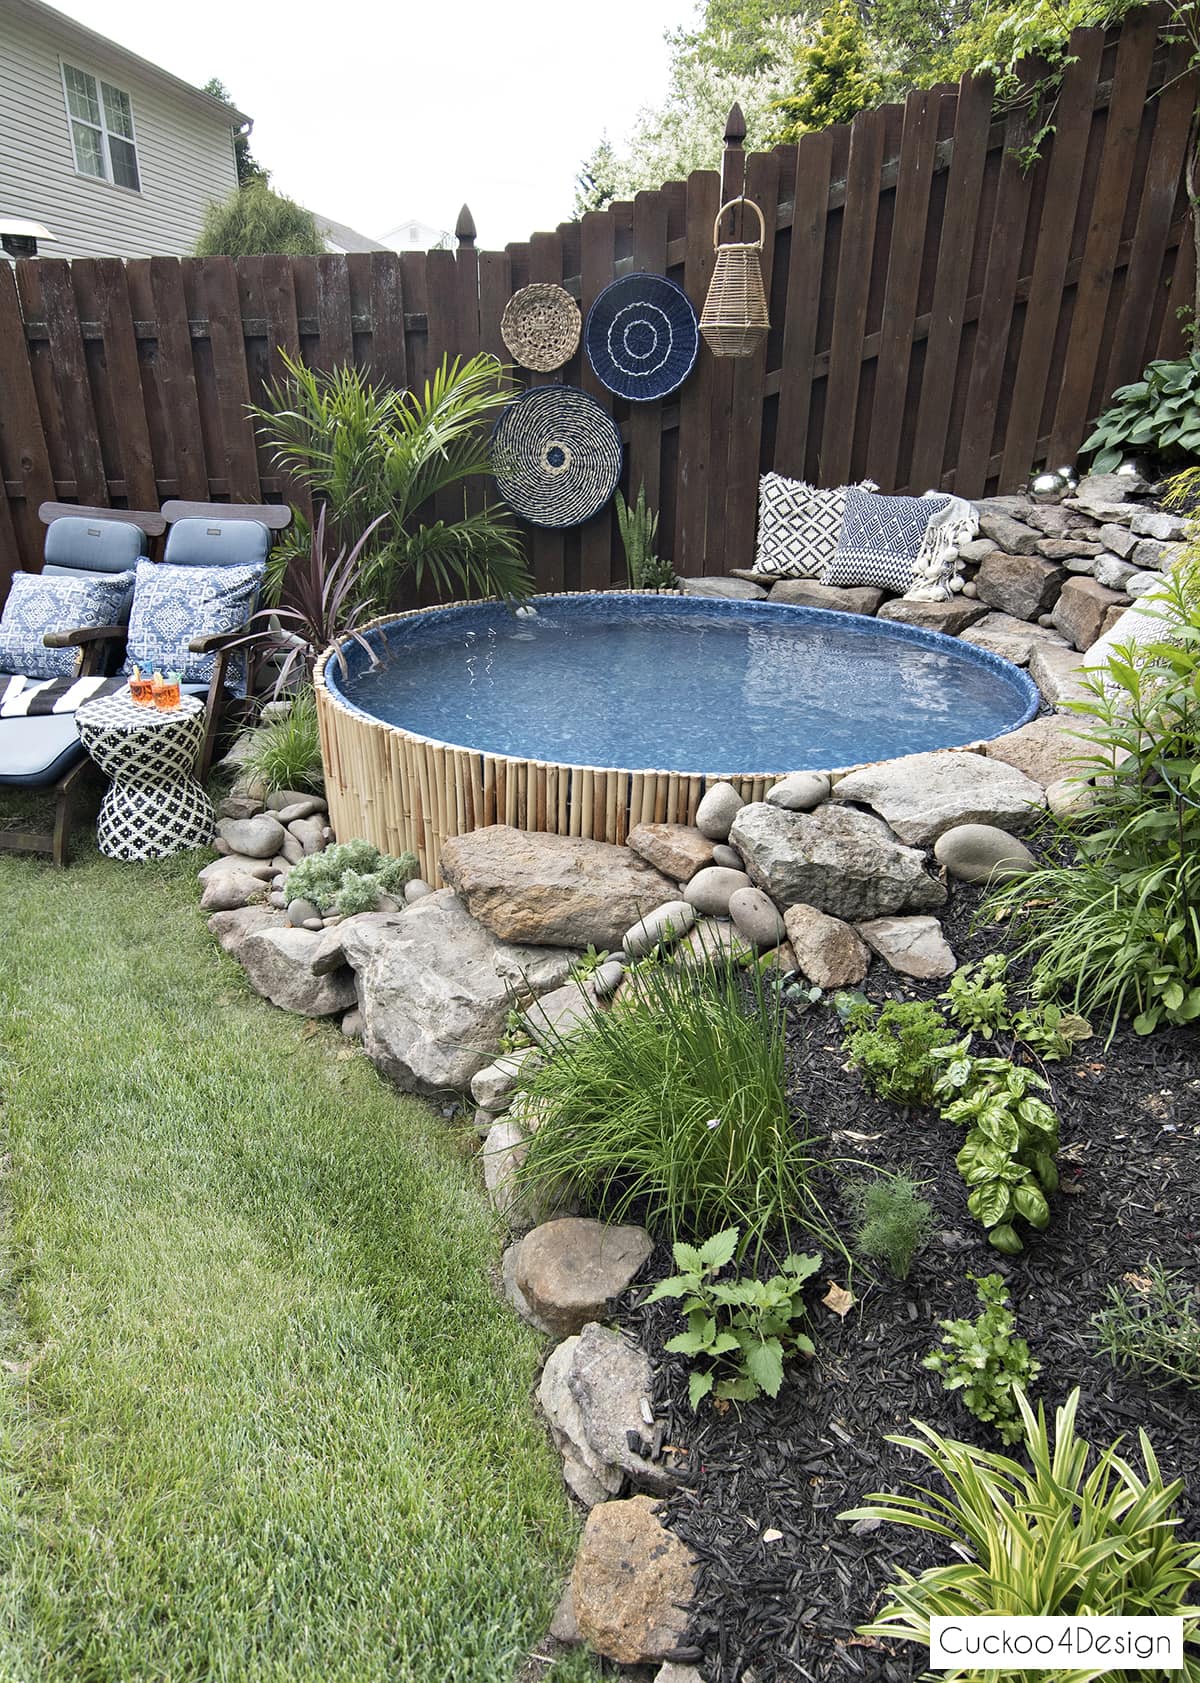
As I mentioned above, I originally wanted to add wood to make it look like a wooden barrel. I chose bamboo for better contrast with the dark brown fence. We believe it was the right choice.
Below you can see how I used the metal spring clamps to keep the liner in place while we added the bamboo and rocks around the pool. The stone and rocks are what keep the liner and bamboo in place. If you are adding a liner without using rocks around it, just use thick wire to tie the bamboo in place where the ends meet.


Step 5: Backfilling the hillside (specific to our setup)
Since our yard is sloped and we nestled the tank into the hill we had to backfill the ground.
We used 2B stone to backfill the pool area to avoid backwash. Soil doesn’t drain well, and the mud would wash back into the pool if the pool overflows.

After my husband was done filling the back and sides of the pool with the 2B stone, he built the rock walls.
The stone was a solid base for the back wall seating area rocks. Buying them would have cost a lot, but my husband’s rock obsession saved us. He hoarded them in our yard over the years.
Before we had kids, my husband and a friend loved taking a truck on his grandfather’s large wooded property to search for large rocks to bring home. He used them for our stairs and also stacked them around trees in anticipation of one day using them for a water feature, which we thought was going to be a pond.
We were really lucky to have the rocks now. And it is also a bittersweet reminder of our friend who recently passed away. We are always reminded of him and how the two of them loved spending time in the woods searching for rocks.
ADDITIONAL TIP: As I said before, there are many other DIYers who have added wooden decks around their plunge pools. That looks great too. Rocks like ours aren’t for everyone, especially if you have small children and are afraid that they might slip and hit their heads. For small kids, it might be a good idea to add pool noodles to the rim of the pool, to prevent them from hitting their heads on the edge.
Photos of the finished DIY stock tank pool
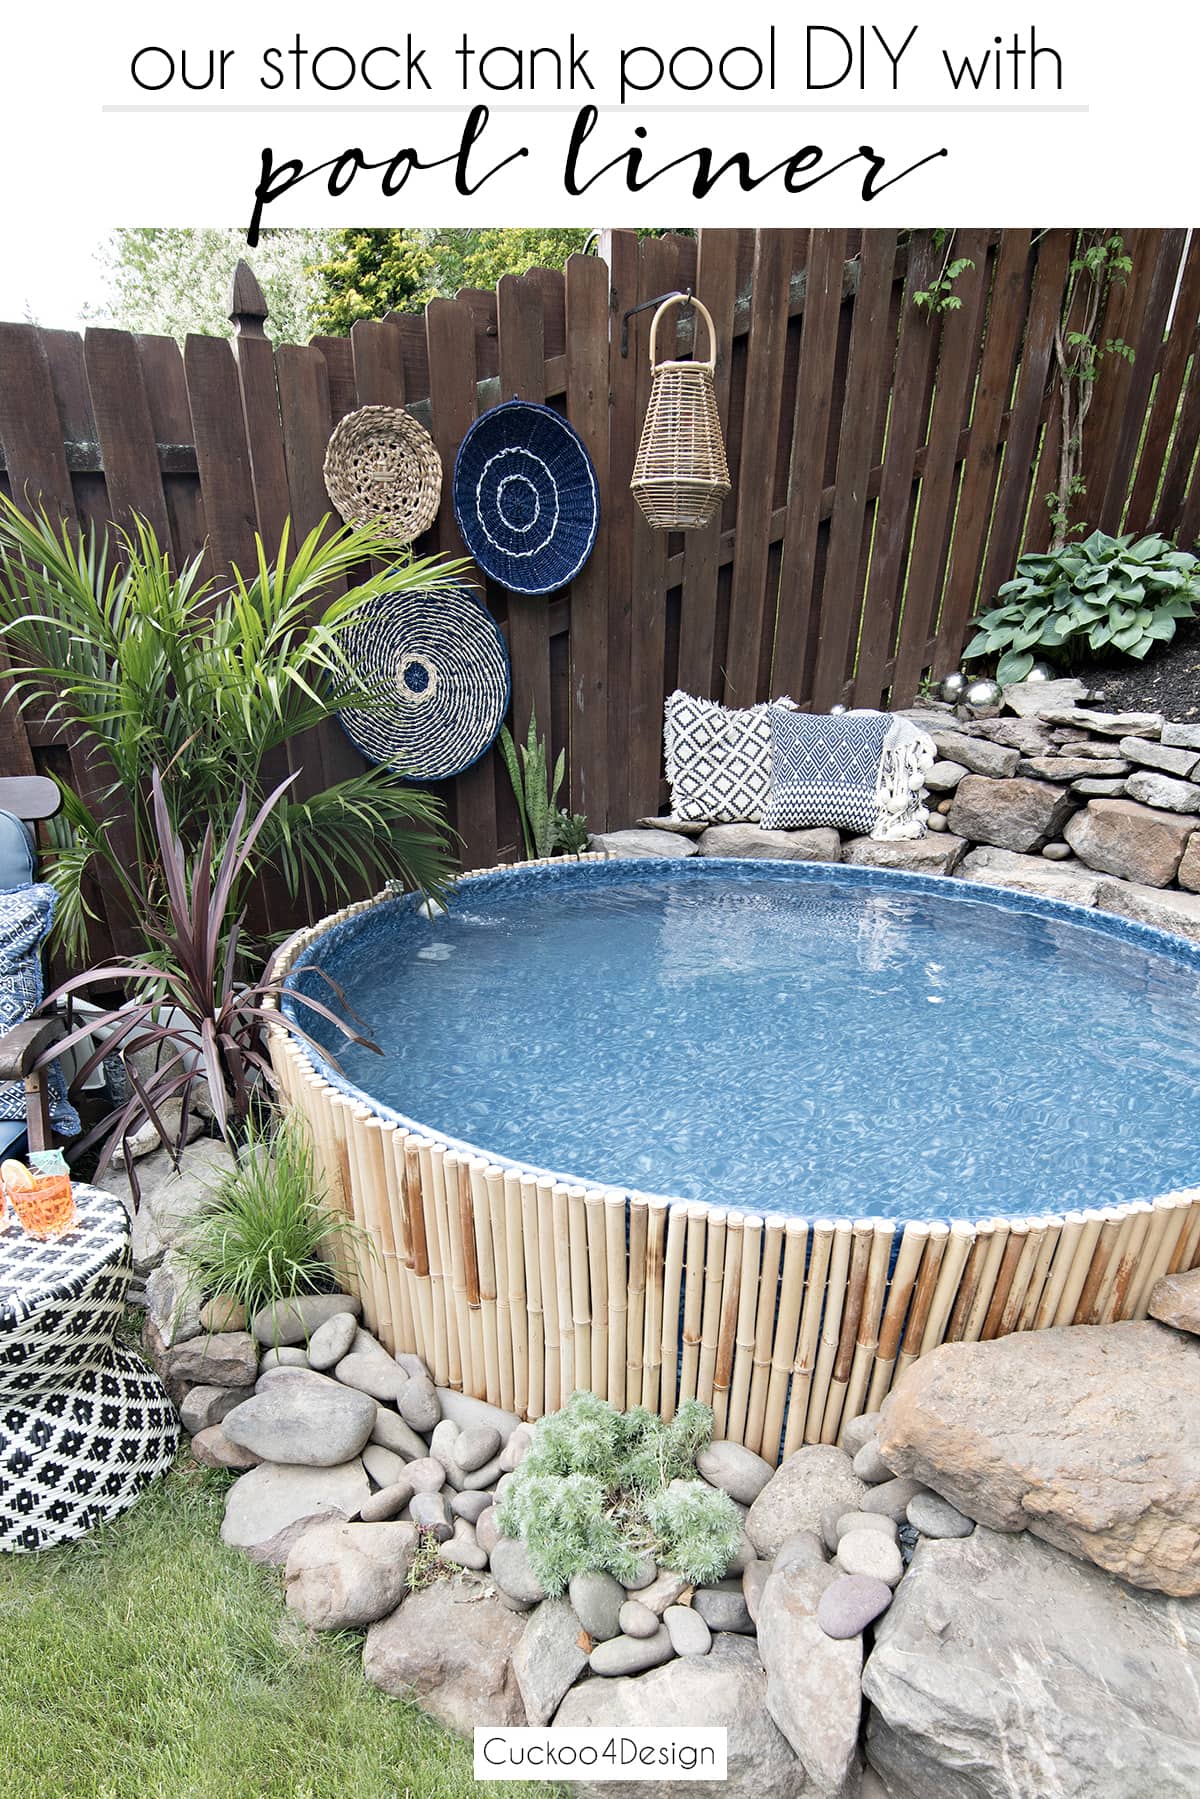
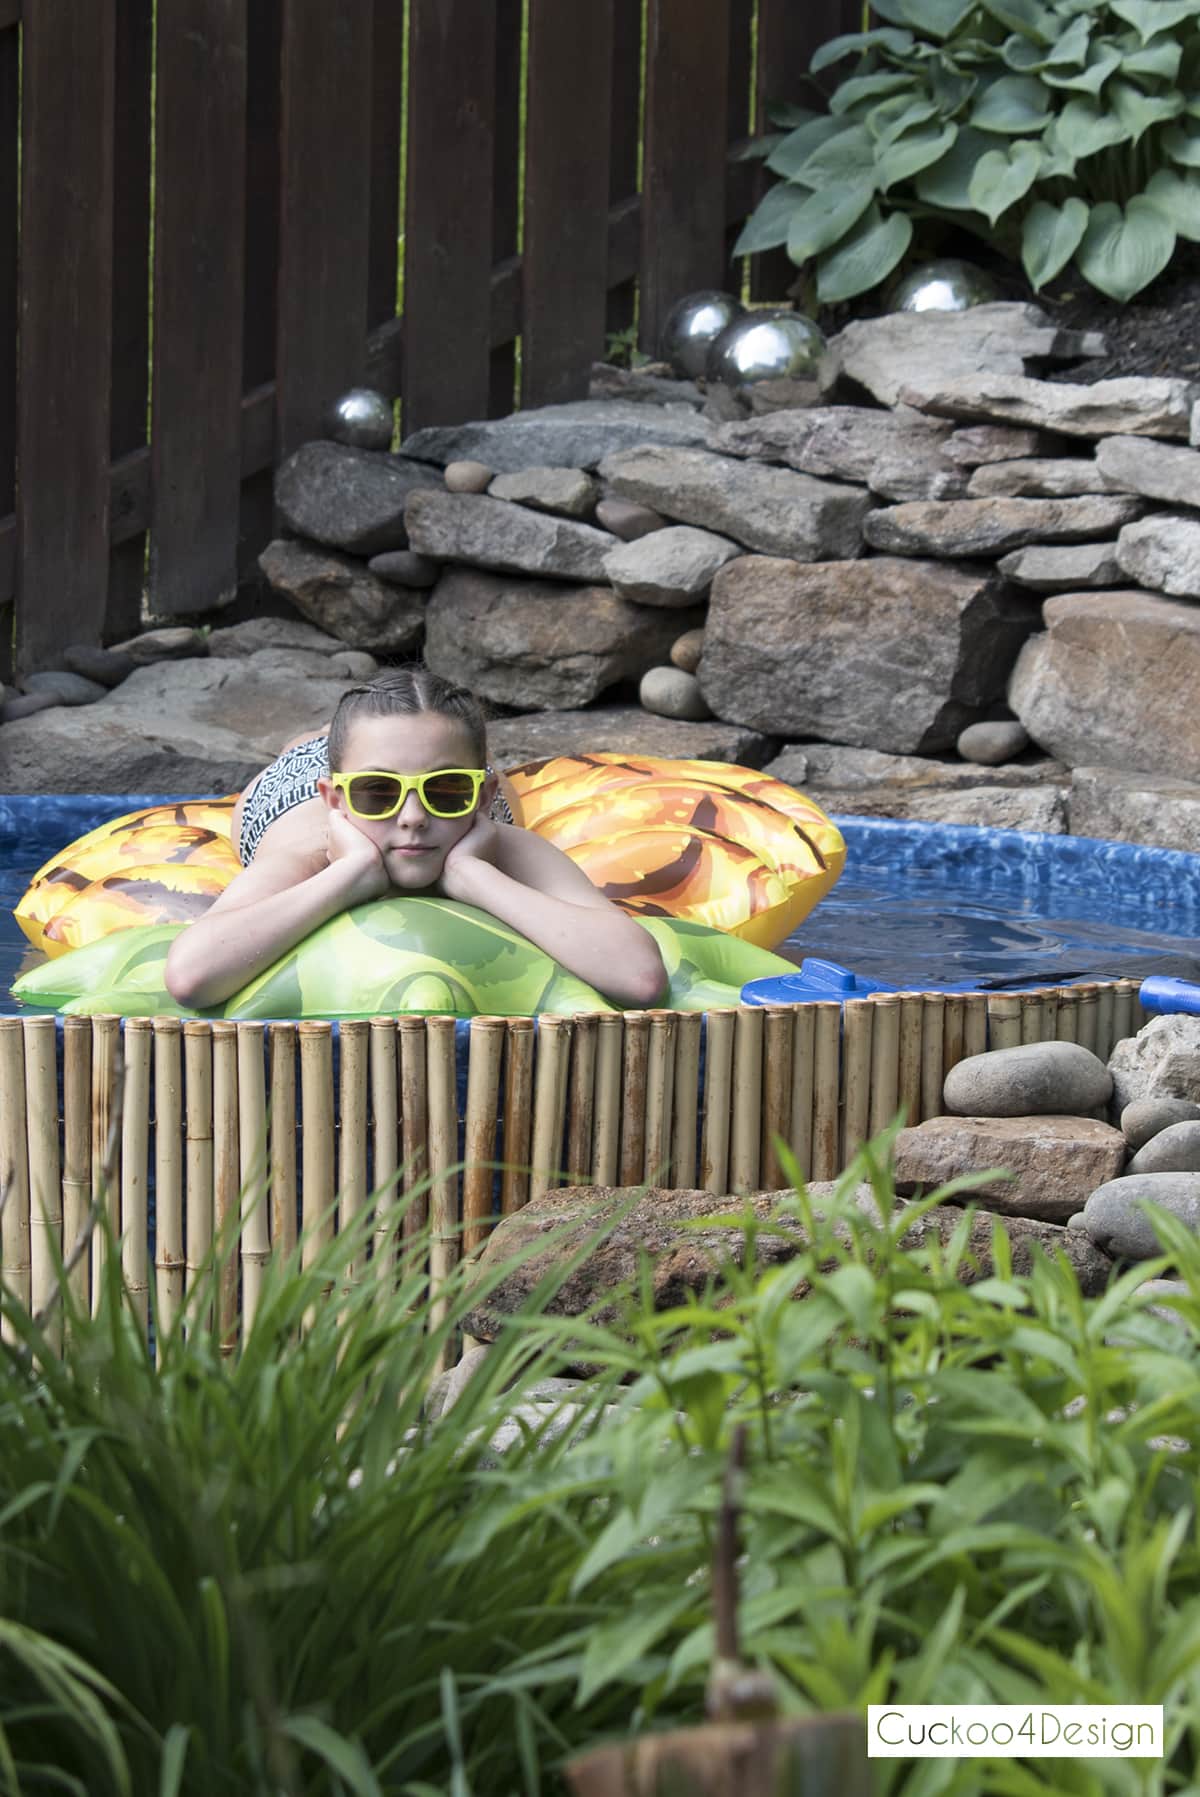
I can already say that we absolutely love using it. It is small but all we need for cooling off and floating around.
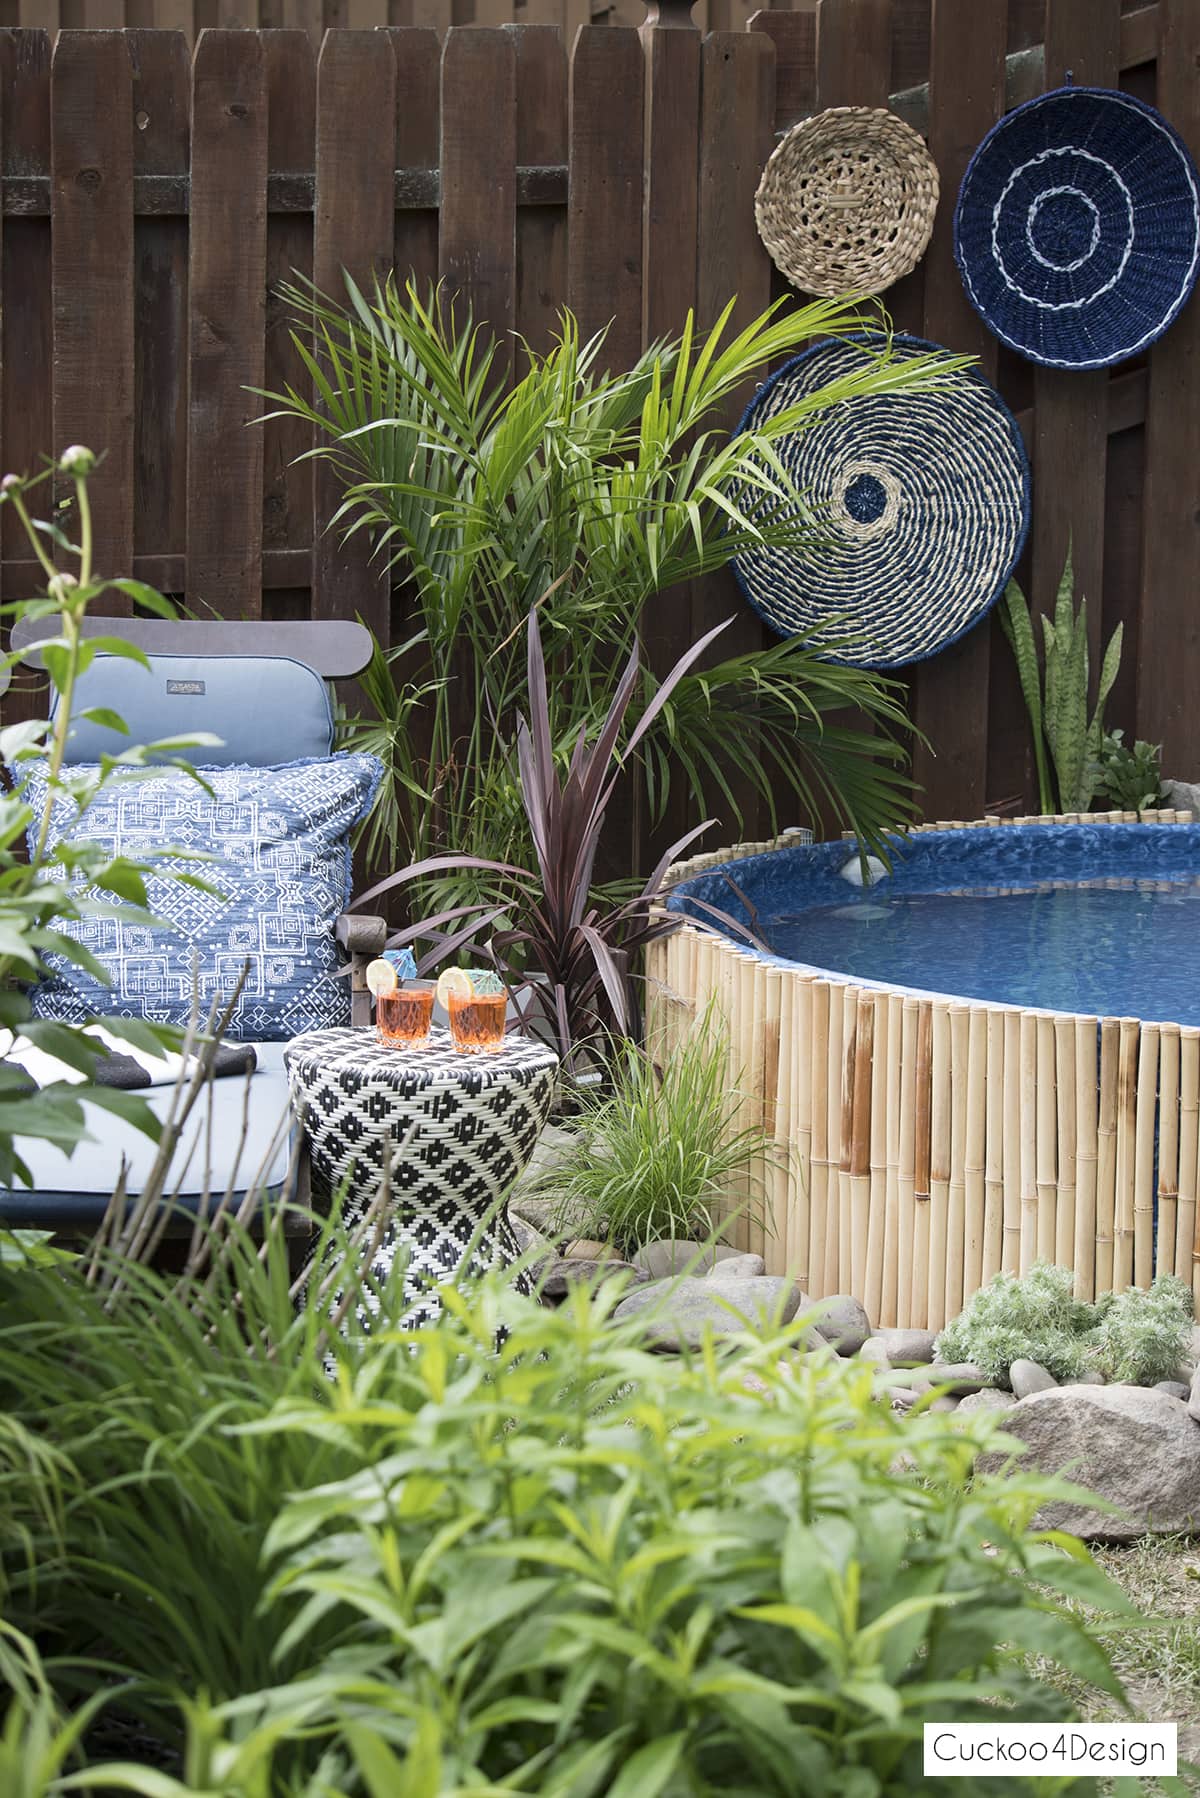
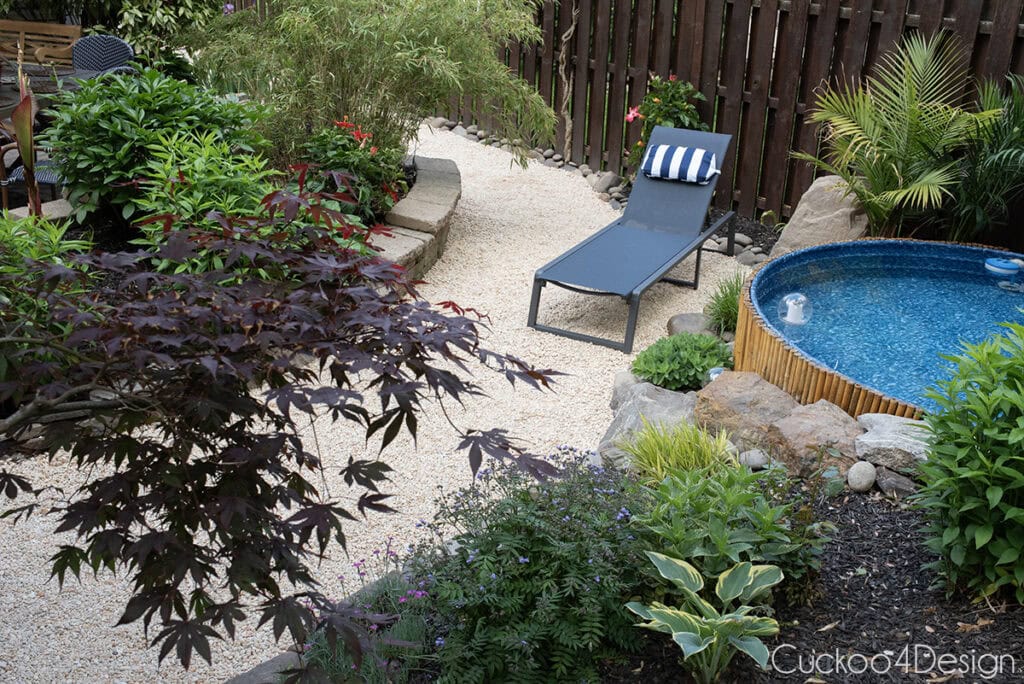
Pictured below is a view from the top of our sloped yard where we have another patio. On the right side, you can see the pool peeking through the leaves with the blue water. The blue liner actually matches nicely now with all the other blue decor we have. My seat cushions are all blue and so is our birdbath.

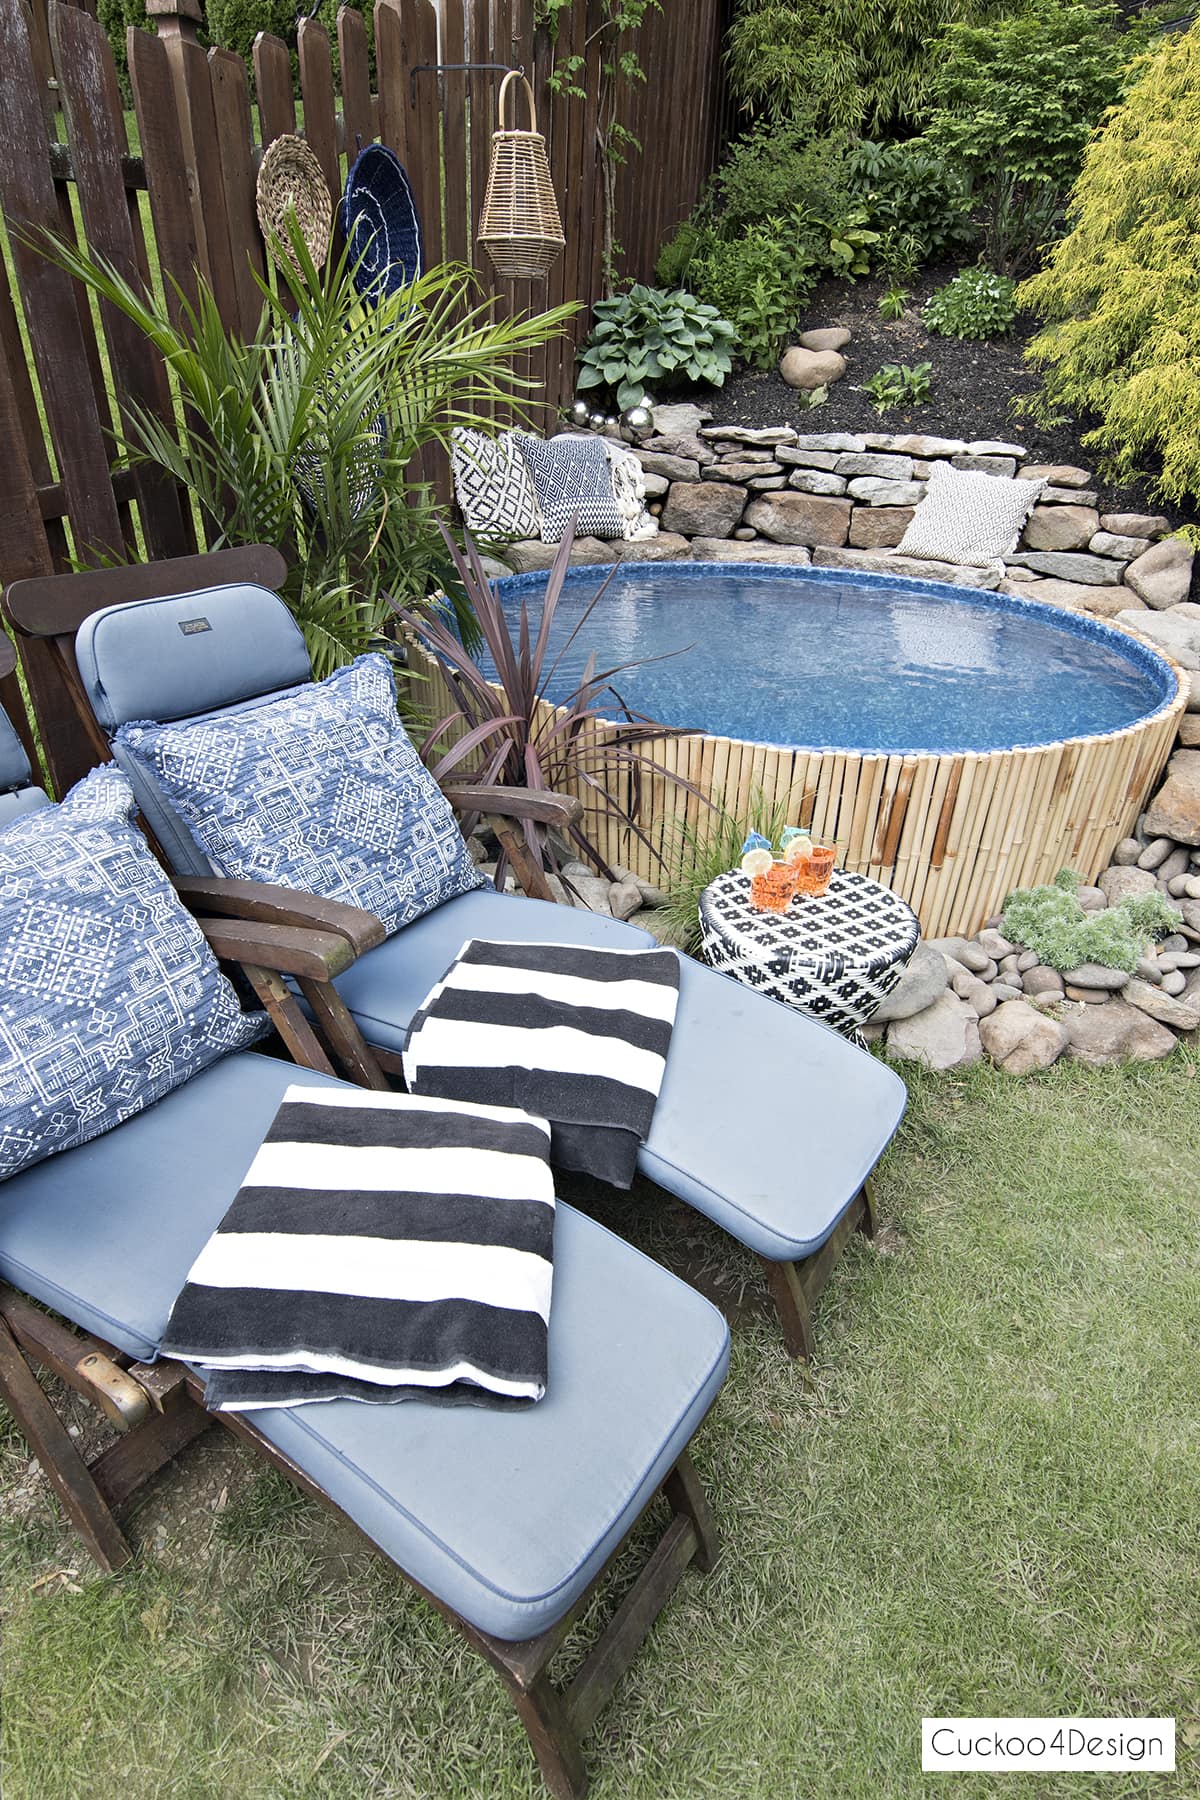
My husband arranged the largest flat rocks at the bottom to make it a row of seating for us to sit and hang out, which we have done many evenings already, and the best part is that the mosquitos can’t bite my ankles anymore and I stay nice and cool.


I love the black and white striped pool float and check out a roundup of all my favorite black and white swimming pool accessories.


He placed the rocks on the right side of the stock tank to make them function as stairs. This setup works perfectly for us. The gaps were filled in with river rocks that we collected by the river right by our house.

We also have an herb garden right next to our set-up.


To say “we love our outdoor space” now is an understatement. We are obsessed is more like it! This is where you can find us on a hot summer day!

UPDATE: More photos after owning our little DIY pool for 6 years
The following photos of our pool were taken 6 years later in the middle of July. Instead of the plates hanging on the wall, we now have more plants instead. The decor hanging on the fence tended to rot too fast and I just love how the grown-in plants look.
You can see that the bamboo got darker and split in a couple of sections, but overall, it has held up really well considering our harsh winters here in Pennsylvania.

The liner’s print rubbed off in a couple of sections along the rim of the pool and we have to keep fixing holes here and there every springtime. We are still really happy with the stock tank pool and how it has worn over the years. Definitely one of the best things we have done for our small yard.

Across from the pool is a little shade tent for our cat, Frank.

And up under the trees, you can see his feral friend. I fixed both of them, and they have stayed with us since.
Using a solar pool cover that we cut to size helps with the debris from the trees and keeps the water warm in the early cold spring weather.

We recently decided to replace grass with gravel and love it. Check out the reasons, process, lots of before and after photos, as well as pros and cons.
Frequently asked stock tank pool questions
All you need is a trailer and some straps, and with the help of a neighbor, we were easily able to bring the tank into our yard. See more about it in my video.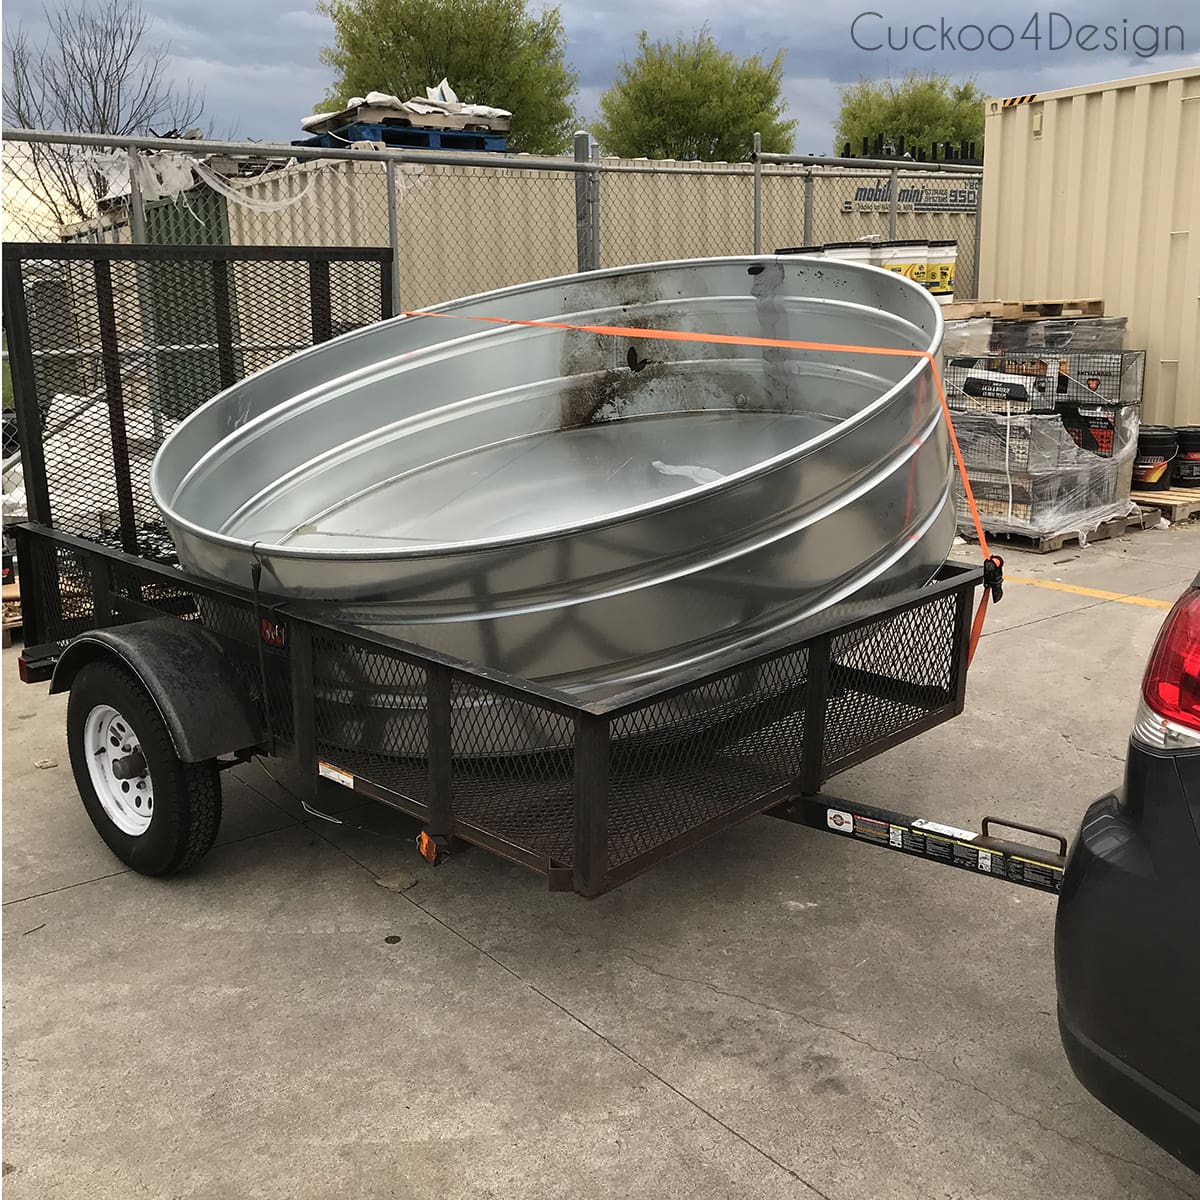
Just like a traditional pool, the water maintenance supplies are, of course, the sand filter, floating chlorine dispenser with chlorine tablets, and the occasional other pool chemicals. After testing, we frequently use the skimmer and the above-linked non-electric vacuum that simply uses airflow to suck out the dirt.
This combo works really well to keep the pool clean so far. We only had one issue after returning from vacation last year, where the pool had a ton of debris, bacteria, and algae in it, resulting in a green mess that only a frog would like, as you can see below. The reason that happened was that the outlet needed to be reset, which resulted in the pump not working and the standing water for almost 2 weeks. Yikes! Now, I have my neighbors check that everything is working every other day while we’re away.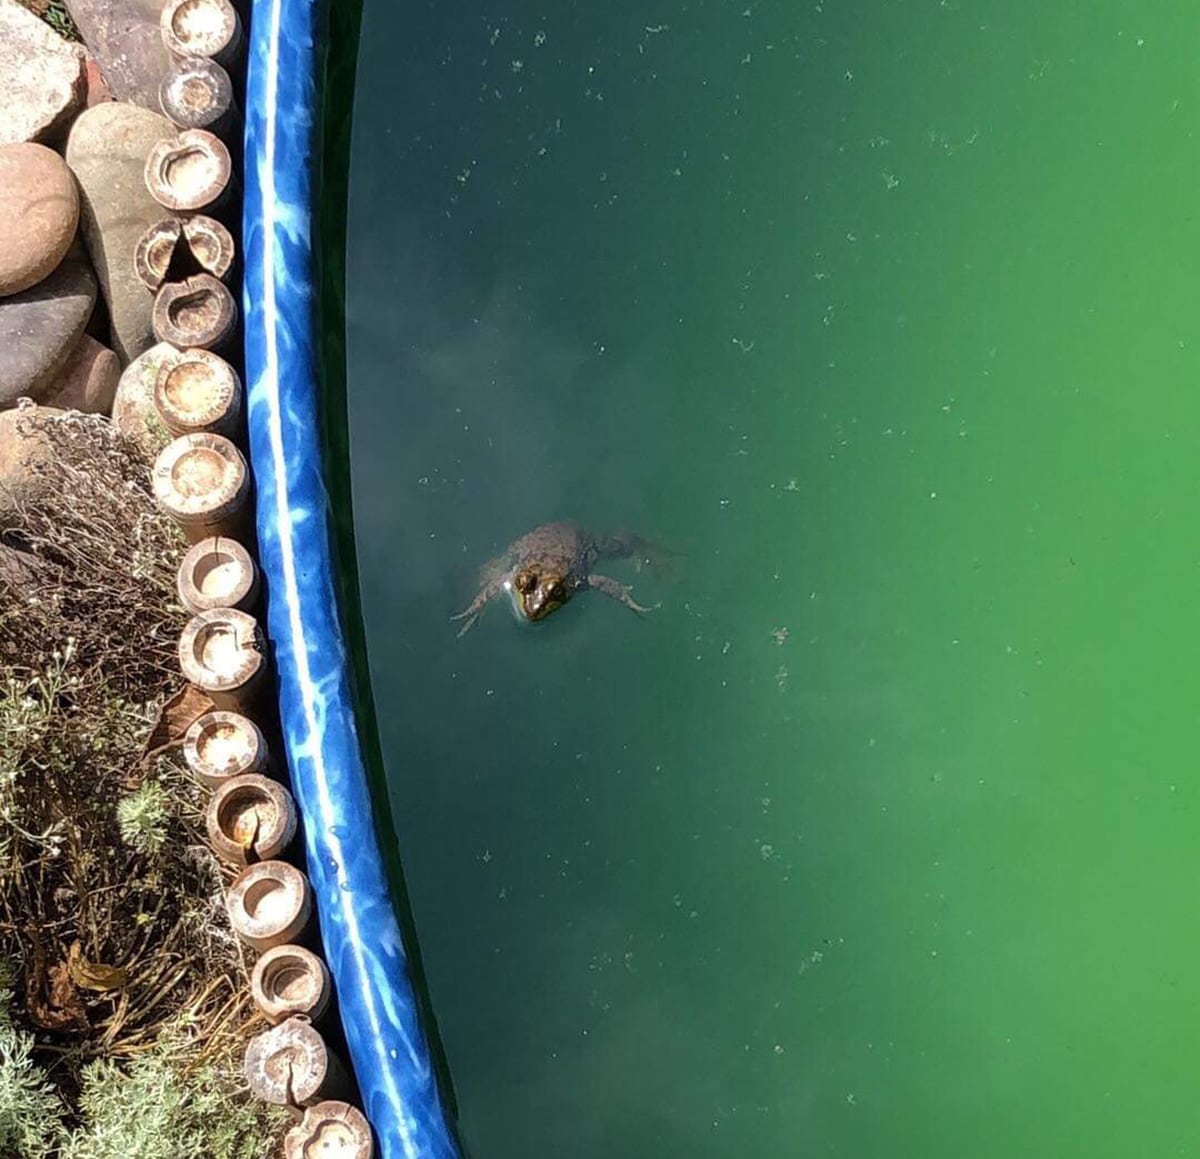
The water gets warmer but not hot, and since the kids play in it a lot and the water gets splashed out, we also have to frequently add fresh cold water to it. So far, the temperature has not been a problem for us, and I know other people who have claimed the same as us.
As I mentioned above, DIY stock tank pools will eventually rust because they are made for regular drinking water. Adding either salt or chlorine to the water will eat away the galvanization, and the pool will start to rust, which is why we added the liner.
I used an 8-foot overlap pool liner from Amazon, which is in my above supply list. It is made for above-ground pools and works really well for a stock tank pool, too. The layers are made of an acrylic top coat, a UV-resistant print layer, and a 100% virgin vinyl base with a 20-year limited warranty.
Yes, use an 8-foot liner for an 8-foot tank. A larger liner creates a wrinkly mess – even the correct size has minor wrinkles in spots. We learned after 6 years: pool liners shrink from UV rays and chemicals! The vinyl deteriorates over time, causing it to shrink. This is normal and why liners eventually need replacement.
This was a question that worried me for a while as well. It is quite obvious that we can’t just simply add another liner to ours since it is pretty much built into the hill. If you have a freestanding stock tank, you can easily just add a new one without a problem.
In early 2025, a chunk of ice cut a large hole into the liner that was too big to patch. Read my post about how to replace a stock tank pool liner. We also added a liner pad under our new, replaced liner, and it was a great decision because we didn’t end up with any more small punctured holes in the liner.
While I have seen other people turn their stock tanks into DIY hot tubs, I wouldn’t recommend it for our version with the pool liner. I don’t want to risk ruining the liner because it hasn’t been tested. I’ve seen at least 3 tutorials so far for the plain metal ones.
I wrote a blog post specifically about the pool pump cover, where you can see in detail how I integrated the pump into our landscaping.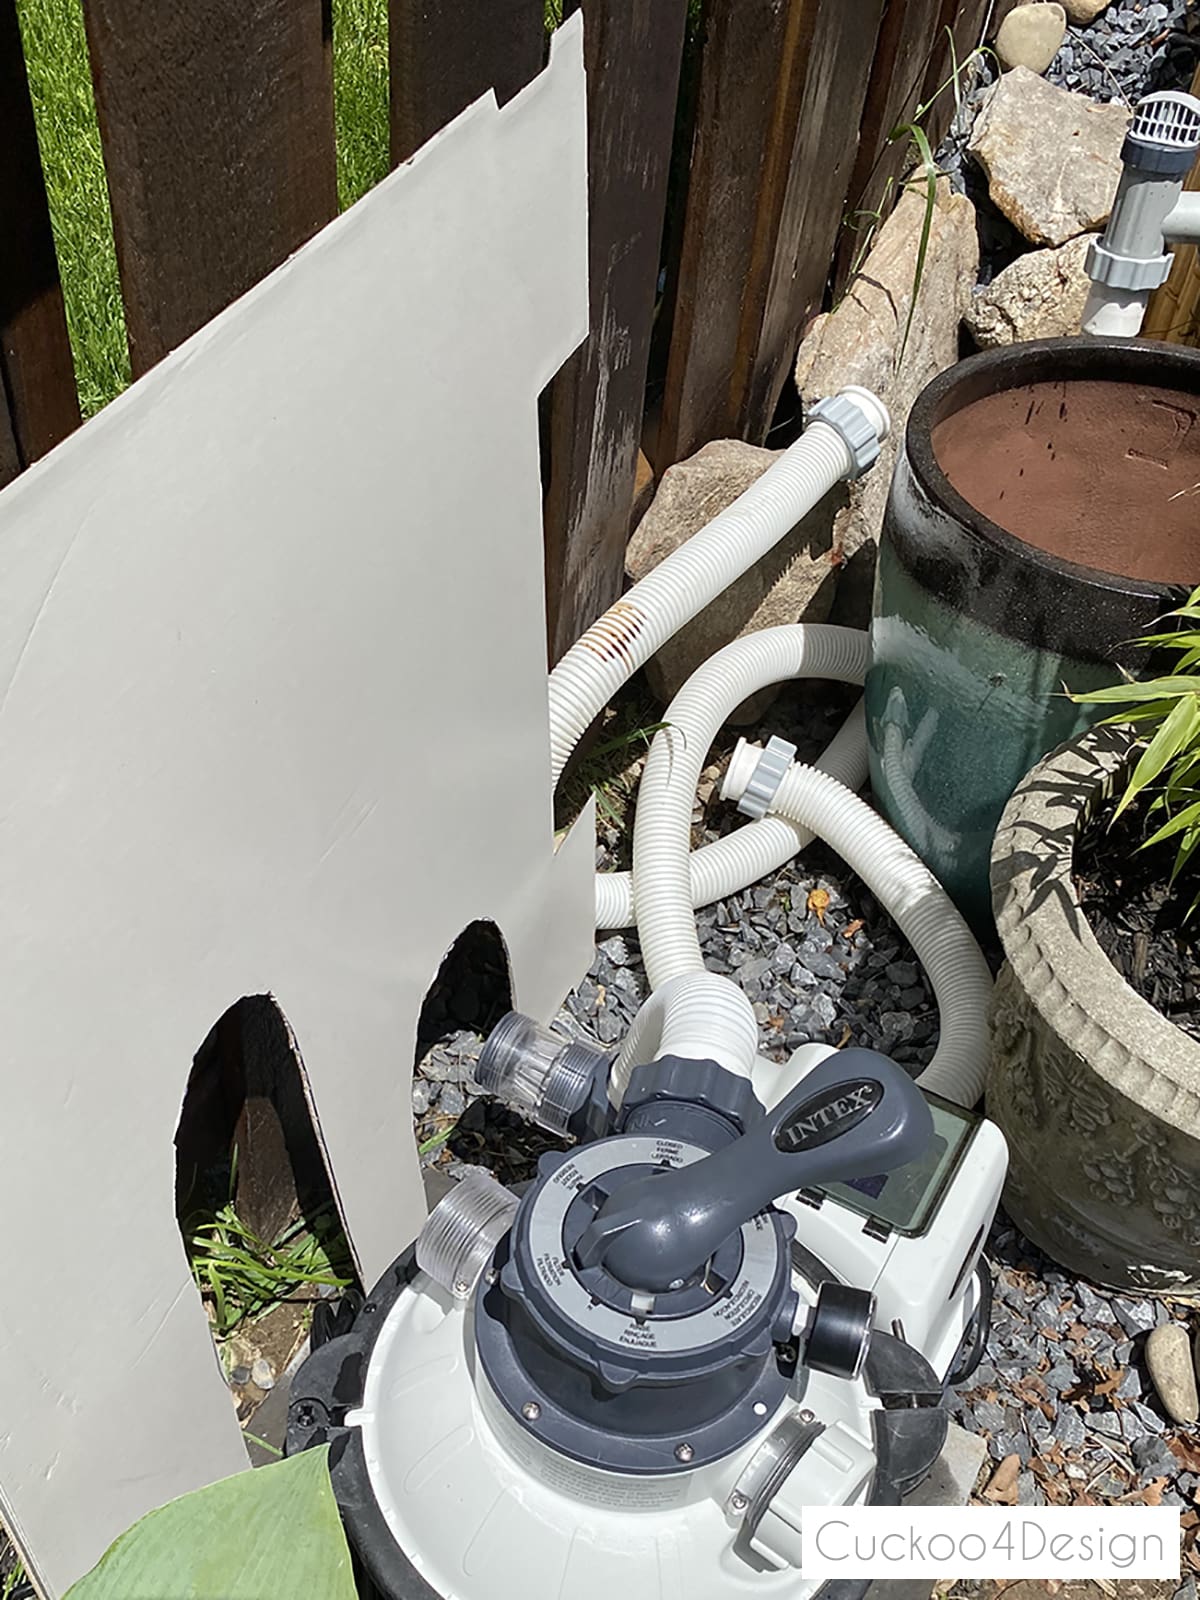
More stock tank pool posts
- Check out the only way to stop your stonk tank pool from rusting
- more stock tank pool ideas inspired by ours
- Here is another blog post about how we opened up our stock tank pool after the first winter and what issues we had to fix.
I hope this post was helpful and if you have any questions please do ask below so I can edit this post and add the answers to my blog post.
Thanks so much to the Tractor Supply Company for providing us with their stock tank. I think the photos speak volumes about how much we love it. We would have never been able to add a little pool to our yard without this galvanized stock tank that is supposed to keep animals hydrated and healthy.
Tschüß,

Ah, you transformed your backyard so well. I love how it turned out, super cute. My kids would love this so much.
WHERE do you find 8 foot stock pools?
Everything but where you can find the large ones???
Hi Caroline, you can find them at Tractor Supply company and some other places. I linked to the exact same one and where I bought it.
Thank you Nancy
Thanks so much Marty! We are ready for summer 🙂
This was such a cool project! From start to finish – how long would you say it took?
Thank you! The longest and hardest part was the digging and since we had to struggle with weather and my husband was mostly only able to dig in the evenings…the digging took at least a month. And the rest we knocked out pretty quickly in about 3 days.
Wow–what a lot of work you guys did–but it looks amazing! I love how it’s built into the hill–I know that’s what made it so much work, but it looks way cooler that way than if it were on flat ground 🙂
What a beautiful backyard oasis! Looks like the perfect spot to unwind and forget.
Awesome! How much this entire project cost? Thanks for sharing!! Sheila
Thanks Sheila, that’s a tough question to answer and I didn’t want to put an exact number on it since you can pick different pumps and parts as well as the prices of the stone and rocks. Also, a lot of times the prices for everything are different depending on where you live. The stock tanks are around $400, the liners are around $100-$200, the bamboo is around $150, the pumps are anywhere from $60-$300, the parts are around $50 and then throw in the chemicals or salt system and other items you need to keep the pool clean.
I think I may be a little obsessed with this project now, haha. I’m pretty sure I’m not going to be able to convince my husband to dig for days, but I’ll start by showing him this post. 🙂 This is the perfect size water feature to cool off and enjoy, without the expense (and maintenance) of a large pool….your own personal oasis! Thanks for sharing your experience from start to finish.
Thanks Kristin! Like I said in my post, it took me years and years to get my husband to dig LOL
i cannot get over how incredible it looks!!!!
You two did an amazing and beautiful job! Hope you can enjoy it for many years.
What an amazing addition to your yard!!! I’ve wanted one of these, but yours looks so much better than ones I’ve seen!!!
Beautiful and back breaking job! I say this after hauling about 100 or more buckets of stones from my neighbor’s house to my place.
Wow you did that all yourself?!? It is a back breaking job for sure
You have such talent..Stand up and take a bow! It looks GREAT!
If I may ask… aside from sweat equity what do you think it cost for the entire job?
Thanks Carol! I did doubt my vision along the way for sure.
And the entire cost is a tough question to answer and I didn’t want to put an exact number on it since you can pick different pumps and parts as well as the prices of the stone and rocks. Also, a lot of times the prices for everything are different depending on where you live. The stock tanks are around $400, the liners are around $100-$200, the bamboo is around $150, the pumps are anywhere from $60-$300, the parts are around $50 and then throw in the chemicals or salt system and other items you need to keep the pool clean. So it’s not a particularly cheap project but for us it really was the only option.
Wow! You executed this beautifully! Your backyard looks like a tropical paradise. I love it. My husband and I have been talking about doing a stock tank pool in our yard, so I really appreciate the detailed tutorial should we decide to go for it. Enjoy your new oasis!
This looks amazing! It really almost looks like a natural water feature rather than something built into your yard. I hope the weather cooperates with you so you can enjoy it prior to your summer trip to Germany – you and your husband deserve some r&r after all that work.
Oh my God I literally just said the same thing to my husband because this weather is driving me crazy. Thank you
Omg it’s stunning! I just took down our intex above ground pool. It was too big for me to manage the cleaning and keep an eye on my baby and 5 month old. This size would be perfect and we still have the pump. and the ring of sand in the yard ….my husband would kill me though haha. Great job!
Thank you and good luck with your husband haha, maybe he’ll agree
Wow. That looks fantastic. You all did a great job. I know you will enjoy it for years to come. Everything you do is just fantastic.
I absolutely loved this post so informative! Your husband did a fantastic job with the rocks. So sorry to hear about the loss of your friend what a wonderful memory to have of him. The rocks look so good and so expensive! I never heard any negative names for stock tank pools but who cares??!! I think this is fantastic!!!
What a brilliant plunge pool! The perfect retreat at the end of a hard day. An awesome combined effort! ~ heather x
I bought them in Germany
And they actually also float on the pool
What a fabulous idea Julia! It looks so amazing and I wouldn’t have ever thought of that!!!
Love the pool! Love the landscaping around it.
Beautifully done.
Julia, this is seriously the most awesome DIY project I have ever seen, you’re my hero!! Amazing!!!!!!! Enjoy it this summer!
This is amazing! What will you do in the winter? Cover with a winter pool cover? We have a smaller yard and struggle every year with buying new plastic or inflatable pools for the kids.
Hi Rachelle, I think we will drain it with a submersible sump pump and then cover it for the winter. It really is a great solution for a small yard!
Hi Julia!! Your pool area looks amazing!! My husband and I are going to do one and love the idea of the bamboo! May I ask how the bamboo is staying up? Did you have glue it or is it just staying up on its own?
Hi Tammy, the bamboo is simply held in place by the weight of the rocks around the pool but I also linked to another blog post by a reader of mine where you can see how they tied theirs.
Wow this is an amazing project and you have documented it so well! Every question that popped into my head was almost immediately tackled by you, plus of course a bunch of items I never considered. Great job, great pics, and thanks for all the specs and referral links! I learned so much and it was fun to read – you are a great communicator! We’ll see how soon I get around to trying this (or one of the related mini-projects it sparked for me), but definitely inspired me! Congrats and thanks for such a great article!
Thanks so much Kasey! I hope you get your pool too.
My Stock Tank is 10ft. I am struggling to find a 10-foot round line. I see 8-Foot and then 12-foot. Any ideas where to locate 10?
Hi Nancy, I’m sorry but I don’t. Did you check with a local pool supply store?
We added a liner and pulled it tight. Filled it up and now the liner slides around so much on the bottom eventually one of us are going to fall and break something. How do we stop the liner from sliding around?
That’s so strange ours isn’t really sliding around unless water gets under the liner. Could that be it in your case?
Very helpful, and I used your guidance as my main resource. But, very importantly, your list is missing a couple of components, namely an additional strainer washer (10255) and strainer nut (10256) for the threaded strainer connector. Both are readily available on the Intex site.
Hi Adam, I can’t recall missing anything when I put our set-up together but thanks for letting me know and I will add them to my list.
Wow, your step-by-step guide makes creating a stock tank swimming pool seem so doable! I especially loved the tips on choosing the right pool liner.
Cozy looking pool, great job! Can I come over for a dip? ? Does the water? attract mosquitoes/bugs? Is the pump on a On/Off timer, or run constantly? Are pool lights possible for night-time?? How is your electric bill affected? Thanks!
HI Scott, since it is running water and there is clorine in it there is no issue with mosquitos or other bugs. The pump is on a timer and runs every day for about 5 hours and it does effect the elctric bill but not as much as our neighbor’s hot tub. I addressed the night time pool lights which are possible but I prefer the floating solar lights I have. I love them.
Wow! I love the outcome! Thank you for sharing the link to the equipment you bought to make this project happen.
Wow, what an incredible transformation! I absolutely love how you persevered to create this amazing stock tank swimming pool in such a challenging space. Your attention to detail and determination to find long-lasting solutions is truly inspiring. It’s not just a pool—it’s a personal achievement and a beautiful backyard feature. Kudos to you and your family for the hard work, and thank you for sharing this fantastic project with all its helpful tips!
Would you recommend the bed liner spray first if you are going to put it completely (or mostly) underground? I want to build a small river bed to flow into the pool so it would be mostly inground. The “creek” would flow into the pool with a small waterfall. (I have built water gardens for years and want to incorporate that into the stock tank pool design.)
Thank you for any ideas!
I’m sure it’ll look amazing with the small riverbed flowing into the pool. I would definitely spray it first. I would love to see photos when you are done!