

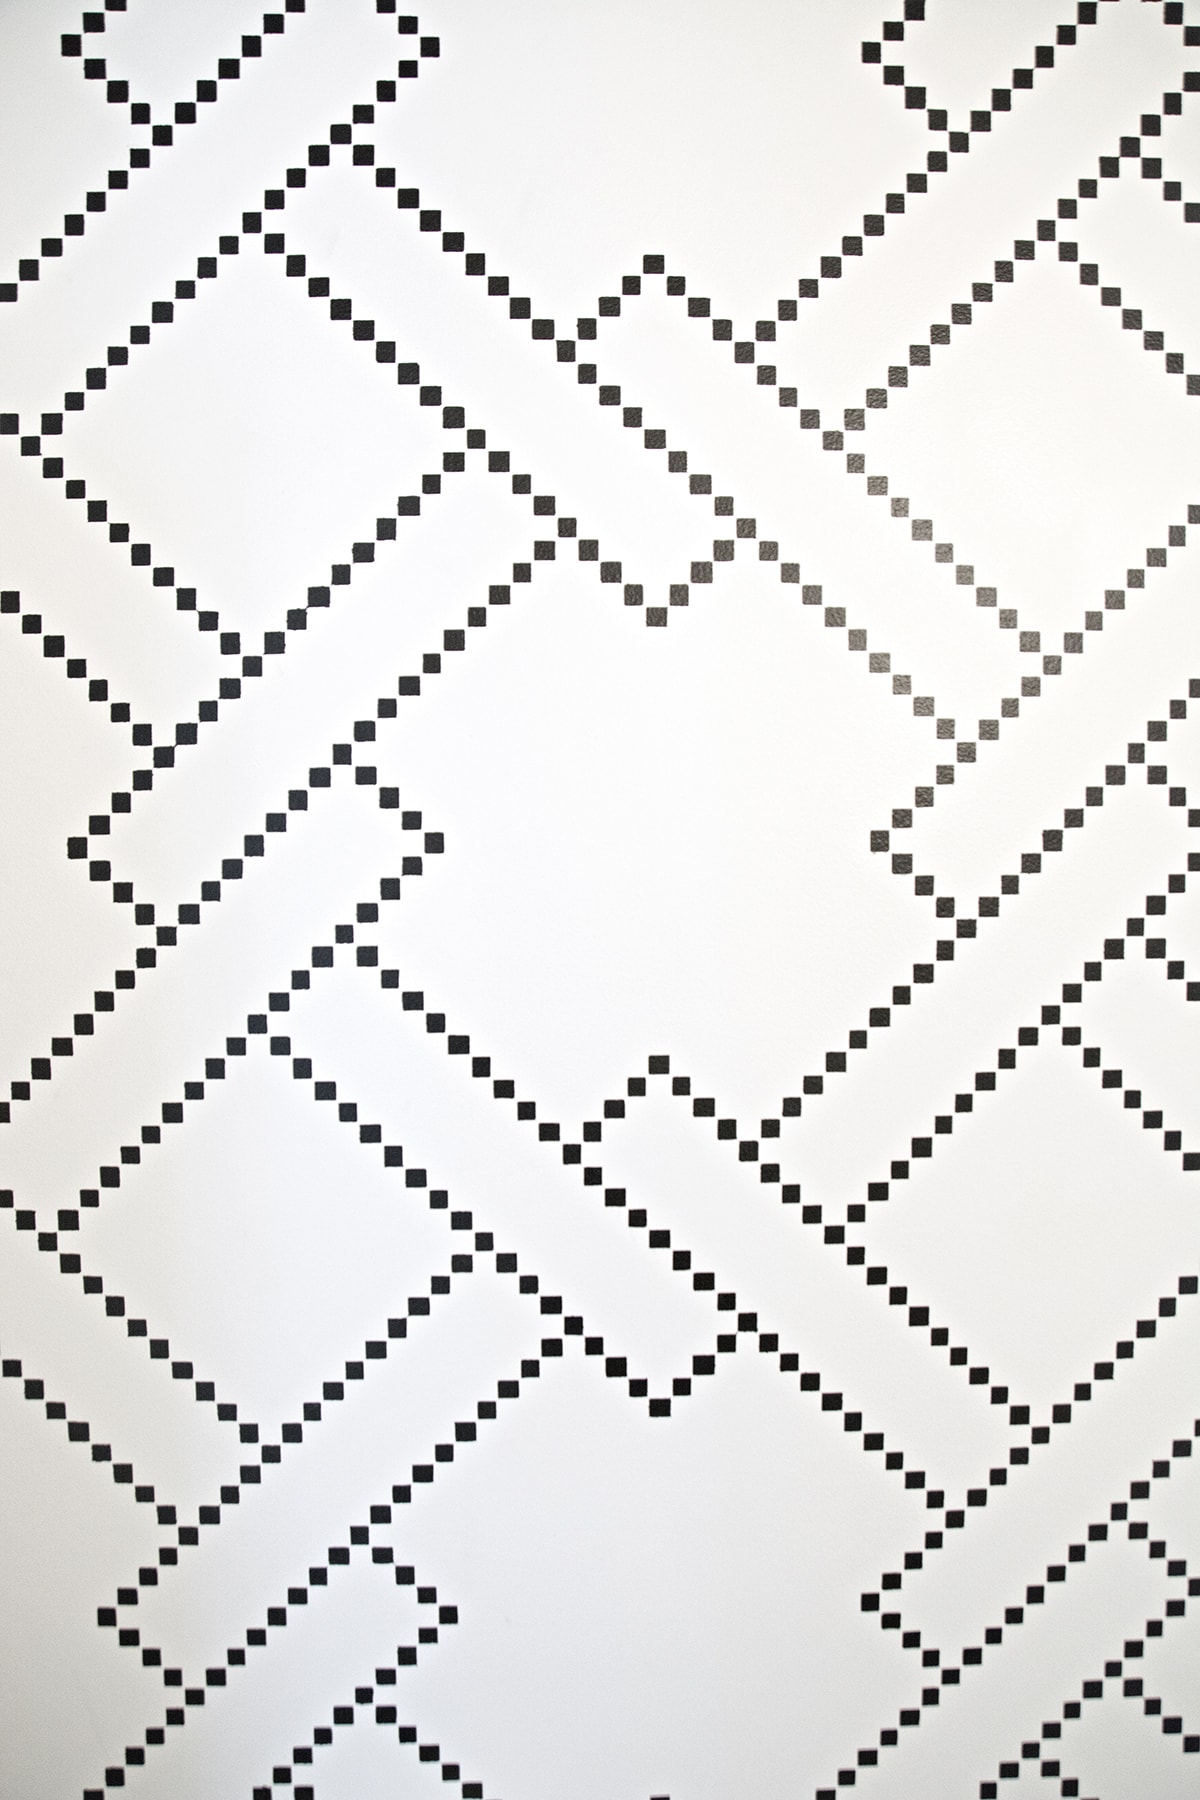
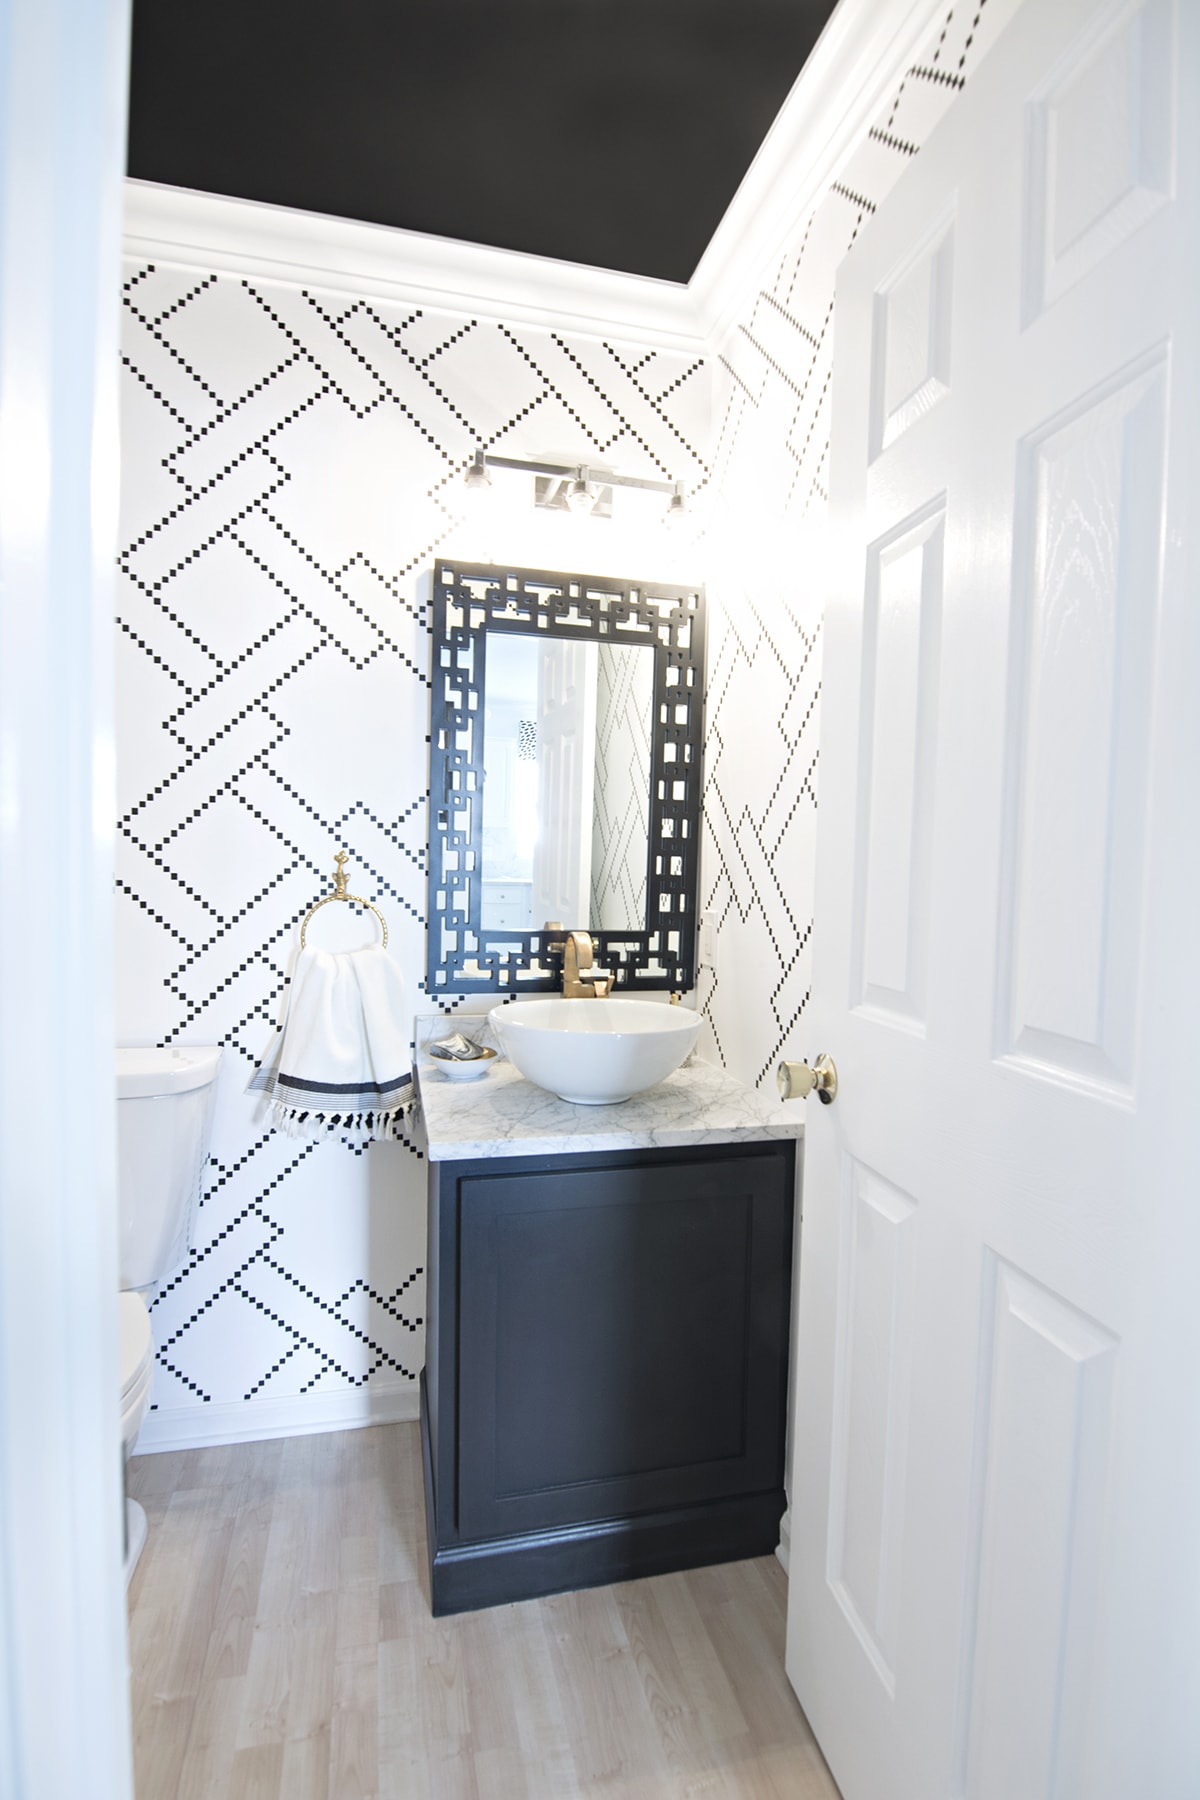
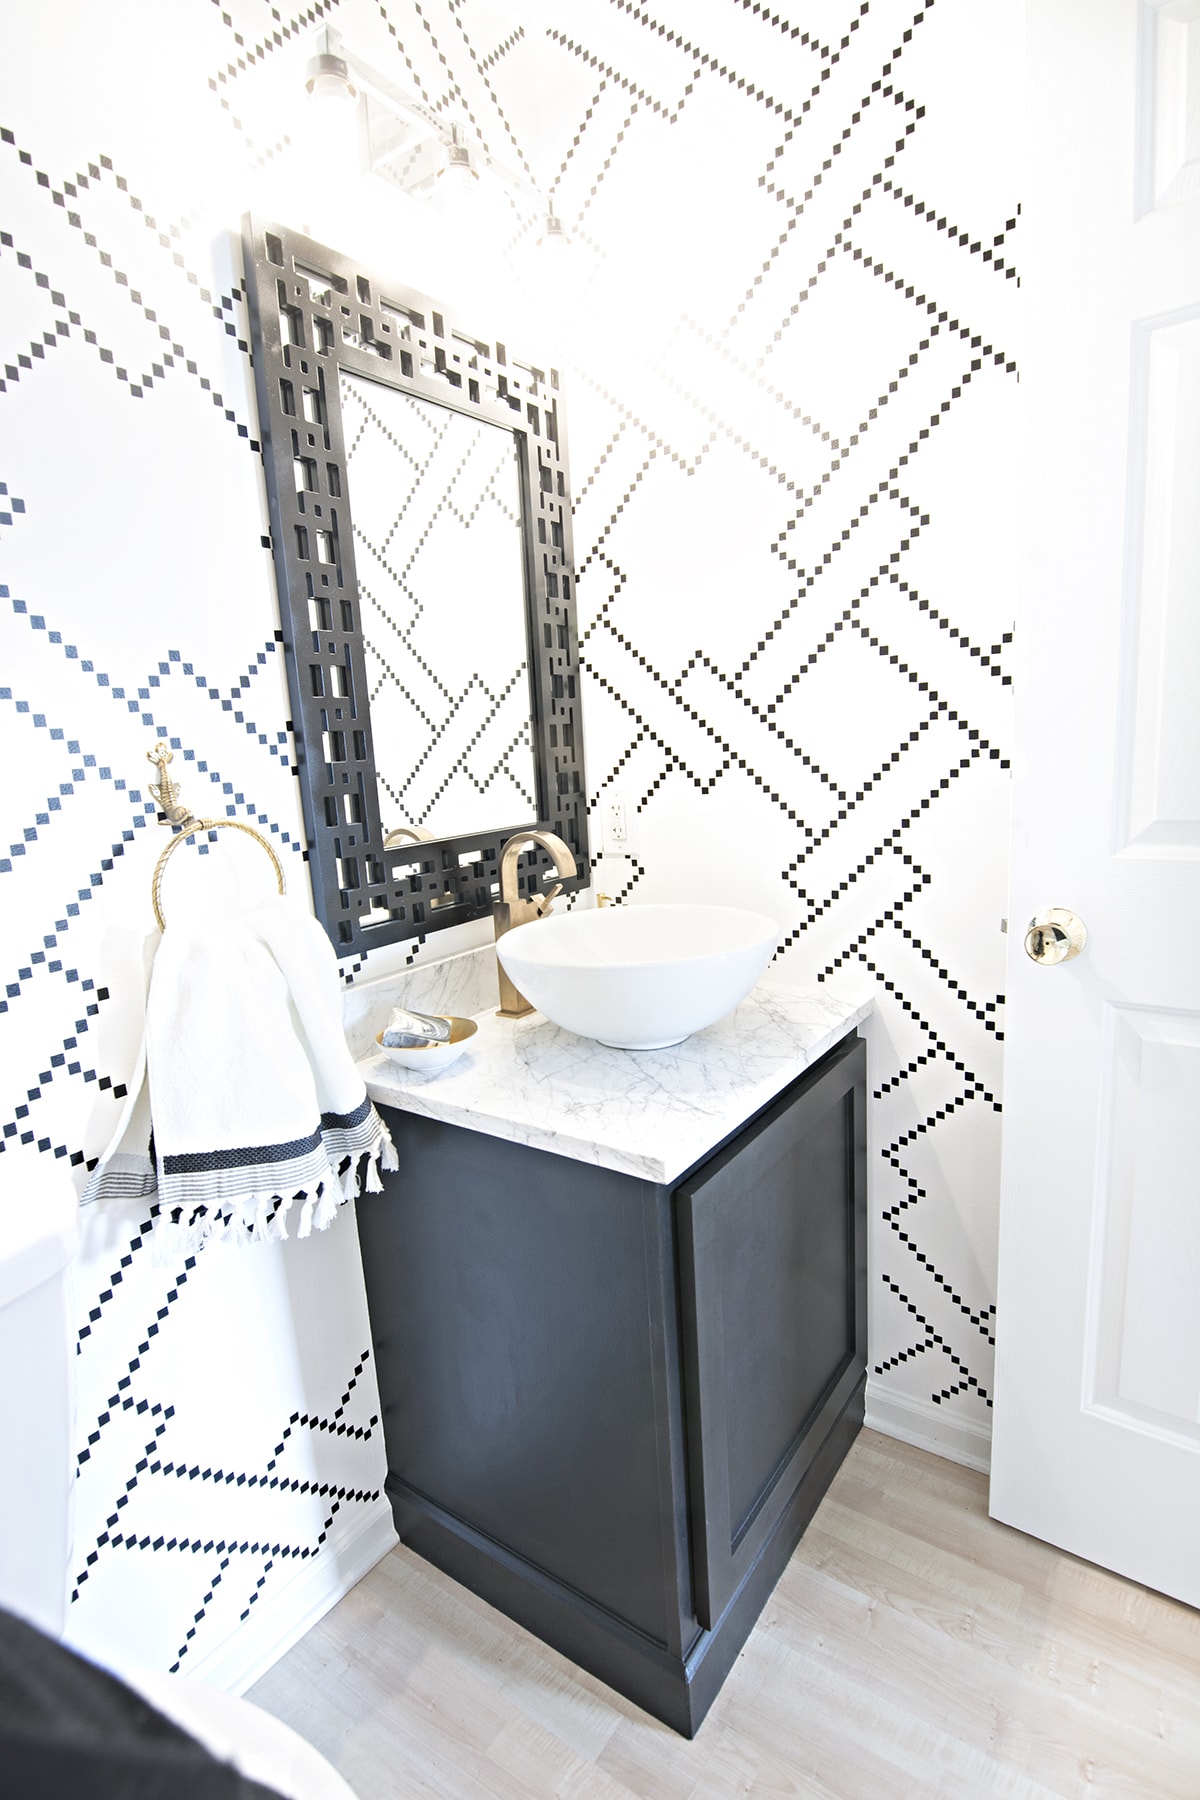
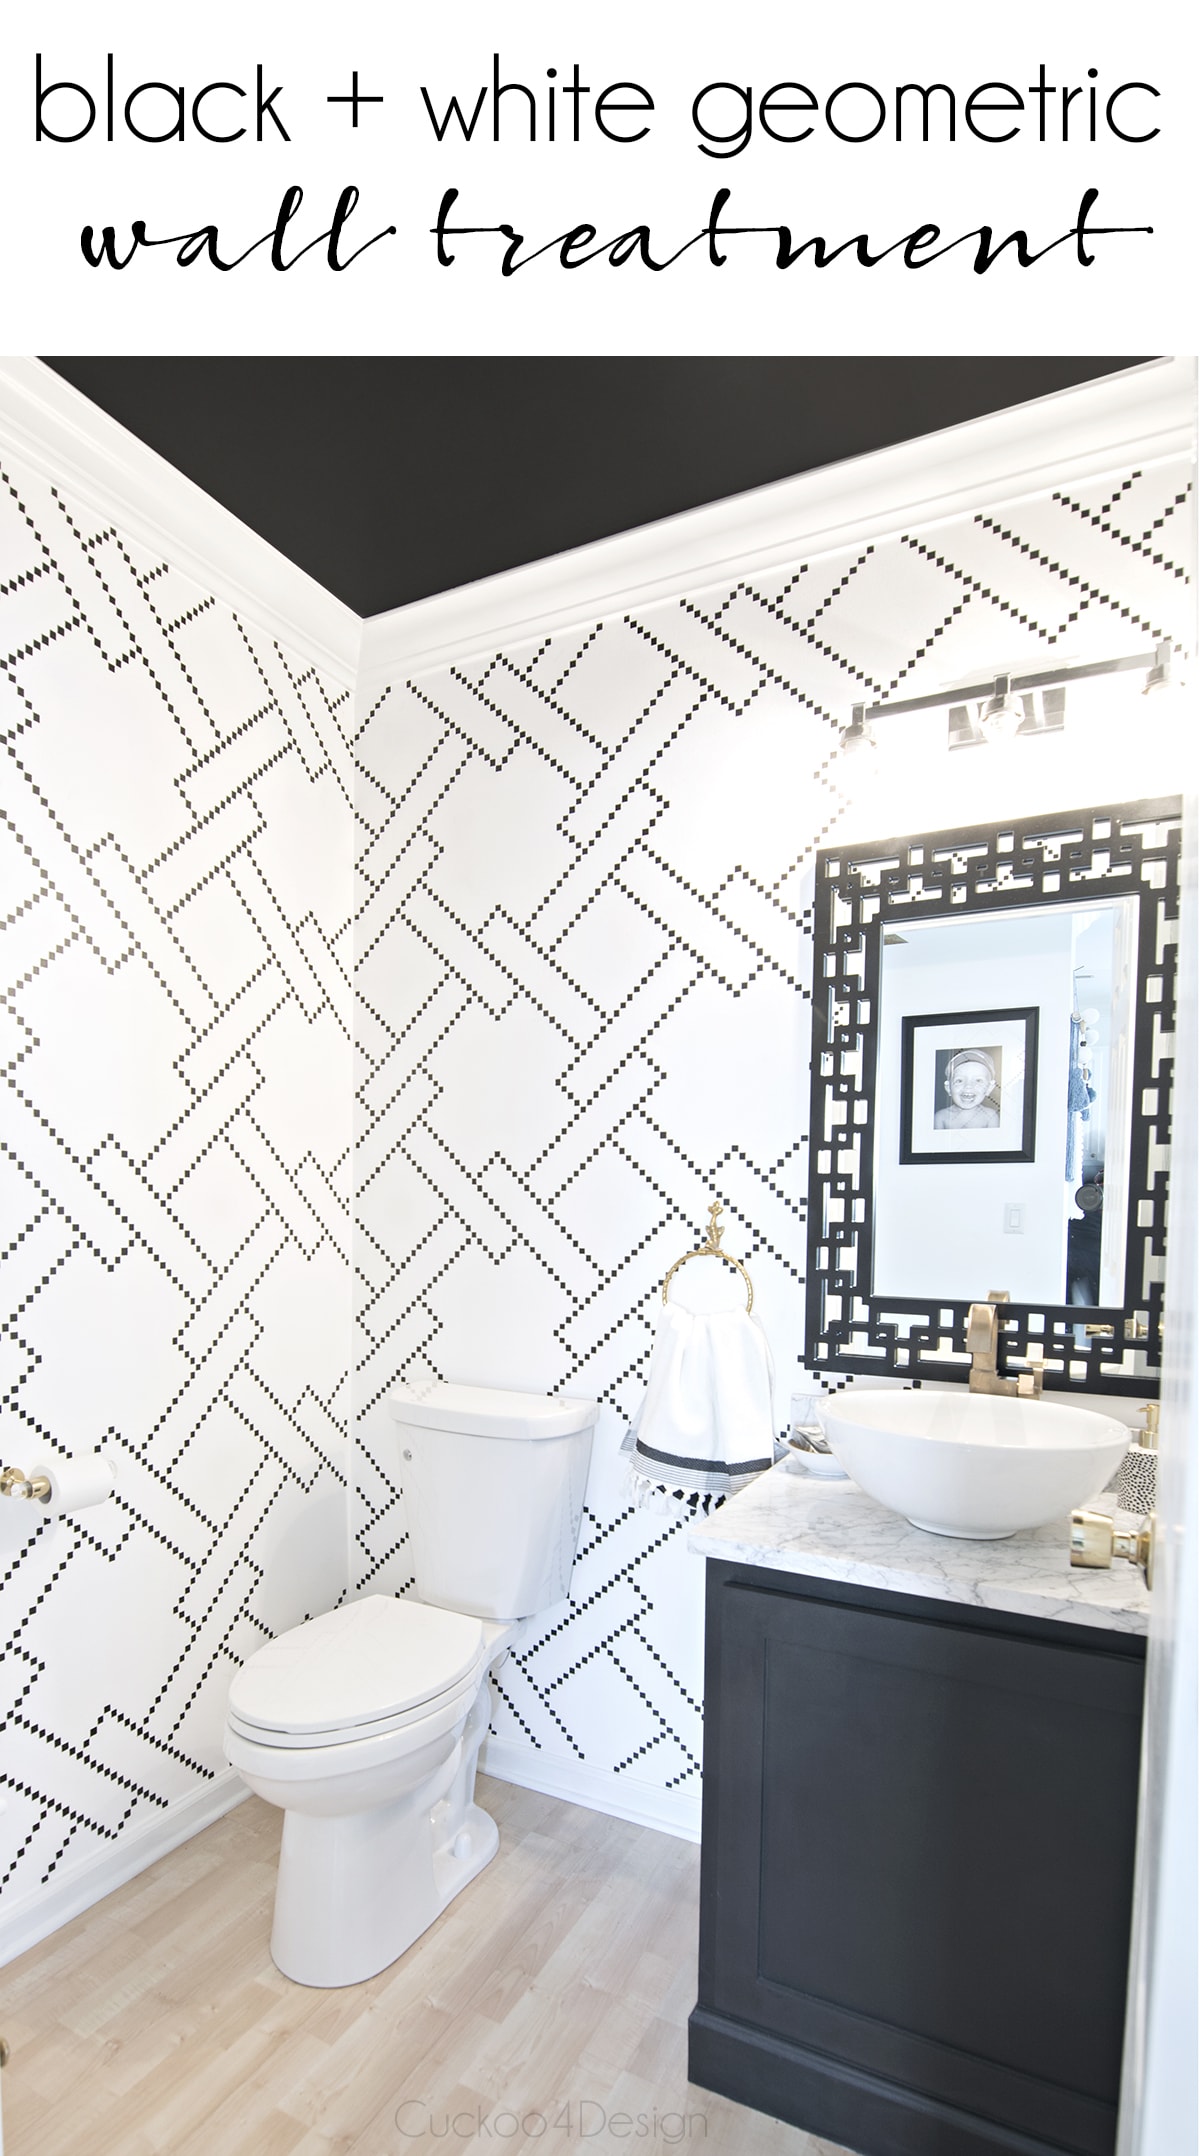
Little black squares stencil wall
I usually love showing my work in a big reveal post but for my powder room it has been in stages (HERE, HERE, and HERE for the posts) because I have been waiting for things. I’m done with my wall but still waiting for the light and the mirror. Guess what I have been contemplating, using the light in our master bath because I never found a reliable electrician to put pendants into my ceiling how I originally wanted. So we’ll see when the light and mirror get here what I will end up doing.
So let’s get to my wall…
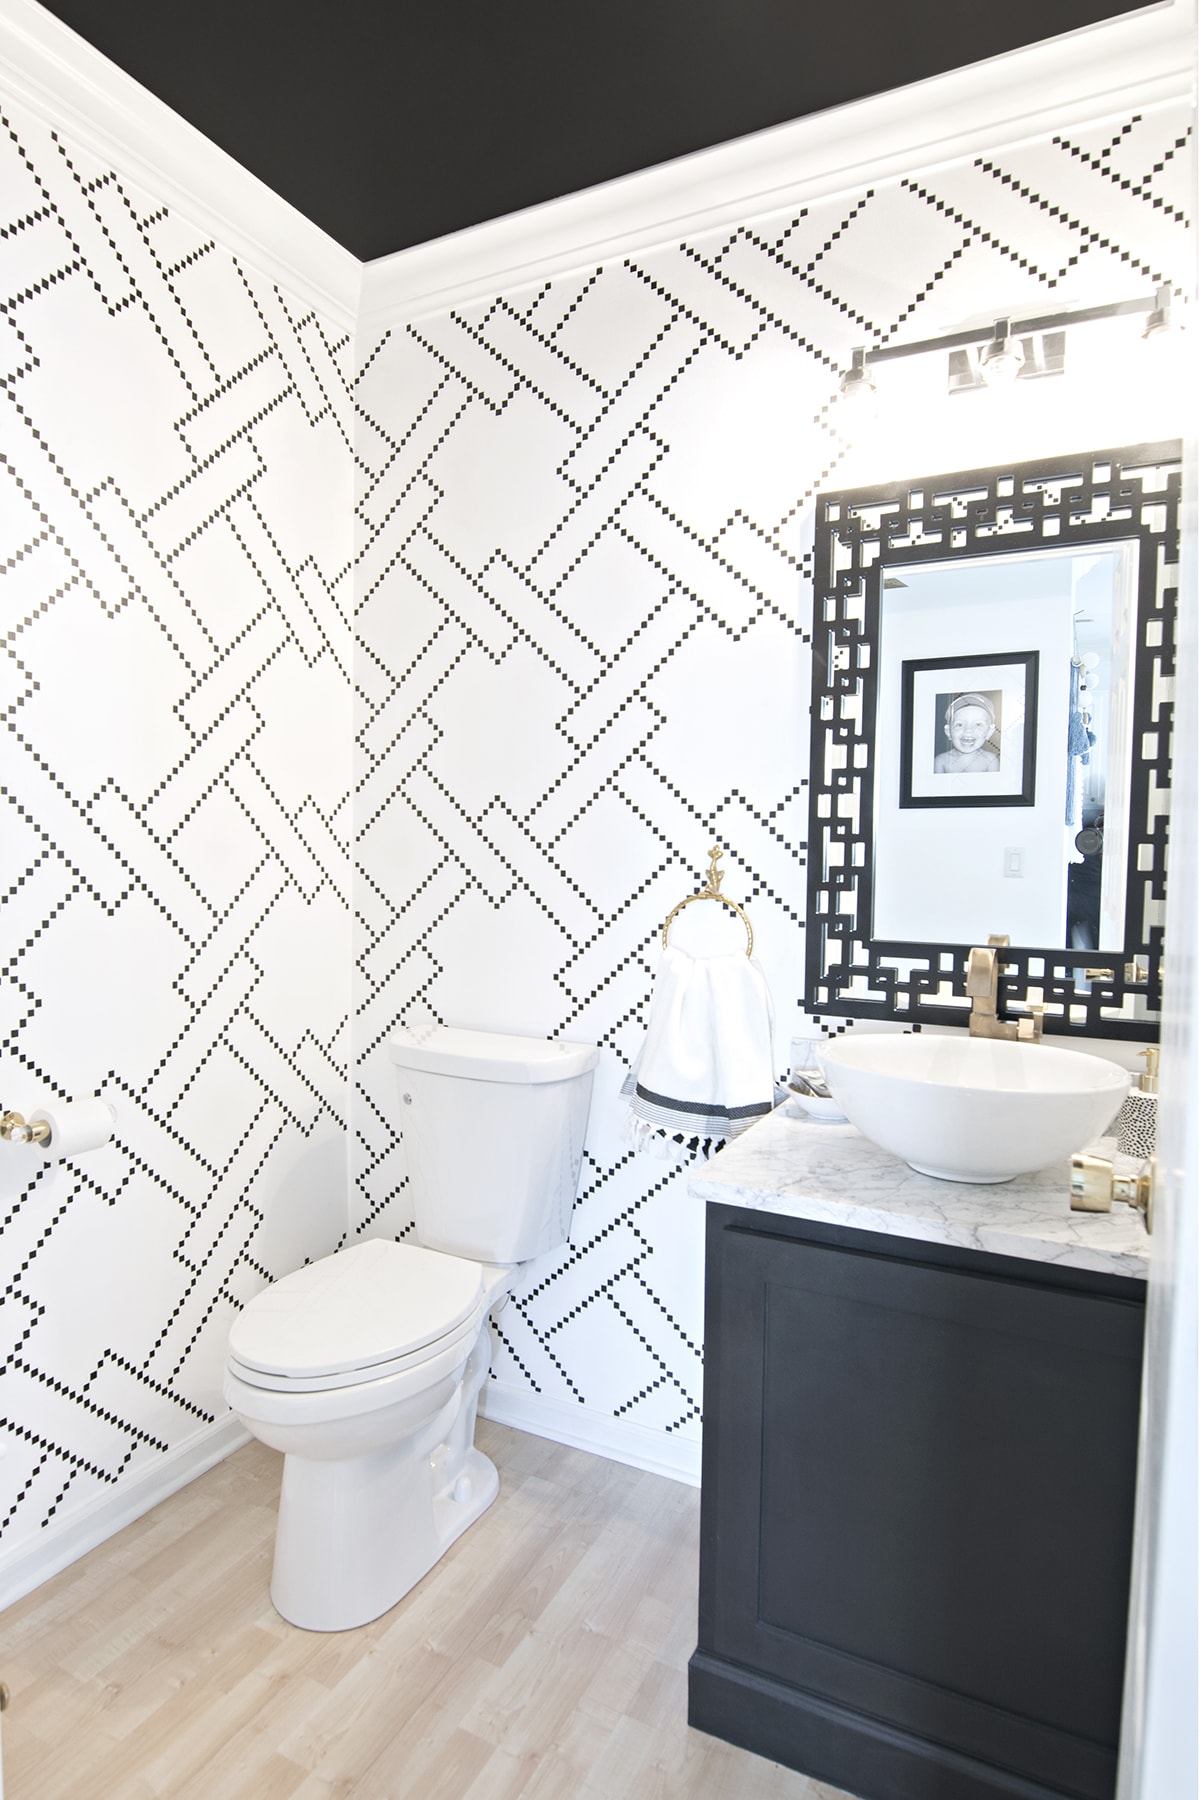
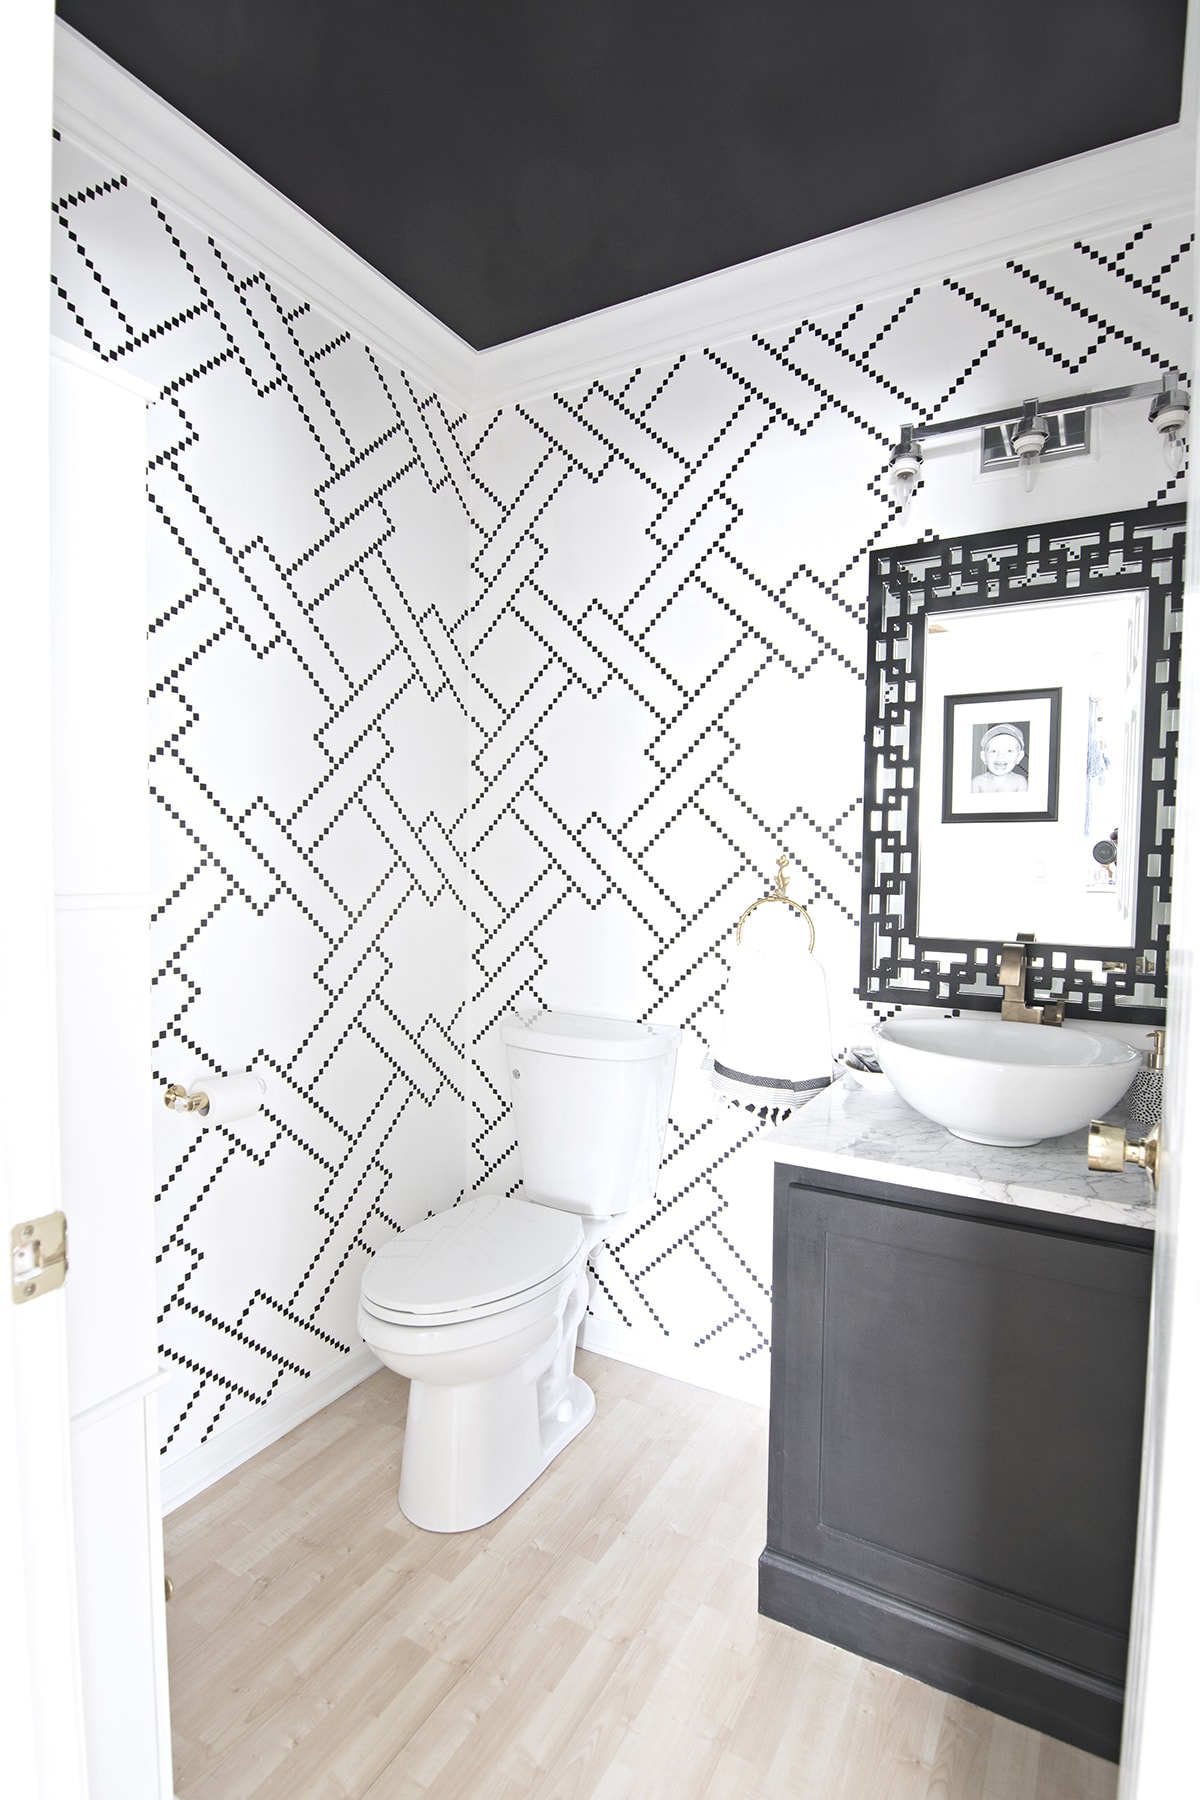
Like I said in one of my earlier posts, I was finally settled on a wall treatment inspired by my favorite bathroom I pinned on Pinterest (HERE is the pin). One of my all-time favorites for sure. I have loved it for such a long time. The interior designer Greg Natale outdid himself. It’s Jonathan Adler-ish and you guys know how much I love him. I’m definitely drawn to black and white geometric patterns and this wall design fits right into my house.
I could have just picked one of the wallpapers I had in my mood boards (HERE) and believe me, I love them all still but this is also a DIY blog on a budget and I had spent enough already on the room.
Little black squares stencil wall
This post may contain affiliate links from which I will earn a commission at no extra cost to you. View my full disclosure policy.
Here is my mood board that I made.
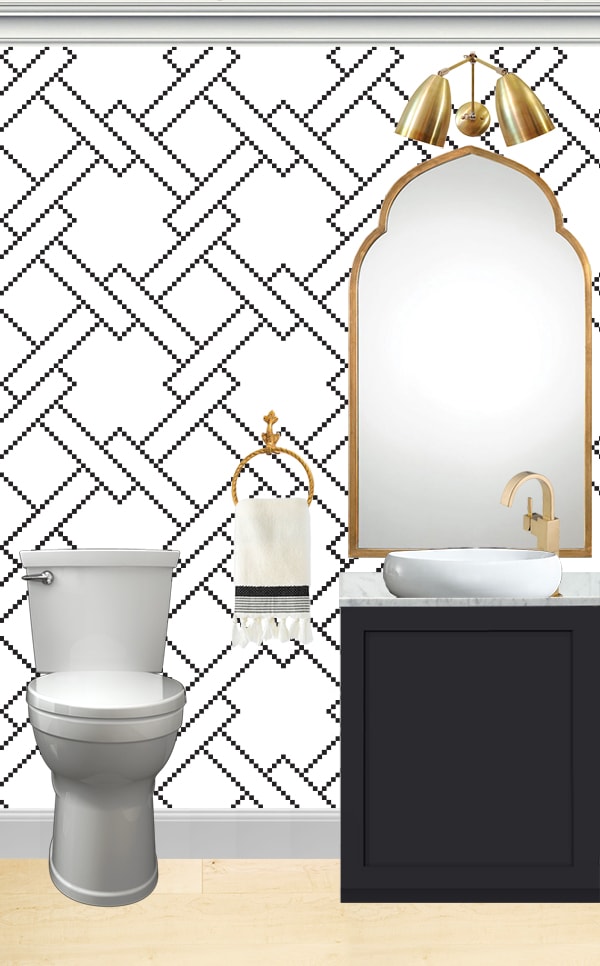
sink HERE | pop-up drain HERE | faucet HERE | lighting HERE | cabinet door HERE | mirror HERE
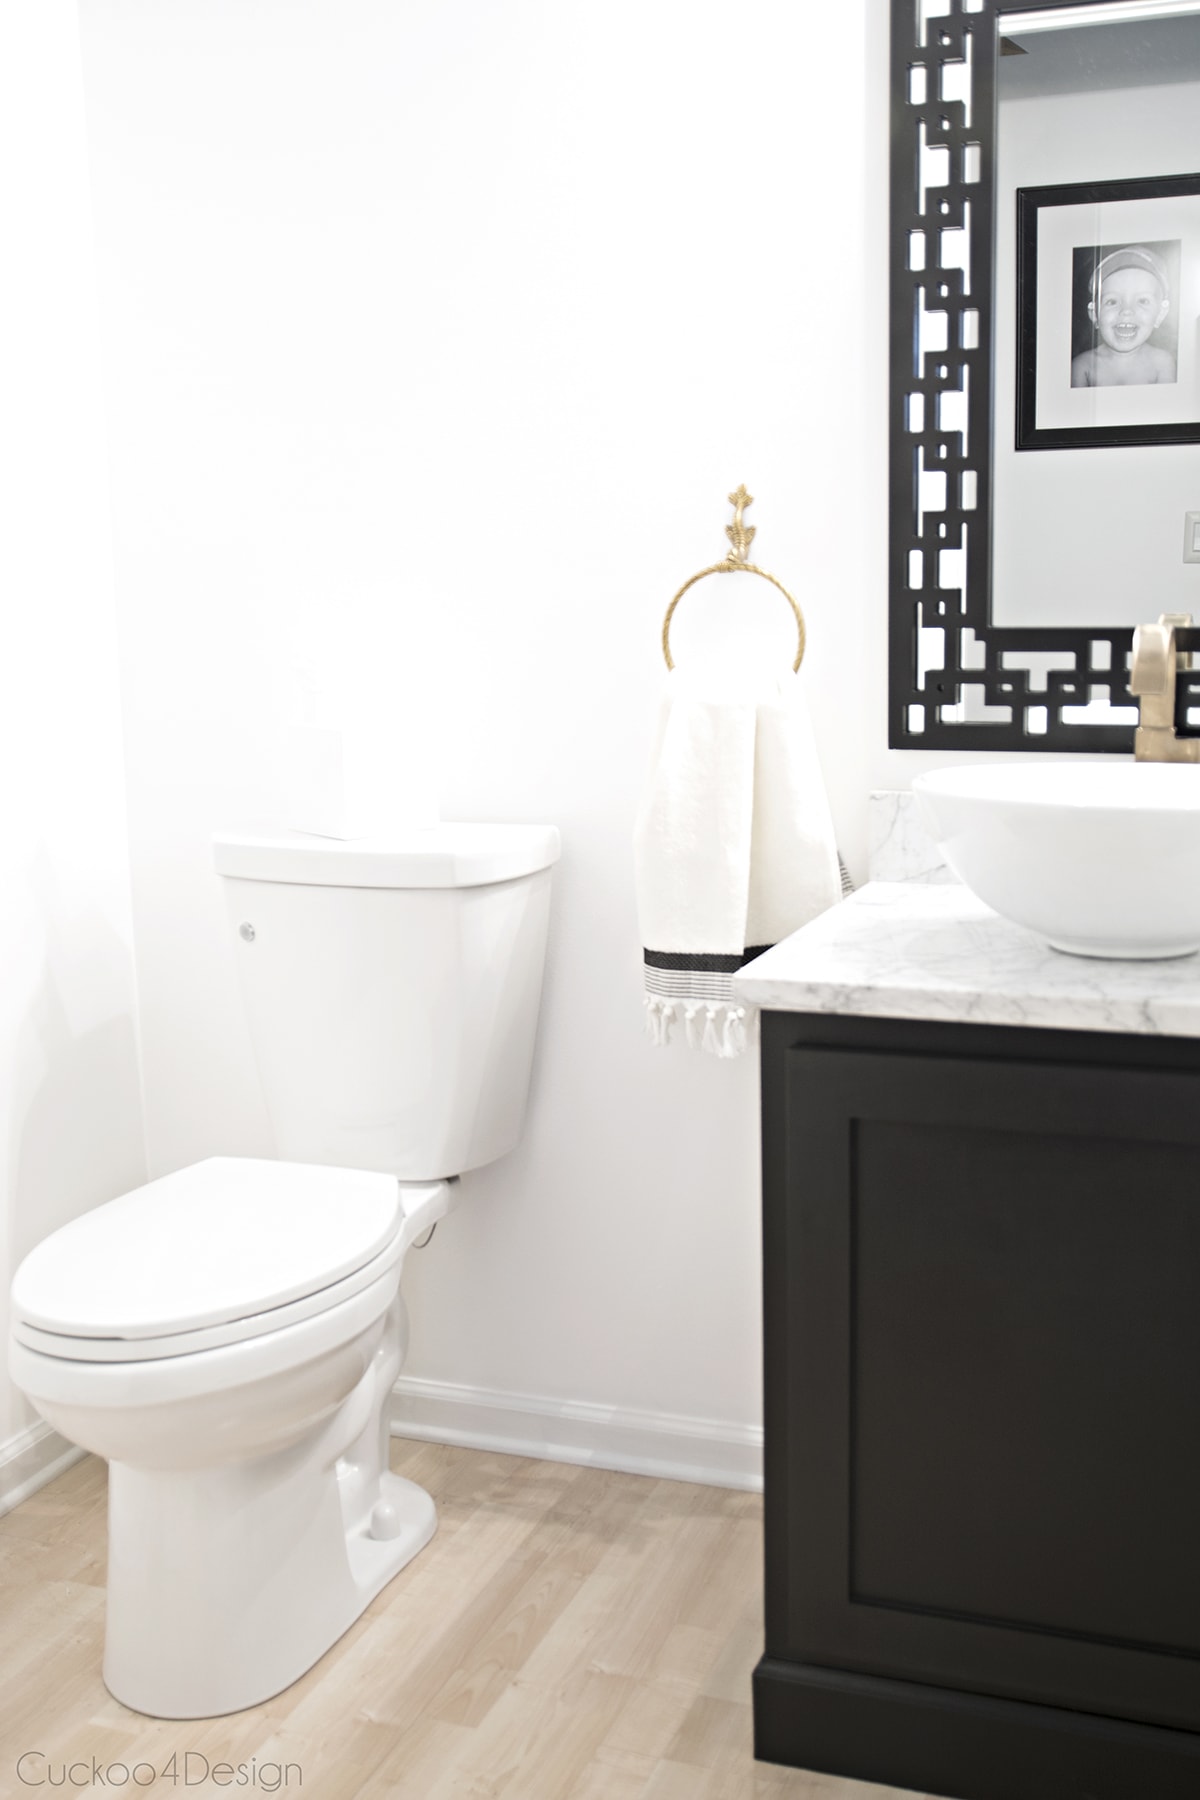
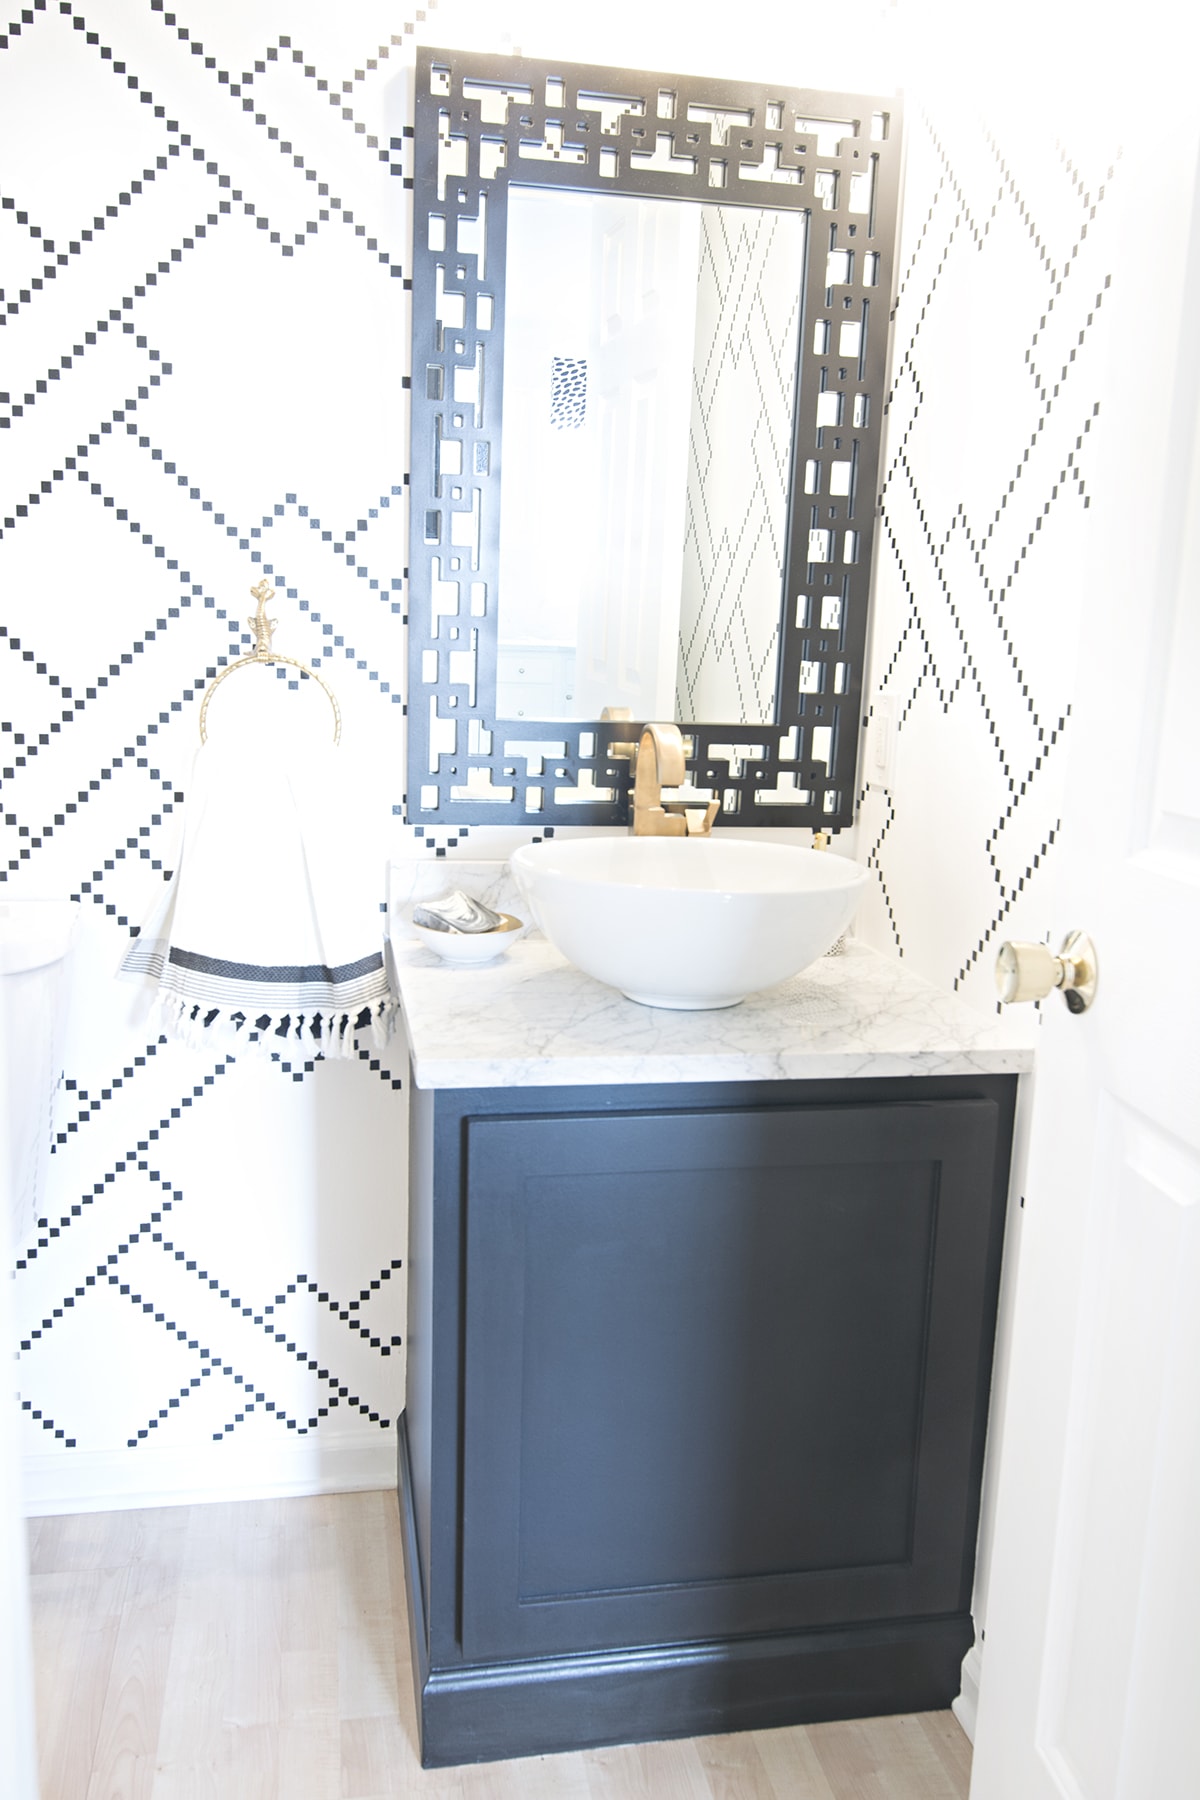
And the unpainted wall which looked nice already too but I wanted more. And remember I’m still waiting for the mirror and light, the reason I don’t want this mirror in the room is the little cutouts and how much work it is to keep this mirror clean when water splashes on it. It is a lovely mirror though and goes well with this room.
Also, check out how I gave the cabinet a kick plate makeover which helps make it look high-end and custom.
I just made the file for the stencil in Adobe Illustrator and wrote to iStencilsOnline to see if they could cut it for me. They sure could. Super nice customer service by the way and they went above and beyond to get me my stencil. You can buy the stencil HERE, HERE in full (and in one square HERE and HERE)
I’m not a stenciler. Never have been because I always used my own decals. So I read their tips and tricks on their blog (HERE) and also watched some youTube videos. Ultimately I came to the conclusion that I wanted to use water-based Sharpie again to trace the squares because I didn’t want to load up the huge stencils with all that paint and worry about using too much paint on my stencil brush and roller. I had bought all the stuff already but decided differently anyways.
Materials used for this project:
• about 4 black water-based Sharpies
• stencil from StencilsOnline
• large and small level
• ruler
• painters tape
• packaging tape
• box cutter to cut the stencil
• clear satin water-based polycrylic
• paint sprayer
(ceiling is Dark Kettle Black (4011-2) and walls are Ultra White (7006-24) both by Valspar)
Remember my last wall treatment in this powder room was water-based Sharpie too? Check HERE to see the project which was only stripes.
So let me show you what I did exactly and sorry for the bad photos. A lot of them were taken with my cellphone as I worked and it’s also so hard to take good photos in it because it’s so small and so dark.
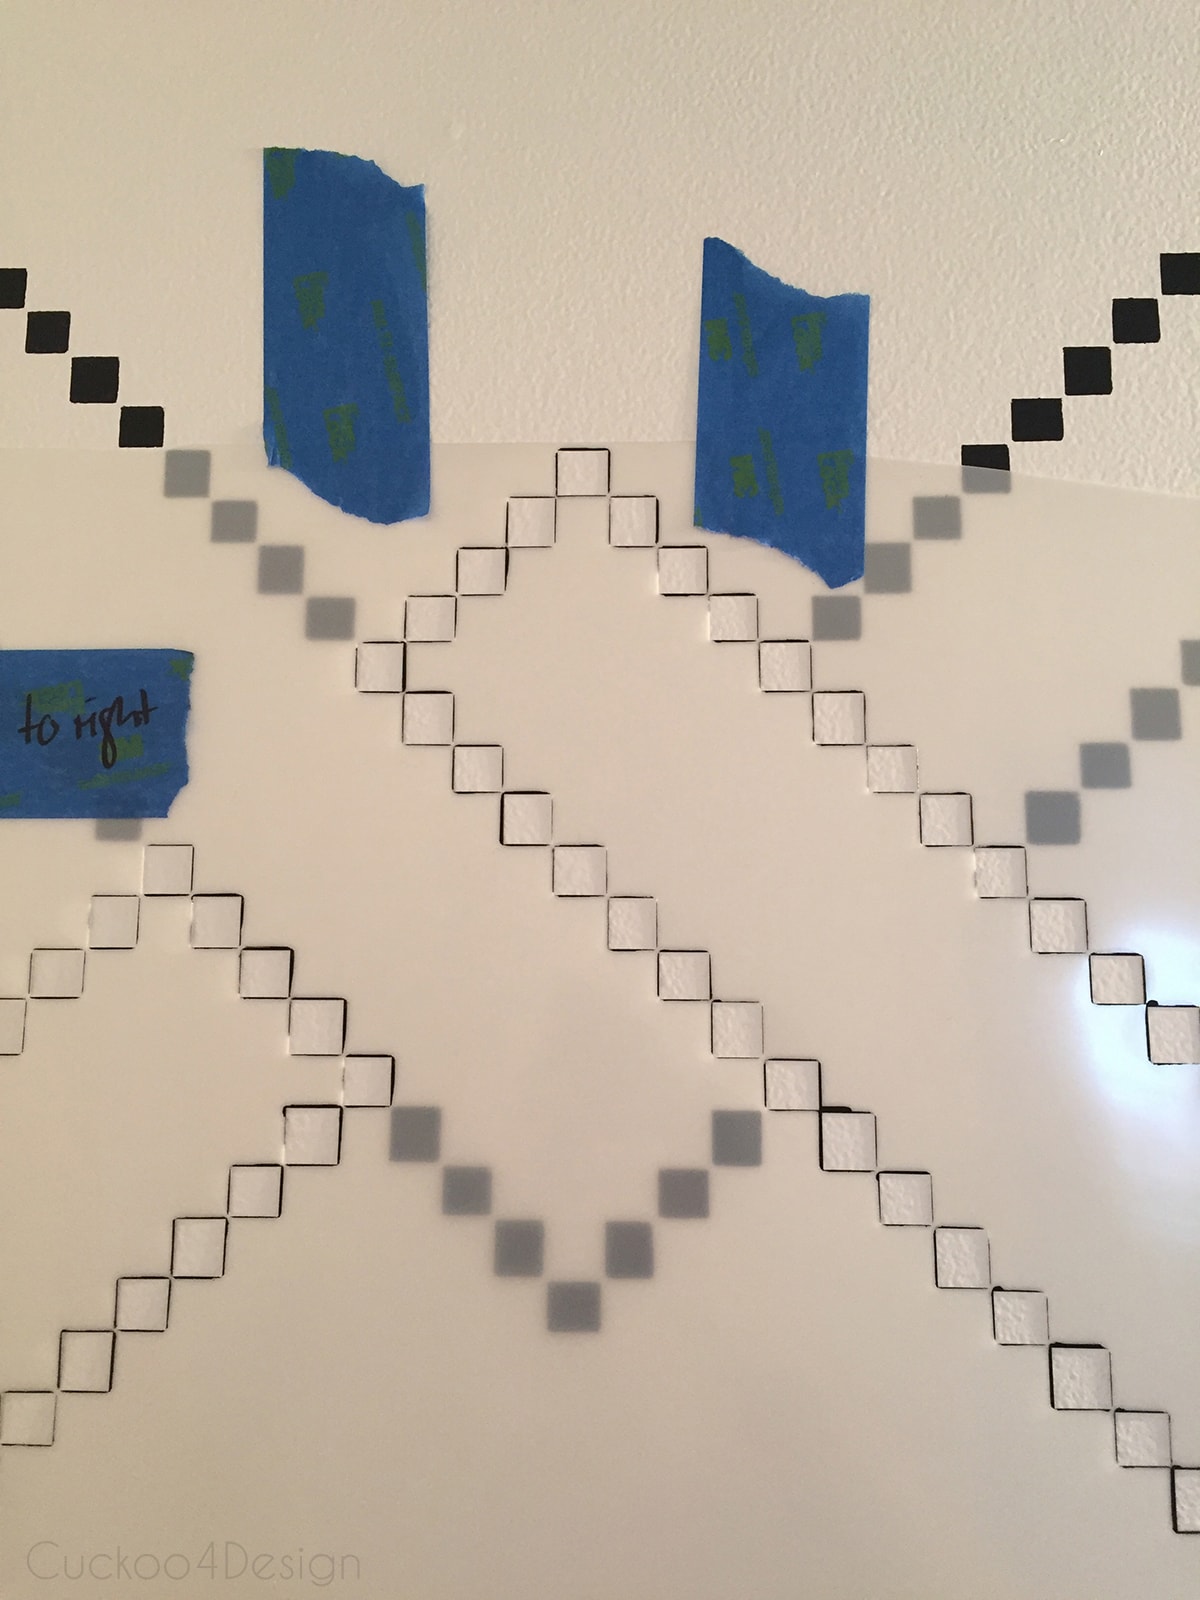
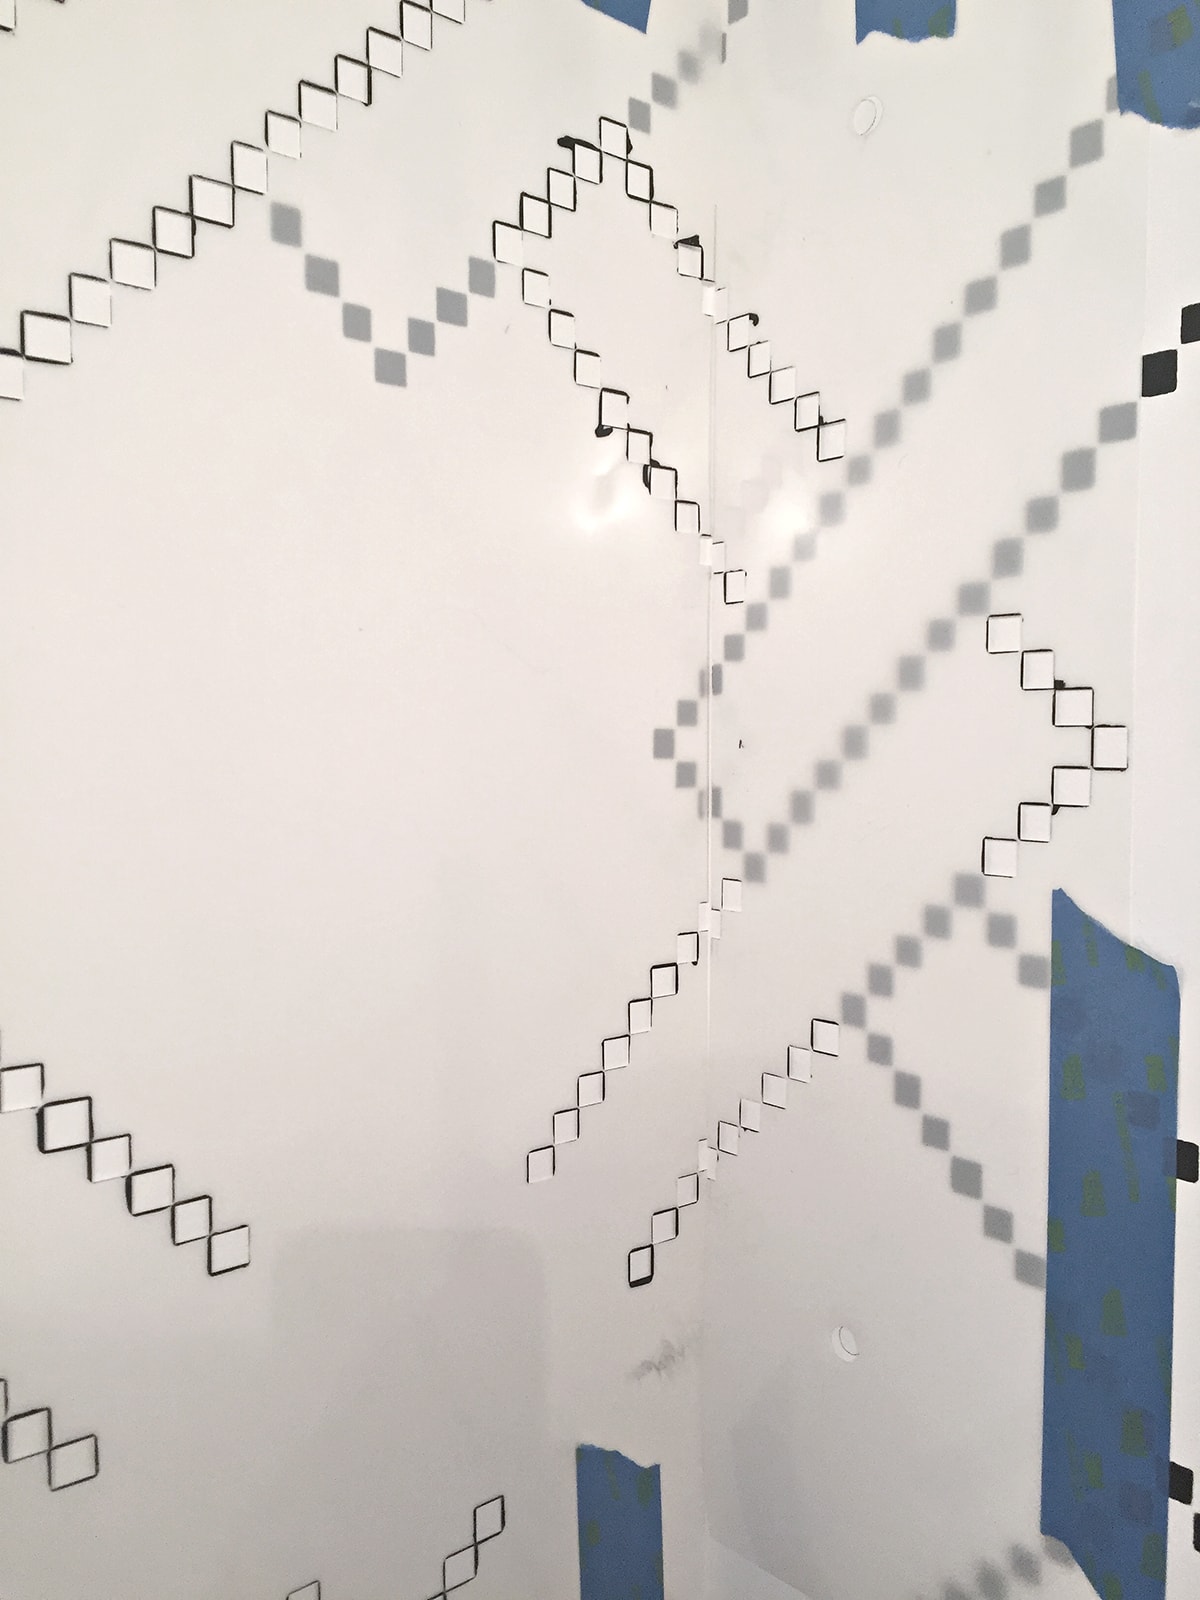
I laid out the stencil to see where and how it would overlap:
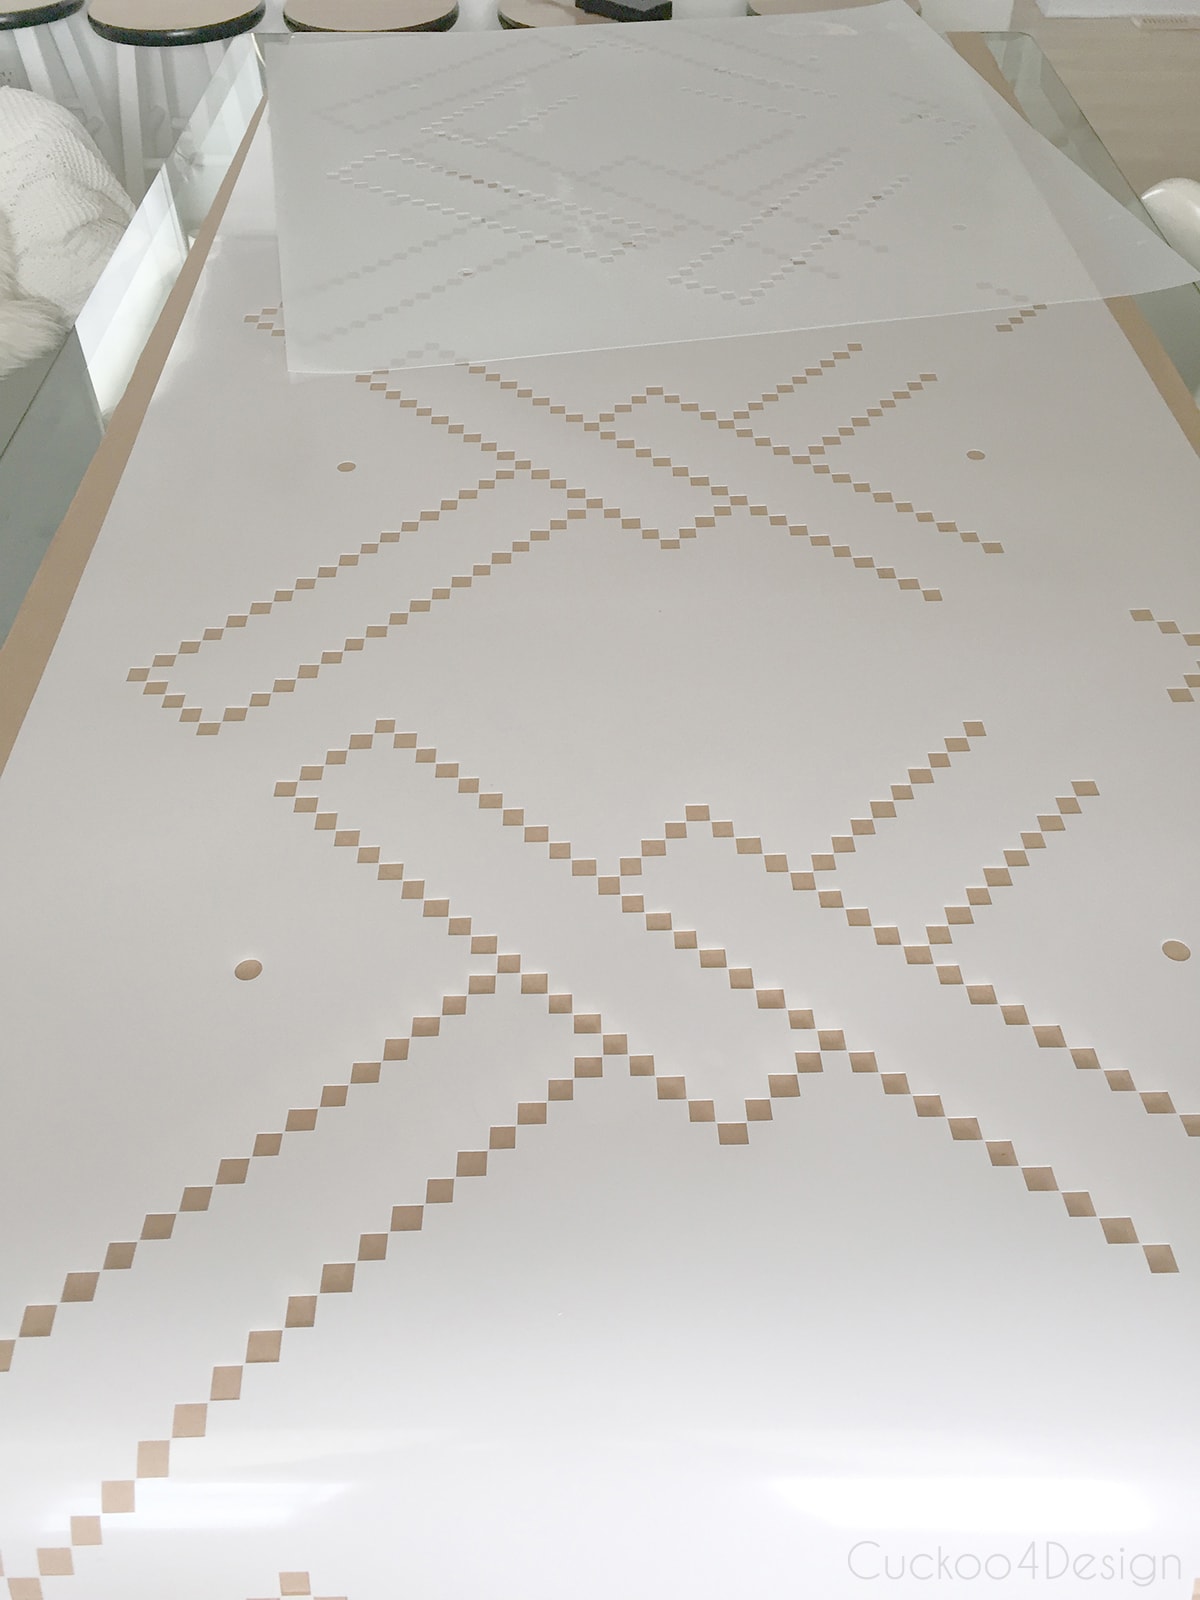
I marked which sides I wanted to have facing up.
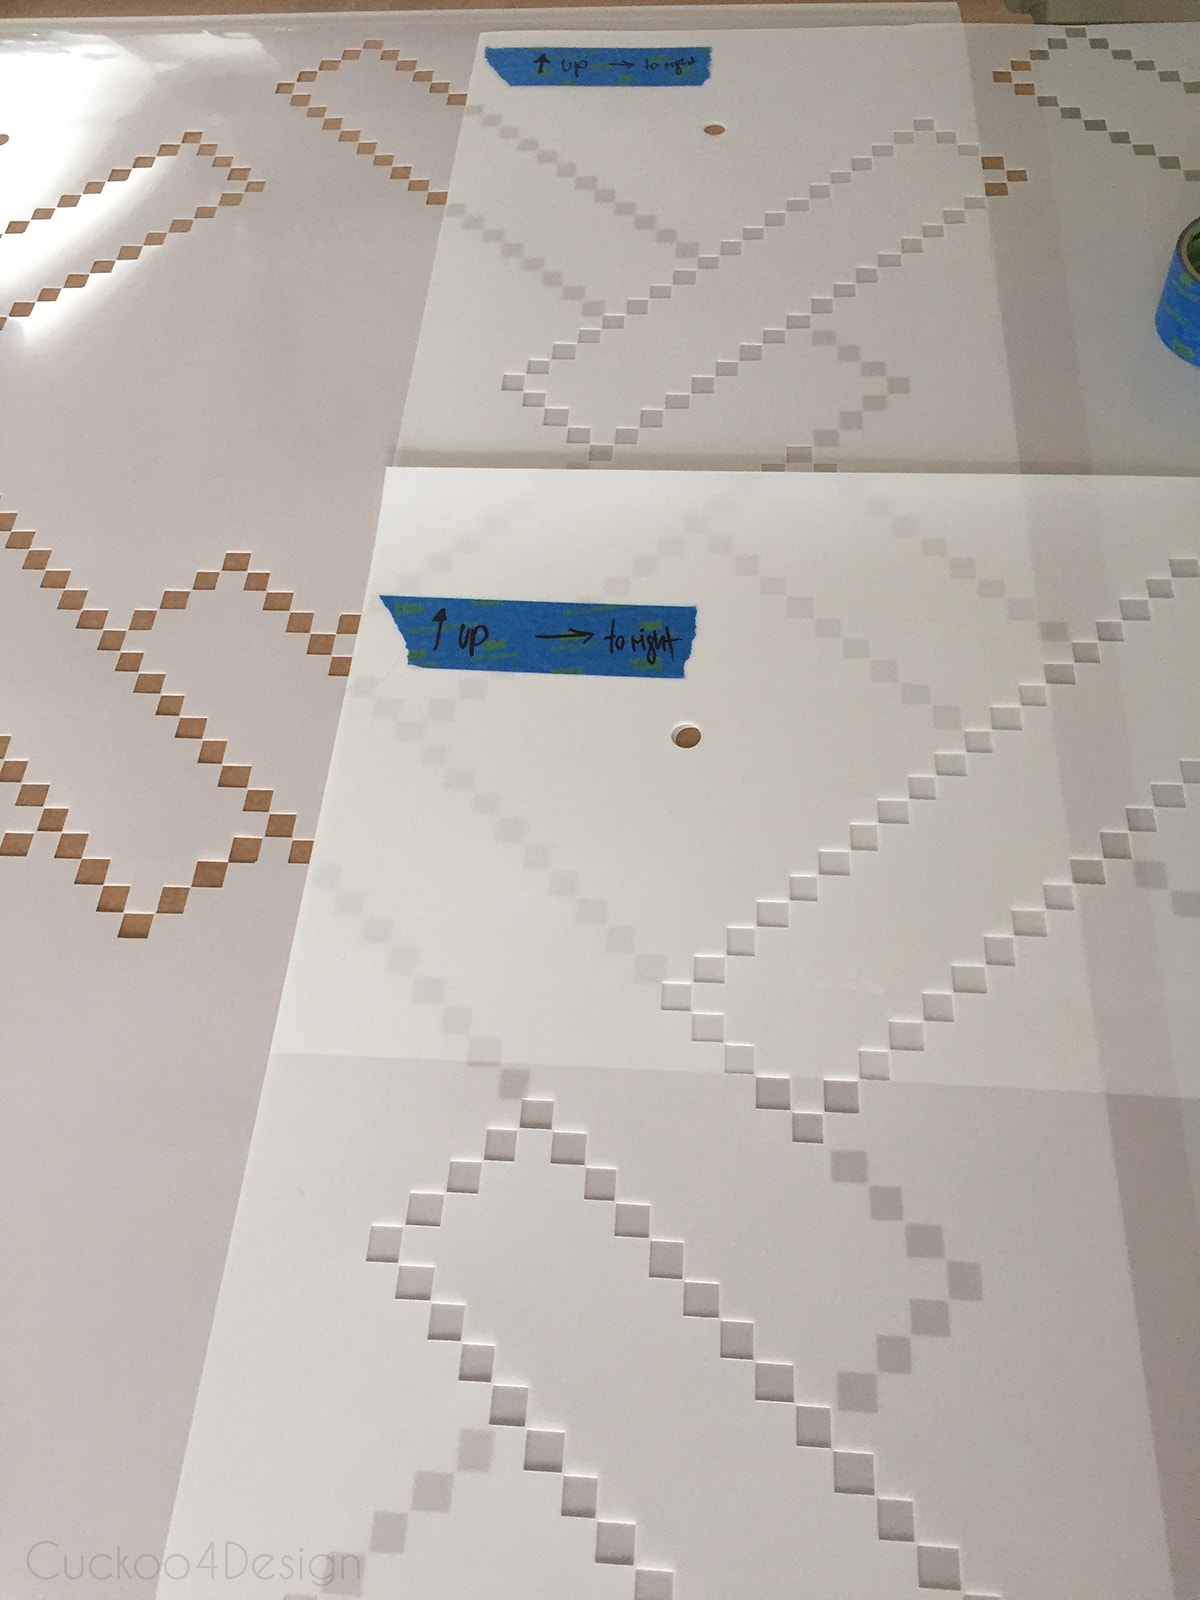
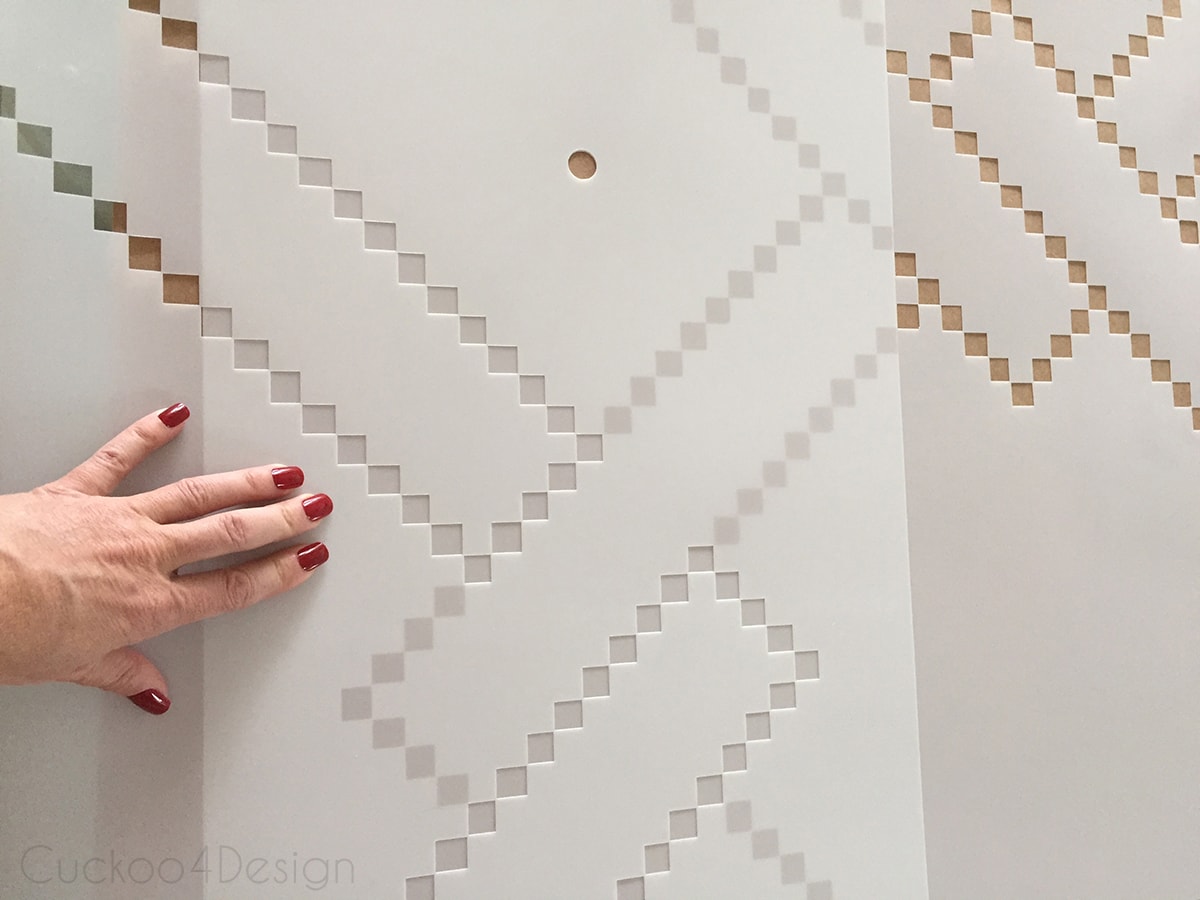
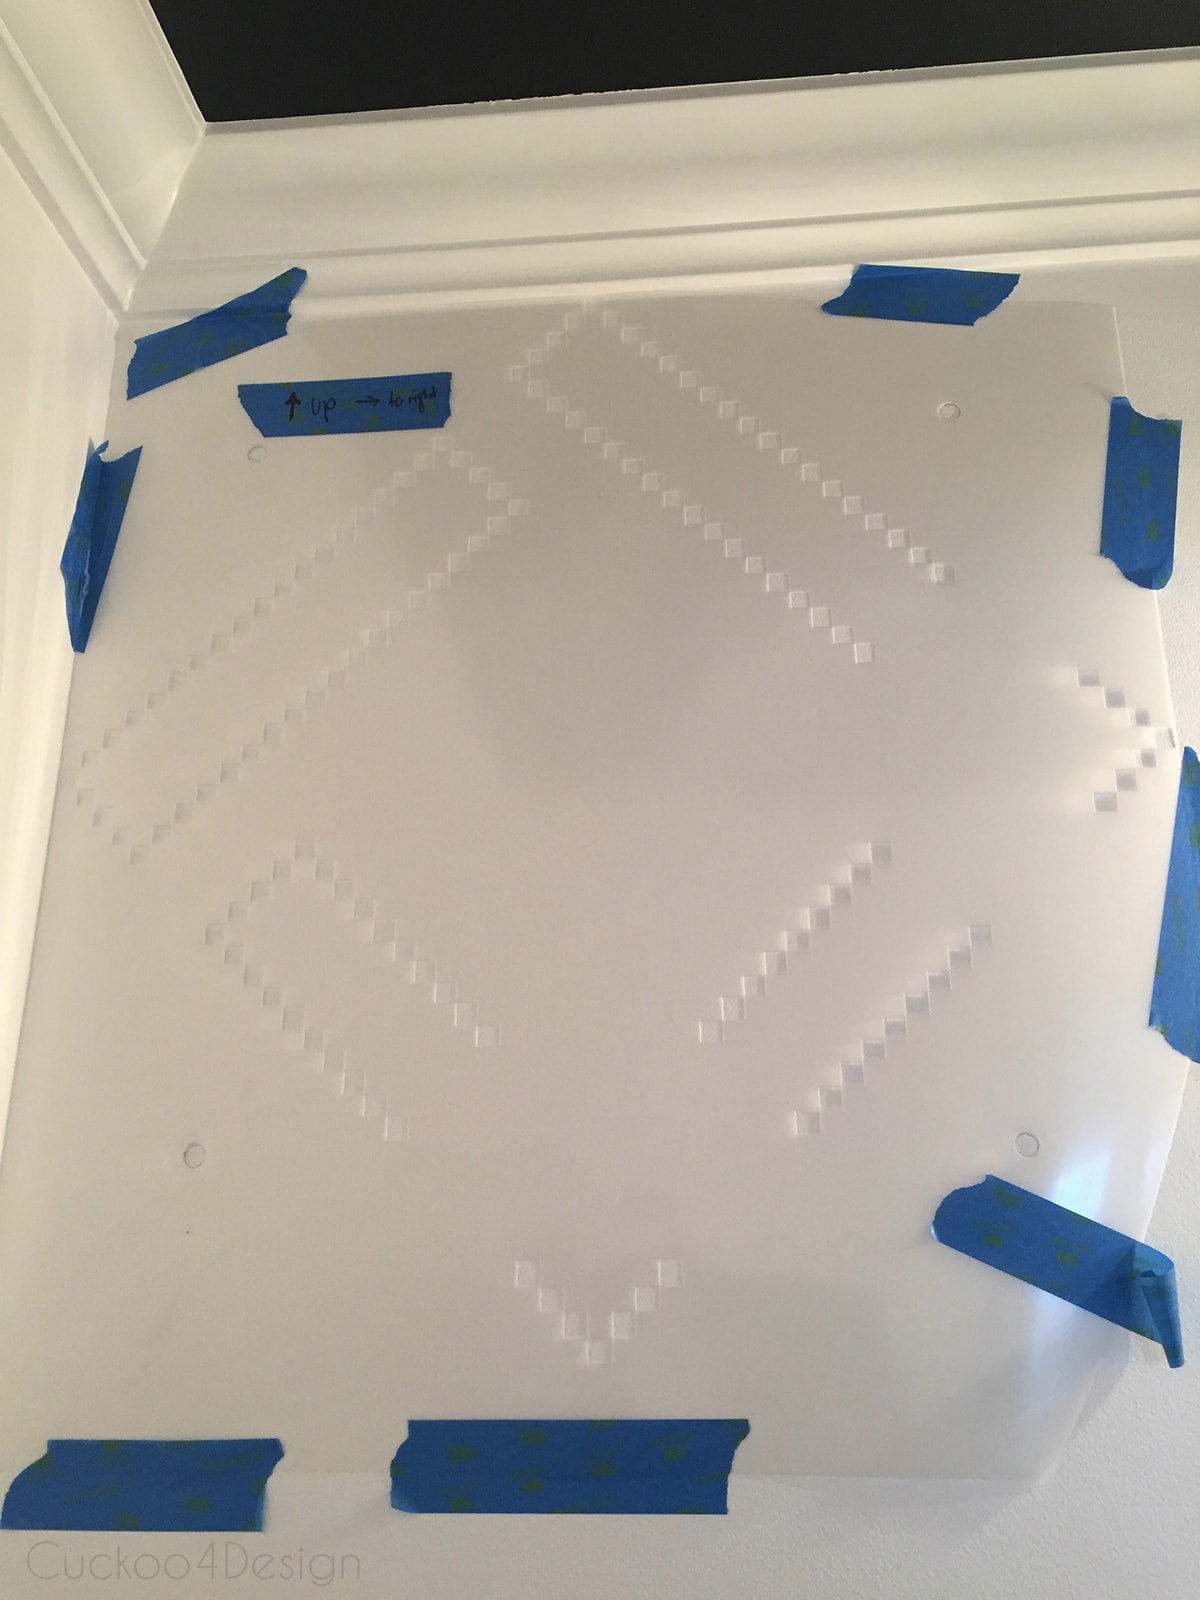
I taped the stencil to the wall and made sure that the squares were level horizontally and vertically.
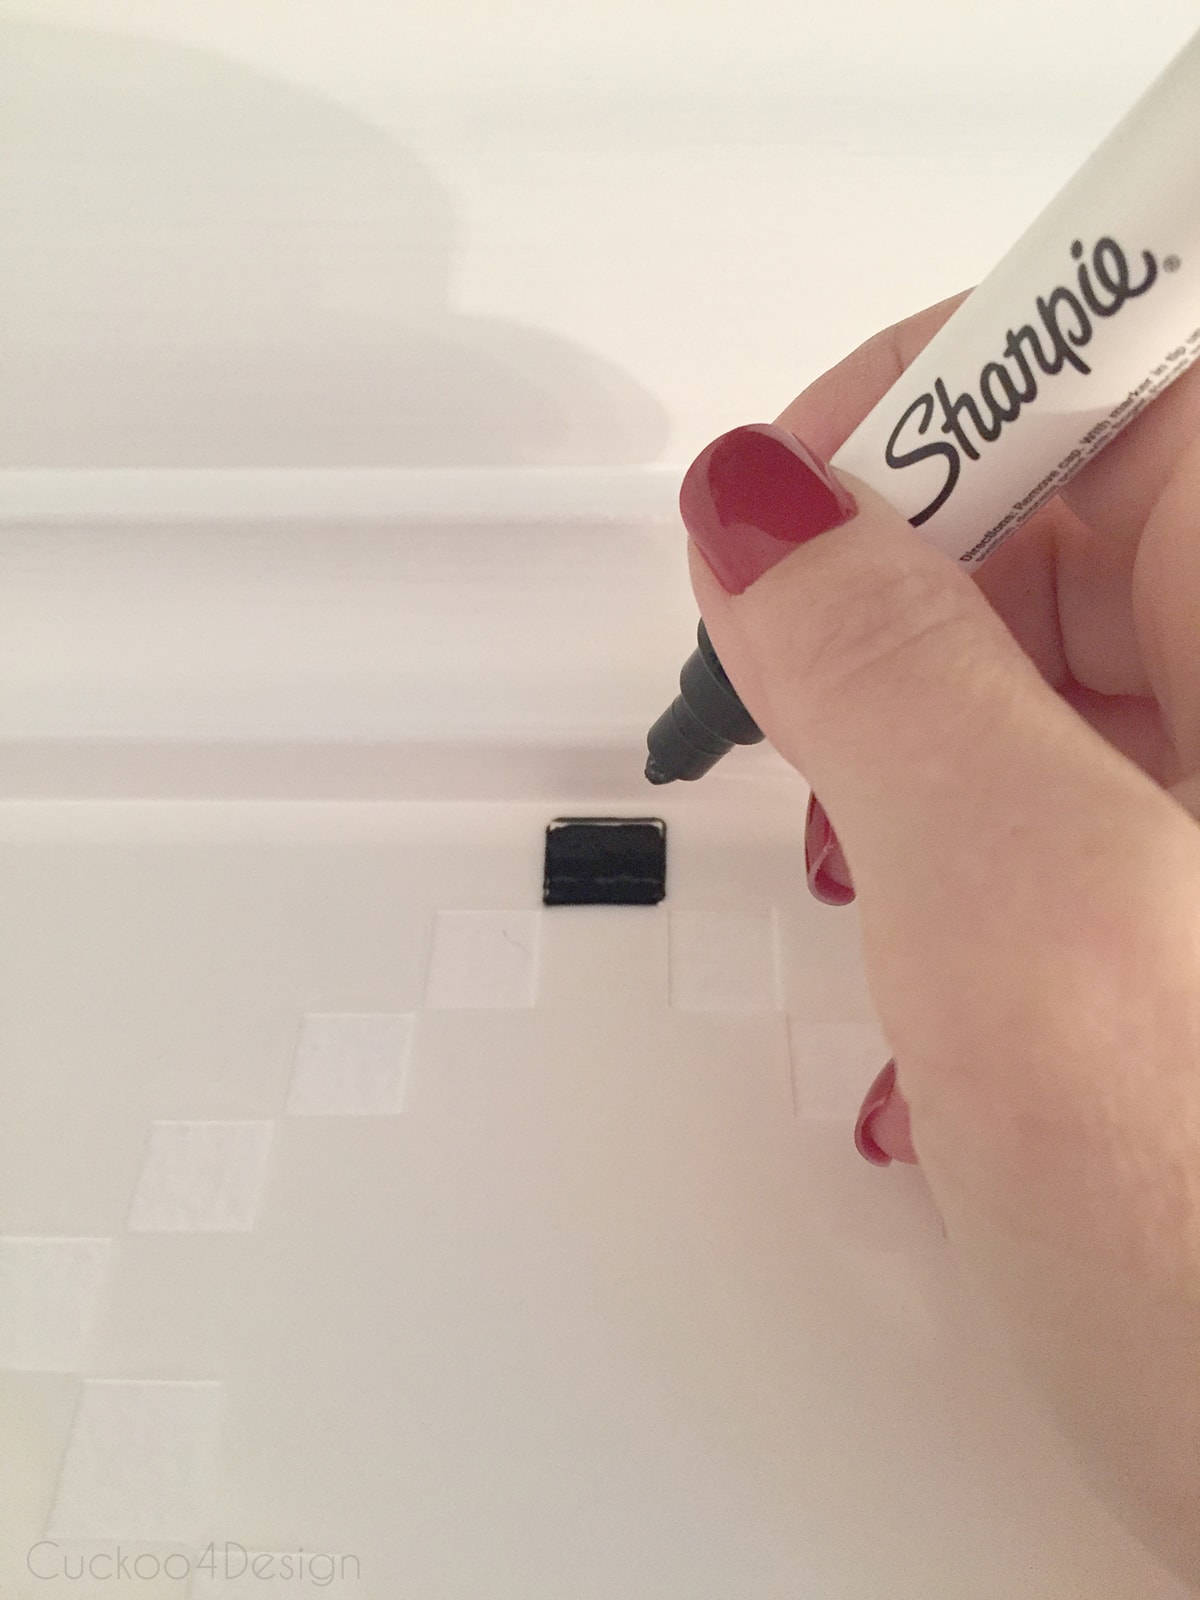
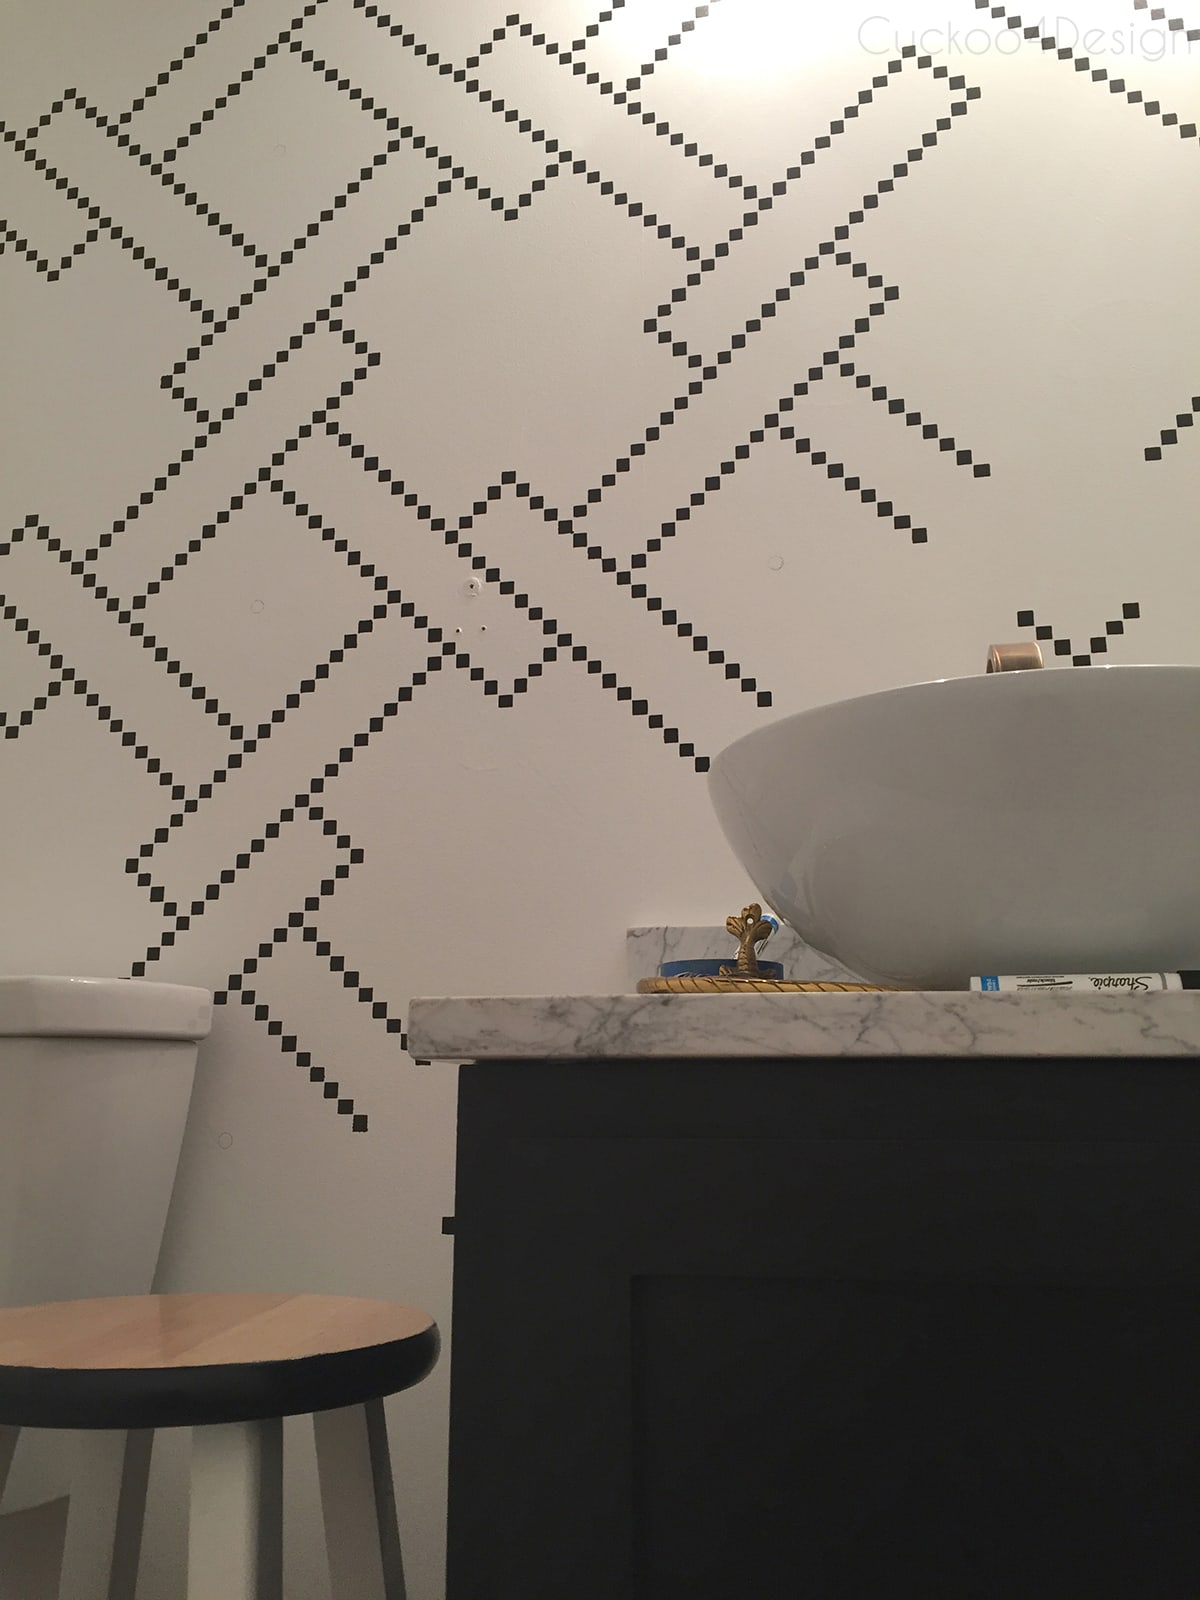
And then I started filling in the squares with the water-based sharpie.
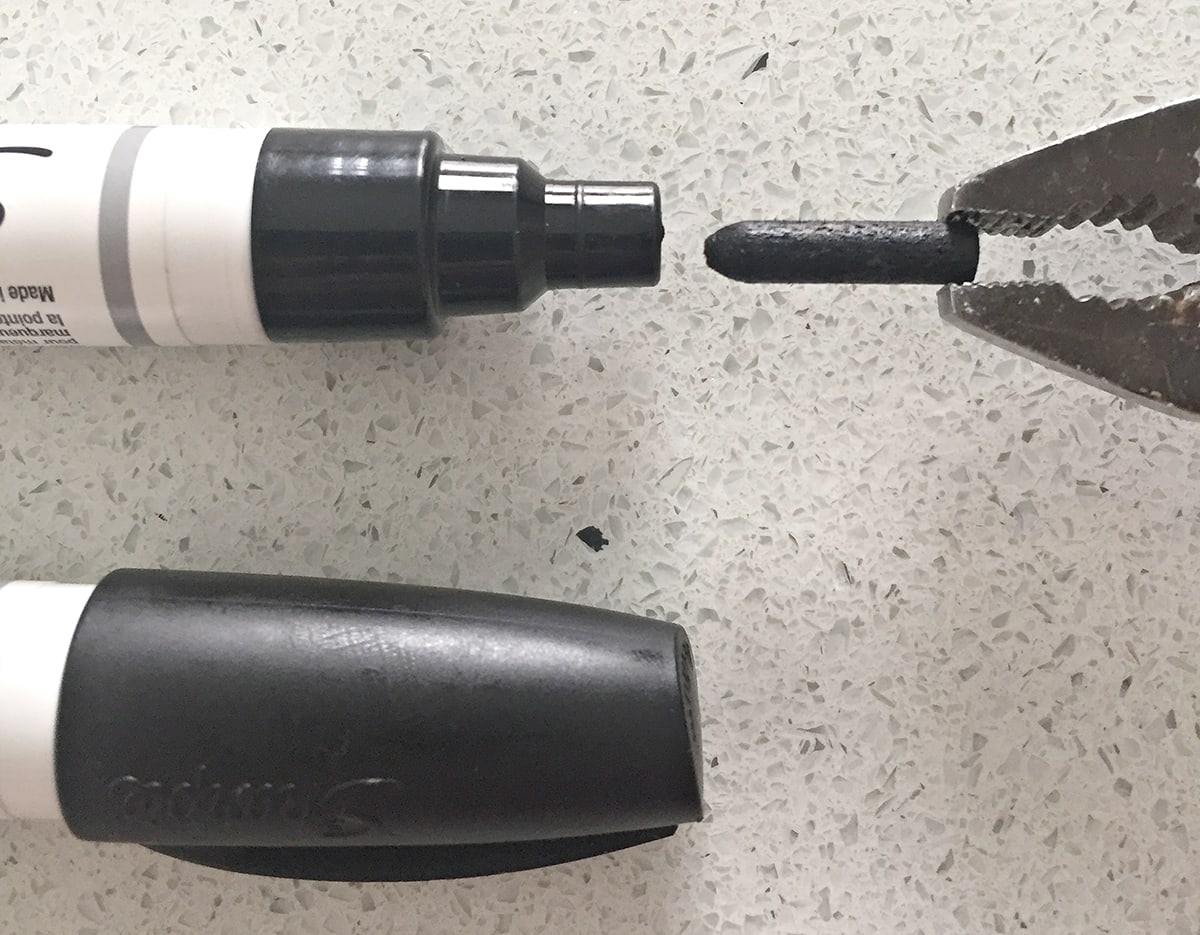
Oh and did you know that when a Sharpie wears down and goes flat that you can just turn the tip around and it feels brand new? See the below photo:
Yes, this stenciling process is time consuming but looks a little worse than it actually is.

With the Sharpie you don’t have a long drying time like you would have with regular paint.
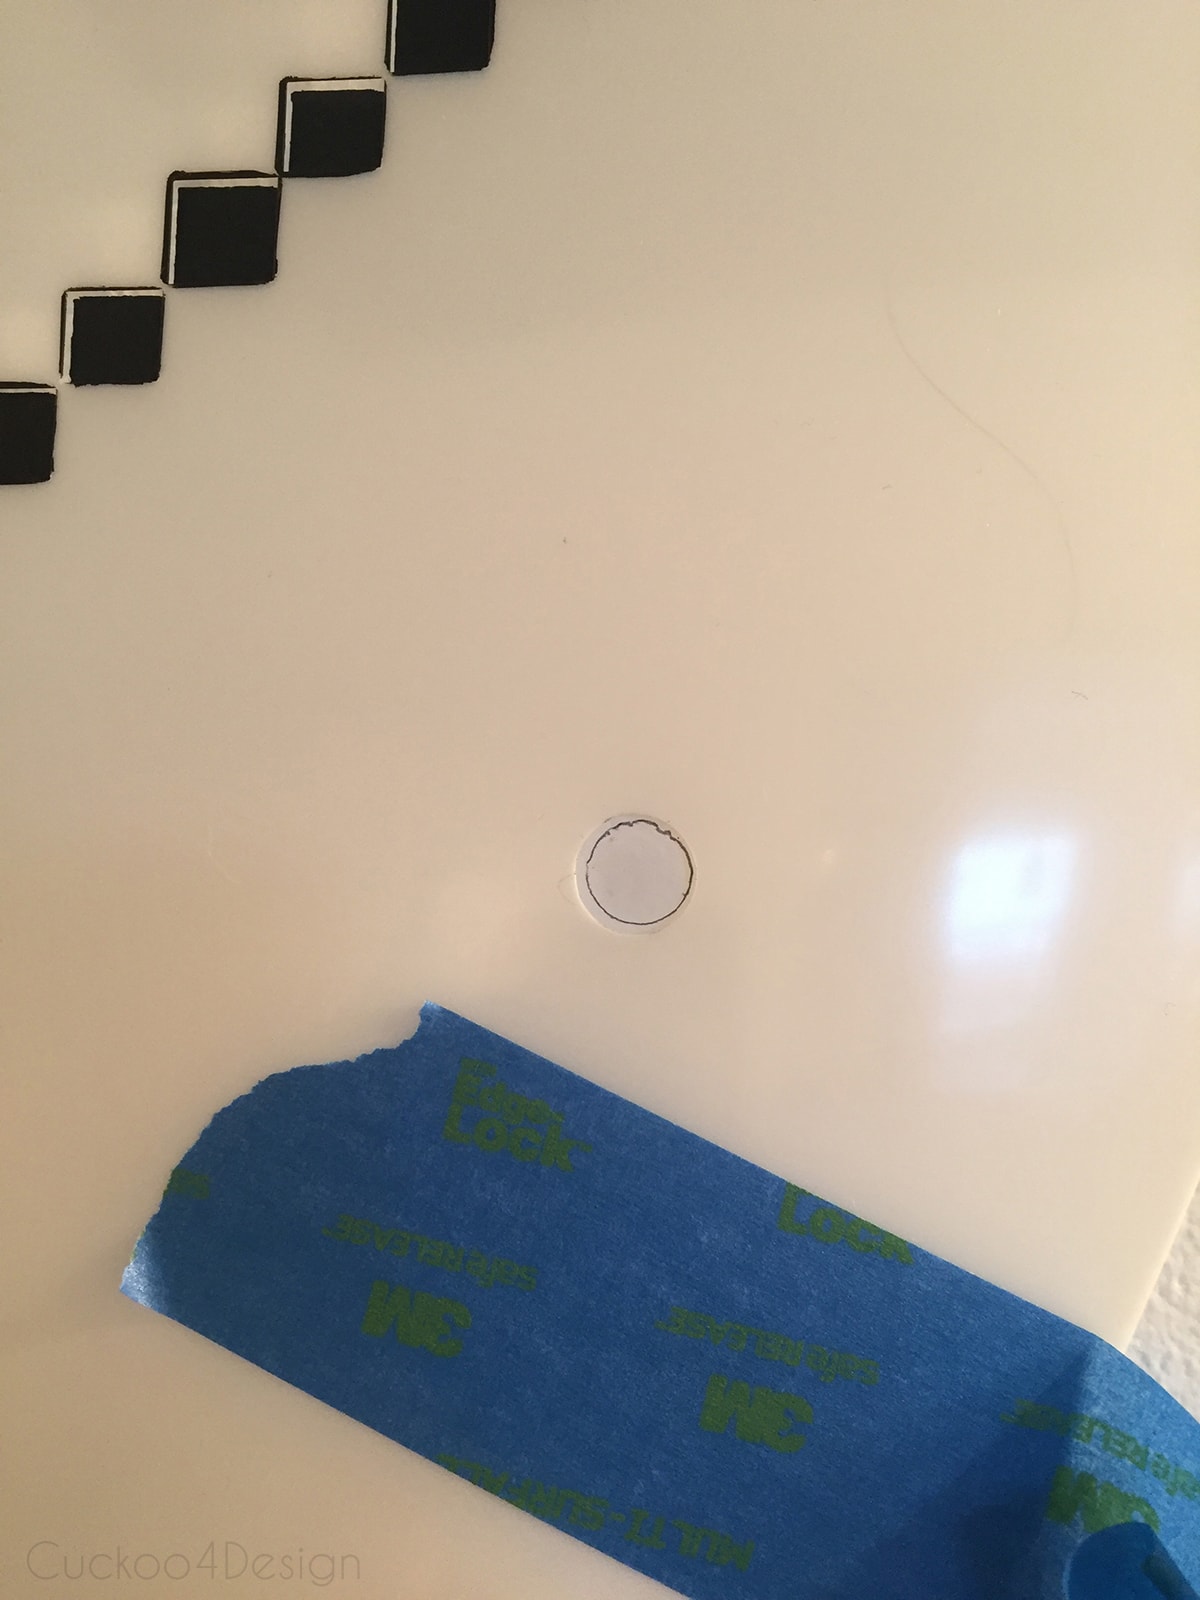
I marked the holes in the stencils which are there to make overlapping easier because you can match them up again .
Here you can see how the stencil overlapped on the wall.
And then I just moved along the wall.
Some of it was done late at night as you can see in this dark photo:
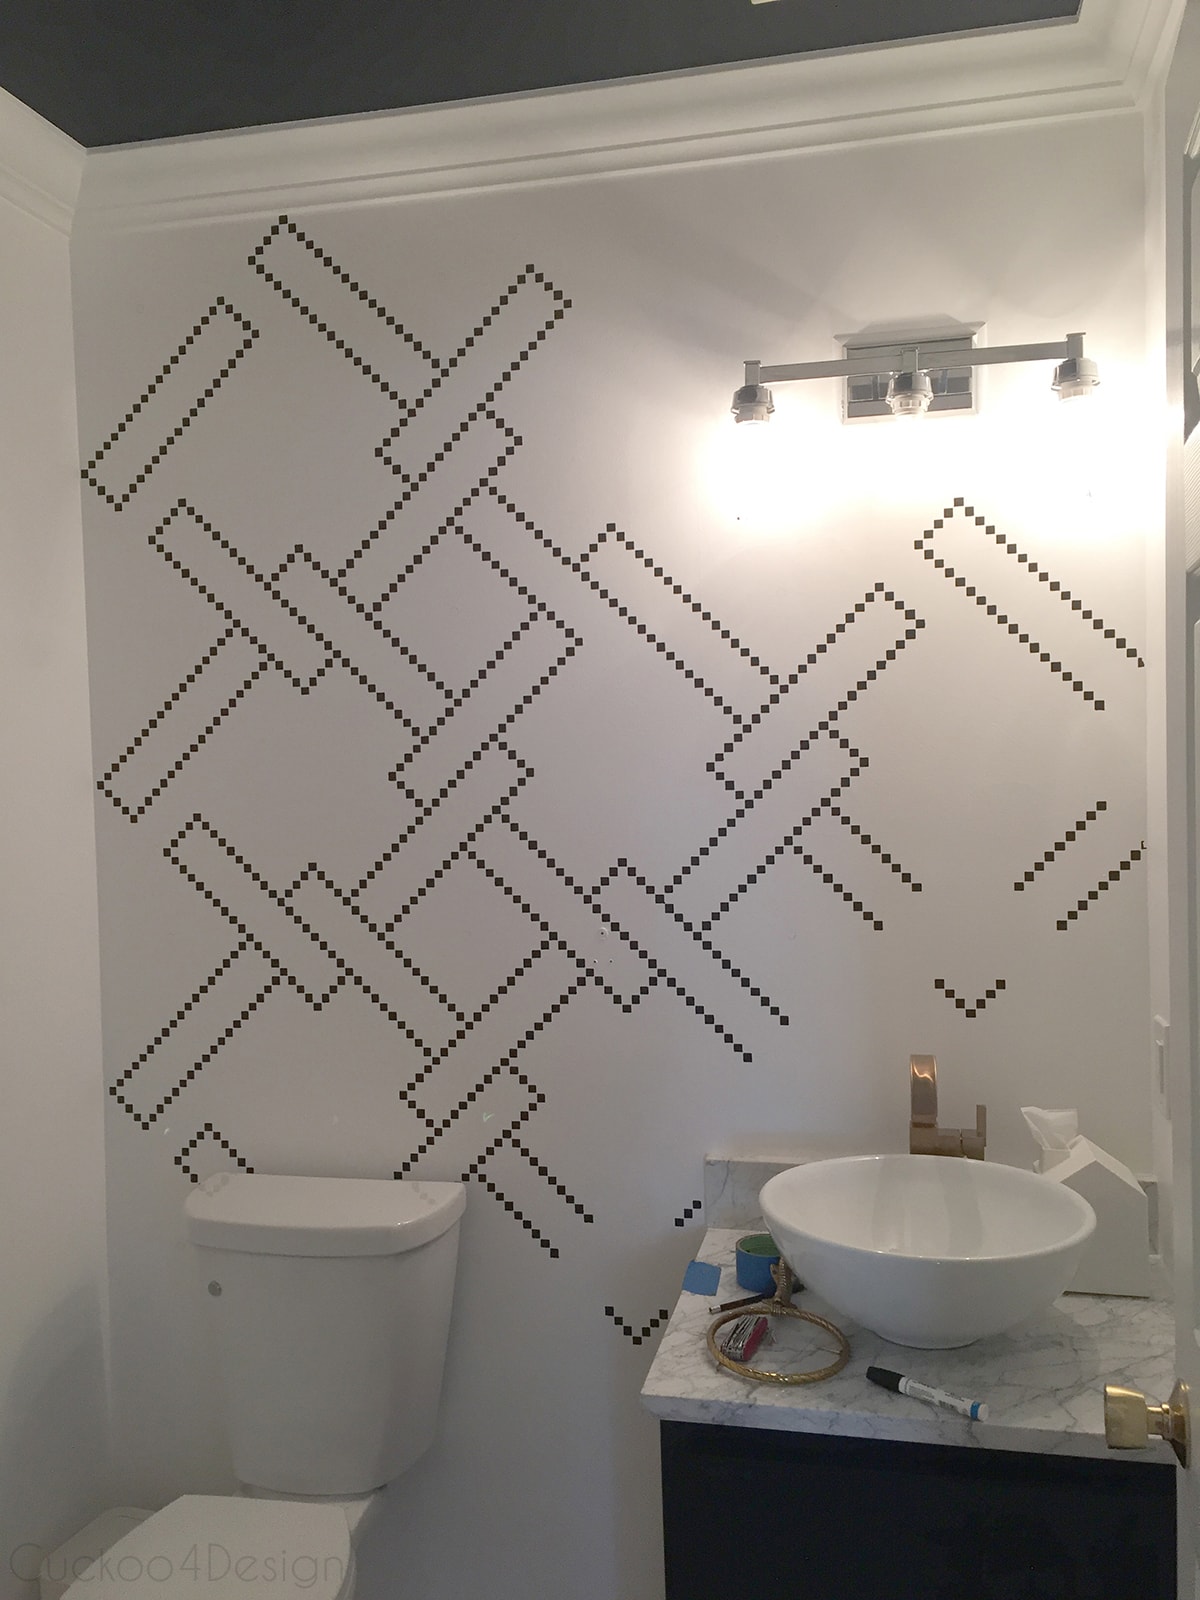
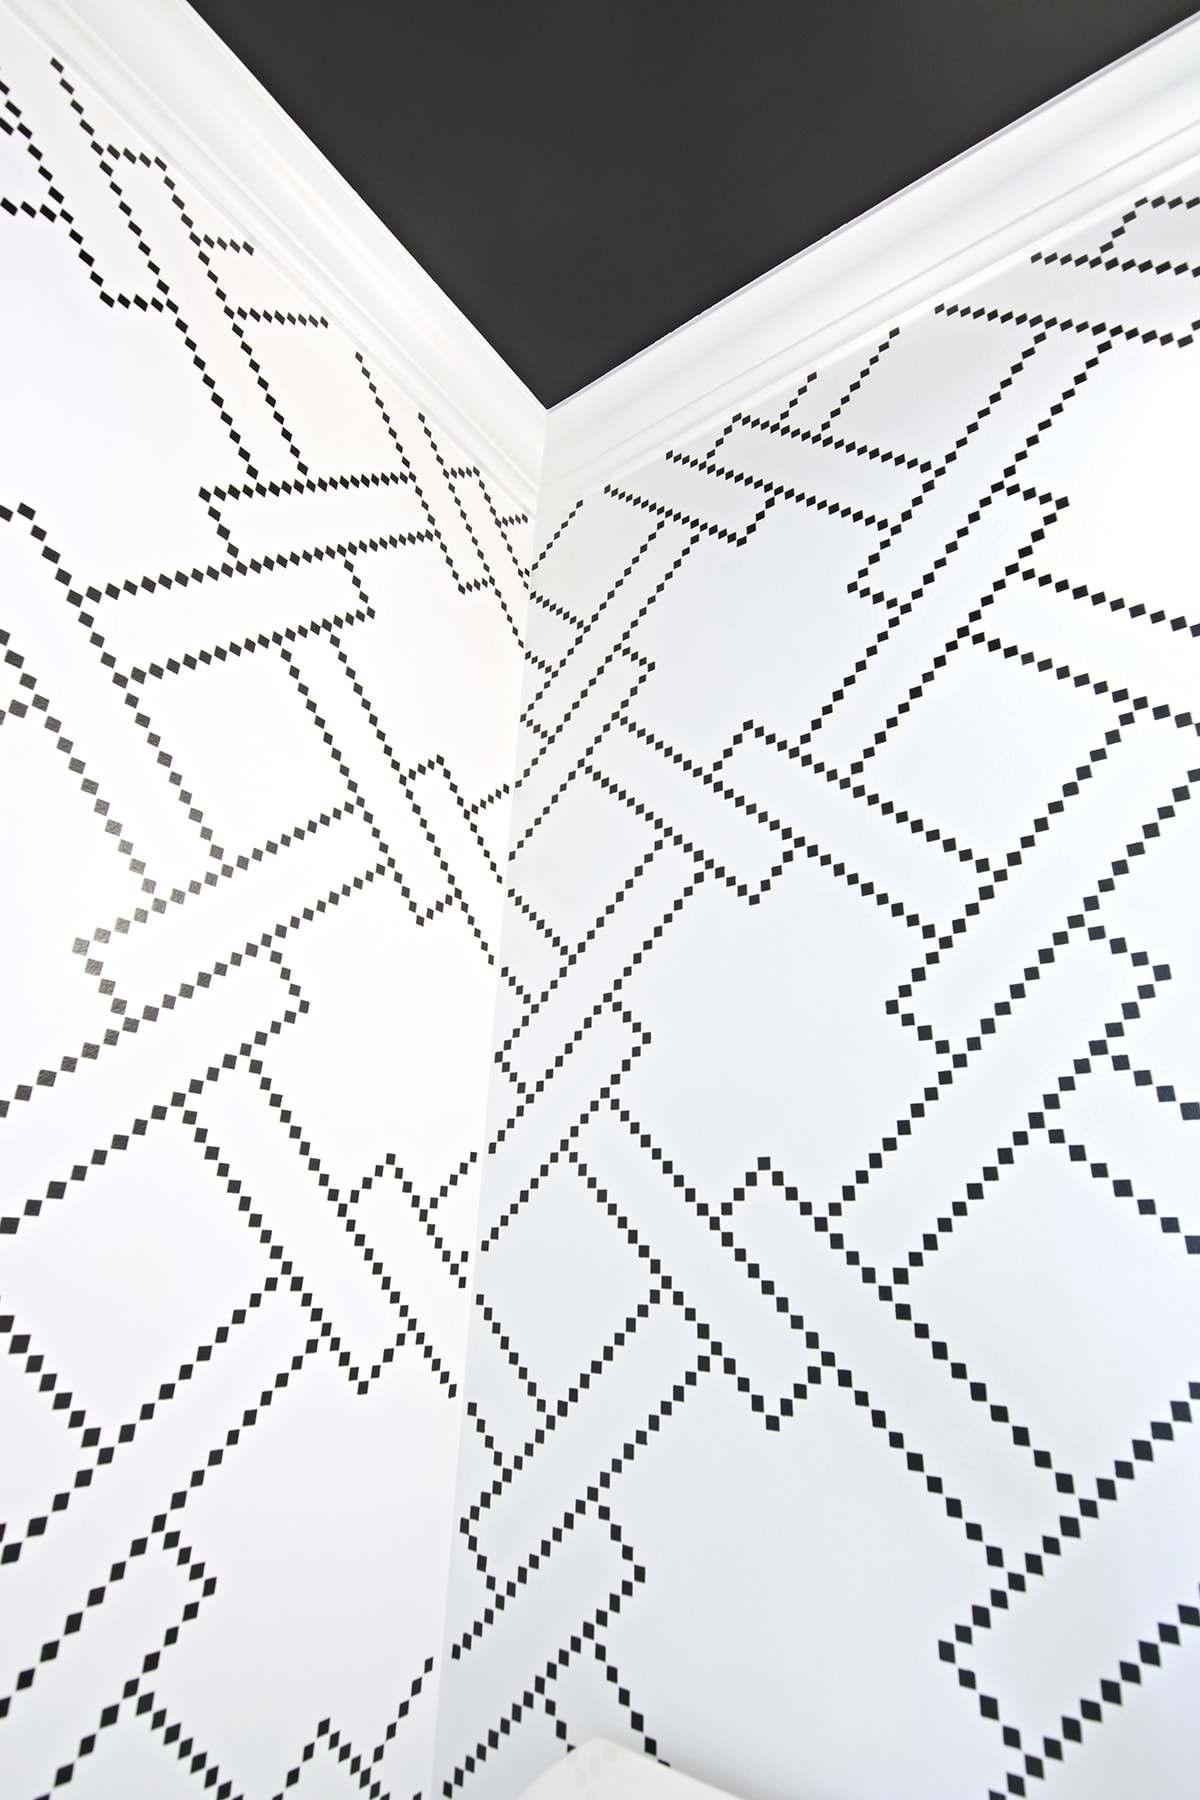
Look how perfect those little squares look. And the nice thing with the Sharpie was that I could draw some squares in difficult areas by hand and if I messed up, I used a magic eraser and just erased those squares and started over. It worked great!
All stenciling tutorials tell you to bend the stencil in the corners. For me that totally didn’t work so I decided to cut the stencil where I needed it cut and when I was done just taped those cuts with clear packaging tape again. It worked like a charm:
So lets get to the next step and don’t scroll too fast. It’s getting ugly.
The last Sharpie project didn’t smudge, at least barely, if I’d taken a magic eraser to it then it would have. The black Sharpie smudged a little more and I wanted to be able to wipe the walls so I decided to spray seal it with one of my favorite clear satin water-based polycrylic finished.
I taped the floor, vanity and ceiling off and filled the sprayer (my favorite sprayer HERE) with the varnish and started spraying a light coat.
Hmmmm guess what? It still had water in it from the last time i used it for the new vanity door which I will het to in a little bit. This ended up being a huge DIY blogger mishap. Seriously! It happens to all of us. Where I started spraying, it was dripping!!! I was ready to lose it. Well I did lose it and not just a little bit.
It was in the evening, so I poured myself a glass of wine or two, took a deep breath after some bitching…
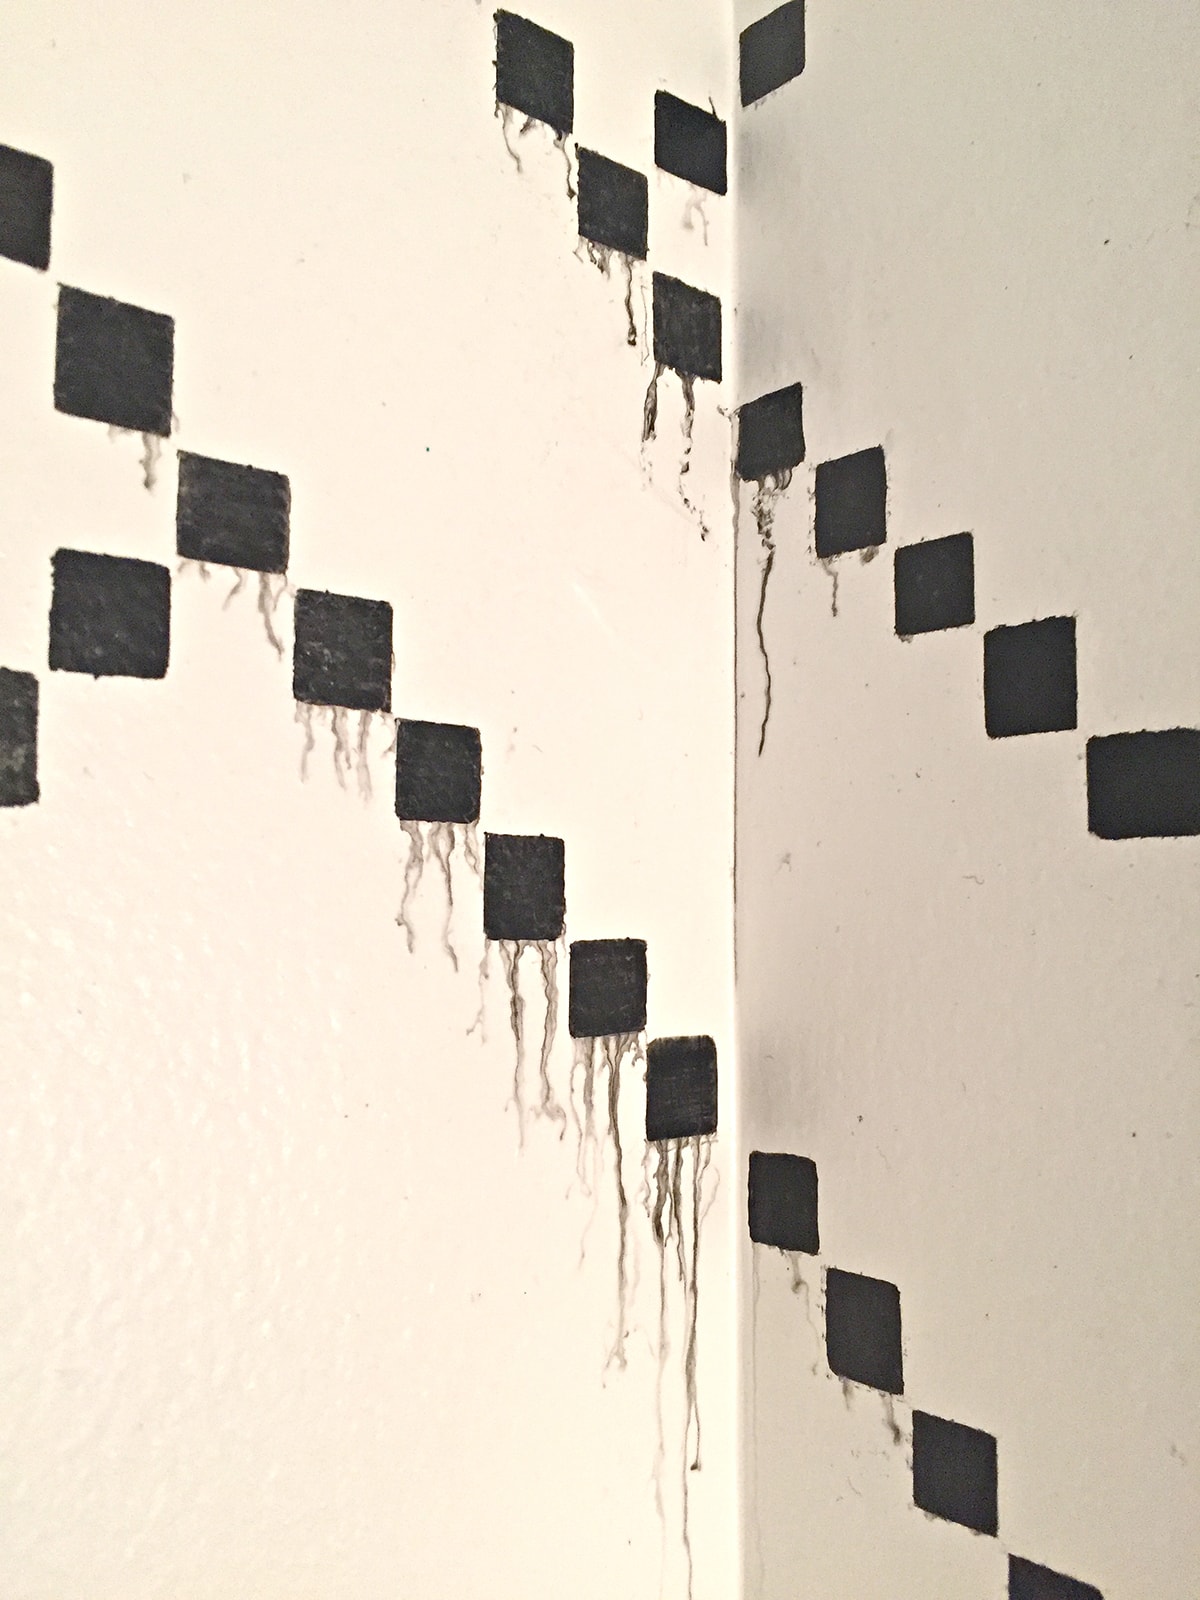
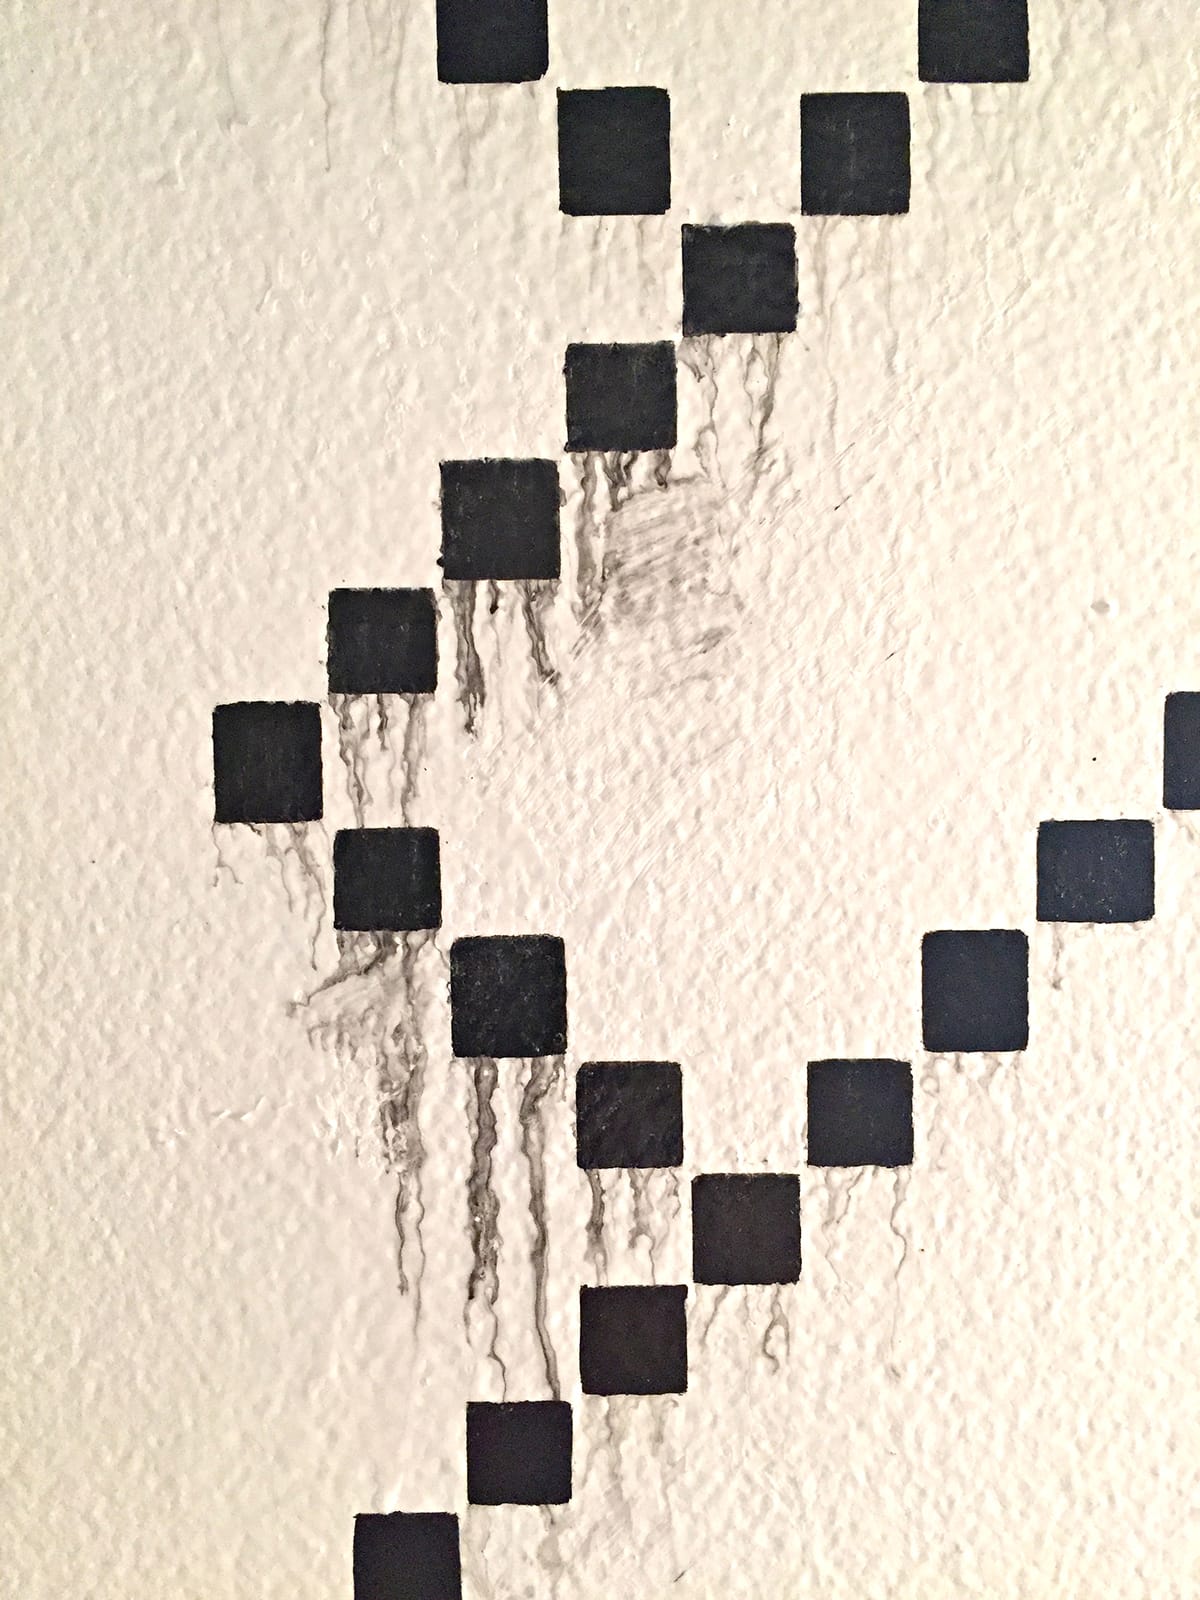
…and just painted over those spots again and spent a couple of more hours next day to redo those areas with the stencil.
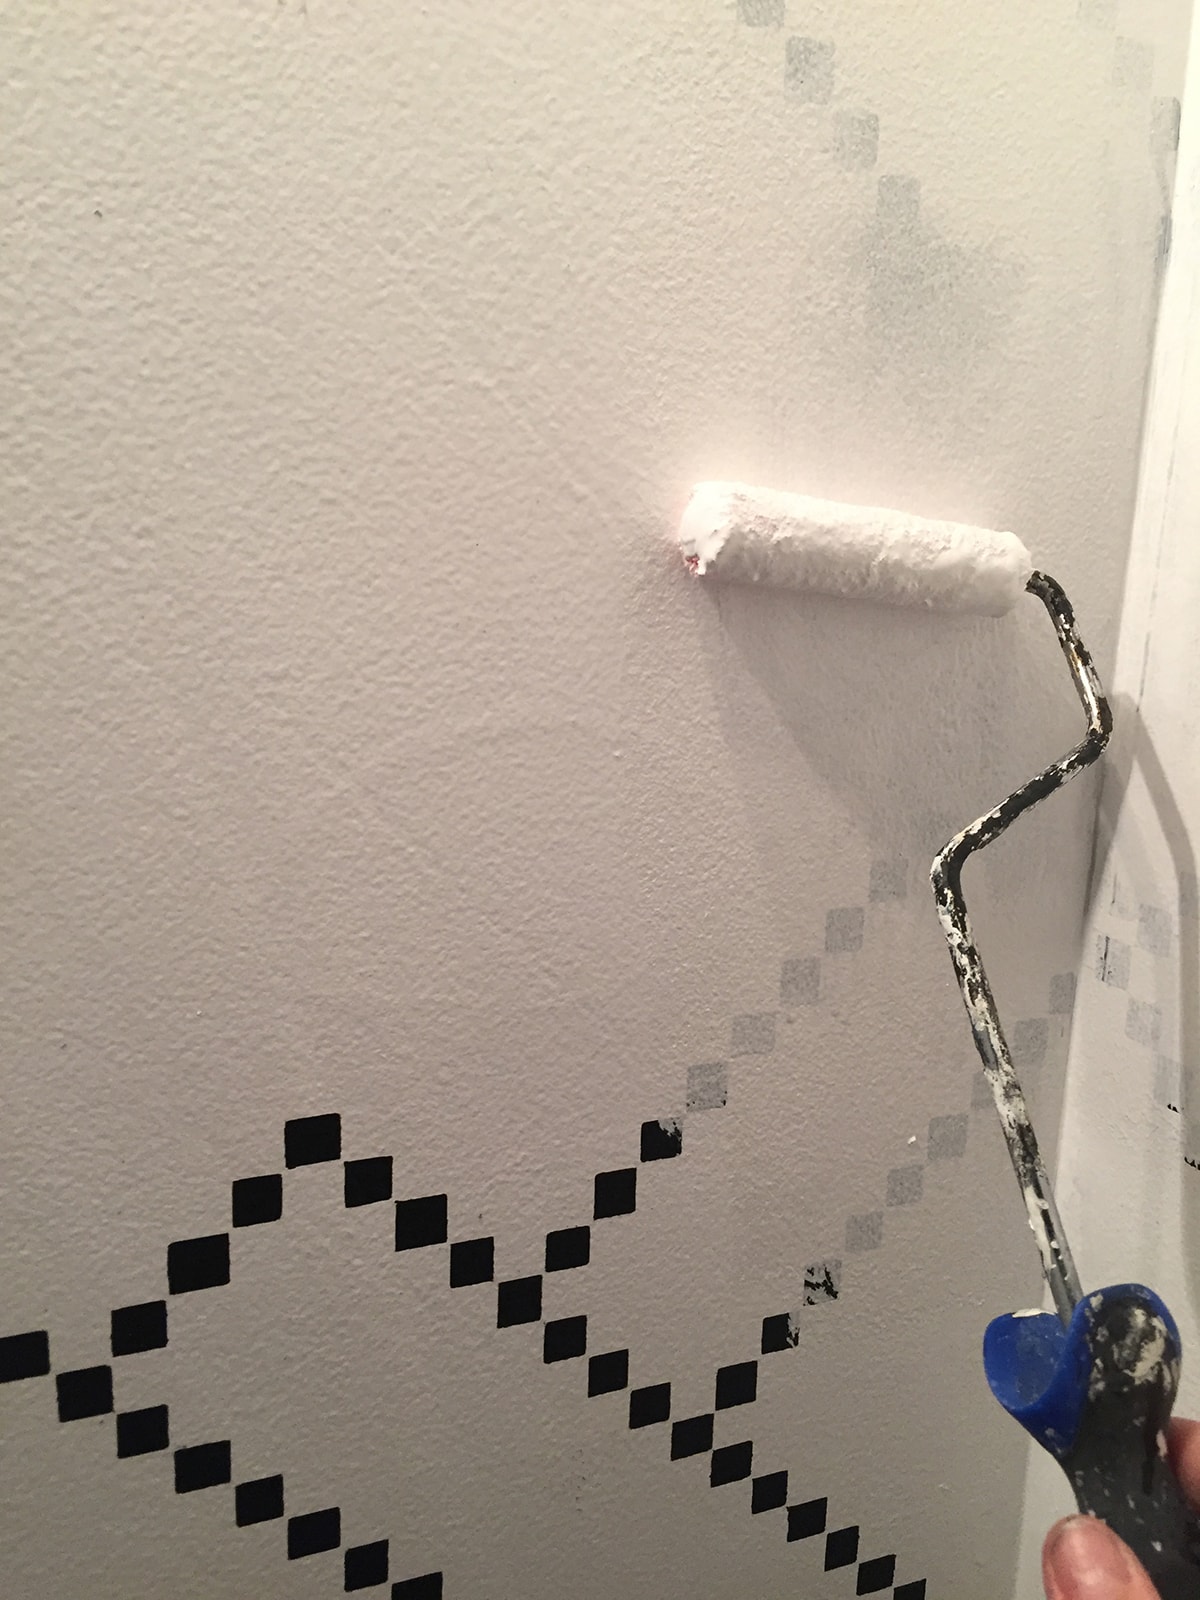
Moral of the story: try out the sprayer outside on a practice surface first and always spray lightly. Patience my friends is always key.
Oh and I mentioned my nice new door I bought for the vanity (HERE) which I ordered from Custom Cabinet Warehouse on Amazon. I used the sprayer on that specific door last which is why it still had water in the hose.
This new door made totally all the difference for this old builder-grade vanity. It looks so much better and they have so many different sizes to pick from and are super affordable. So check them out.
And here is the before again with the huge candle stain:
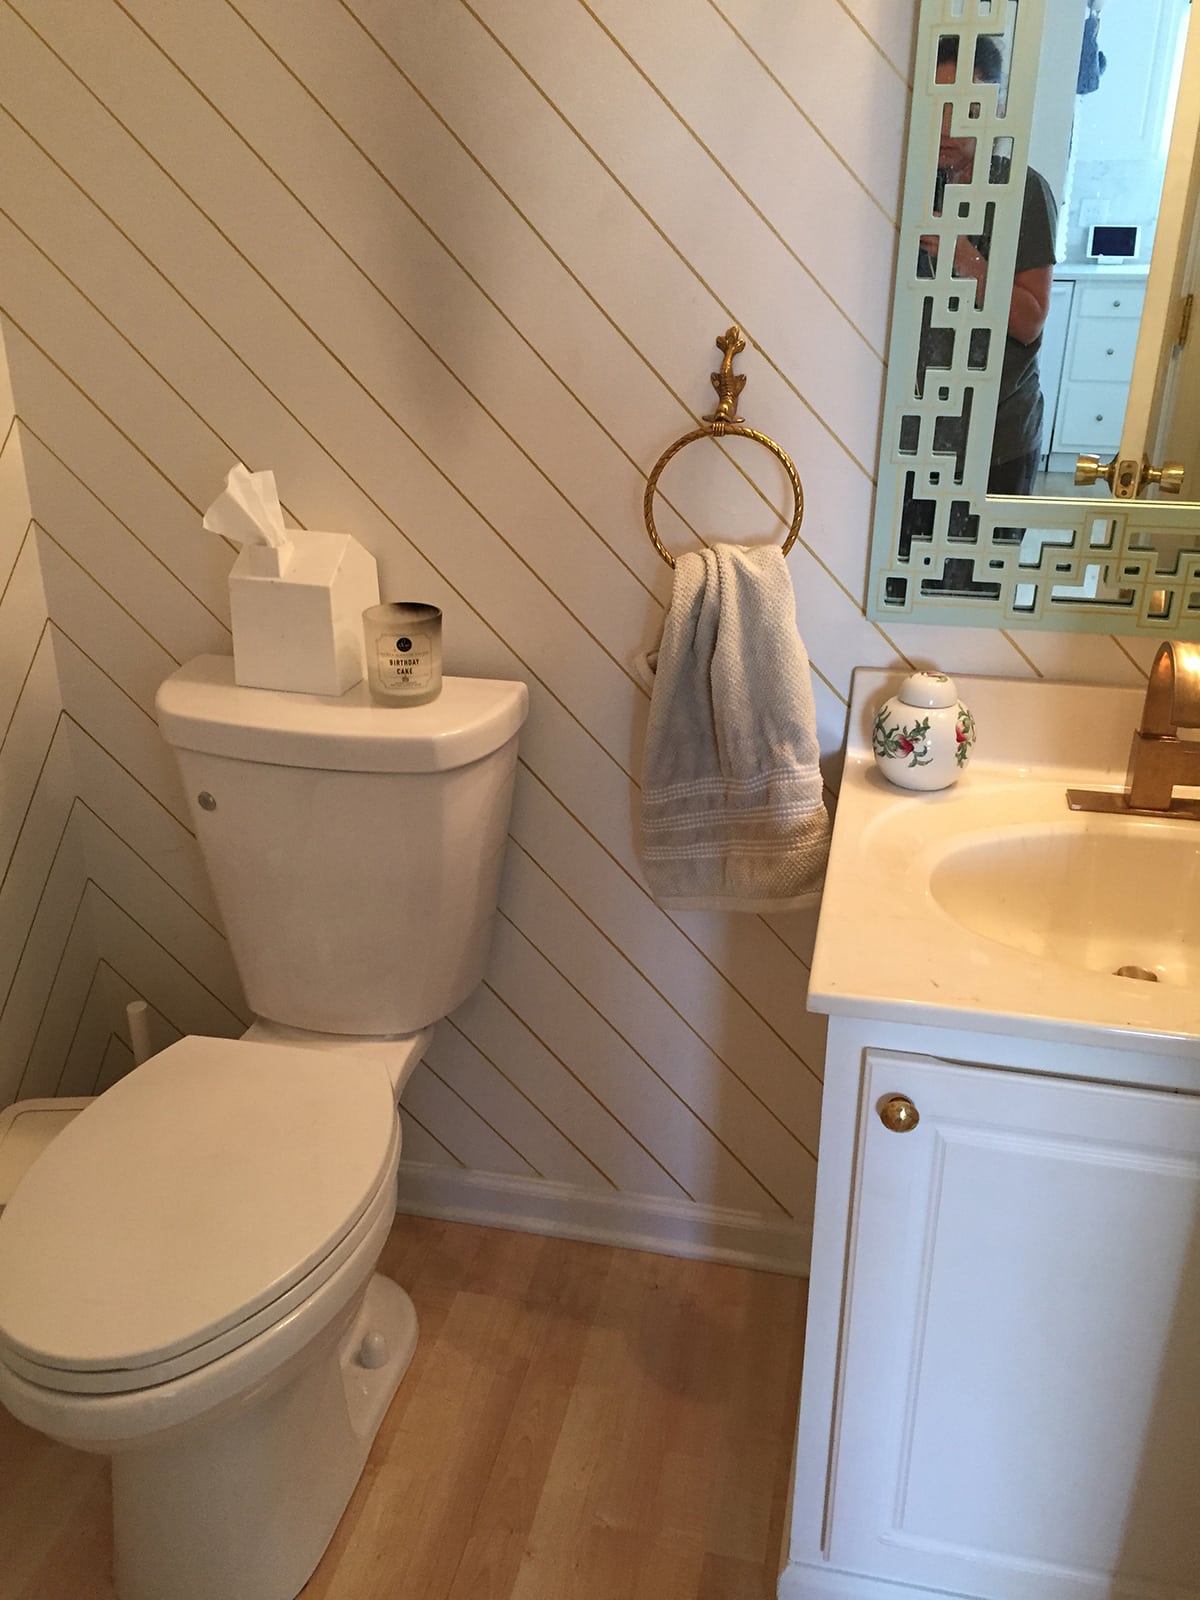
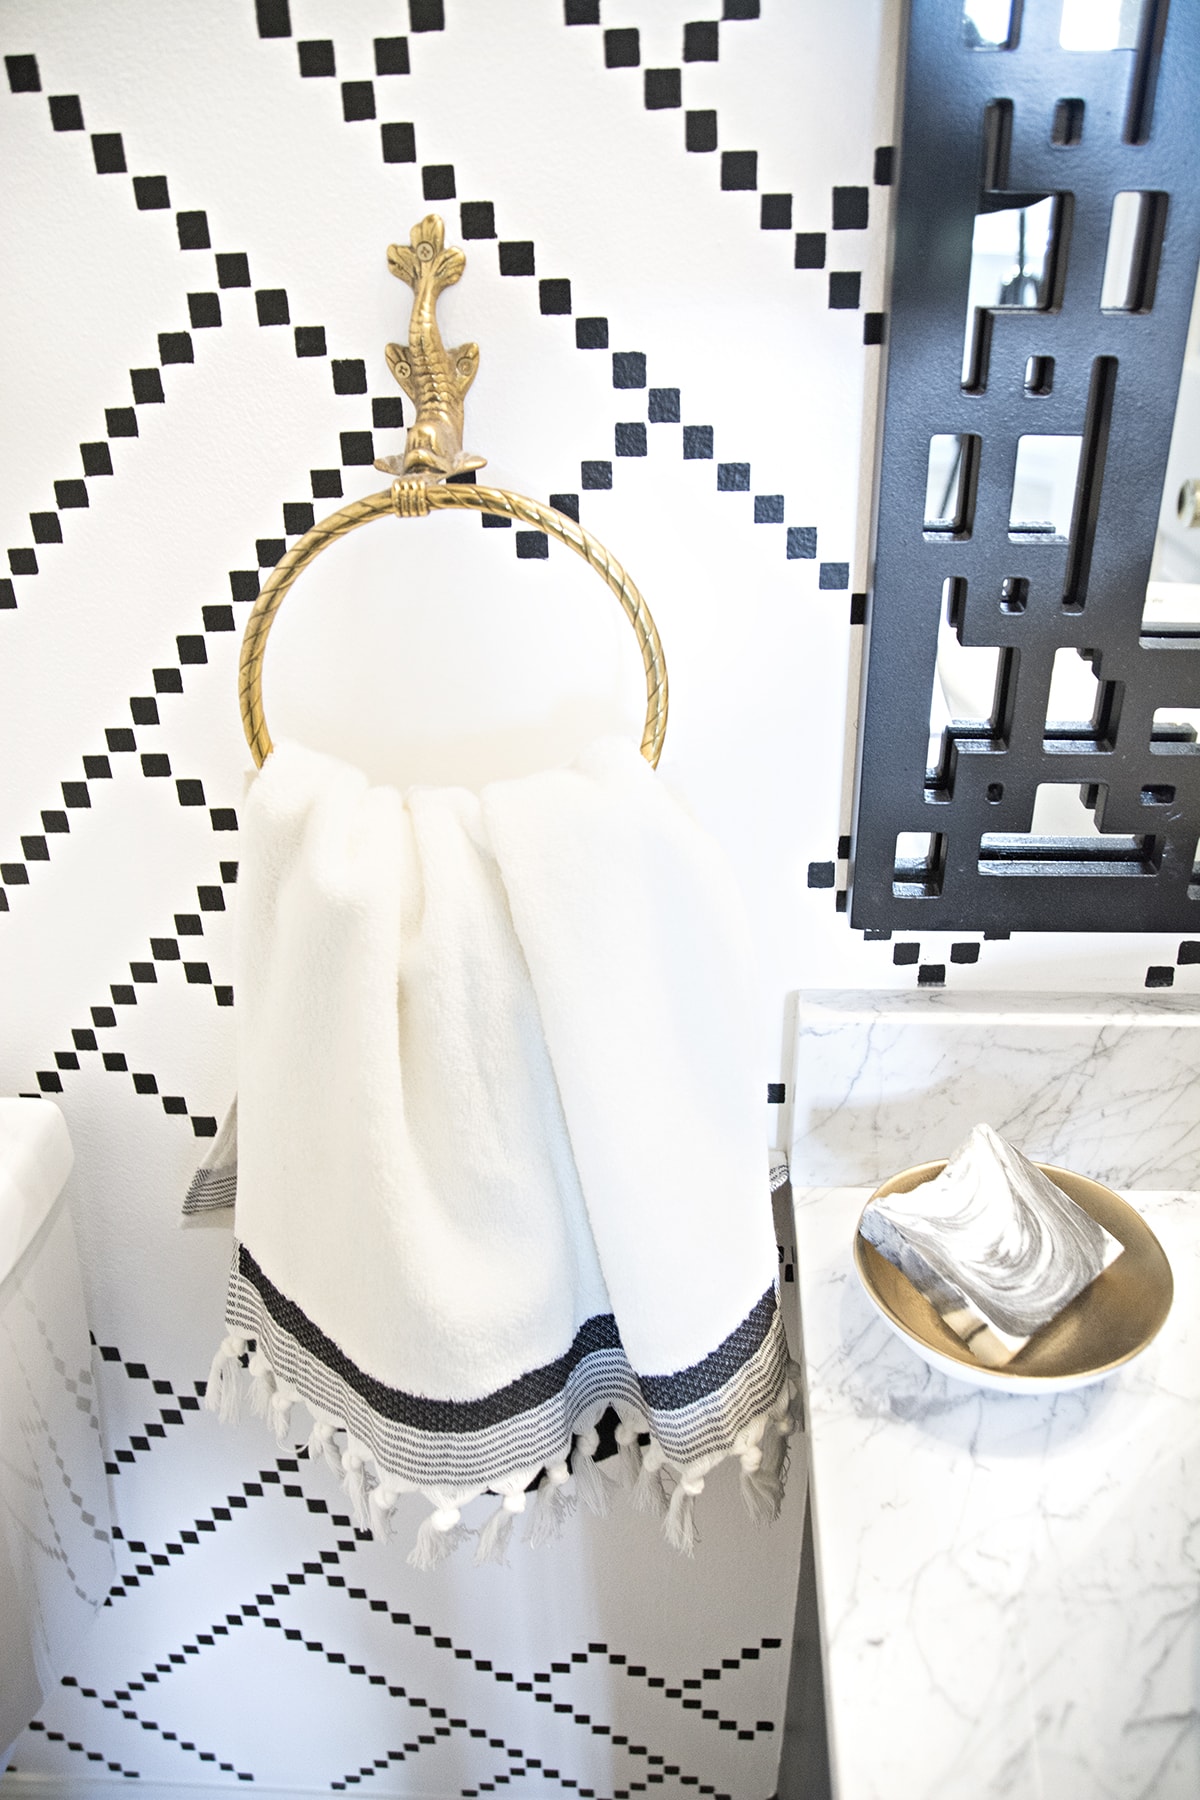
acrylic and brass toilet paper holder HERE | towel ring is vintage, find similar one HERE or check out my DIY towel holder using leather and wood
Without the light on in the bathroom and don’t forget to check out that pretty new door:
In this post HERE, I’m talking about how I updated the bottom of the cabinet.
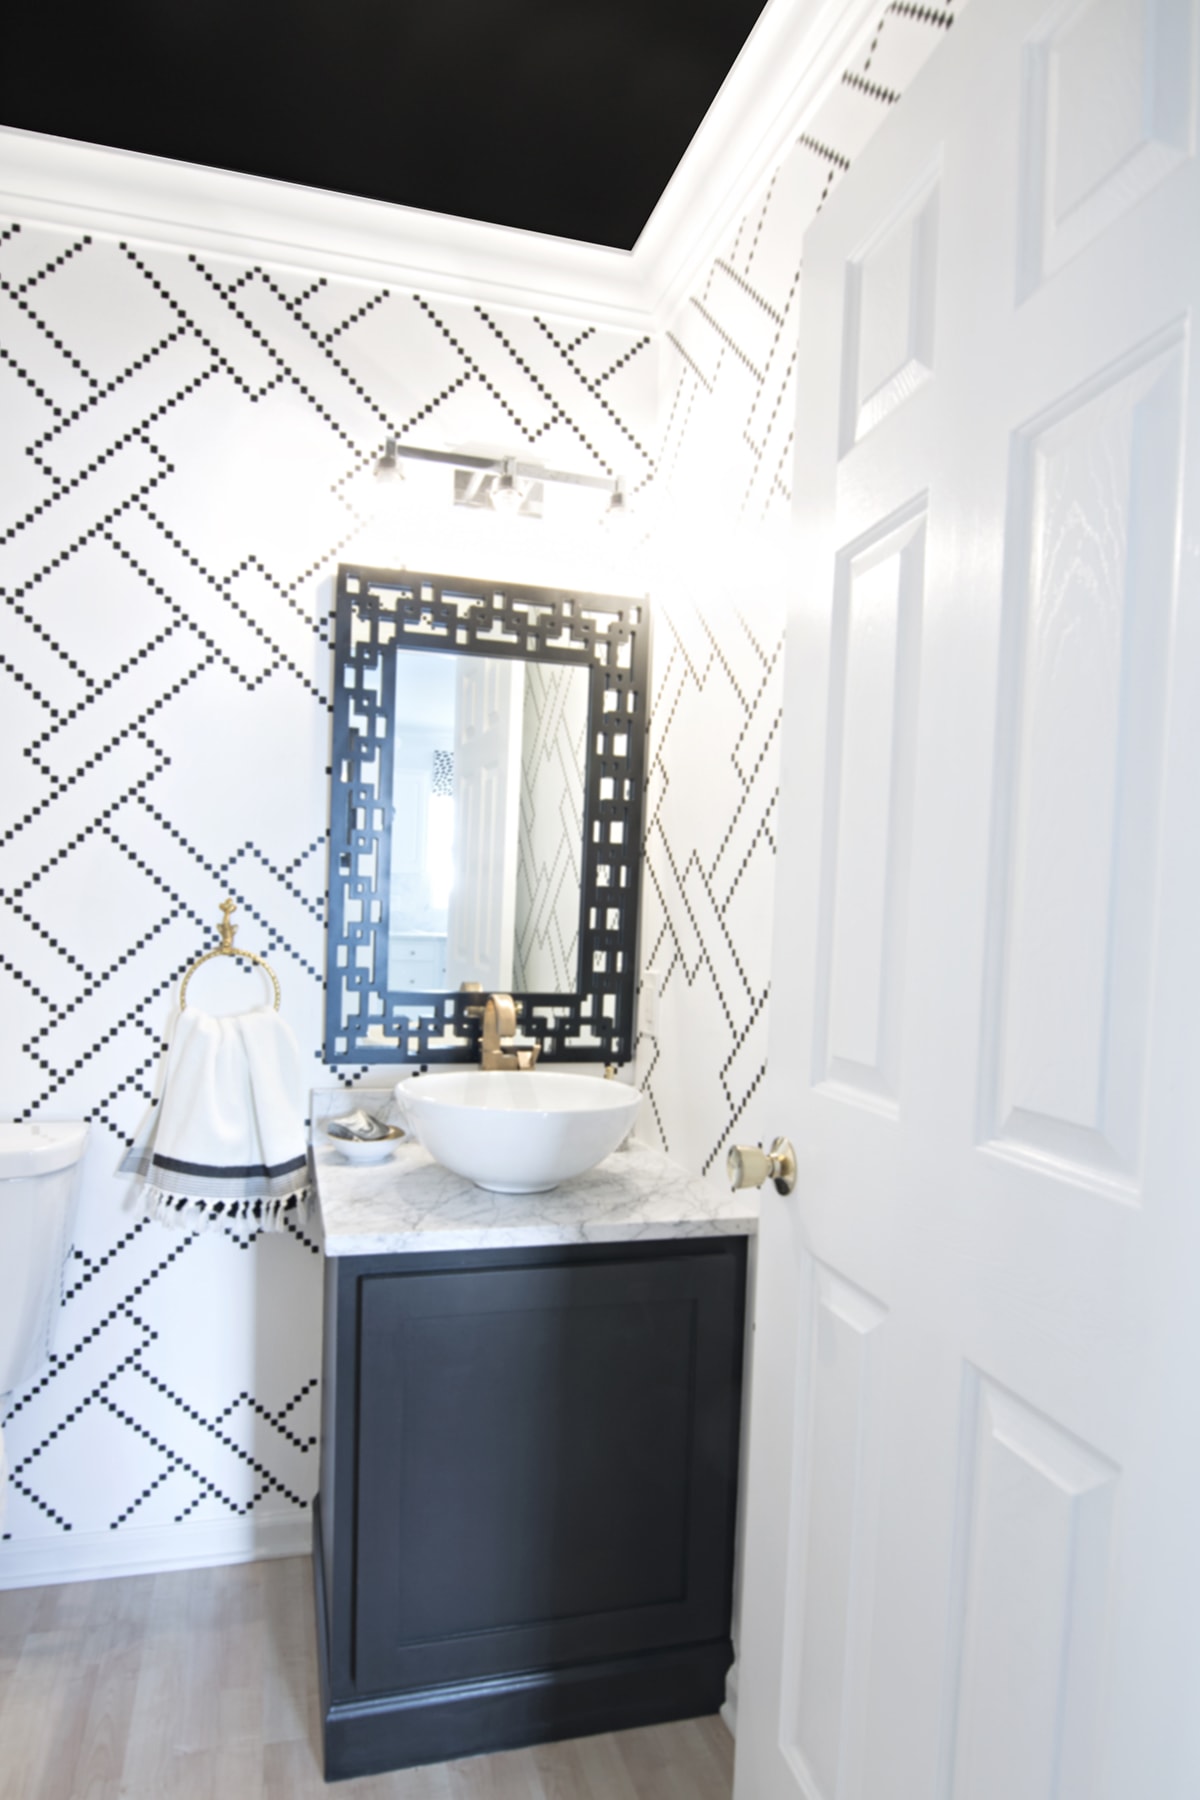
UPDATE: the new mirror came and you can see more of the space HERE
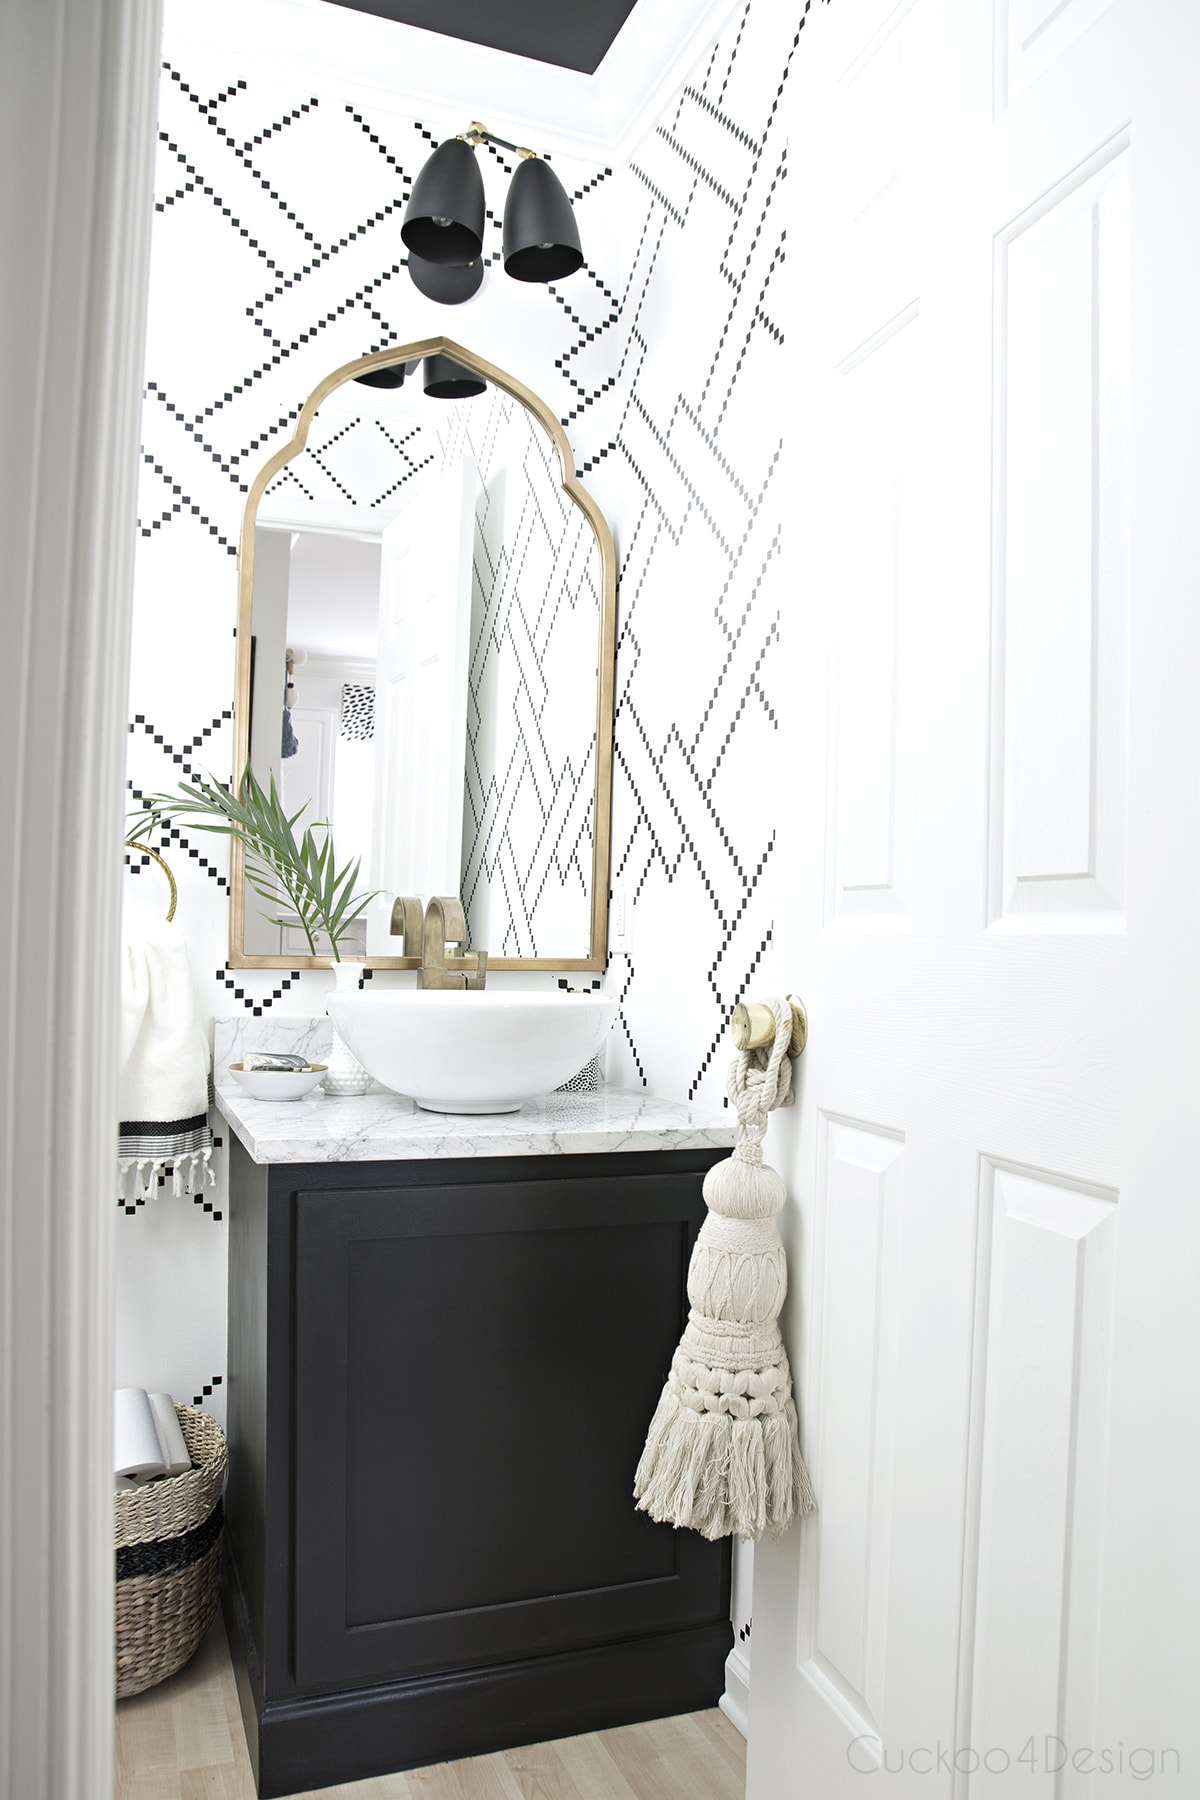
Find out how to make your own giant tassel HERE.
You can pin the next couple of images for future reference:

I really feel like it flows well with my downstairs and the curtains I made a while back which were also very time-consuming (see the tutorial HERE and a collection of my favorite back and white curtains HERE).
A lot of work but so worth it and when I finally got everything sprayed and sealed it’s as good as any other bathroom finish. I couldn’t love it more.
Tschüß,
Here are more of my bathroom posts:
[pt_view id=”bc2f6efi0y”]
And here are some more of my painting posts:
[pt_view id=”36b274eucm”]
this space looks amazing~ i know it was frustrating and at times you wanted to rip your hair out, but just look at it! worth it!
It looks great – and you certainly deserves a bottle of wine! This is a huge amount of work and takes on a lot of patience and commitment. I do not think I could do it. But I certainly appreciate it. Well done! It is looking amazing.
Tschüss (ss is the rule in Switzerland)
oh thank you Ale and I know it’s ss now I think in Germany too. I’m just so used to it 😉
that looks amazing. i love the black and white, and the “real” that you showed when you showed the “ugly.”
b
I couldn’t leave that ugly part out. I kind of had to explain why it took even longer 😉
That looks so awesome! I wish I had your patience for projects like these.
I’m sur more people have the patience. You should try it. It is rewarding and thank you
All I can say is “WOW”. The room looks amazing. I admire your talent, patience and commitment.
Thanks Marnie 🙂 i really appreciate it
This looks so good, Julia! Love the wall — it turned out great, as always!
Thank you Tracy
Wow!! What an incredible transformation! I love the huge impact! Sorry about the little mishap, glad you had wine in the house to debrief with! 😉
Thanks Karrie and there is always wine in my house 😉 which is probably not a good thing
Oh my word, talk about labor intensive, wow. It looks amazing.
Thanks Marty. It was quite labor intensive but not as much as my curtains 😉
Julia it came out so great!! I love it with the vanity and can’t wait to see your new mirror, but the black mirror looks so good with it too! I’m impressed at how you persevered through that glitch!!!
Thanks Lisa, I needed a minute after that glitch, that’s for sure
It is beautiful and you did an amazing job. I’ve done a fair amount of stenciling, but never with a Sharpie. More time consuming, but so worth it. The end result is fabulous. I do have one question for you. How did you handle the area behind that toilet? Did you remove the toilet before stenciling or were you somehow able to get your hand behind it?
I’m getting ready to redecorate our powder room and deciding between vinyl decals and stenciling. The toilet always poses a problem.
For this type of stencil, I feel like it wasn’t more time consuming because of the size of the squares. As for your question I should have probably mentioned what I did. The truth is that I went as far as I could with my hands behind the toilet and just didn’t worry about the rest. You an’t really tell because of the design of the stencil. I was worried about it though.
You did a great job-as usual!!! Always need wine in the house????
LOL thanks and I totally agree
I love your bathroom and I admire your patience. Sometimes having projects like this helps our hearts to heal. You are amazing. Sometimes we just need to hear that. Looking forward to reading about your home projects and you sharing stories about your family.
It looks UNBELIEVABLY great.
But sister..you must gave patience of a saint!!
Oh, Julia… I can’t imagine the amount of work that went in to this, but it was SO worth it! The walls are absolutely stunning and SO cool!!
Nice! Looking so nice! I love the pattern too!
Thanks Miranda
Hi Julia,
Love this bathroom!!!!! I have often admired this pattern and have loved various photos of it online.
See this charming boys bathroom. http://www.housemixblog.com/2014/07/10/stenciling-and-kids-bath-makeover/.
I love the black and white even more (I currently have a black walled painted powder room) and would love to do something like this in my newly painted white laundry/mudroom area to add interest. Would you mind sharing your file you made to have the stencil done? I cannot find this stencil for purchase anywhere!
Get the heck out! This is the first time I’m seeing this post and I thought I had a new idea. Guess not, what a bummer. I have been considering selling the file or stencil but I copied the original mosaic tile design and want to make sure I wouldn’t get in trouble. It can be really iffy, you know?
I’ll let you know if I’ll ever sell it.
oh my gosh, I would have lost it over that!! Julia- the end result though is freaking amazing
Looks so awesome!!
what a great idea! I love that you made your own stencil too. I’ll have to try this!
Hey there! I did this with my bathroom and still haven’t sealed it. I don’t have a paint sprayer but was wondering if a roller would work without smearing the sharpie? Any insight?
Hi Hannah, that’s risky but you could try in a small section I guess. I find that the sprayer works better for sure
I’m planning to do something similar in my daughter’s room but also want it to be wipeable. Do you think the polycrylic will yellow over time? That’s my biggest fear.
Hi there, I’ve had my walls like this since 2017 and I haven’t had any yellowing. However that powder room dodesn’t have any windows and sun exposure. I don’t know how sun would effect it.