

Easy DIY snail shell bracelet (seashell craft idea)
I came across the Free People Sarasota Shell Bracelet and immediately wanted to make my own. It looked so simple, and I knew I had the perfect snail shells in my collection to recreate it. So that’s exactly what I did, and I love how it turned out.
If you have been looking for seashell craft ideas for your collection, this easy DIY snail shell bracelet is a great place to start. Our trip to Punta Cana really got me in the mood for beach crafts, and this was the perfect project to kick things off.


Supplies needed
- snail shells (or other shells work too of course)
- micro hand drill or Dremel (aka power rotary tool)
- small drill bit
- scissors
- elastic stretch cord for jewelry making
- flat protected surface to drill on like an old cutting board
- (small clamp or paper clip is optional)
I used 24 snail shells. The amount of shells you need depends on the size of the shells and the size of your wrist. I have tiny wrists. (Of course, you could turn this into a snail shell necklace too if you made it really long)

I’m using Shark Eye (Neverita duplicata) moonsnail shells and Northern Moonsnail (Euspira heros) shells. The Shark eye has a dark eye at the tip of the spire. And the bottom is closed meaning the hole of shell on the bottom is covered in the center of the shell versus the Northern Moonsnail having an uncovered hole at the center of the shell. (learn more about all the seashells)
Here you can see what I mean:

I also want to make a bracelet with American Mud Snails or Mud Dog Whelks (Tritia trivittata) if I find enough this upcoming summer.
Video tutorial about how to make a snail shell bracelet
I always have a video so you can see what I was doing with my hands during the project. If it doesn’t load for you here on my blog, then you can watch it on my YouTube Channel instead. I had a hard time focusing on the drilling and having my hands in the way. Sorry!
Step-by-step instructions
This post may contain affiliate links from which I will earn a commission at no extra cost to you. View my full disclosure policy.
Below are the step-by-step instructions for making your own snail shell bracelet. Before you start threading, it is important to properly clean and prep your shells, so don’t skip the first step.
Step 1: How to clean the snail shells before using
Especially snail shells can keep all kinds of bacteria and even parasites hidden far down in their spiral shell. You can soak them in peroxide or a water and bleach solution, but the bleach can discolor the shells. Discoloring the shells can look pretty too which is what I needed for my seashell flower tutorial.
If you boil the shells you can avoid discoloration and still accomplish destroying bacteria and diseases hidden within. Let them dry all the way after boiling or soaking.
For example, freshwater and land snails can house parasitic worms that can transmit schistosomiasis, which is a chronic disease. (You can read a lot more info about snail-borne parasitic diseases)
This is not to scare you, just to make sure that you handle them the right way. I never had any issues with any of the snail shells that I collected since I was a child.
Step 2: Drilling holes in the shells
I have drilled holes with both, the hand drill and the Dremel. The hand drill takes much longer and is better if your shells are brittle.
If they are sturdy like these snail shells, then using a Dremel with a small drill bit is the faster and easier solution.
I used an old cutting board to drill my shells on. Simply hold the shell with one hand and the drill in the other hand while slowly pressing on the shell with the rotating drill.

As I mentioned earlier, I needed 24 snail shells for my bracelet. So the drilling can take a bit of time, and the Dremel helps speeds things up for sure.

Step 3: Threading the shells onto the stretch cord
Start with wrapping some of the elastic stretch cord around your wrist to see how much you need and add about 4 inches to be safe.
I attached a small clamp to one end about two inches in so the snail shells don’t slide off again while working on threading them all onto the cord.

Slide all the shells onto the cord and keep wrapping it over your wrist to make sure you have enough shells for the circumference of your wrist.

Step 4: Knotting the ends
When you have enough shells on your cord, securely double-knot the stretch cord, and voila, you have a beautiful snail shell bracelet.


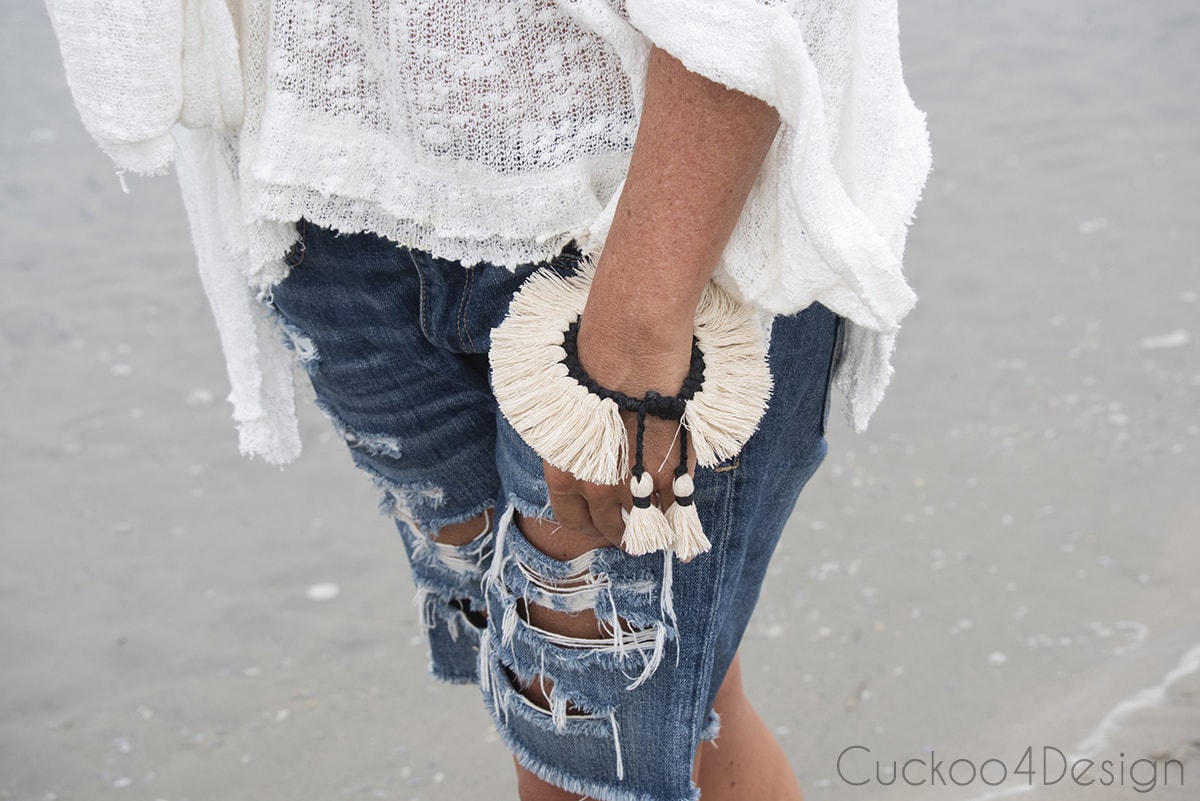
Also, check out my macrame starfish tutorial that I’m holding in the photo below while wearing the bracelet.


Here it is on the much prettier and younger hand of my daughter.


Tips and other ideas for making a snail shell bracelet or seashell bracelet
Whether you call it a snail shell bracelet or a snailshell bracelet, the technique is exactly the same. It all comes down to finding shells with a good shape and drilling a clean hole through the top.
- If your elastic/stretch cord keeps breaking or ripping then you can string the shells on a wax cord or hemp cord instead and adding a macrame sliding knot clasp instead the way I did in my Square Knot bracelet tutorial (check out the tutorial at step 2: adding the adjustable closure of the bracelet). That’s what I will do if mine should break. Or you can hang them on a bracelet chain by adding little jewelry-making jump rings to the holes and adding those to the bracelet. I prefer the look of the shells strung up though.

- These elastic seashell bracelets look great when you stack them with other different shell bracelets.
- You could add beads and other embellishments onto the stretch cord but I prefer the look of the plain shells
Where to buy snail shell bracelets
If you don’t feel like making your own, there are always great places to buy them. Etsy is always my favorite source to support small businesses and shops.
More seashell craft ideas
- DIY mussel shell flowers that look like protea flowers. This is the tutorial where I used bleach to bring out the blue color of the shells which I mentioned earlier.
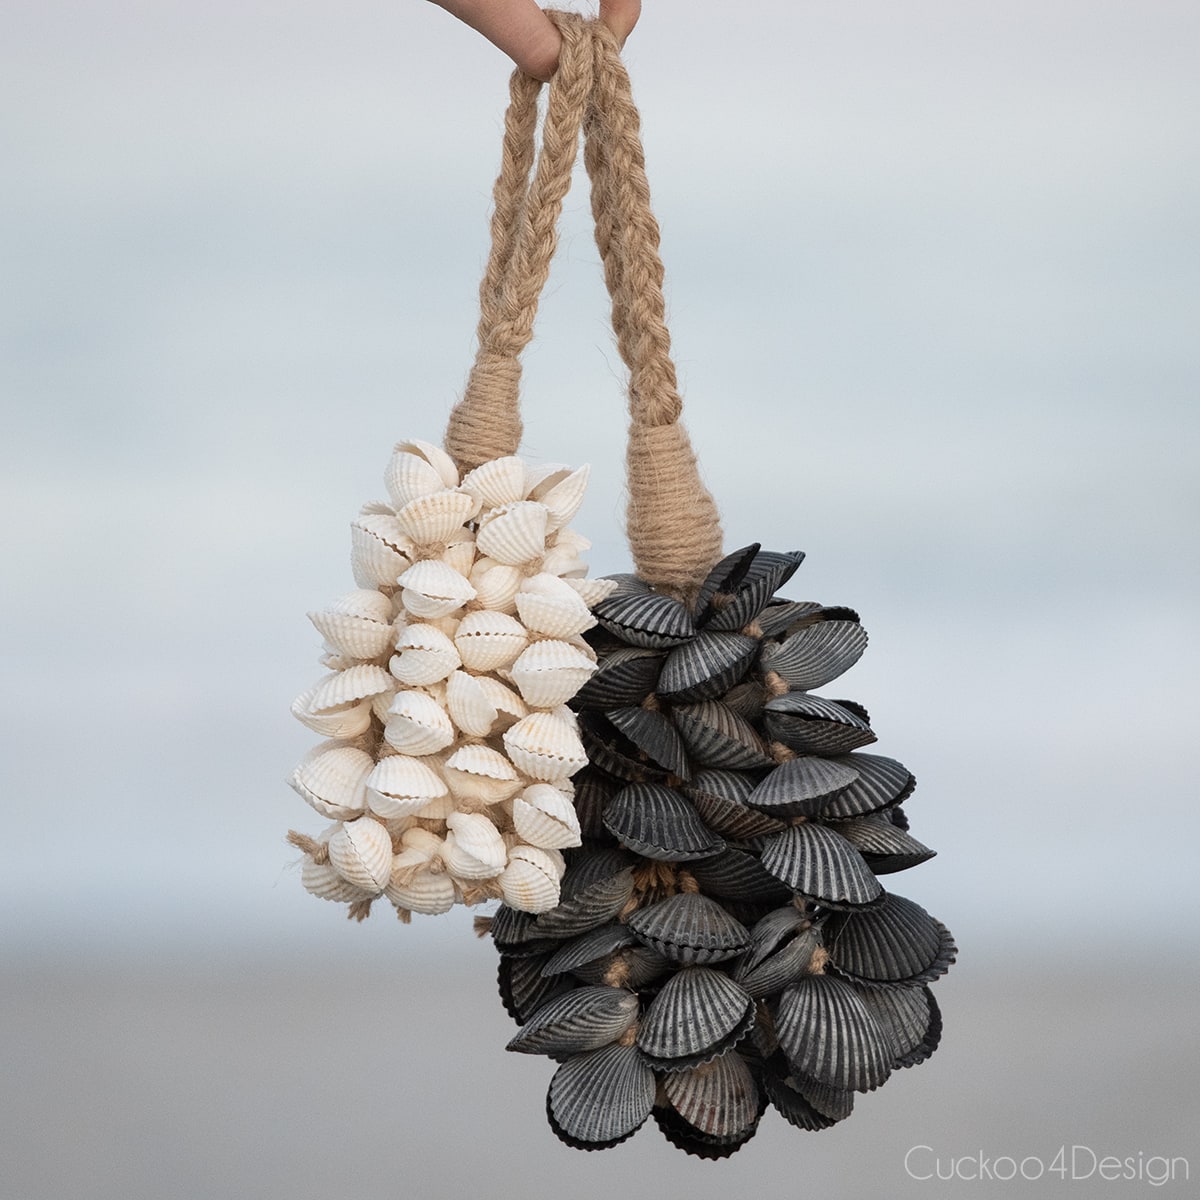
- How to make seashell tassels as boho beach decor (you need a whole bunch of sea shells for these beauties but it’s worth it)

- DIY zipper pull charm or bikini charm using seashells
- Easy DIY tea light candles in seashells. These are great for wedding tables!
- The easiest DIY starfish ornaments


Anyways, I hope you liked this little jewelry project.
Tschüß,


How to make a snail shell bracelet
Transform snail shells into pretty seashell jewelry with this easy DIY snail shell bracelet tutorial. Perfect for beach lovers in need of a seashell craft idea!
Materials
- snail shells (or other shells work too of course)
- elastic stretch cord for jewelry-making
- flat protected surface to drill on like an old cutting board
- (small clamp or paper clip is optional)
Tools
- micro hand drill or Dremel (aka power rotary tool)
- small drill bit
- scissors
Instructions
- How to clean the snail shells before using
Especially snail shells can keep all kinds of bacteria and even parasites hidden far down in their spiral shell. You can soak them in peroxide or a water and bleach solution, but the bleach can discolor the shells. Discoloring the shells can look pretty too which is what I needed for my seashell flower tutorial. If you boil the shells you can avoid discoloration and still accomplish destroying bacteria and diseases hidden within. Let them dry all the way after boiling or soaking.
For example, freshwater and land snails can house parasitic worms that can transmit schistosomiasis, which is a chronic disease. (You can read a lot more info about snail-borne parasitic diseases)
This is not to scare you, just to make sure that you handle them the right way. I never had any issues with any of the snail shells that I collected since I was a child.
- Drilling holes in the shells
I have drilled holes with the hand drill and the Dremel. The hand drill takes much longer and is better if your shells are brittle.
If they are sturdy like these snail shells, then using a Dremel with a small drill bit is the faster and easier solution.
I used an old cutting board to drill my shells on. Simply hold the shell with one hand and the drill in the other hand while slowly pressing on the shell with the rotating drill.
As I mentioned earlier, I needed 24 snail shells for my bracelet. So the drilling can take a bit of time, and the Dremel helps speed things up for sure. - Threading the shells onto the stretch cord
Start out by wrapping some of the elastic stretch cord around your wrist to see how much you need and add about 4 inches to be safe.
I attached a small clamp to one end about two inches in so the snail shells don't slide off again while working on threading them all onto the cord.
Slide all the shells onto the cord and keep wrapping it over your wrist to make sure you have enough shells for the circumference of your wrist.
- Knotting the ends
When you have enough shells on your cord, securely double-knot the stretch cord, and voila, you have a beautiful snail shell bracelet.


Perfect way to have a sentimental souvenir from a beach vacation!! I love it!! And your hands are not ugly!! They hold lots of love, I’m sure!!
Awww thank you, Alicia, yes they do hold lots of love. And I agree it is the perfect souvenir.